HYBRID / BATTERY CONTROL HV BATTERY CHARGING
CAUTION / NOTICE / HINT
The necessary procedures (adjustment, calibration, initialization, or registration) that must be performed after parts are removed and installed, or replaced when charging the EV supply battery assembly are shown below.
| Replacement Part or Procedure | Necessary Procedure | Effect/Inoperative when not Performed | Link |
|---|---|---|---|
| Disconnect cable from negative auxiliary battery terminal | Memorize steering angle neutral point | Parking assist monitor system | ( ) |
| Panoramic view monitor system | ()
|
- CAUTION:
- ·
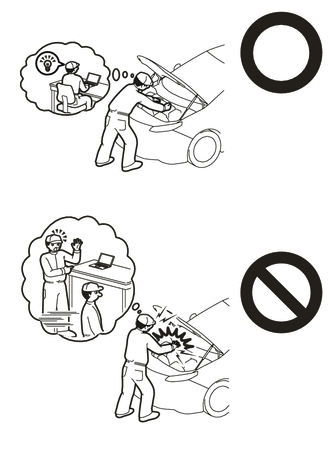
·Orange wire harnesses and connectors indicate high-voltage circuits. To prevent electric shock, always follow the procedure described in the repair manual.
Click hereEngine / Hybrid System>HYBRID / BATTERY CONTROL>HYBRID CONTROL SYSTEM>PRECAUTION
·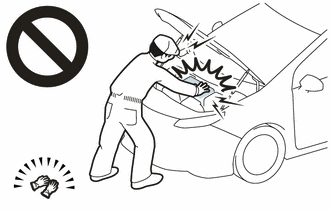
To prevent electric shock, wear insulated gloves when working on wire harnesses and components of the high voltage system.
- HINT:
-
When the cable is disconnected/reconnected to the auxiliary battery terminal, systems temporarily stop operating. However, each system has a function that completes learning the first time the system is used.
- ·
Learning completes when vehicle is driven
Effect/Inoperative Function When Necessary Procedures are not Performed Necessary Procedures Link Lane tracing assist system Drive the vehicle straight ahead at 35 km/h (22 mph) or more for 5 seconds or more. ( )
Pre-collision system Adaptive high beam system
- ·
Learning completes when vehicle is operated normally
Effect/Inoperative Function When Necessary Procedures are not Performed Necessary Procedures Link Air conditioning system After the ignition switch is turned to ON, the servo motor and expansion valve standard position is recognized. -
PROCEDURE

 1.INSPECT AUXILIARY BATTERY VOLTAGE
Measure the auxiliary battery voltage.
- Standard Voltage:
Approximately 11 V or more
- HINT:
- ·
The horn should sound clearly.
·If the voltage is 10 V or less, either charge the auxiliary battery (charging usually takes about 1 hour), or replace it with an auxiliary battery that is already charged.
2. PREPARATION FOR EV BATTERY CHARGING
- CAUTION:
- ·
The hybrid system has high-voltage circuits. Accidents, such as electric shock, or electric leaks may result if the hybrid system is not operated in a correct manner. Make sure to follow the correct procedure.
Click hereGeneral>INTRODUCTION>REPAIR INSTRUCTION>PRECAUTION
·Wear insulated gloves.
- HINT:
- ·
Removing the service plug grip interrupts the high voltage circuit.
·High voltage wiring connectors are orange.
Check the SOC (State of Charge) of the EV supply battery assembly.
If the EV system fails to start and "Traction Battery needs to be Protected. Shift into [P] to Restart" or "Traction Battery Needs to be Protected Refrain from the Use of [N] Position" is displayed on the multi-information display, the EV supply battery assembly may be discharged.
If it does not go into the READY-on state, follow the steps to charge the EV battery.
- HINT:
- ·
Before performing external charging, always use the GTS to perform troubleshooting.
·Charging with the THS charger must be completed in a short time (approximately 10 minutes when the battery temperature is 25°C or approximately 30 minutes when the battery temperature is 0°C) enough to turn the ignition switch to ON (READY).
Remove the service plug grip.
Click hereEngine / Hybrid System>HYBRID / BATTERY CONTROL>SERVICE PLUG GRIP>REMOVAL
Disconnect the FC converter power outlet cable (inverter with converter assembly).
Remove the upper radiator support seal.
Click hereEngine / Hybrid System>FC CONTROL>FC STACK>REMOVAL
Remove the FC stack cover sub-assembly.
Click hereEngine / Hybrid System>FC CONTROL>FC STACK>REMOVAL
Disconnect the FC converter power outlet cable (inverter with converter assembly).
Click hereEngine / Hybrid System>HYBRID / BATTERY CONTROL>INVERTER WITH CONVERTER>REMOVAL
Check the terminal voltage.
Remove the connector cover assembly.
Click hereEngine / Hybrid System>HYBRID / BATTERY CONTROL>INVERTER WITH CONVERTER>REMOVAL
Check the terminal voltage.
Click hereEngine / Hybrid System>HYBRID / BATTERY CONTROL>INVERTER WITH CONVERTER>REMOVAL
Install the connector cover assembly.
Click hereEngine / Hybrid System>HYBRID / BATTERY CONTROL>INVERTER WITH CONVERTER>INSTALLATION
Remove the bench type rear seatback assembly.
Remove the rear seat side garnish RH.
Click hereVehicle Interior>INTERIOR PANELS / TRIM>ROOF HEADLINING>REMOVAL
Remove the No. 1 room partition pad.
Click hereAudio / Visual / Telematics>AUDIO / VIDEO>RADIO ANTENNA CORD (for Floor)>REMOVAL
Remove the No. 2 EV battery intake duct.
Click hereEngine / Hybrid System>HYBRID / BATTERY CONTROL>HV BATTERY>REMOVAL
Remove the center No. 1 floor to brace extension.
Click hereEngine / Hybrid System>HYBRID / BATTERY CONTROL>HV BATTERY>REMOVAL
Remove the battery cover lock striker.
Click hereEngine / Hybrid System>HYBRID / BATTERY CONTROL>HV BATTERY>REMOVAL
Remove the No. 10 EV battery shield panel.
Click hereEngine / Hybrid System>HYBRID / BATTERY CONTROL>HV BATTERY>REMOVAL
Disconnect the floor under wire.
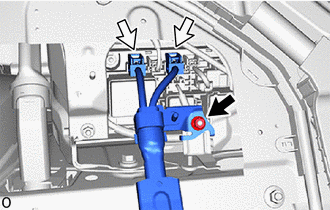
Remove the nut and disconnect the 2 No. 1 EV battery junction block assembly connectors.
- NOTICE:
-
Insulate each disconnected high-voltage connector with insulating tape. Wrap the connector from the wire harness side to the end of the connector.
Inspect the electrical insulation of the EV supply battery assembly.
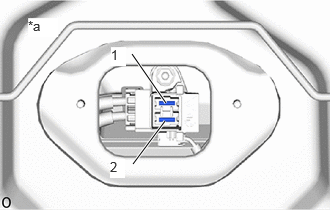
| *a | Service Plug Grip Removed
(Service Plug Grip Connecting Terminals) |
Using a megohmmeter set to 500 V, measure the resistance according to the value(s) in the table below.
- NOTICE:
-
Be sure to set the megohmmeter to 500 V when performing this test. Using a setting higher than 500 V can result in damage to the component being inspected.
- Standard Resistance:
Tester Connection Condition Specified Condition 1 - Body ground ignition switch off 10 MΩ or higher 2 - Body ground ignition switch off 10 MΩ or higher
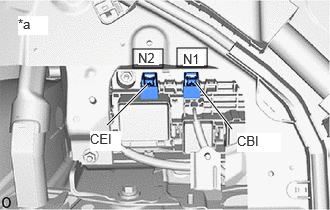
| *a | Component without harness connected
(EV Supply Battery Assembly Junction Block Assembly) |
Using a megohmmeter set to 500 V, measure the resistance according to the value(s) in the table below.
- NOTICE:
-
Be sure to set the megohmmeter to 500 V when performing this test. Using a setting higher than 500 V can result in damage to the component being inspected.
- Standard Resistance:
Tester Connection Condition Specified Condition Click Location & Routing(N1,N2)Location & Routingewd_type=routing;type=c,c;code=N1,N2
Click Connector(N1)Body>Floor Under Wire>No. 1 EV Battery Junction Block Assemblyewd_type=component;type=c;code=N1;pinno=1
Click Connector(N2)Body>Floor Under Wire>No. 1 EV Battery Junction Block Assemblyewd_type=component;type=c;code=N2;pinno=1
N1-1 (CBI) - Body ground ignition switch off 10 MΩ or higher N2-1 (CEI) - Body ground ignition switch off 10 MΩ or higher
Connect the THS charger in the order shown in the illustration.
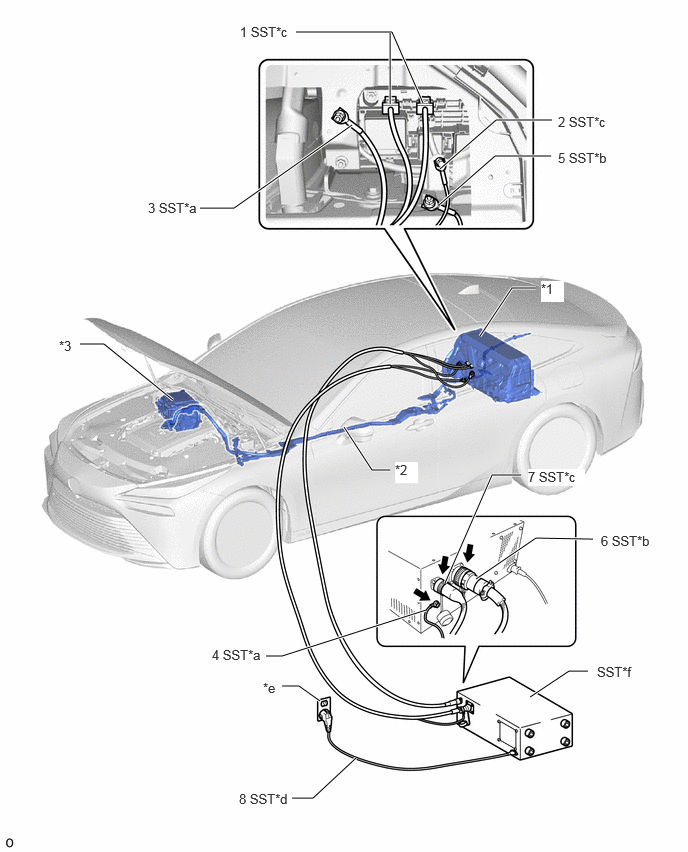
| *1 | EV Supply Battery Assembly | *2 | Floor Under Wire |
| *3 | Inverter with Converter Assembly | - | - |
| *a | EV Bonding Cable (Green Cable) | *b | Low Voltage Cable |
| *c | High Voltage Cable | *d | Power Input Plug |
| *e | Grounded AC 100 to 240 V Receptacle | *f | THS Charger |
- NOTICE:
- ·
Make sure to connect the EV bonding cable first to prevent electrical shock.
·Connect all of the THS charger cables in the order shown in the illustration to prevent electrical shock.
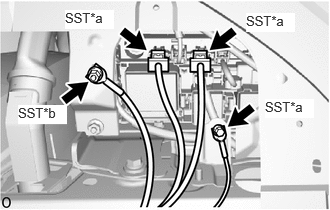
| *a | High Voltage Cable |
| *b | EV Bonding Cable (Green Cable) |
Connect the 2 SST (high voltage cable) connectors to the EV supply battery assembly junction block assembly.
- SST
- 09882-10090
Connect SST (high voltage cable) terminal to the position shown in the illustration with the nut.
- Torque:
- 8.0 N*m (82 kgf*cm, 71 in.*lbf)
Connect SST (EV bonding cable (green cable)) to the position shown in the illustration with the nut.
- SST
- 09882-10070
- Torque:
- 7.5 N*m (76 kgf*cm, 66 in.*lbf)
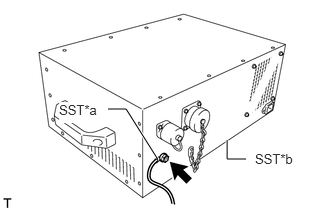
| *a | EV Bonding Cable (Green Cable) |
| *b | THS Charger |
Connect SST (EV bonding cable (green cable)) to SST (THS charger).
- SST
- 09880-10021 (09881-10041)
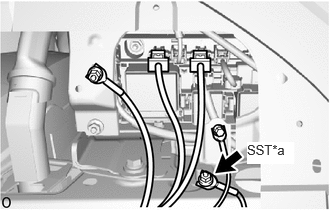
| *a | Low Voltage Cable |
Connect SST (low voltage cable) to the position shown in the illustration with the nut.
- Torque:
- 7.5 N*m (76 kgf*cm, 66 in.*lbf)
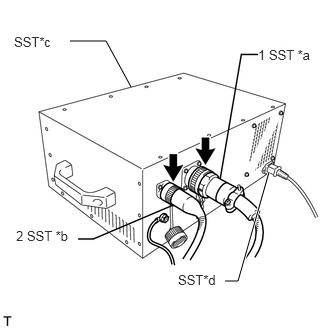
| *a | Low Voltage Cable |
| *b | High Voltage Cable |
| *c | THS Charger |
| *d | Power Input Plug |
Connect SST (low voltage cable) and SST (high voltage cable) to SST (THS charger) in the order shown in the illustration.
Connect the FC converter power outlet cable (inverter with converter assembly).
Click hereEngine / Hybrid System>HYBRID / BATTERY CONTROL>HV BATTERY>INSTALLATION
Install the service plug grip.
Click hereEngine / Hybrid System>HYBRID / BATTERY CONTROL>SERVICE PLUG GRIP>INSTALLATION
Connect SST (power input plug) of SST (THS charger) to a grounded AC 100 to 240 V receptacle.
- SST
- 09881-10081 09881-10050 09881-10090
- NOTICE:
-
Always use an AC 100 to 240 V receptacle with a properly functioning ground. The ground is designed to reduce the chance of electric shock if a malfunction occurs. Do not use the charger if any of the pins on its plug have been damaged or removed.
3. EV BATTERY CHARGING
Enter the following menus: Powertrain / EV / Active Test / Hybrid/EV Battery Charge
- Powertrain > EV > Active Test
-
Tester Display Hybrid/EV Battery Charge - 50004 397 42001
- HINT:
- ·
While performing the " Hybrid/EV Battery Charge" Active Test, check the Data List items "System Main Relay Status - SMRB" and "System Main Relay Status - SMRG".
·If the values of the Data List items are not as specified in the table below, turn the GTS and the ignition switch off and then perform the EV supply battery assembly charging procedure again.
- "System Main Relay Status - SMRB" and "System Main Relay Status - SMRG" in Data List during " Hybrid/EV Battery Charge" Active Test:
Step Active Test
" Hybrid/EV Battery Charge"THS charger START
SwitchData List
"System Main Relay Status - SMRB"Data List
"System Main Relay Status - SMRG"1 OFF OFF OFF OFF 2 OFF → ON OFF OFF → ON OFF → ON 3 ON OFF → ON ON ON
Make sure that the EMERGENCY STOP switch is in the reset condition (the switch is turned clockwise and released).
Make sure that the BREAKER is in the ON position.
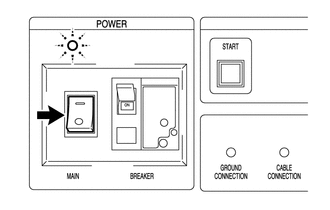
Turn the THS charger MAIN switch on.
- HINT:
-
The MAIN indicator will illuminate (green).
Press the START switch.
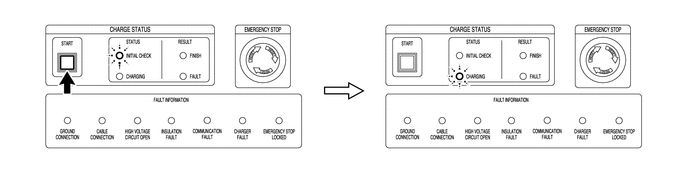
- HINT:
- ·
When the START switch is turned on, the INITIAL CHECK indicator illuminates and an initial check starts. When the initial check completes successfully, the INITIAL CHECK indicator turns off, the CHARGING indicator illuminates and charging will start at the same time.
·While the INITIAL CHECK indicator is illuminated, the insulation, 400 V output, emergency stop switch, connector connections and ground connection are inspected.
Repeat the charge cycle 3 times. When the last cycle has finished, turn the THS charger MAIN switch off.
- HINT:
- ·
Charging time using the THS charger is 10 minutes per charge cycle. The charging time when using a THS charger is a short charging time (when the battery temperature is 25°C (77°F), 10 minutes may be sufficient, if the battery temperature is 0°C (32°F), then three 10 minute charge cycles may be required) for putting the READY-ON in a condition where it can be started. (The THS charger will automatically stop 10 minutes after charging starts.)
·There is very little chance of overcharging the EV supply battery assembly during the second or third charging cycle. The SOC will not likely increase beyond the upper limit because it was low enough to prevent the READY-ON. Even if the SOC was to increase enough to exceed the limit, the EV control ECU will stop the Active Test to prevent overcharging.
·Cranking the engine once causes the SOC to drop approximately 1%.
·Charging the EV supply battery assembly once (10 minutes) using the THS charger restores the SOC approximately 2%.
Turn the ignition switch off.
Remove the THS charger and connect the floor under wire (for EV supply battery assembly).
- NOTICE:
-
Make sure to disconnect the EV bonding cable last.
Disconnect SST (power inlet plug) of SST (THS charger) from the grounded AC 100 to 240 V receptacle.
Disconnect the FC converter power outlet cable (inverter with converter assembly).
Click hereEngine / Hybrid System>HYBRID / BATTERY CONTROL>INVERTER WITH CONVERTER>REMOVAL
Remove the service plug grip.
Click hereEngine / Hybrid System>HYBRID / BATTERY CONTROL>SERVICE PLUG GRIP>REMOVAL
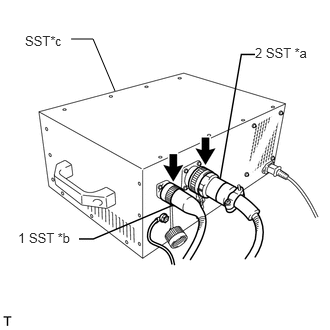
| *a | Low Voltage Cable |
| *b | High Voltage Cable |
| *c | THS Charger |
Disconnect SST (high voltage cable) and SST (low voltage cable) from SST (THS charger) in the order shown in the illustration.
| *a | Low Voltage Cable |
Remove the nut and disconnect SST (low voltage cable).
| *a | EV Bonding Cable (Green Cable) |
| *b | THS Charger |
Disconnect SST (EV bonding cable (green cable)) from SST (THS charger).
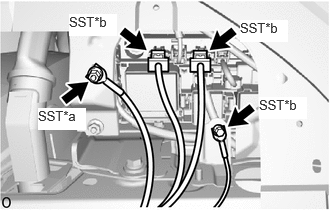
| *a | EV Bonding Cable (Green Cable) |
| *b | High Voltage Cable |
Remove the nut and disconnect SST (EV bonding cable (green cable)).
Remove the nut and disconnect SST (high voltage cable) terminal.
Disconnect the 2 SST (high voltage cable) connectors from the EV supply battery assembly junction block assembly.
Connect the floor under wire.
Click hereEngine / Hybrid System>HYBRID / BATTERY CONTROL>HV BATTERY>INSTALLATION
Install the No. 10 EV battery shield panel.
Click hereEngine / Hybrid System>HYBRID / BATTERY CONTROL>HV BATTERY>INSTALLATION
Install the battery cover lock striker.
Click hereEngine / Hybrid System>HYBRID / BATTERY CONTROL>HV BATTERY>INSTALLATION
Install the service plug grip.
Click hereEngine / Hybrid System>HYBRID / BATTERY CONTROL>SERVICE PLUG GRIP>INSTALLATION
Check that the ignition switch is turned to ON (READY).
- HINT:
-
If the ignition switch is not turned to ON (READY), perform the EV battery charging operation again.
Install the center No. 1 floor to brace extension.
Click hereEngine / Hybrid System>HYBRID / BATTERY CONTROL>HV BATTERY>INSTALLATION
Install the No. 2 EV battery intake duct.
Click hereEngine / Hybrid System>HYBRID / BATTERY CONTROL>HV BATTERY>INSTALLATION
Install the No. 1 room partition pad.
Click hereAudio / Visual / Telematics>AUDIO / VIDEO>RADIO ANTENNA CORD (for Floor)>INSTALLATION
Install the rear seat side garnish RH.
Click hereVehicle Interior>INTERIOR PANELS / TRIM>ROOF HEADLINING>INSTALLATION
Install the bench type rear seatback assembly.
Click hereVehicle Interior>SEAT>REAR SEAT ASSEMBLY>INSTALLATION
4. CHECK EV BATTERY AFTER EV BATTERY CHARGE
Check for DTCs.
Leave vehicle with park (p) selected, continue to charge the vehicle until fc intermittent operation becomes on.
- Powertrain > EV > Data List
-
Tester Display FC Intermittent Operation - 50003 397 872