3ZR-FAE ENGINE MECHANICAL ENGINE ASSEMBLY REMOVAL
CAUTION / NOTICE / HINT
- CAUTION:
-
As the engine assembly with transaxle is extremely heavy, the engine lifter may suddenly drop if the instructions listed in the repair manual are not followed. Therefore, always follow the instructions listed in the repair manual when performing this procedure.
- NOTICE:
-
for Manual Transaxle:
-
When the transaxle is removed, be sure to use a new clutch release with bearing cylinder and new installation bolts. Removal of the transaxle allows the compressed clutch release with bearing cylinder to return to its original position, and dust could damage the seal of the clutch release with bearing cylinder, possibly causing clutch fluid leaks.
PROCEDURE

 1.DISCHARGE FUEL SYSTEM PRESSURE
11212
2.REMOVE NO. 2 CYLINDER HEAD COVER
3. PRECAUTION
- NOTICE:
-
After turning the ignition switch off, waiting time may be required before disconnecting the cable from the battery terminal. Therefore, make sure to read the disconnecting the cable from the battery terminal notice before proceeding with work.
-
Click hereGeneral>INTRODUCTION>REPAIR INSTRUCTION>PRECAUTION
4.DISCONNECT CABLE FROM NEGATIVE BATTERY TERMINAL
- NOTICE:
-
When disconnecting the cable, some systems need to be initialized after the cable is reconnected.
-
Click hereGeneral>INTRODUCTION>REPAIR INSTRUCTION>INITIALIZATION
5.DISCONNECT CABLE FROM POSITIVE BATTERY TERMINAL
6.ALIGN FRONT WHEELS FACING STRAIGHT AHEAD
51441
7.REMOVE NO. 1 ENGINE UNDER COVER
51443
8.REMOVE REAR ENGINE UNDER COVER RH
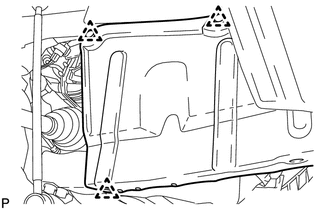
Remove the 3 clips and rear engine under cover RH.
51444
9.REMOVE REAR ENGINE UNDER COVER LH
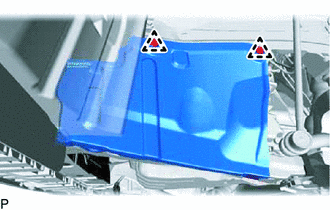
Remove the 2 clips and rear engine under cover LH.
50819
10.REMOVE FRONT FLOOR COVER
11.REMOVE NO. 2 ENGINE UNDER COVER
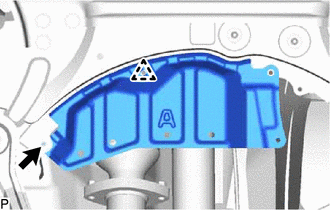
Remove the bolt, clip and No. 2 engine under cover.
12.DRAIN ENGINE COOLANT
13.DRAIN ENGINE OIL
14.DRAIN MANUAL TRANSAXLE OIL (for Manual Transaxle)
15.DRAIN CONTINUOUSLY VARIABLE TRANSAXLE FLUID (for CVT)
16.DRAIN TRANSFER OIL
16470
17.REMOVE RADIATOR RESERVOIR ASSEMBLY
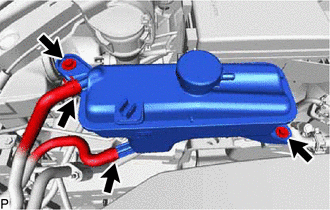
Slide the 2 hose clamps and disconnect the No. 1 and No. 2 water by-pass hoses from the radiator reservoir assembly.
Remove the 2 bolts and radiator reservoir assembly.
16361A
18.REMOVE V-RIBBED BELT
27020
19.REMOVE GENERATOR ASSEMBLY
16572D
20.DISCONNECT NO. 2 RADIATOR HOSE
88310
21.DISCONNECT COMPRESSOR ASSEMBLY WITH PULLEY
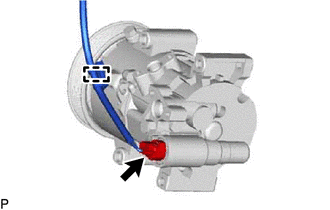
Detach the wire harness clamp and disconnect the cooler compressor connector.
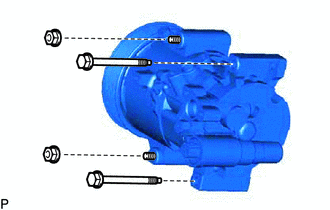
Remove the 2 bolts and 2 nuts.
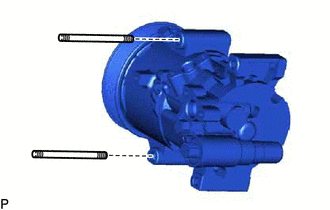
Using an E8 "TORX" socket wrench, remove the 2 stud bolts and disconnect the compressor assembly with pulley from the engine.
- HINT:
-
It is not necessary to completely remove the compressor assembly with pulley. With the hoses connected to the compressor assembly with pulley, hang the compressor assembly with pulley on the vehicle body with a rope.
17705
22.REMOVE AIR CLEANER CAP SUB-ASSEMBLY
23.REMOVE AIR CLEANER CASE SUB-ASSEMBLY
74404A
24.REMOVE BATTERY CLAMP SUB-ASSEMBLY
28800
25.REMOVE BATTERY
16057
26.DISCONNECT RADIATOR HOSE SUB-ASSEMBLY
74431
27.REMOVE BATTERY TRAY
74411B
28.REMOVE FRONT BATTERY BRACKET
74414B
29.REMOVE BATTERY BRACKET REINFORCEMENT
89661
30.REMOVE ECM
16571C
31.DISCONNECT NO. 1 RADIATOR HOSE
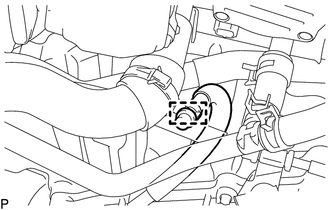
for CVT:
Disconnect the breather plug hose from the clamp.
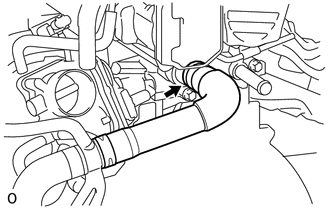
Slide the hose clamp and disconnect the No. 1 radiator hose from the cylinder head sub-assembly.
23901
32.DISCONNECT FUEL TUBE SUB-ASSEMBLY
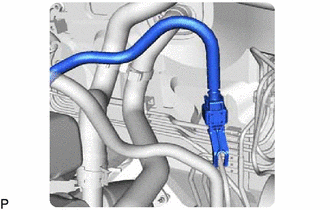
Remove the No 1 fuel pipe clamp, and then disconnect the fuel tube sub-assembly from the fuel pipe.
Click hereEngine / Hybrid System>3ZR-FAE FUEL>FUEL SYSTEM>PRECAUTION
33.DISCONNECT WIRE HARNESS AND HOSE
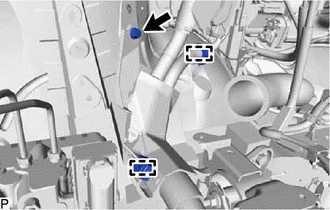
Detach the 2 wire harness clamps and remove the bolt.
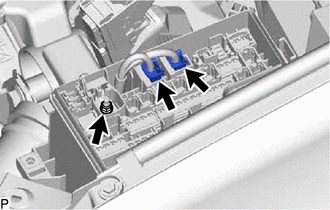
Disconnect the 2 engine room junction block connectors and remove the nut.
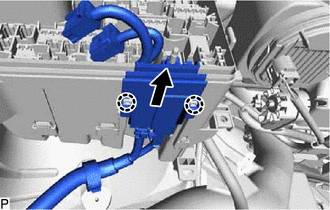
Detach the 2 claws and slide the engine wire, and then disconnect the engine wire from the engine room junction block assembly.
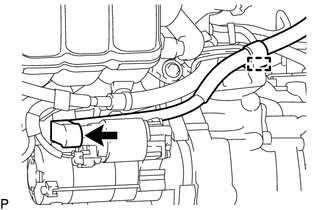
Disconnect the terminal cap, and then remove the nut and disconnect the starter wire.
Detach the wire harness clamp.
for Manual Transaxle:
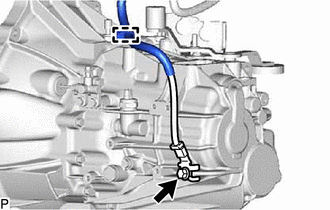
Remove the bolt.
Detach the wire harness clamp to disconnect the engine wire from the manual transaxle assembly.
for CVT:
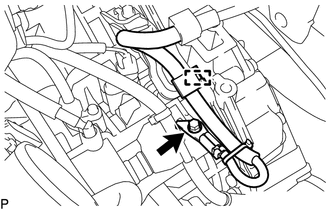
Remove the bolt.
Detach the wire harness clamp to disconnect the engine wire from the continuously variable transaxle assembly.
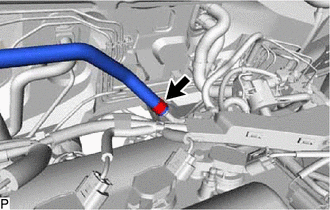
Slide the hose clamp and disconnect the connector tube hose from the air tube.
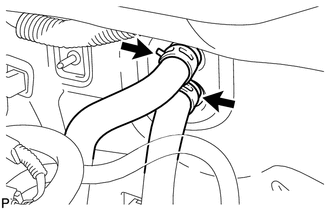
Slide the 2 clamps and disconnect the 2 heater hoses from the heater core.
33820B
34.DISCONNECT TRANSMISSION CONTROL CABLE ASSEMBLY (for Manual Transaxle)
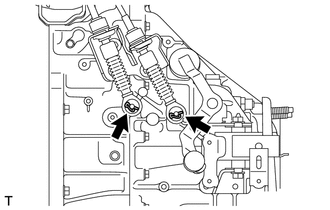
Remove the 2 clips and disconnect the top ends of the transmission control cable assembly from the manual transaxle assembly.
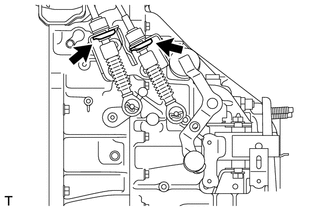
Remove the 2 clips and disconnect the 2 transmission control cable assemblies from the transmission control cable bracket.
33820B
35.DISCONNECT TRANSMISSION CONTROL CABLE ASSEMBLY (for CVT)
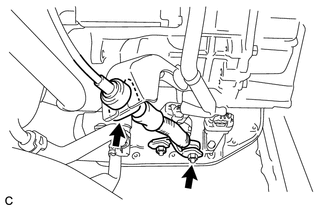
Remove the nut and disconnect the transmission control cable assembly from the control shaft lever.
Remove the clip and disconnect the transmission control cable assembly from the transmission control cable bracket.
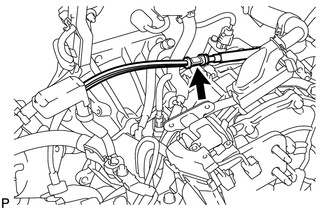
Disconnect the transmission control cable assembly from the transmission control cable support.
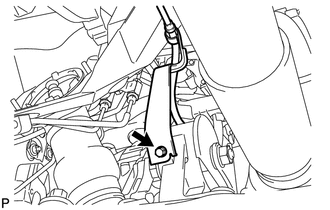
Remove the bolt and disconnect the clamp of the transmission control cable assembly.
31418
36.DISCONNECT CLUTCH HOSE (for Manual Transaxle)
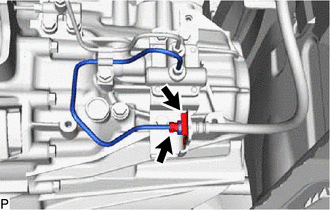
Using a 10 mm union nut wrench, disconnect the clutch hose from the accumulator to flexible hose tube.
Remove the clip and disconnect the clutch hose from the clutch hose bracket.
45259A
37.REMOVE COLUMN HOLE COVER SILENCER SHEET
45260
38.DISCONNECT NO. 2 STEERING INTERMEDIATE SHAFT ASSEMBLY
45025D
39.DISCONNECT NO. 1 STEERING COLUMN HOLE COVER SUB-ASSEMBLY
43502H
40.REMOVE FRONT AXLE SHAFT NUT LH
43501H
41.REMOVE FRONT AXLE SHAFT NUT RH
- HINT:
-
Use the same procedure described for the LH side.
42.DISCONNECT FRONT SPEED SENSOR LH
43.DISCONNECT FRONT SPEED SENSOR RH
- HINT:
-
Use the same procedure described for the LH side.
48810
44.DISCONNECT FRONT STABILIZER LINK ASSEMBLY LH
48820B
45.DISCONNECT FRONT STABILIZER LINK ASSEMBLY RH
- HINT:
-
Use the same procedure described for the LH side.
45047
46.DISCONNECT TIE ROD END SUB-ASSEMBLY LH
45046
47.DISCONNECT TIE ROD END SUB-ASSEMBLY RH
- HINT:
-
Use the same procedure described for the LH side.
48069
48.DISCONNECT FRONT LOWER NO. 1 SUSPENSION ARM SUB-ASSEMBLY LH
48068
49.DISCONNECT FRONT LOWER NO. 1 SUSPENSION ARM SUB-ASSEMBLY RH
- HINT:
-
Use the same procedure described for the LH side.
43420
50.REMOVE FRONT DRIVE SHAFT ASSEMBLY LH
43420G
51.REMOVE FRONT DRIVE SHAFT HOLE SNAP RING LH
43410
52.REMOVE FRONT DRIVE SHAFT ASSEMBLY RH
89465
53.DISCONNECT HEATED OXYGEN SENSOR (for Bank 1 Sensor 2)
17410
54.REMOVE FRONT EXHAUST PIPE ASSEMBLY
37100
55.REMOVE PROPELLER WITH CENTER BEARING SHAFT ASSEMBLY
32101A
56.REMOVE DRIVE PLATE AND TORQUE CONVERTER SETTING BOLT (for CVT)
51218A
57.REMOVE FRONT SUSPENSION MEMBER REINFORCEMENT LH
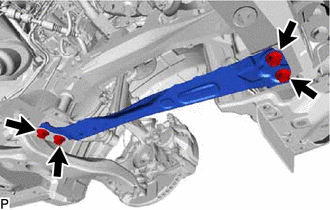
Remove the 4 bolts and front suspension member reinforcement LH.
51217A
58.REMOVE FRONT SUSPENSION MEMBER REINFORCEMENT RH
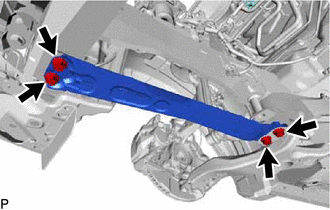
Remove the 4 bolts and front suspension member reinforcement RH.
59.INSTALL ENGINE HANGER
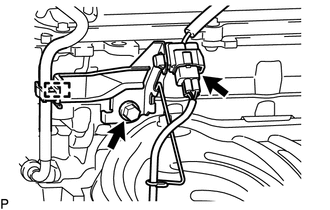
Disconnect the air fuel ratio sensor connector and detach the clamp to disconnect the fuel tube from the air fuel ratio sensor bracket.
Remove the bolt and air fuel ratio sensor bracket.
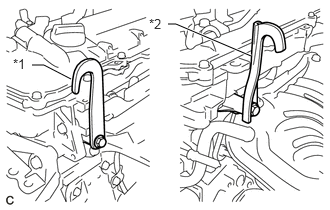
| *1 | No. 1 Engine Hanger |
| *2 | No. 2 Engine Hanger |
Install the 2 engine hangers with 2 bolts as shown in the illustration.
- Torque:
- 43 N*m (438 kgf*cm, 32 ft.*lbf)
- HINT:
No. 1 Engine Hanger 12281-37021 No. 2 Engine Hanger 12282-37011 Bolt 91552-81050
60.REMOVE ENGINE ASSEMBLY WITH TRANSAXLE
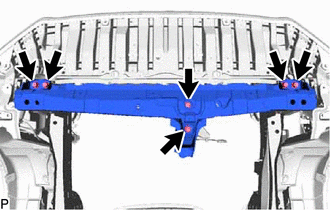
Remove the 6 bolts and front crossmember sub-assembly.
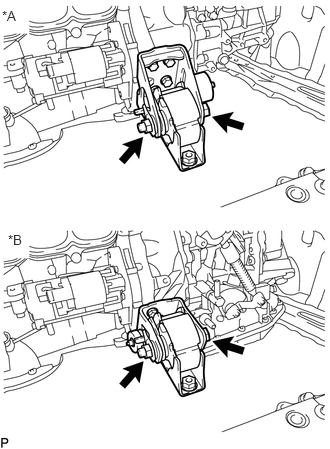
| *A | for Manual Transaxle |
| *B | for CVT |
Remove the through bolt, nut and front engine mounting insulator.
Set an engine lifter underneath the engine.
- NOTICE:
-
Place the engine on wooden blocks or equivalent so that the engine is level.
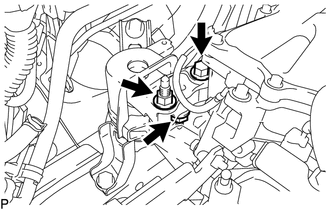
Remove the bolt and 2 nuts, and disconnect the engine mounting insulator sub-assembly RH.
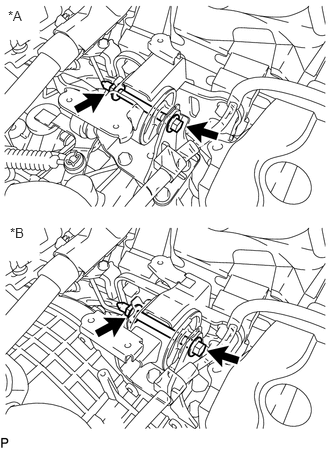
| *A | for Manual Transaxle |
| *B | for CVT |
Remove the bolt and nut, and disconnect the engine mounting insulator LH.
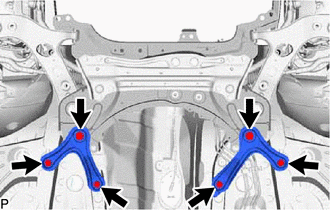
Remove the 6 bolts and front suspension member rear brace RH and LH.
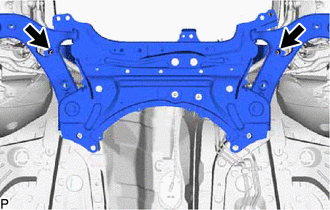
Remove the 2 bolts and front suspension crossmember sub-assembly.
Operate the engine lifter and slowly remove the engine from the vehicle.
- NOTICE:
- ·
Make sure that the engine is clear of all wiring and hoses.
·While lowering the engine from the vehicle, do not allow it to contact the vehicle.
Attach an engine sling device and hang the engine with a chain block.
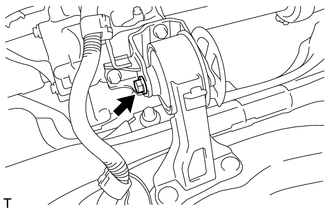
Remove the through bolt and front suspension crossmember sub-assembly from the engine.
- NOTICE:
-
Do not damage any engine or transaxle components.
- HINT:
-
Raise the engine with transaxle assembly while keeping it level.
45319A
61.REMOVE STEERING GEAR HEAT INSULATOR (for RHD)
28100
62.REMOVE STARTER ASSEMBLY
11363A
63.REMOVE FLYWHEEL HOUSING SIDE COVER
36100
64.REMOVE TRANSFER ASSEMBLY
30400
65.REMOVE CONTINUOUSLY VARIABLE TRANSAXLE ASSEMBLY (for CVT)
30300
66.REMOVE MANUAL TRANSAXLE ASSEMBLY (for Manual Transaxle)
67.FIX ENGINE ASSEMBLY
Using wooden blocks or plate lift attachments, set the engine on a flat surface.
- NOTICE:
- ·
Place wooden blocks or plate lift attachments so that the engine is level.
·Never install attachments to the oil pan of the engine assembly or transmission as doing so may deform the oil pan.
·Perform this step while supporting the engine assembly using a sling device and chain block.
32101
68.REMOVE DRIVE PLATE AND RING GEAR SUB-ASSEMBLY (for CVT)
31210
69.REMOVE CLUTCH COVER ASSEMBLY (for Manual Transaxle)
31250
70.REMOVE CLUTCH DISC ASSEMBLY (for Manual Transaxle)
71.REMOVE CLUTCH TUBE (for Manual Transaxle)
31407B
72.REMOVE CLUTCH RELEASE BLEEDER SUB-ASSEMBLY (for Manual Transaxle)
31400
73.REMOVE CLUTCH RELEASE WITH BEARING CYLINDER ASSEMBLY (for Manual Transaxle)
13405
74.REMOVE FLYWHEEL SUB-ASSEMBLY (for Manual Transaxle)
82121
75.REMOVE ENGINE WIRE
Remove the engine wire from the engine.
76.INSTALL ENGINE TO ENGINE STAND
- NOTICE:
- ·
Pay attention to the angle of the sling device as the engine assembly or engine hangers may be damaged or deformed if the angle is incorrect.
·With the exception of installing the engine assembly to an engine stand or removing the engine assembly from an engine stand, do not perform any work on the engine while it is suspended, as doing so is dangerous.
Install the engine to an engine stand with the bolts.
Remove the 2 bolts and 2 engine hangers.
43457
77.REMOVE DRIVE SHAFT BEARING BRACKET
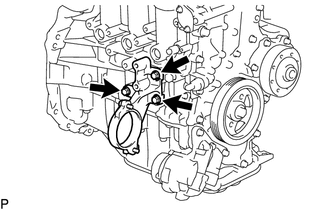
Remove the 3 bolts and drive shaft bearing bracket.
12371A
78.REMOVE REAR ENGINE MOUNTING INSULATOR
- HINT:
-
Perform this procedure only when replacement of the rear engine mounting insulator is necessary.
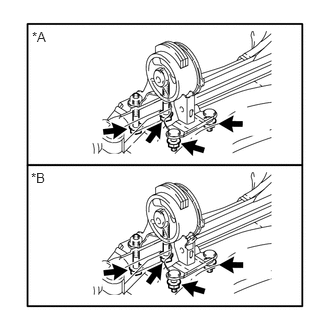
| *A | for Manual Transaxle |
| *B | for CVT |
Remove the 2 bolts, 2 nuts and rear engine mounting insulator.
12305
79.REMOVE ENGINE MOUNTING INSULATOR SUB-ASSEMBLY RH
- HINT:
-
Perform this procedure only when replacement of the engine mounting insulator sub-assembly RH is necessary.
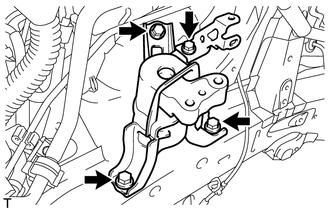
Remove the bolt and radiator reservoir bracket.
Remove the 3 bolts and engine mounting insulator sub-assembly RH.
12372A
80.REMOVE ENGINE MOUNTING INSULATOR LH
- HINT:
-
Perform this procedure only when replacement of the engine mounting insulator LH is necessary.
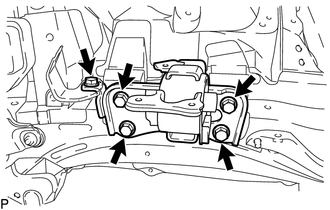
Remove the bolt and wire harness clamp bracket.
Remove the 4 bolts and engine mounting insulator LH.