FRONT SUSPENSION FRONT SUSPENSION MEMBER INSTALLATION
PROCEDURE

 12361
1.INSTALL FRONT ENGINE MOUNTING INSULATOR LH
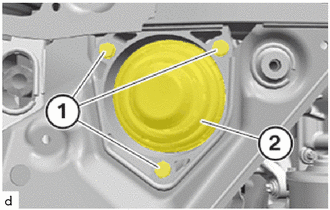
Install the front engine mounting insulator LH (2).
Tighten the bolts (1).
- Torque:
- 19 N*m (194 kgf*cm, 14 ft.*lbf)
12361
2.INSTALL FRONT ENGINE MOUNTING INSULATOR RH
- HINT:
-
Use the same procedure as for the LH side.
3.INSTALL CLIP
- HINT:
-
Perform the operations on the left and right side.
Replace the clip.
Install clip.
51201
4.INSTALL FRONT SUSPENSION CROSSMEMBER SUB-ASSEMBLY
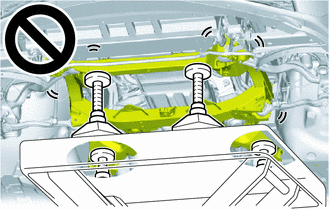
Slowly jack up the front suspension crossmember sub-assembly with an engine lifter using 4 attachments or equivalent tools.
- CAUTION:
-
- ·
The front suspension crossmember sub-assembly is a very heavy component. Make sure that it is supported securely.
·If the front suspension crossmember sub-assembly is not securely supported, it may drop, resulting in serious injury.
- NOTICE:
-
Use attachments to keep the front suspension crossmember sub-assembly level.
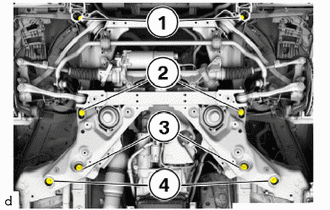
Replace bolts (1) to (4).
Tighten the E14 bolts (1).
- Torque:
- 56 N*m (571 kgf*cm, 41 ft.*lbf)
Using SST, tighten the E14 bolts (1) an additional 45°.
- SST
- 09900-WA010
- HINT:
- ·
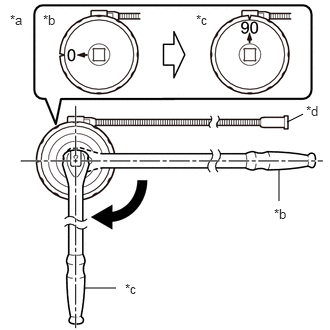 2.99,1.271 3.156,1.188 false 2.906,2.094 2.906,1.76 false 0.875,3 1.208,3 false 0.104,0.125 0.417,0.281 0.313,0.156 10 false *a 0.448,0.125 0.76,0.281 0.313,0.156 10 false *b 2.042,0.125 2.354,0.281 0.313,0.156 10 false *c 3.188,1.073 3.427,1.271 0.24,0.198 10 false *d 2.854,2.146 3.167,2.302 0.313,0.156 10 false *b 1.302,2.927 1.615,3.083 0.313,0.156 10 false *c
*a Example *b Before Tightening *c After Tightening *d Magnetic Portion
·The magnetic portion is used to secure the gauge to the vehicle.
·After first adjusting the needle of the gauge to 0°, tighten to the specified angle.
·Perform the work procedure carefully so that the gauge, etc. does not become tilted.
Tighten down E18 bolts (2).
- Torque:
- 108 N*m (1101 kgf*cm, 80 ft.*lbf)
Using SST, tighten the E18 bolts (2) an additional 45°.
- SST
- 09900-WA010
- HINT:
- ·
2.99,1.271 3.156,1.188 false 2.906,2.094 2.906,1.76 false 0.875,3 1.208,3 false 0.104,0.125 0.417,0.281 0.313,0.156 10 false *a 0.448,0.125 0.76,0.281 0.313,0.156 10 false *b 2.042,0.125 2.354,0.281 0.313,0.156 10 false *c 3.188,1.073 3.427,1.271 0.24,0.198 10 false *d 2.854,2.146 3.167,2.302 0.313,0.156 10 false *b 1.302,2.927 1.615,3.083 0.313,0.156 10 false *c
*a Example *b Before Tightening *c After Tightening *d Magnetic Portion
·The magnetic portion is used to secure the gauge to the vehicle.
·After first adjusting the needle of the gauge to 0°, tighten to the specified angle.
·Perform the work procedure carefully so that the gauge, etc. does not become tilted.
Tighten down bolts (3).
- Torque:
- 108 N*m (1101 kgf*cm, 80 ft.*lbf)
Using SST, tighten the bolts (3) an additional 45°.
- SST
- 09900-WA010
- HINT:
- ·
2.99,1.271 3.156,1.188 false 2.906,2.094 2.906,1.76 false 0.875,3 1.208,3 false 0.104,0.125 0.417,0.281 0.313,0.156 10 false *a 0.448,0.125 0.76,0.281 0.313,0.156 10 false *b 2.042,0.125 2.354,0.281 0.313,0.156 10 false *c 3.188,1.073 3.427,1.271 0.24,0.198 10 false *d 2.854,2.146 3.167,2.302 0.313,0.156 10 false *b 1.302,2.927 1.615,3.083 0.313,0.156 10 false *c
*a Example *b Before Tightening *c After Tightening *d Magnetic Portion
·The magnetic portion is used to secure the gauge to the vehicle.
·After first adjusting the needle of the gauge to 0°, tighten to the specified angle.
·Perform the work procedure carefully so that the gauge, etc. does not become tilted.
Tighten down E18 bolts (4).
- Torque:
- 108 N*m (1101 kgf*cm, 80 ft.*lbf)
Using SST, tighten the E18 bolts (4) an additional 45°.
- SST
- 09900-WA010
- HINT:
- ·
2.99,1.271 3.156,1.188 false 2.906,2.094 2.906,1.76 false 0.875,3 1.208,3 false 0.104,0.125 0.417,0.281 0.313,0.156 10 false *a 0.448,0.125 0.76,0.281 0.313,0.156 10 false *b 2.042,0.125 2.354,0.281 0.313,0.156 10 false *c 3.188,1.073 3.427,1.271 0.24,0.198 10 false *d 2.854,2.146 3.167,2.302 0.313,0.156 10 false *b 1.302,2.927 1.615,3.083 0.313,0.156 10 false *c
*a Example *b Before Tightening *c After Tightening *d Magnetic Portion
·The magnetic portion is used to secure the gauge to the vehicle.
·After first adjusting the needle of the gauge to 0°, tighten to the specified angle.
·Perform the work procedure carefully so that the gauge, etc. does not become tilted.
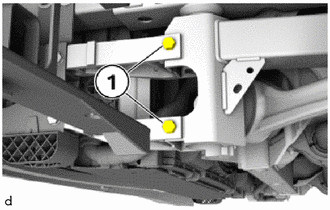
Tighten the E11 bolts (1).
- Torque:
- 19 N*m (194 kgf*cm, 14 ft.*lbf)
- HINT:
-
Perform the operations on the left and right side.
Lower the engine lifter.
48630
5.INSTALL FRONT UPPER SUSPENSION ARM ASSEMBLY LH
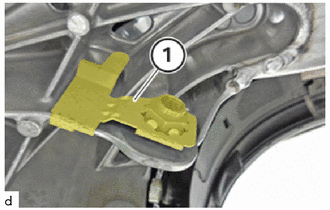
Replace the clip nut (1).
Position front upper suspension arm assembly LH at the front suspension crossmember sub-assembly.
Replace the 18 mm bolt.
w/ Front Suspension Member Bracket:
Position the front suspension member bracket sub-assembly LH and screw the 18 mm bolt in a few turns but do not tighten.
w/o Front Suspension Member Bracket:
Screw the 18 mm bolt in a few turns but do not tighten.
Position front upper suspension arm assembly LH on steering knuckle.
Replace nut.
Tighten the nut, if necessary, counter support the T40 "TORX" socket wrench.
- Torque:
- 175 N*m (1785 kgf*cm, 129 ft.*lbf)
Tighten 18 mm bolt.
- Torque:
- 100 N*m (1020 kgf*cm, 74 ft.*lbf)
- NOTICE:
-
Tighten the 18 mm bolt connection in the normal position.
Using SST, tighten the 18 mm bolt an additional 90°.
- SST
- 09900-WA010
- HINT:
- ·
2.99,1.271 3.156,1.188 false 2.906,2.094 2.906,1.76 false 0.875,3 1.208,3 false 0.104,0.125 0.417,0.281 0.313,0.156 10 false *a 0.448,0.125 0.76,0.281 0.313,0.156 10 false *b 2.042,0.125 2.354,0.281 0.313,0.156 10 false *c 3.188,1.073 3.427,1.271 0.24,0.198 10 false *d 2.854,2.146 3.167,2.302 0.313,0.156 10 false *b 1.302,2.927 1.615,3.083 0.313,0.156 10 false *c
*a Example *b Before Tightening *c After Tightening *d Magnetic Portion
·The magnetic portion is used to secure the gauge to the vehicle.
·After first adjusting the needle of the gauge to 0°, tighten to the specified angle.
·Perform the work procedure carefully so that the gauge, etc. does not become tilted.
48610
6.INSTALL FRONT UPPER SUSPENSION ARM ASSEMBLY RH
- HINT:
-
Use the same procedure as for the LH side.
7.INSTALL FRONT LOWER SUSPENSION ARM ASSEMBLY LH
- CAUTION:
- ·
Component damage caused by striking tools.
Brute force can result in component damage.
-Only use those tools intended for the work.
Install the front lower suspension arm assembly LH.
Replace the 18 mm bolt and the 18 mm nut.
Using a 18 mm deep socket wrench, tighten the 18 mm nut in the normal position.
- Torque:
- 100 N*m (1020 kgf*cm, 74 ft.*lbf)
Using SST and 18 mm deep socket wrench, tighten the 18 mm nut an additional 90°.
- SST
- 09900-WA010
- HINT:
- ·
2.99,1.271 3.156,1.188 false 2.906,2.094 2.906,1.76 false 0.875,3 1.208,3 false 0.104,0.125 0.417,0.281 0.313,0.156 10 false *a 0.448,0.125 0.76,0.281 0.313,0.156 10 false *b 2.042,0.125 2.354,0.281 0.313,0.156 10 false *c 3.188,1.073 3.427,1.271 0.24,0.198 10 false *d 2.854,2.146 3.167,2.302 0.313,0.156 10 false *b 1.302,2.927 1.615,3.083 0.313,0.156 10 false *c
*a Example *b Before Tightening *c After Tightening *d Magnetic Portion
·The magnetic portion is used to secure the gauge to the vehicle.
·After first adjusting the needle of the gauge to 0°, tighten to the specified angle.
·Perform the work procedure carefully so that the gauge, etc. does not become tilted.
w/ Height Control Sensor:
Clip in the front height control sensor link sub-assembly.
8.INSTALL FRONT LOWER SUSPENSION ARM ASSEMBLY RH
- HINT:
-
Use the same procedure as for the LH side.
9.INSTALL WIRE HARNESS
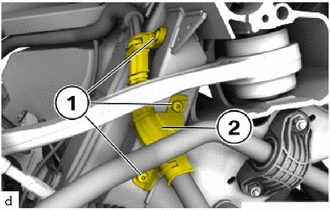
Position the wire harness mounting (2) with the wire harness.
Tighten the T25 screws (1).
- Torque:
- 8.0 N*m (82 kgf*cm, 71 in.*lbf)
10.INSTALL STEERING LINK ASSEMBLY
45047
11.CONNECT TIE ROD END SUB-ASSEMBLY LH
45046
12.CONNECT TIE ROD END SUB-ASSEMBLY RH
- HINT:
-
Use the same procedure as for the LH side.
48811
13.INSTALL FRONT STABILIZER BAR
48810
14.INSTALL FRONT STABILIZER LINK ASSEMBLY LH
Position the front stabilizer link assembly LH on the front stabilizer bar.
Replace 16 mm nut.
Tighten the 16 mm nut, if necessary, counter support the T30 "TORX" socket wrench.
- Torque:
- 56 N*m (571 kgf*cm, 41 ft.*lbf)
48820B
15.INSTALL FRONT STABILIZER LINK ASSEMBLY RH
- HINT:
-
Use the same procedure as for the LH side.
16.INSTALL COOLANT HOSE (for B58)
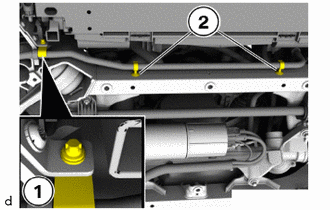
Position both holders (2) at the front suspension crossmember sub-assembly.
Tighten down E8 bolts (1).
- Torque:
- 11.8 N*m (120 kgf*cm, 9 ft.*lbf)
52822
17.INSTALL AIR INTAKE DUCT LH
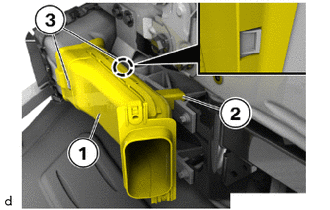
Position air intake duct LH (1) with the guide (2) correctly and clip into the latch mechanisms (3).
52821
18.INSTALL AIR INTAKE DUCT RH
for B58:
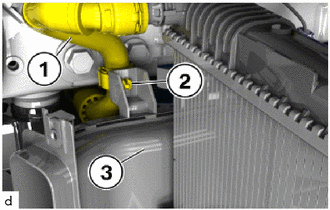
Clip in coolant line (1) with the bracket (2) in the air intake duct RH (3).
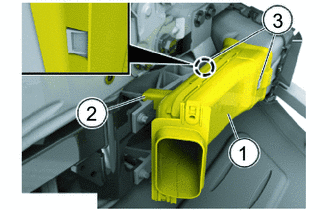
Position brake air duct RH (1) with the guide (2) correctly and clip into the latch mechanisms (3).
45220
19.CONNECT STEERING INTERMEDIATE SHAFT ASSEMBLY
20.REMOVE ENGINE SUPPORT BRIDGE (for Type A)
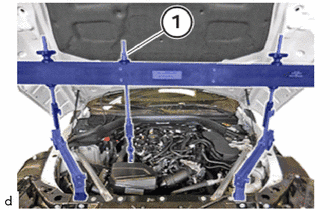
Turn the spindle (1) to lower the engine until the engine support arms rest completely flat on the engine mounts.
Remove the engine support bridge with the help from another person.
21.REMOVE ENGINE SUPPORT BRIDGE (for Type B)
Turn the chain block to lower the engine until the engine support arms rest completely flat on the engine mounts.
Remove the engine support bridge with the help from another person.
- NOTICE:
-
Prevent SST from contacting the vehicle body or windshield glass.
22.REMOVE ENGINE HANGER
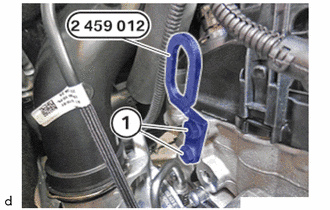
Unscrew the bolts (1) of the special tool 2 459 012.
- SST
- 09200-WA610
Feed out the special tool 2 459 012 at the cylinder head sub-assembly and remove.
- SST
- 09200-WA610
12361
23.CONNECT FRONT ENGINE MOUNTING INSULATOR LH
- NOTICE:
-
Lower the engine completely to prevent play before bolting down the front engine mounting insulator LH and front No. 1 engine mounting bracket LH.
Tighten down E14 bolt.
- Torque:
- 100 N*m (1020 kgf*cm, 74 ft.*lbf)
12361
24.CONNECT FRONT ENGINE MOUNTING INSULATOR RH
- NOTICE:
-
Lower the engine completely to prevent play before bolting down the front engine mounting insulator RH and front No. 1 engine mounting bracket RH.
Tighten down E14 bolt.
- Torque:
- 100 N*m (1020 kgf*cm, 74 ft.*lbf)
53879
25.INSTALL FRONT FENDER LINER LH
53878
26.INSTALL FRONT FENDER LINER RH
- HINT:
-
Use the same procedure as for the LH side.
51219
27.INSTALL FRONT SUSPENSION MEMBER LOWER PROTECTOR
53826A
28.INSTALL FRONT FENDER UPPER PROTECTOR LH
53825A
29.INSTALL FRONT FENDER UPPER PROTECTOR RH
- HINT:
-
Use the same procedure as for the LH side.
30.INSTALL ENGINE ROOM ECU BOX (for B48)
31.INSTALL ENGINE ROOM ECU BOX (for B58)
32.INSTALL INTEGRATION RELAY (for Engine Room Side)
33.REMOVE AND INSTALL HOOD SUPPORT ASSEMBLY
12601B
34.INSTALL NO. 1 ENGINE COVER SUB-ASSEMBLY (for B48)
12601B
35.INSTALL NO. 1 ENGINE COVER SUB-ASSEMBLY (for B58)
36.INSTALL FRONT WHEEL
37.CONNECT CABLE TO NEGATIVE BATTERY TERMINAL (for B48)
38.CONNECT CABLE TO NEGATIVE BATTERY TERMINAL (for B58)
39.INSPECT AIRBAG FOR FUNCTION
40. START-UP OF ELECTROMECHANICAL STEERING
41.INSPECT STRAIGHT-AHEAD DRIVING POSITION OF THE STEERING WHEEL
42.INSPECT AND ADJUST FRONT WHEEL ALIGNMENT