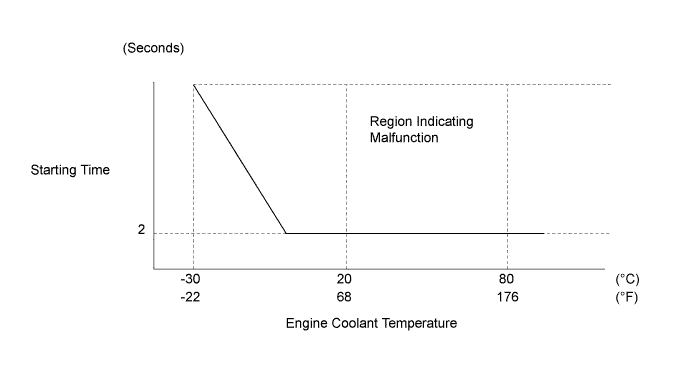
DTC P1604 Startability Malfunction |
| DTC No. | DTC Detection Condition | Trouble Area |
| P1604 | Either condition is met:
|
|
| Reference waveforms showing a normal cold engine start |
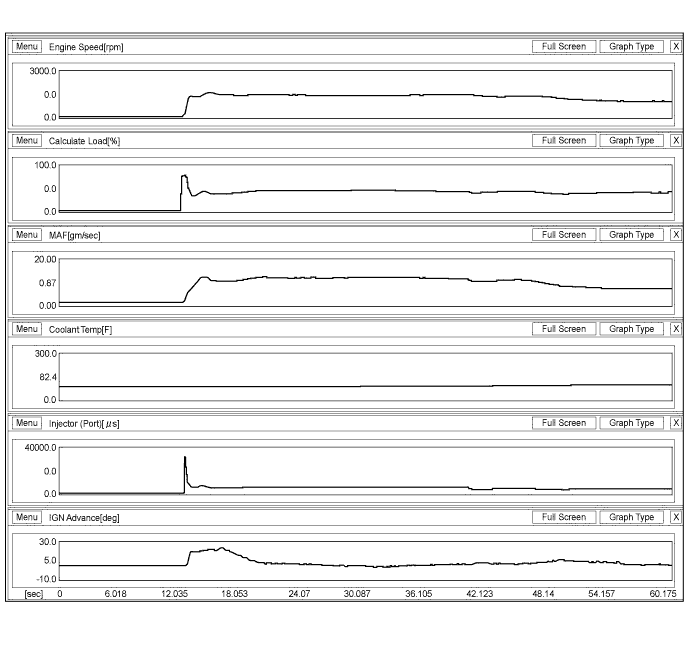
| Reference waveforms showing a normal warm engine start |
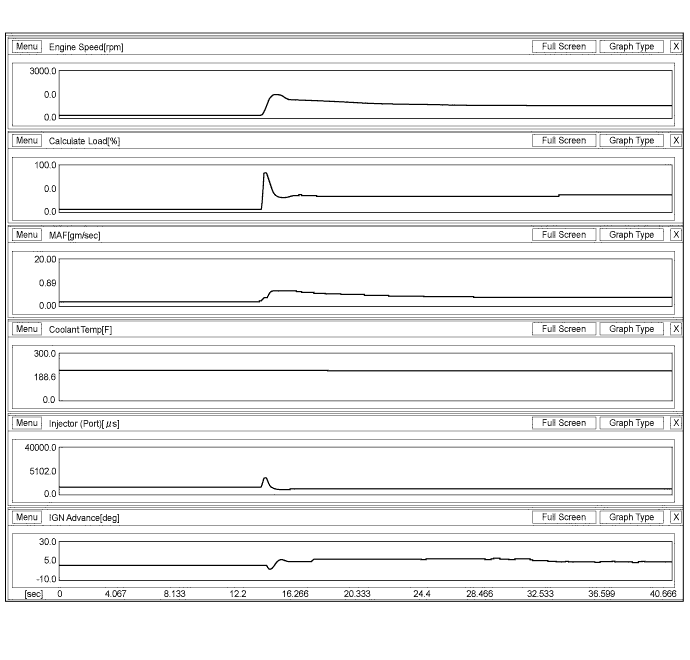
| Reference values when there is an air leak in the intake system during starting difficulty |
| Parameter | -3 | -2 | -1 | 0 | 1 | Unit |
| Engine Speed | 1010 | 746 | 319 | 180 | 125 | rpm |
| Calculate Load | 78.8 | 41.9 | 42.7 | 84.3 | 84.3 | % |
| Vehicle Load | 9.4 | 21.1 | 28.7 | 20.3 | 26.2 | % |
| MAF | 2.62 | 4.21 | 2.45 | 1.00 | 0.89 | gm/sec |
| Atmosphere Pressure | -0 | -0 | -0 | -0 | -0 | psi(gauge) |
| Coolant Temp | 183 | 183 | 183 | 183 | 183 | F |
| Intake Air | 111 | 109 | 108 | 106 | 106 | F |
| Battery Voltage | 11.269 | 11.914 | 11.835 | 11.855 | 11.875 | V |
| Throttle Sensor Volt % | 16.4 | 16.8 | 16.4 | 16.4 | 16.4 | % |
| Throttle Sensor #2 Volt % | 48.2 | 48.6 | 48.2 | 48.2 | 48.2 | % |
| Throttle Sensor Position | 0.0 | 0.0 | 0.0 | 0.3 | 0.0 | % |
| Throttle Motor DUTY | 16.8 | 16.4 | 16.4 | 16.4 | 16.4 | % |
| Injector (Port) | 13560 | 4417 | 4081 | 4081 | 4081 | μs |
| Injection Volume (Cylinder 1) | 0.130 | 0.130 | 0.246 | 0.246 | 0.246 | ml |
| Fuel Pump/Speed Status | ON | ON | ON | ON | ON | |
| EVAP (Purge) VSV | 0.0 | 0.0 | 0.0 | 0.0 | 0.0 | % |
| Evap Purge Flow | 0.0 | 0.0 | 0.0 | 0.0 | 0.0 | % |
| Purge Density Learn Value | 0.000 | 0.000 | 0.000 | 0.000 | 0.000 | |
| EVAP Purge VSV | OFF | OFF | OFF | OFF | OFF | |
| Target Air Fuel Ratio | 0.954 | 0.954 | 0.870 | 0.870 | 0.876 | |
| AF Lambda B1S1 | 0.998 | 0.998 | 0.998 | 0.998 | 0.998 | |
| AFS Voltage B1S1 | 3.289 | 3.290 | 3.290 | 3.290 | 3.290 | V |
| O2S B1 S2 | 0.000 | 0.000 | 0.000 | 0.000 | 0.000 | V |
| Short FT #1 | 0.000 | 0.000 | 0.000 | 0.000 | 0.000 | % |
| Long FT #1 | -3.907 | -2.344 | -2.344 | -2.344 | -2.344 | % |
| Total FT #1 | -0.047 | -0.047 | -0.047 | -0.047 | -0.047 | |
| Fuel System Status #1 | OL | OL | OL | OL | OL | |
| IGN Advance | 5.0 | 8.0 | 7.0 | 5.0 | 5.0 | deg |
| Knock Feedback Value | -3.0 | -3.0 | -3.0 | -3.0 | -3.0 | CA |
| Knock Correct Learn Value | 15.5 | 15.5 | 15.5 | 15.5 | 15.5 | CA |
| VVT Control Status #1 | OFF | OFF | OFF | OFF | OFF | |
| Starter Signal | ON | OFF | OFF | OFF | OFF |
| Malfunction Recurrence and Inspection Areas |
Freeze frame data exists, but the malfunction (starting difficulty) has not reoccurred and the malfunction conditions are unknown.
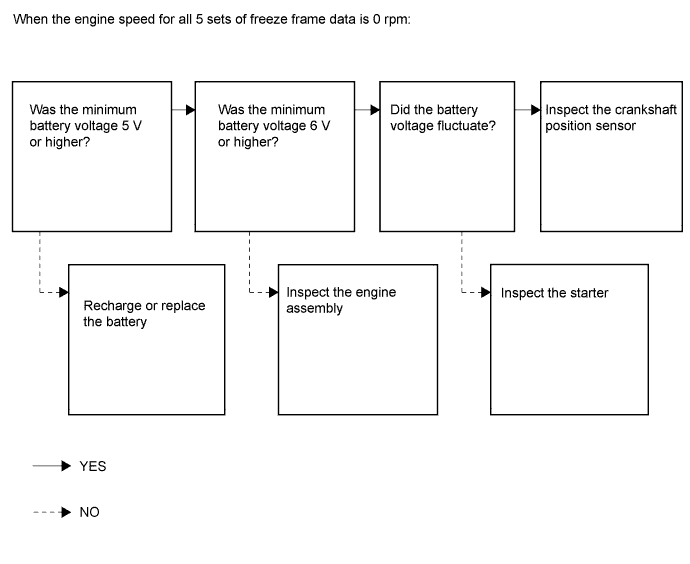
The engine speed recorded in the freeze frame data is 0 rpm (the engine does not crank).
All engine speeds recorded in the freeze frame data are between 60 and 250 rpm (the engine cranks but there is no combustion).
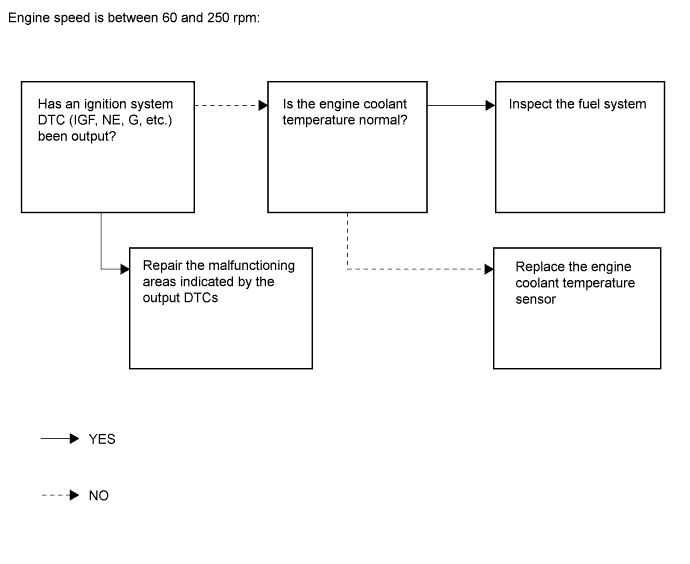
The engine speed recorded in the freeze frame data is 250 rpm or higher (the initial combustion and starter turnoff timing is too late).
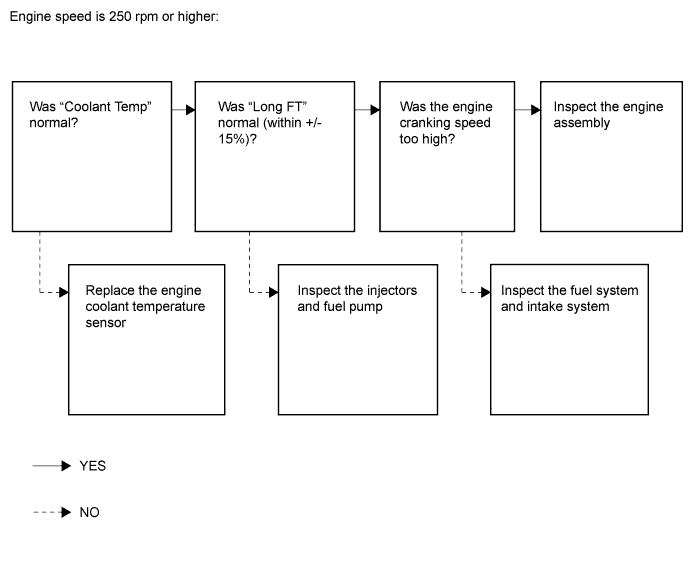
When the malfunction (starting difficulty) can be reproduced, or malfunction conditions are known, perform the following inspections ("Problem Symptoms" and "Systems to Inspect").
Problem Symptoms
Systems to Inspect
| INSPECTION FLOW |
Freeze frame data exists, but the malfunction (starting difficulty) has not reoccurred and the malfunction conditions are unknown.
| Freeze Frame Data Item | Result | Suspected Area | Procedure |
| Engine Speed | 0 rpm (no engine cranking at all) |
| 4 to 9 |
| 60 to 250 rpm (engine cranks but no initial combustion*1) |
| 10 to 14 | |
| 250 rpm or higher (combustion occurs but initial combustion and starter turnoff*2 occur late) |
| 15 to 23 |
When the malfunction (starting difficulty) can be reproduced, or when malfunction conditions are known.
Problem Symptoms
| Problem Symptom | Suspected Area | Suspected Component | Procedure |
| The engine does not crank | Battery malfunction |
| 26 to 31 |
| Starting system |
| ||
| Engine assembly |
| ||
| Cranking speed too low | Battery malfunction |
| 32 to 34 |
| Starting system |
| ||
| Engine assembly |
| ||
| Cranking speed too high | Engine assembly |
| |
| There is no initial combustion | Fuel supply problem |
| 35 to 49 |
| Immobiliser system | Immobiliser system (w/ immobiliser system) | ||
| Ignition system malfunction |
| ||
| Engine stalls after starter turnoff | Air suction |
| 50 to 55 |
| Deposits in throttle body |
| ||
| VVT valve does not return properly |
| ||
| Mass air flow meter malfunction |
| ||
| The initial combustion and starter turnoff occur late | Engine coolant temperature sensor malfunction |
| 56 to 69 |
| Mass air flow meter malfunction |
| ||
| Abnormal A/F learned value |
| ||
| Deviation from fuel injection characteristics |
| ||
| Wet-fouled or dry-fouled spark plug |
| ||
| Lack of fuel pressure |
|
Systems to Inspect
| Troubleshooting by System | Suspected Area | Suspected Component | Procedure |
| Fuel system troubleshooting A | Abnormal air fuel ratio learned value |
| 85 to 92 93 to 100 |
| Rough idling |
| ||
| Abnormal fuel pressure |
| ||
| Fuel system troubleshooting B | Abnormal concentration of HC in surge tank |
| 101 to 103 |
| Fuel system troubleshooting C | Injection signal system malfunction |
| 71 to 75 |
| Intake system troubleshooting | Difference between ISC target value and opening angle when idling |
| 82 to 84 104 to 106 |
| Ignition system troubleshooting | Camshaft and/or crankshaft position sensor signal malfunction |
| 76 to 81 107 to 112 |
| 1.CHECK FOR ANY OTHER DTCS OUTPUT AND RECORD FREEZE FRAME DATA |
Connect the Techstream to the DLC3.
Turn the ignition switch to ON.
Enter the following menus: Powertrain / Engine and ECT / Trouble Codes.
 |
Read the DTCs and record the freeze frame data.
| Result | Proceed to |
| DTC P1604 is output | A |
| DTC P1604 and other DTCs are output | B |
|
| ||||
| A | |
 |
| 2.CHECK ENGINE IMMOBILISER SYSTEM |
Connect the Techstream to the DLC3.
Turn the ignition switch to ON.
Turn the Techstream on.
Enter the following menus: Powertrain / Engine and ECT / Data List / Immobiliser Fuel Cut.
Read the value displayed on the Techstream.
|
| ||||
| OK | |
|
| 3.CHECK MALFUNCTION CONDITION |
Confirm the problem symptoms.
| Result | Proceed to |
| Freeze frame data exists, but the starting difficulty cannot be reproduced and it is unknown what kind of starting difficulty occurred | A |
| The problem symptoms can be reproduced, or the malfunction conditions are known | B |
|
| ||||
| A | |
|
| 4.READ FREEZE FRAME DATA |
Connect the Techstream to the DLC3.
Turn the ignition switch to ON.
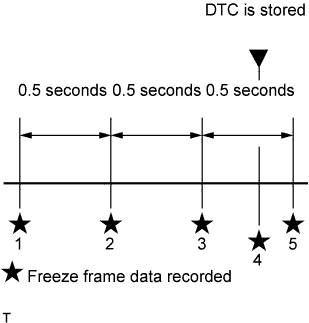
Using the Techstream, confirm the vehicle conditions recorded in the freeze frame data which were present when the DTC was stored (Click here).
| Freeze Frame Data Item | Suspected Area | Proceed to | |
| Engine Speed | Battery Voltage | ||
| All 5 sets of freeze frame data are 0 rpm (no engine cranking at all) | Minimum voltage is below 5 V | Battery fully depleted | A |
| Minimum voltage is 5 V or higher |
| B | |
| 60 to 250 rpm (engine cranks but no initial combustion) | - |
| C |
| 250 rpm or higher (combustion occurs but initial combustion and starter turnoff occur late) | - |
| D |
| Freeze Frame Data Item | Suspected Area | Proceed to |
| Low Rev for Eng Start | ||
| ON exists |
| E |
|
| ||||
|
| ||||
|
| ||||
|
| ||||
| A | ||
 | ||
| ||
| 5.READ FREEZE FRAME DATA |
Connect the Techstream to the DLC3.
Turn the ignition switch to ON.
Using the Techstream, confirm the vehicle conditions recorded in the freeze frame data which were present when the DTC was stored (Click here).
| Freeze Frame Data Item | Result | Suspected Area | Proceed to |
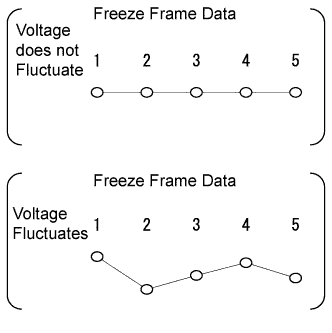
| Battery Voltage | Minimum voltage is 6 V or higher and voltage does not fluctuate*1 | Starter system | A |
| Minimum voltage is 6 V or higher and voltage fluctuates*2, *3 |
| B | |
| Minimum voltage is 5 to 6 V*4 |
| C |
 |
|
| ||||
|
| ||||
| A | ||
| ||
| ||
| 6.CHECK SENSOR INSTALLATION (CRANKSHAFT POSITION SENSOR) |
Check the tightening and installation condition of the crankshaft position sensor bolt.
Check the connection of the crankshaft position sensor connector.
|
| ||||
| OK | |
|
| 7.CHECK CRANKSHAFT POSITION SENSOR |
Disconnect the crankshaft position sensor connector.
Check for oil on the connector terminals.
|
| ||||
| OK | |
|
| 8.CHECK HARNESS AND CONNECTOR (CRANKSHAFT POSITION SENSOR - ECM) |
Check the harnesses and connectors, referring to DTC P0335 inspection procedure .
|
| ||||
| OK | |
|
| 9.CHECK CRANKSHAFT POSITION SENSOR |
Replace the crankshaft position sensor (Click here).
Check the engine start operation.
|
| ||||
| OK | ||
| ||
| ||
| 10.READ FREEZE FRAME DATA |
Connect the Techstream to the DLC3.
Turn the ignition switch to ON.
Using the Techstream, confirm the vehicle conditions recorded in the freeze frame data which were present when the DTC was stored (Click here).
| Freeze Frame Data Item | Suspected Area | Proceed to | ||
| Coolant Temp, Intake Air | Coolant Temp, Ambient Temperature | Fuel Pump/Speed Status | ||
| Difference between Coolant Temp, Ambient Temperature and Intake Air is 10°C (18°F) or more*1 | Coolant Temp is 125°C (257°F) or higher, or below Ambient Temperature by 15°C (27°F) or more | - | Engine coolant temperature sensor | A |
| Other than above | All 5 sets of freeze frame data are ON | - | B | |
| At least 1 of the 5 sets of freeze frame data is OFF | Fuel pump control circuit | C | ||
| Difference between Coolant Temp, Ambient Temperature and Intake Air is less than 10°C (18°F)*2 | - | At least 1 of the 5 sets of freeze frame data is OFF | Fuel pump control circuit | C |
| All 5 sets of freeze frame data are ON | - | B | ||
|
| ||||
|
| ||||
| A | ||
| ||
| ||
| 11.PERFORM ACTIVE TEST USING TECHSTREAM (CONTROL THE FUEL PUMP/SPEED) |
Connect the Techstream to the DLC3.
Disconnect the connector from the fuel suction tube.
Turn the ignition switch to ON.
Enter the following menus: Powertrain / Engine and ECT / Active Test / Control the Fuel Pump/Speed.
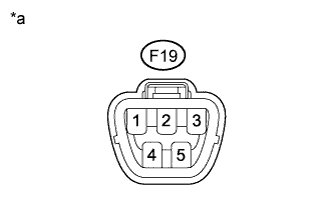 |
Measure the voltage according to the value(s) in the table below.
| Tester Connection | Condition | Specified Condition |
| F19-4 - Body ground | Active Test is being performed | 11 to 14 V |
| *a | Front view of wire harness connector (to Fuel Pump) |
|
| ||||
| OK | |
|
| 12.CHECK TERMINAL VOLTAGE (POWER SOURCE OF FUEL INJECTOR) |
Check the harnesses and connectors, referring to Fuel Injector Circuit inspection procedure .
|
| ||||
| OK | |
|
| 13.PERFORM ACTIVE TEST USING TECHSTREAM (CONTROL THE FUEL PUMP/SPEED) |
Connect the Techstream to the DLC3.
Turn the ignition switch to ON.
Enter the following menus: Powertrain / Engine and ECT / Active Test / Control the Fuel Pump/Speed.
When performing the Active Test, check for fuel leakage from the fuel pipes.
| Result | Proceed to |
| Fuel leakage or signs of fuel leakage are present | A |
| No fuel leakage or signs of fuel leakage | B |
|
| ||||
| A | ||
| ||
| ||
| 14.CHECK FUEL SYSTEM |
Check for foreign matter such as iron particles around the fuel pump (fuel pump, fuel pump filter and inside the fuel tank), and for signs that the fuel pump was stuck.
| Result | Proceed to |
| There is foreign matter or signs that fuel pump was stuck | A |
| There is no foreign matter and no signs that fuel pump was stuck | B |
|
| ||||
| A | ||
| ||
| ||
| 15.READ FREEZE FRAME DATA |
Connect the Techstream to the DLC3.
Turn the ignition switch to ON.
Using the Techstream, confirm the vehicle conditions recorded in the freeze frame data which were present when the DTC was stored (Click here).
| Freeze Frame Data Item | Suspected Area | Proceed to | |||
| Coolant Temp, Ambient Temperature, Intake Air | Coolant Temp, Ambient Temperature | Long FT | Engine Speed | ||
| Difference between Coolant Temp, Ambient Temperature and Intake Air is 10°C (18°F) or more | Coolant Temp is 125°C (257°F) or higher, or below Ambient Temperature by 15°C (27°F) or more | - | - | Engine coolant temperature sensor | A |
| Other than above | -15% or less, or +15% or more | - |
| B | |
| -15 to +15% | Minimum speed is 300 rpm or more*1 | Engine assembly | C | ||
| Minimum speed is less than 300 rpm |
| D | |||
| Difference between Coolant Temp, Ambient Temperature and Intake Air is less than 10°C (18°F) | - | -15% or less, or +15% or more | - |
| B |
| -15 to +15% | Minimum speed is 300 rpm or more*1 | Engine assembly | C | ||
| Minimum speed is less than 300 rpm |
| D | |||
|
| ||||
|
| ||||
|
| ||||
| A | ||
| ||
| ||
| 16.INSPECT FUEL INJECTOR ASSEMBLY |
Check that no carbon is stuck to the fuel injector assembly.
|
| ||||
| OK | |
|
| 17.CHECK FUEL SYSTEM |
Check for foreign matter such as iron particles around the fuel pump (fuel pump, fuel pump filter and inside the fuel tank), and for signs that the fuel pump was stuck.
| Result | Proceed to |
| There is foreign matter or signs that fuel pump was stuck | A |
| There is no foreign matter and no signs that fuel pump was stuck | B |
|
| ||||
| A | ||
| ||
| ||
| 18.READ FREEZE FRAME DATA |
Connect the Techstream to the DLC3.
Turn the ignition switch to ON.
Using the Techstream, confirm the vehicle conditions recorded in the freeze frame data which were present when the DTC was stored (Click here).
| Freeze Frame Data Item | Result | Suspected Area | Proceed to |
| Coolant Temp | Engine coolant temperature is 40°C (104°F) or less*1 | Pressure regulator | A |
| Engine coolant temperature is 40 to 90°C (104 to 194°F)*2 | Fuel injector | B | |
| Engine coolant temperature is 90°C (194°F) or higher*3 | Pressure regulator | A |
|
| ||||
| A | |
|
| 19.CHECK FUEL PRESSURE |
Check the fuel pressure .
| Result | Proceed to |
| Abnormal | A |
| Normal | B |
|
| ||||
| A | ||
| ||
| ||
| 20.INSPECT FUEL INJECTOR ASSEMBLY |
Clean the inside of the surge tank with compressed air.
After stopping the engine, measure the HC concentration inside the surge tank for 15 minutes.
| Result | Proceed to |
| 400 ppm or more | A |
| Less than 400 ppm | B |
|
| ||||
| A | |
|
| 21.INSPECT FUEL INJECTOR ASSEMBLY |
Inspect the fuel injector assembly .
| Result | Proceed to |
| Abnormal | A |
| Normal | B |
|
| ||||
| A | ||
| ||
| ||
| 22.INSPECT THROTTLE BODY ASSEMBLY |
Check if carbon is in the airflow passage.
| Result | Proceed to |
| Carbon in passage | A |
| No carbon present | B |
|
| ||||
| A | ||
| ||
| ||
| 23.CHECK INTAKE SYSTEM |
Check the intake system for vacuum leaks .
|
| ||||
| OK | |
|
| 24.PERFORM SIMULATION TEST |
Check if the engine can be started.
| Result | Proceed to |
| Engine can be started | A |
| Engine cannot be started | B |
|
| ||||
| A | ||
| ||
| ||
| 25.CONFIRM PROBLEM SYMPTOM |
Confirm the problem symptoms.
| Problem Symptom | Suspected Area | Proceed to |
| The engine does not crank |
| A |
| Abnormal cranking speed |
| B |
| There is no initial combustion (combustion does not occur even once)*3 |
| C |
| The engine stalls after starter turnoff (engine stalls immediately after the first time the engine speed increases)*4 |
| D |
| The initial combustion and starter turnoff occur late*5 |
| E |
|
| ||||
|
| ||||
|
| ||||
|
| ||||
| A | |
|
| 26.PERFORM SIMULATION TEST |
When cranking the engine, check for a noise indicating that the starter pinion gear is extending, and check that the starter pinion gear is not spinning freely.
| Problem Symptom | Suspected Area | Proceed to |
| A noise indicating that the starter pinion gear is extending is heard and the starter pinion gear is not spinning freely*3 |
| A |
| A noise indicating that the starter pinion gear is extending is heard but the starter pinion gear is spinning freely |
| B |
| A noise indicating that the starter pinion gear is extending is not heard |
| C |
|
| ||||
|
| ||||
| A | |
|
| 27.INSPECT BATTERY |
Inspect the battery (Click here).
|
| ||||
| OK | |
|
| 28.CHECK ENGINE ASSEMBLY |
Check that the crankshaft rotates smoothly when rotating it by hand.
|
| ||||
| OK | ||
| ||
| ||
| 29.INSPECT STARTER (STARTER PINION GEAR) |
Remove the starter (Click here).
Check for starter pinion gear wear and damage.
|
| ||||
| OK | ||
| ||
| ||
| 30.INSPECT BATTERY |
Inspect the battery (Click here).
|
| ||||
| OK | |
|
| 31.INSPECT STARTER |
Inspect the starter (Click here).
|
| ||||
| OK | ||
| ||
| ||
| 32.PERFORM SIMULATION TEST |
Check the cranking speed.
| Problem Symptom | Suspected Area | Proceed to |
| Cranking speed is slow (100 rpm or less) |
| A |
| Cranking speed is fast (300 rpm or more)*1 | Engine compression loss | B |
|
| ||||
| A | |
|
| 33.INSPECT BATTERY |
Inspect the battery (Click here).
|
| ||||
| OK | |
|
| 34.CHECK ENGINE |
Check that the crankshaft rotates smoothly when rotating it by hand.
|
| ||||
| OK | ||
| ||
| ||
| 35.INSPECT FUEL INJECTOR ASSEMBLY |
Using a sound scope or screwdriver, check for an injector operating noise while cranking the engine.
|
| ||||
| OK | |
|
| 36.CHECK FUEL PRESSURE |
Inspect the fuel pressure .
|
| ||||
| OK | |
|
| 37.CHECK SPARK PLUG AND SPARK |
Check for sparks (Click here).
|
| ||||
| OK | |
|
| 38.CONFIRM VEHICLE CONDITION |
Confirm the conditions present when the malfunction occurred based on the customer problem analysis.
| Problem Symptom | Suspected Area | Proceed to |
| When the engine is stopped and a long time has passed, engine starting trouble occurs*1 | Pressure regulator is stuck open | A |
| When the engine is stopped and approximately 15 to 120 minutes have passed, engine starting trouble occurs*2 | Fuel injector leak | B |
| When the engine is stopped and approximately 2 to 3 minutes have passed, engine starting trouble occurs*3 | Failure to maintain fuel pressure by pressure regulator | A |
| Condition other than above, or there is an inconsistency in the conditions present when engine starting trouble occurs | - | C*4 |
|
| ||||
|
| ||||
| A | |
|
| 39.CHECK FUEL PRESSURE |
Attach a fuel pressure gauge and check the fuel pressure after stopping the engine.
| Result | Proceed to |
| Below 147 kPa (1.5 kgf/cm2) (5 minutes after stopping the engine) | A |
| 147 kPa (1.5 kgf/cm2) or higher (5 minutes after stopping the engine) | B*1 |
|
| ||||
| A | ||
| ||
| ||
| 40.INSPECT FUEL INJECTOR ASSEMBLY |
After stopping the engine, measure the HC concentration inside the surge tank for 15 minutes.
| Result | Proceed to |
| 400 ppm or more | A |
| Less than 400 ppm | B*1 |
|
| ||||
| A | ||
| ||
| ||
| 41.INSPECT SPARK PLUG |
Inspect the spark plugs (Click here).
|
| ||||
| OK | |
|
| 42.READ VALUE USING TECHSTREAM (ENGINE SPEED) |
Connect the Techstream to the DLC3.
Turn the ignition switch to ON.
Enter the following menus: Powertrain / Engine and ECT / Data List / Engine Speed.
Start the engine.
While running the engine, read the value of Engine Speed.
|
| ||||
| OK | |
|
| 43.CHECK TERMINAL VOLTAGE (POWER SOURCE OF IGNITION COIL ASSEMBLY) |
Check the harnesses and connectors, referring to DTC P0351 inspection procedure .
|
| ||||
| OK | |
|
| 44.CHECK HARNESS AND CONNECTOR (IGNITION COIL ASSEMBLY - ECM) |
Check harnesses and connectors, referring to DTC P0351 inspection procedure .
|
| ||||
| OK | ||
| ||
| ||
| 45.PERFORM ACTIVE TEST USING TECHSTREAM (CONTROL THE FUEL PUMP/SPEED) |
Connect the Techstream to the DLC3.
Turn the ignition switch to ON.
Enter the following menus: Powertrain / Engine and ECT / Active Test / Control the Fuel Pump/Speed.
When performing the Active Test, check for an operating sound from the fuel pump.
| Control the Fuel Pump/Speed | Specified Condition |
| ON | Operating sound heard |
| OFF | Operating sound not heard |
|
| ||||
| OK | |
|
| 46.PERFORM ACTIVE TEST USING TECHSTREAM (CONTROL THE FUEL PUMP/SPEED) |
Connect the Techstream to the DLC3.
Turn the ignition switch to ON.
Enter the following menus: Powertrain / Engine and ECT / Active Test / Control the Fuel Pump/Speed.
When performing the Active Test, check for fuel leakage from the fuel pipes.
| Result | Proceed to |
| Fuel leakage or signs of fuel leakage are present | A |
| No fuel leakage or signs of fuel leakage | B |
|
| ||||
| A | ||
| ||
| ||
| 47.READ VALUE USING TECHSTREAM (ENGINE SPEED) |
Connect the Techstream to the DLC3.
Turn the ignition switch to ON.
Enter the following menus: Powertrain / Engine and ECT / Data List / Engine Speed.
Start the engine.
While running the engine, read the value of Engine Speed.
|
| ||||
| OK | |
|
| 48.CHECK TERMINAL VOLTAGE (POWER SOURCE OF FUEL INJECTOR ASSEMBLY) |
Check the harnesses and connectors, referring to Fuel Injector Circuit inspection procedure .
|
| ||||
| OK | |
|
| 49.CHECK HARNESS AND CONNECTOR (FUEL INJECTOR ASSEMBLY - ECM) |
Check the harnesses and connectors, referring to Fuel Injector Circuit inspection procedure .
|
| ||||
| OK | ||
| ||
| ||
| 50.INSPECT MASS AIR FLOW METER |
Inspect the mass air flow meter .
|
| ||||
| OK | |
|
| 51.CHECK INTAKE SYSTEM |
Check for air leaks in the intake system [vacuum hose disconnection, cracks, damaged gaskets, etc.] .
|
| ||||
| OK | |
|
| 52.INSPECT THROTTLE BODY ASSEMBLY |
Disconnect the throttle body assembly connector.
Crank the engine and check that it starts.
| Result | Proceed to |
| Engine starts | A |
| Engine does not start | B |
Reconnect the throttle body assembly connector.
|
| ||||
| A | |
|
| 53.INSPECT THROTTLE BODY ASSEMBLY |
Check if carbon is in the air flow passage.
|
| ||||
| OK | |
|
| 54.PERFORM ACTIVE TEST USING TECHSTREAM (CONTROL THE VVT SYSTEM) |
Performing the Active Test, referring to DTC P0011 inspection procedure .
| Result | Proceed to |
| NG | A |
| OK | B |
|
| ||||
| A | ||
| ||
| ||
| 55.CHECK HARNESS AND CONNECTOR (MASS AIR FLOW METER - ECM) |
Check the harnesses and connectors, referring to DTC P0102 inspection procedure .
|
| ||||
| OK | ||
| ||
| ||
| 56.INSPECT ENGINE COOLANT TEMPERATURE SENSOR |
Inspect the engine coolant temperature sensor (Click here).
|
| ||||
| OK | |
|
| 57.CHECK HARNESS AND CONNECTOR (ENGINE COOLANT TEMPERATURE SENSOR - ECM) |
Check the harnesses and connectors, referring to DTC P0115 inspection procedure .
|
| ||||
| OK | |
|
| 58.INSPECT MASS AIR FLOW METER |
Inspect the mass air flow meter (Click here).
|
| ||||
| OK | |
|
| 59.CHECK HARNESS AND CONNECTOR (MASS AIR FLOW METER - ECM) |
Check the harnesses and connectors, referring to DTC P0102 inspection procedure .
|
| ||||
| OK | |
|
| 60.READ VALUE USING TECHSTREAM |
Connect the Techstream to the DLC3.
Turn the ignition switch to ON.
Enter the following menus: Powertrain / Engine and ECT / Data List / Long FT and Atmosphere Pressure.
| Data List Item | Result | Suspected Area | Proceed to |
| Long FT#1 | +25% or more or less than -25% |
| A |
| Atmosphere Pressure | 80 kPa(abs) [600.0 mmHg(abs)] or less (when elevation is 0 m) | ||
| Both Data List items listed above | Values are other than above | - | B |
|
| ||||
| A | |
|
| 61.PERFORM SIMULATION TEST |
Remove the EFI and ETCS fuses from the engine room relay block.
After 60 seconds or more elapse, install the EFI and ETCS fuses.
Check if the engine can be started.
| Result | Proceed to |
| Engine can be started | A |
| Engine cannot be started | B |
|
| ||||
| A | |
|
| 62.INSPECT AIR FUEL RATIO SENSOR |
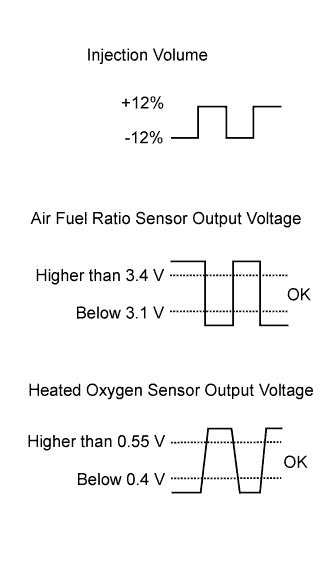 |
Connect the Techstream to the DLC3.
Start the engine.
Turn the Techstream on.
Enter the following menus: Powertrain / Engine and ECT / Data List / Fuel System Status #1.
Confirm that Fuel System Status #1 is CL.
Enter the following menus: Powertrain / Engine and ECT / Data List / AF Lambda B1S1.
Confirm that AF Lambda B1S1 is within the range of 0.95 to 1.05 when idling.
Enter the following menus: Powertrain / Engine and ECT / Active Test / Control the Injection Volume.
Read the output voltage from the air fuel ratio sensor when increasing and decreasing the fuel injection volume.
| Techstream Display | Injection Volume | Specified Condition |
| AFS Voltage B1S1 | +12% | Air fuel ratio sensor output voltage is below 3.1 V |
| -12% | Air fuel ratio sensor output voltage is higher than 3.4 V |
|
| ||||
| OK | |
|
| 63.PERFORM SIMULATION TEST |
Check if the idling speed is stable after starting the engine.
|
| ||||
| OK | ||
| ||
| ||
| 64.CHECK FUEL PRESSURE |
Inspect the fuel pressure .
|
| ||||
| OK | |
|
| 65.INSPECT SPARK PLUG |
Inspect the spark plugs .
| Result | Proceed to |
| All cylinders are normal | A |
| One cylinder is abnormal*1 | B |
| All cylinders are abnormal*2, *3 | C |
|
| ||||
|
| ||||
| A | |
|
| 66.CONFIRM VEHICLE CONDITION |
Confirm the conditions present when the malfunction occurred based on the customer problem analysis.
| Problem Symptom | Suspected Area | Proceed to |
| When the engine is stopped and a long time has passed, engine starting trouble occurs*1 | Pressure regulator is stuck open | A |
| When the engine is stopped and approximately 15 to 120 minutes have passed, engine starting trouble occurs*2 | Fuel injector leak | B |
| When the engine is stopped and approximately 2 to 3 minutes have passed, engine starting trouble occurs*3 | Failure to maintain fuel pressure by pressure regulator | A |
| Condition other than above, or there is an inconsistency in the conditions present when engine starting trouble occurs | - | C*4 |
|
| ||||
|
| ||||
| A | |
|
| 67.CHECK FUEL PRESSURE |
Attach a fuel pressure gauge and check the fuel pressure after stopping the engine.
| Result | Proceed to |
| Below 147 kPa (1.5 kgf/cm2) (5 minutes after stopping the engine) | A |
| 147 kPa (1.5 kgf/cm2) or higher (5 minutes after stopping the engine) | B*1 |
|
| ||||
| A | ||
| ||
| ||
| 68.INSPECT FUEL INJECTOR ASSEMBLY |
Clean the inside of the surge tank with compressed air.
After stopping the engine, measure the HC concentration inside the surge tank for 15 minutes.
| Result | Proceed to |
| 400 ppm or more | A |
| Less than 400 ppm | B*1 |
|
| ||||
| A | ||
| ||
| ||
| 69.PERFORM ACTIVE TEST USING TECHSTREAM (CONTROL THE FUEL PUMP/SPEED) |
Connect the Techstream to the DLC3.
Turn the ignition switch to ON.
Enter the following menus: Powertrain / Engine and ECT / Active Test / Control the Fuel Pump/Speed.
When performing the Active Test, check for fuel leakage from the fuel pipes.
| Result | Proceed to |
| Fuel leakage or signs of fuel leakage are present | A |
| No fuel leakage or signs of fuel leakage | B |
|
| ||||
| A | ||
| ||
| ||
| 70.CHECK MALFUNCTION CONDITION |
If the malfunction could not be identified during the inspections in steps 38, 39, 40 and 46, perform fuel system troubleshooting C (steps 71 to 75).
| Performed Step | Troubleshooting by System | Procedure | Proceed to |
| Steps 38, 39, 40 and 46 | Fuel system troubleshooting C | 71 to 75 | A |
If the malfunction could not be identified during the inspection in step 44, perform ignition system troubleshooting (steps 76 to 81).
| Performed Step | Troubleshooting by System | Procedure | Proceed to |
| Step 44 | Ignition system troubleshooting | 76 to 81 | B |
If the malfunction could not be identified during the inspections in steps 54 and 55, perform intake air system troubleshooting (steps 82 to 84). If engine starting trouble still occurs, perform fuel system troubleshooting A (steps 85 to 92).
| Performed Step | Troubleshooting by System | Procedure | Proceed to |
| Step 54 and 55 | Intake air system troubleshooting | 82 to 84 | C |
| Fuel system troubleshooting A | 85 to 92 |
If the malfunction could not be identified during the inspections in steps 56, 57, 58, 59, 62, 63, 65, 66, 67, 68 and 69, perform fuel system troubleshooting A (steps 93 to 100), fuel system troubleshooting B (steps 101 to 103), intake air system troubleshooting (steps 104 to 106), and ignition system troubleshooting (steps 107 to 112), in that order.
| Performed Step | Troubleshooting by System | Procedure | Proceed to |
| Steps 56, 57, 58, 59, 62, 63, 65, 66, 67, 68 and 69 | Fuel system troubleshooting A | 93 to 100 | D |
| Fuel system troubleshooting B | 101 to 103 | ||
| Intake air system troubleshooting | 104 to 106 | ||
| Ignition system troubleshooting | 107 to 112 |
|
| ||||
|
| ||||
|
| ||||
| A | |
|
| 71.INSPECT FUEL INJECTOR ASSEMBLY |
Inspect the fuel injector assembly .
|
| ||||
| OK | |
|
| 72.CHECK TERMINAL VOLTAGE (POWER SOURCE OF FUEL INJECTOR) |
Check the harnesses and connectors, referring to Fuel Injector Circuit inspection procedure .
|
| ||||
| OK | |
|
| 73.CHECK HARNESS AND CONNECTOR (FUEL INJECTOR ASSEMBLY - ECM) |
Check the harnesses and connectors, referring to Fuel Injector Circuit inspection procedure .
|
| ||||
| OK | |
|
| 74.CHECK CRANKSHAFT POSITION SENSOR |
Replace the crankshaft position sensor (Click here).
Check the engine start operation.
|
| ||||
| OK | ||
| ||
| ||
| 75.CHECK CAMSHAFT POSITION SENSOR |
Replace the camshaft position sensor (Click here).
Check the engine start operation.
|
| ||||
| OK | ||
| ||
| ||
| 76.CHECK SENSOR INSTALLATION (CRANKSHAFT POSITION SENSOR) |
Check the tightening and installation condition of the crankshaft position sensor bolt.
Check the connection of the crankshaft position sensor connector.
|
| ||||
| OK | |
|
| 77.CHECK SENSOR INSTALLATION (CAMSHAFT POSITION SENSOR) |
Check the tightening and installation condition of the camshaft position sensor bolt.
Check the connection of the camshaft position sensor connector.
|
| ||||
| OK | |
|
| 78.CHECK HARNESS AND CONNECTOR (CRANKSHAFT POSITION SENSOR - ECM) |
Check the harnesses and connectors, referring to DTC P0335 inspection procedure .
|
| ||||
| OK | |
|
| 79.CHECK HARNESS AND CONNECTOR (CAMSHAFT POSITION SENSOR - ECM) |
Check the harnesses and connectors, referring to DTC P0340 inspection procedure .
|
| ||||
| OK | |
|
| Go to step 81 |
| 80.CHECK CRANKSHAFT POSITION SENSOR |
Replace the crankshaft position sensor (Click here).
Check the engine start operation.
|
| ||||
| OK | ||
| ||
| ||
| 81.CHECK CAMSHAFT POSITION SENSOR |
Replace the camshaft position sensor (Click here).
Check the engine start operation.
|
| ||||
| OK | ||
| ||
| ||
| 82.READ VALUE USING TECHSTREAM (ISC LEARNING VALUE) |
Connect the Techstream to the DLC3.
Turn the ignition switch to ON.
Start the engine and warm it up until the engine coolant temperature stabilizes with the A/C switch and all the accessory switches off.
Enter the following menus: Powertrain / Engine and ECT / Data List / ISC Learning Value.
| Data List Item | Result | Suspected Area | Proceed to |
| ISC Learning Value | (engine displacement (liters) x 0.9) or more |
| A |
| Less than (engine displacement (liters) x 0.9) | - | B |
|
| ||||
| A | |
|
| 83.CHECK CYLINDER COMPRESSION PRESSURE |
Check the compression .
|
| ||||
| OK | ||
| ||
| ||
| 84.INSPECT ENGINE COOLANT TEMPERATURE SENSOR |
Inspect the engine coolant temperature sensor (Click here).
|
| ||||
| OK | |
|
| 85.CHECK FUEL PRESSURE |
Attach a fuel pressure gauge and check the fuel pressure when cranking the engine and after stopping the engine.
| Vehicle State | Specified Condition |
| Cranking engine | 304 to 343 kPa (3.1 to 3.5 kgf/cm2) |
| 5 minutes after stopping engine | 147 kPa (1.5 kgf/cm2) or higher |
|
| ||||
| OK | |
|
| 86.READ VALUE USING TECHSTREAM (LONG FT#1) |
Connect the Techstream to the DLC3.
Turn the ignition switch to ON.
Enter the following menus: Powertrain / Engine and ECT / Data List / Long FT#1.
| Data List Item | Result | Suspected Area | Proceed to |
| Long FT#1 | -15 to +15% |
| A |
| +15% or more, or less than -15% | Fuel injector assembly | B |
|
| ||||
| A | |
|
| 87.PERFORM SIMULATION TEST |
Check if the idling speed is stable after starting the engine and if an unstable idling speed has ever occurred in the past.
| Problem Symptom | Suspected Area | Proceed to |
| Current unstable idling speed or history of unstable idling speed | Crankshaft position sensor system | A |
| All current and past idling speeds are stable | Fuel | B |
|
| ||||
| A | |
|
| 88.CHECK SENSOR INSTALLATION (CRANKSHAFT POSITION SENSOR) |
Check the tightening and installation condition of the crankshaft position sensor bolt.
Check the connection of the crankshaft position sensor connector.
|
| ||||
| OK | |
|
| 89.CHECK HARNESS AND CONNECTOR (CRANKSHAFT POSITION SENSOR - ECM) |
Check the harnesses and connectors, referring to DTC P0335 inspection procedure .
|
| ||||
| OK | |
|
| 90.CHECK CRANKSHAFT POSITION SENSOR |
Replace the crankshaft position sensor (Click here).
Check the engine start operation.
|
| ||||
| OK | ||
| ||
| ||
| 91.PERFORM ACTIVE TEST USING TECHSTREAM (CONTROL THE FUEL PUMP/SPEED) |
Connect the Techstream to the DLC3.
Turn the ignition switch to ON.
Enter the following menus: Powertrain / Engine and ECT / Active Test / Control the Fuel Pump/Speed.
When performing the Active Test, check for fuel leakage from the fuel pipes.
| Result | Proceed to |
| Fuel leakage or signs of fuel leakage are present | A |
| No fuel leakage or signs of fuel leakage | B |
|
| ||||
| A | ||
| ||
| ||
| 92.INSPECT FUEL PUMP |
Inspect the fuel pump (Click here).
|
| ||||
| OK | ||
| ||
| ||
| 93.CHECK FUEL PRESSURE |
Attach a fuel pressure gauge and check the fuel pressure after stopping the engine.
| Result | Proceed to |
| 147 kPa (1.5 kgf/cm2) or higher (5 minutes after stopping the engine) | A |
| Below 147 kPa (1.5 kgf/cm2) (5 minutes after stopping the engine) | B |
|
| ||||
| A | |
|
| 94.READ VALUE USING TECHSTREAM (LONG FT#1) |
Connect the Techstream to the DLC3.
Turn the ignition switch to ON.
Enter the following menus: Powertrain / Engine and ECT / Data List / Long FT#1.
| Data List Item | Result | Suspected Area | Proceed to |
| Long FT#1 | -15 to +15% |
| A |
| +15% or more, or less than -15% | Fuel injector assembly | B |
|
| ||||
| A | |
|
| 95.PERFORM SIMULATION TEST |
Check if the idling speed is stable after starting the engine and if an unstable idling speed has ever occurred in the past.
| Problem Symptom | Suspected Area | Proceed to |
| Current unstable idling speed or history of unstable idling speed | Crankshaft position sensor system | A |
| All current and past idling speeds are stable | Fuel | B |
|
| ||||
| A | |
|
| 96.CHECK SENSOR INSTALLATION (CRANKSHAFT POSITION SENSOR) |
Check the tightening and installation condition of the crankshaft position sensor bolt.
Check the connection of the crankshaft position sensor connector.
|
| ||||
| OK | |
|
| 97.CHECK HARNESS AND CONNECTOR (CRANKSHAFT POSITION SENSOR - ECM) |
Check the harnesses and connectors, referring to DTC P0335 inspection procedure .
|
| ||||
| OK | |
|
| 98.CHECK CRANKSHAFT POSITION SENSOR |
Replace the crankshaft position sensor (Click here).
Check the engine start operation.
|
| ||||
| OK | ||
| ||
| ||
| 99.PERFORM ACTIVE TEST USING TECHSTREAM (CONTROL THE FUEL PUMP/SPEED) |
Connect the Techstream to the DLC3.
Turn the ignition switch to ON.
Enter the following menus: Powertrain / Engine and ECT / Active Test / Control the Fuel Pump/Speed.
When performing the Active Test, check for fuel leakage from the fuel pipes.
| Result | Proceed to |
| Fuel leakage or signs of fuel leakage are present | A |
| No fuel leakage or signs of fuel leakage | B |
|
| ||||
| A | ||
| ||
| ||
| 100.INSPECT FUEL PUMP |
Inspect the fuel pump (Click here).
|
| ||||
| OK | |
|
| 101.CHECK PURGE VSV |
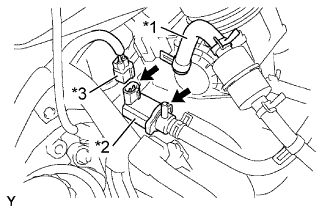 |
Disconnect the purge hose (on the canister side) of the purge VSV.
Start the engine.
Idle the engine.
Disconnect the connector of the purge VSV.
Check if air flows through the purge VSV.
| *1 | Hose (to canister) |
| *2 | Purge VSV |
| *3 | Connector |
|
| ||||
| OK | |
|
| 102.CHECK FUEL INJECTOR ASSEMBLY |
Clean the inside of the surge tank with compressed air.
After stopping the engine, measure the HC concentration inside the surge tank for 15 minutes.
| Result | Proceed to |
| 400 ppm or more | A |
| Less than 400 ppm | B |
|
| ||||
| A | ||
| ||
| ||
| 103.CHECK INTAKE VALVE |
Check if carbon is on the intake valves.
| Result | Proceed to |
| Carbon present | A |
| No carbon present | B |
|
| ||||
| A | ||
| ||
| ||
| 104.READ VALUE USING TECHSTREAM (ISC LEARNING VALUE) |
Connect the Techstream to the DLC3.
Turn the ignition switch to ON.
Start the engine, turn off all accessory switches and warm up the engine until the engine coolant temperature stabilizes.
Enter the following menus: Powertrain / Engine and ECT / Data List / ISC Learning Value.
| Data List Item | Result | Suspected Area | Proceed to |
| ISC Learning Value | (engine displacement (liters) x 0.9) or more |
| A |
| Less than (engine displacement (liters) x 0.9) | - | B |
|
| ||||
| A | |
|
| 105.CHECK CYLINDER COMPRESSION PRESSURE |
Inspect the compression .
|
| ||||
| OK | ||
| ||
| ||
| 106.INSPECT ENGINE COOLANT TEMPERATURE SENSOR |
Inspect the engine coolant temperature sensor (Click here).
|
| ||||
| OK | |
|
| 107.CHECK SENSOR INSTALLATION (CRANKSHAFT POSITION SENSOR) |
Check the tightening and installation condition of the crankshaft position sensor bolt.
Check the connection of the crankshaft position sensor connector.
|
| ||||
| OK | |
|
| 108.CHECK SENSOR INSTALLATION (CAMSHAFT POSITION SENSOR) |
Check the tightening and installation condition of the camshaft position sensor bolt.
Check the connection of the camshaft position sensor connector.
|
| ||||
| OK | |
|
| 109.CHECK HARNESS AND CONNECTOR (CRANKSHAFT POSITION SENSOR - ECM) |
Check the harnesses and connectors, referring to DTC P0335 inspection procedure .
|
| ||||
| OK | |
|
| 110.CHECK HARNESS AND CONNECTOR (CAMSHAFT POSITION SENSOR - ECM) |
Check the harnesses and connectors, referring to DTC P0340 inspection procedure .
|
| ||||
| OK | |
|
| 111.CHECK CRANKSHAFT POSITION SENSOR |
Replace the crankshaft position sensor (Click here).
Check the engine start operation.
|
| ||||
| OK | ||
| ||
| ||
| 112.CHECK CAMSHAFT POSITION SENSOR |
Replace the camshaft position sensor (Click here).
Check the engine start operation.
|
| ||||
| OK | ||
| ||
| ||

