K320 MULTIDRIVE / CVT CONTINUOUSLY VARIABLE TRANSAXLE ASSEMBLY(When Using the Engine Support Bridge) INSTALLATION
CAUTION / NOTICE / HINT
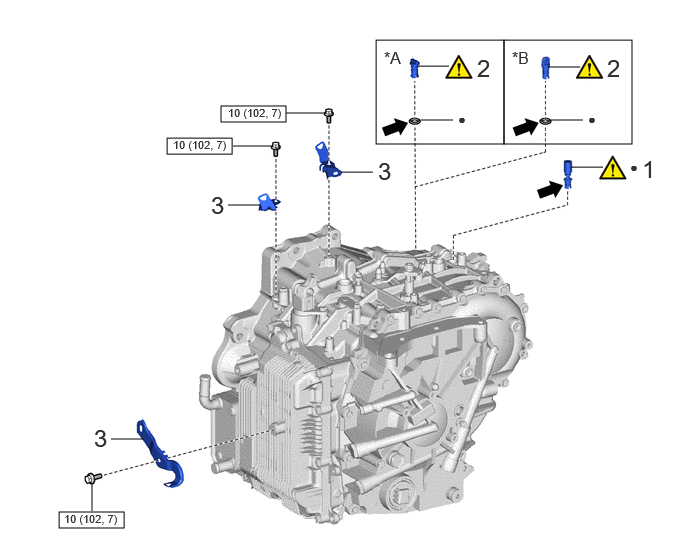
| Procedure | Part Name Code | 
|

|

|
|
|---|---|---|---|---|---|
| 1 | NO. 1 BREATHER PLUG | 35141F | ( ) |
- | - |
| 2 | TRANSMISSION CASE PLUG ASSEMBLY | 35150B | ()
|
- | - |
| 3 | WIRE HARNESS CLAMP BRACKET | - | - | - | - |
| *A | for Type A | *B | for Type B |

|
N*m (kgf*cm, ft.*lbf): Specified torque | ● | Non-reusable part |

|
Toyota Genuine CVT Fluid FE | - | - |
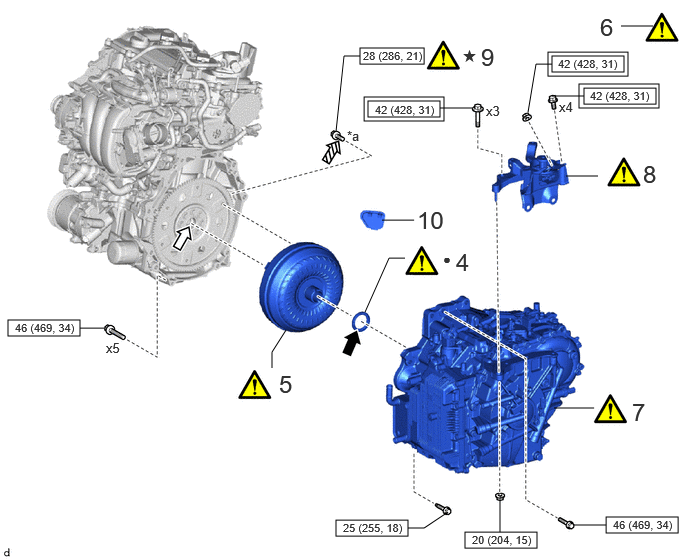
| Procedure | Part Name Code |
|
|
|
|
|---|---|---|---|---|---|
| 4 | CVT OIL PUMP TYPE T OIL SEAL | 30400E | ()
|
- | - |
| 5 | TORQUE CONVERTER ASSEMBLY | 32000A | ()
|
- | - |
| 6 | SUPPORT CONTINUOUSLY VARIABLE TRANSAXLE ASSEMBLY | 30400 | ()
|
- | - |
| 7 | INSTALL CONTINUOUSLY VARIABLE TRANSAXLE ASSEMBLY | 30400 | ()
|
- | - |
| 8 | ENGINE MOUNTING INSULATOR LH | 12372A | ()
|
- | - |
| 9 | DRIVE PLATE AND TORQUE CONVERTER ASSEMBLY SETTING BOLT | - | ()
|
- | - |
| 10 | FLYWHEEL HOUSING UNDER COVER | 11361J | - | - | - |
| *a | Black Color: x1
Silver Color: x5 |
- | - |

|
Tightening torque for "Major areas involving basic vehicle performance such as moving/turning/stopping": N*m (kgf*cm, ft.*lbf) |
|
N*m (kgf*cm, ft.*lbf): Specified torque |
| ● | Non-reusable part |
|
MP grease |

|
Clutch spline grease | 
|
Adhesive 1324 |
| ★ | Precoated part | - | - |
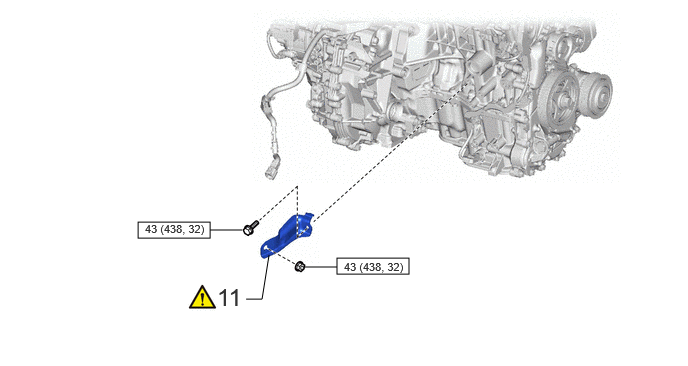
| Procedure | Part Name Code |
|
|
|
|
|---|---|---|---|---|---|
| 11 | MANIFOLD STAY | 17118 | ()
|
- | - |
|
|
N*m (kgf*cm, ft.*lbf): Specified torque | - | - |
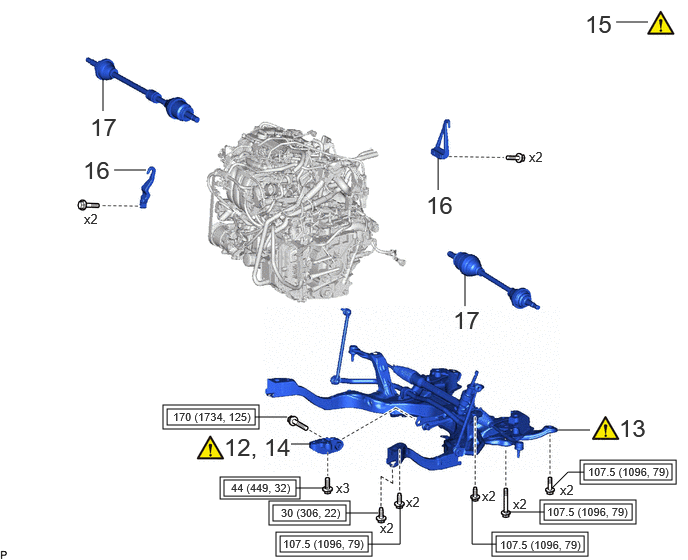
| Procedure | Part Name Code |
|
|
|
|
|---|---|---|---|---|---|
| 12 | INSTALL NO. 2 ENGINE MOVING CONTROL ROD | 12364B | ()
|
- | - |
| 13 | FRONT SUSPENSION CROSSMEMBER SUB-ASSEMBLY | 51201 | ()
|
- | - |
| 14 | CONNECT NO. 2 ENGINE MOVING CONTROL ROD | 12364B | - | - | - |
| 15 | ENGINE SUPPORT BRIDGE | - | ()
|
- | - |
| 16 | ENGINE HANGERS | - | - | - | - |
| 17 | FRONT DRIVE SHAFT ASSEMBLIES | - | - | - | - |
|
|
Tightening torque for "Major areas involving basic vehicle performance such as moving/turning/stopping": N*m (kgf*cm, ft.*lbf) | - | - |
| Procedure | Part Name Code |
|
|
|
|
|---|---|---|---|---|---|
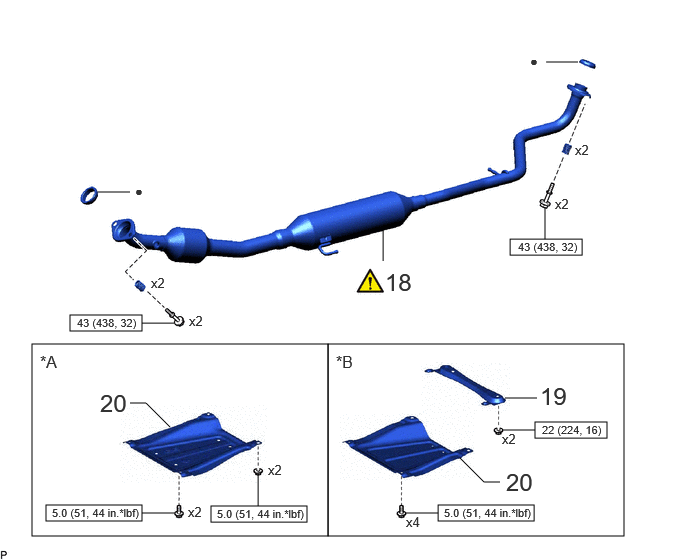
| 18 | FRONT EXHAUST PIPE ASSEMBLY | 17410 | ()
|
- | - |
| 19 | CENTER NO. 1 FLOOR BRACE | 57543C | - | - | - |
| 20 | CENTER NO. 4 ENGINE UNDER COVER | 51447D | - | - | - |
| *A | for TMC Made | *B | for TMMF Made |
|
|
N*m (kgf*cm, ft.*lbf): Specified torque | ● | Non-reusable part |
| Procedure | Part Name Code |
|
|
|
|
|---|---|---|---|---|---|
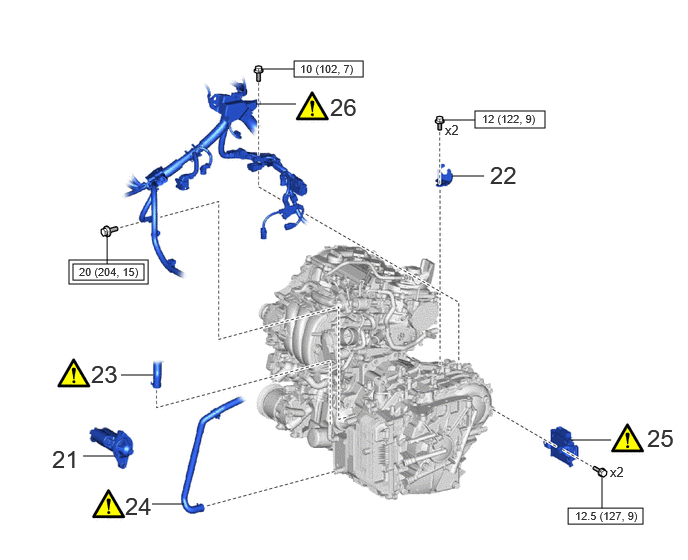
| 21 | STARTER ASSEMBLY | 28100 | - | - | - |
| 22 | NO. 1 TRANSMISSION CONTROL CABLE BRACKET | 33823 | - | - | - |
| 23 | NO. 3 WATER BY-PASS HOSE ASSEMBLY | 16290F | ()
|
- | - |
| 24 | NO. 4 WATER BY-PASS HOSE | 16281N | ()
|
- | - |
| 25 | TCM | 89535B | ()
|
- | - |
| 26 | ENGINE WIRE | 82121 | ()
|
- | - |
|
|
Tightening torque for "Major areas involving basic vehicle performance such as moving/turning/stopping": N*m (kgf*cm, ft.*lbf) |
|
N*m (kgf*cm, ft.*lbf): Specified torque |
| Procedure | Part Name Code |
|
|
|
|
|---|---|---|---|---|---|
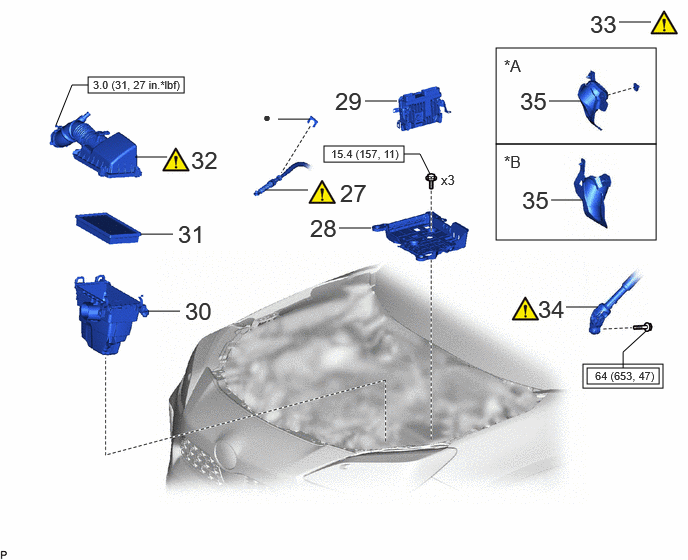
| 27 | TRANSMISSION CONTROL CABLE ASSEMBLY | 33820B | ()
|
- | - |
| 28 | BATTERY CLAMP SUB-ASSEMBLY | 74404A | - | - | - |
| 29 | ECM | 89661 | - | - | - |
| 30 | AIR CLEANER CASE SUB-ASSEMBLY | 17701 | - | - | - |
| 31 | AIR CLEANER FILTER ELEMENT SUB-ASSEMBLY | 17801 | - | - | - |
| 32 | AIR CLEANER CAP WITH AIR CLEANER HOSE | - | ()
|
- | - |
| 33 | ALIGN FRONT WHEELS FACING STRAIGHT AHEAD | - | ()
|
- | - |
| 34 | NO. 2 STEERING INTERMEDIATE SHAFT ASSEMBLY | 45260 | ()
|
- | - |
| 35 | COLUMN HOLE COVER SILENCER SHEET | 45259A | - | - | - |
| *A | for LHD | *B | for RHD |
|
|
Tightening torque for "Major areas involving basic vehicle performance such as moving/turning/stopping": N*m (kgf*cm, ft.*lbf) |
|
N*m (kgf*cm, ft.*lbf): Specified torque |
| ● | Non-reusable part | - | - |
| Procedure | Part Name Code |
|
|
|
|
|---|---|---|---|---|---|
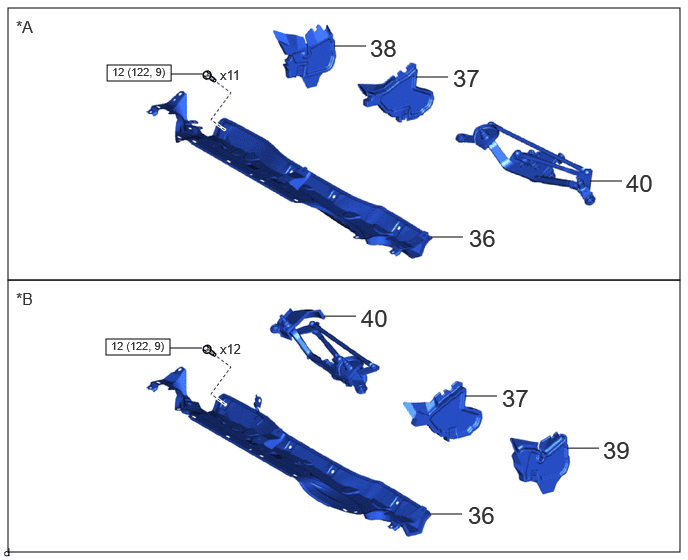
| 36 | OUTER COWL TOP PANEL SUB-ASSEMBLY | 55701J | - | - | - |
| 37 | FRONT NO. 1 VENTILATOR SEAL | 55815E | - | - | - |
| 38 | WATER GUARD PLATE RH | 55734A | - | - | - |
| 39 | WATER GUARD PLATE LH | 55735A | - | - | - |
| 40 | WINDSHIELD WIPER MOTOR AND LINK | - | - | - | - |
| *A | for LHD | *B | for RHD |
|
|
N*m (kgf*cm, ft.*lbf): Specified torque | - | - |
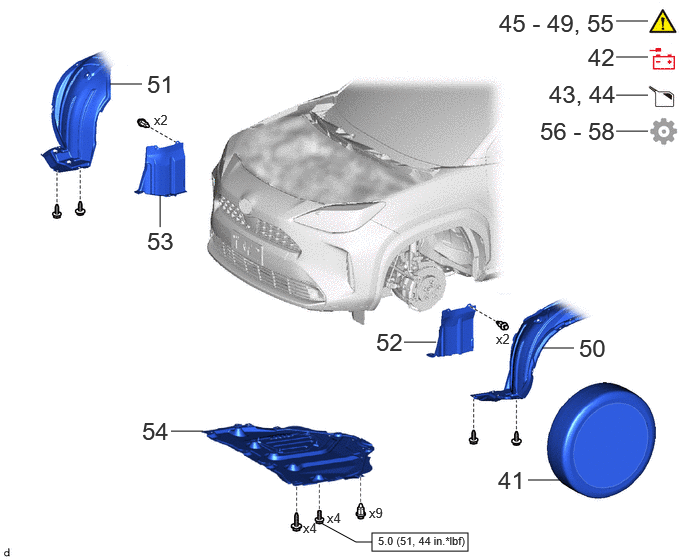
| Procedure | Part Name Code |
|
|
|
|
|---|---|---|---|---|---|
| 41 | FRONT WHEELS | - | - | - | - |
| 42 | CONNECT CABLE TO NEGATIVE AUXILIARY BATTERY TERMINAL | - | - | - | - |
| 43 | ADD ENGINE COOLANT | - | - | ()
|
- |
| 44 | ADD CONTINUOUSLY VARIABLE TRANSAXLE FLUID | - | - | ()
|
- |
| 45 | INSPECT FOR COOLANT LEAK | - | ()
|
- | - |
| 46 | INSPECT FOR CONTINUOUSLY VARIABLE TRANSAXLE FLUID LEAK | - | ()
|
- | - |
| 47 | INSPECT FOR EXHAUST GAS LEAK | - | ()
|
- | - |
| 48 | INSPECT SHIFT LEVER POSITION | - | ()
|
- | - |
| 49 | ADJUST SHIFT LEVER POSITION | - | ()
|
- | - |
| 50 | FRONT FENDER LINER LH | 53876A | - | - | - |
| 51 | FRONT FENDER LINER RH | 53875A | - | - | - |
| 52 | ENGINE UNDER COVER LH | 51442C | - | - | - |
| 53 | ENGINE UNDER COVER RH | 51441C | - | - | - |
| 54 | NO. 1 ENGINE UNDER COVER ASSEMBLY | 51410 | - | - | - |
| 55 | CHECK FOR SPEED SENSOR SIGNAL | - | ()
|
- | - |
| 56 | INSPECT AND ADJUST FRONT WHEEL ALIGNMENT | - | - | - | ()
|
| 57 | RESET MEMORY | - | - | - | ()
|
| 58 | INITIALIZATION AFTER RECONNECTING AUXILIARY BATTERY TERMINAL | - | - | - | ()
|
|
|
N*m (kgf*cm, ft.*lbf): Specified torque | - | - |
PROCEDURE

 35141F
1.INSTALL NO. 1 BREATHER PLUG
|
|
|
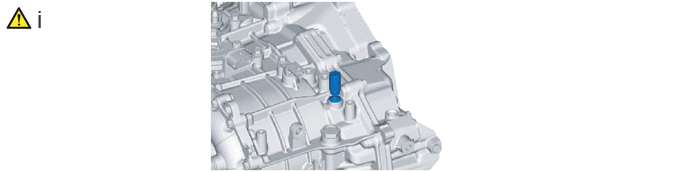
Coat the O-ring of a new No. 1 breather plug with Toyota Genuine CVT fluid FE and install it to the continuously variable transaxle assembly.
- NOTICE:
-
Be careful not to damage the O-ring.
35150B
2.INSTALL TRANSMISSION CASE PLUG ASSEMBLY
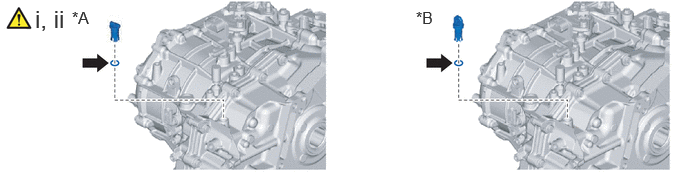
| *A | for Type A | *B | for Type B |
Coat a new O-ring with Toyota Genuine CVT fluid FE and install it to the transmission case plug assembly.
- NOTICE:
-
Ensure that the O-ring is not twisted.
Install the transmission case plug assembly to the continuously variable transaxle assembly.
- NOTICE:
-
Be careful not to damage the O-ring.
3.INSTALL WIRE HARNESS CLAMP BRACKET
- Torque:
- 10 N*m (102 kgf*cm, 7 ft.*lbf)
30400E
4.INSTALL CVT OIL PUMP TYPE T OIL SEAL
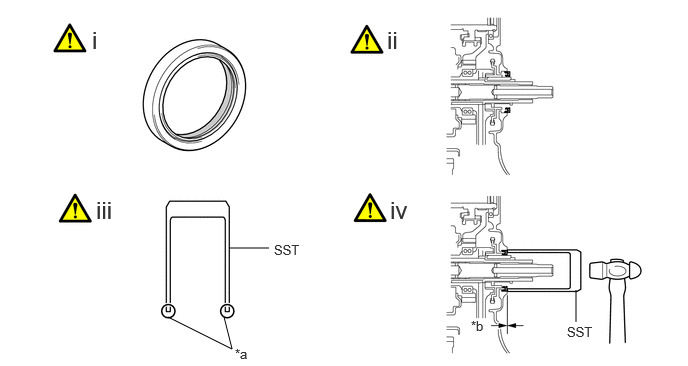
| *a | Clean | *b | Depth |

|
MP Grease | - | - |
Ensure that there is no dirt or foreign matter on your hands and then apply MP grease to the entire periphery of the lip of a new CVT oil pump type T oil seal.
Temporarily install the CVT oil pump type T oil seal by pressing it to the installation surface of the oil pump housing by hand.
- NOTICE:
-
Be sure to install the CVT oil pump type T oil seal in the correct direction.
Clean the CVT oil pump type T oil seal contact surface of SST and the area around it.
- SST
- 09223-00010
Using SST and a hammer, drive the CVT oil pump type T oil seal in evenly, until it is even with the side surface of the transaxle housing.
- Standard Depth:
-0.5 to 0.5 mm (-0.0197 to 0.0197 in.)
- NOTICE:
- ·
Drive the CVT oil pump type T oil seal in gradually, while visually checking that it is even.
·After installation, confirm that the CVT oil pump type T oil seal has been driven in until it is even with the side surface of the transaxle housing.
·Wipe any extra grease off with your hand.
32000A
5.INSTALL TORQUE CONVERTER ASSEMBLY
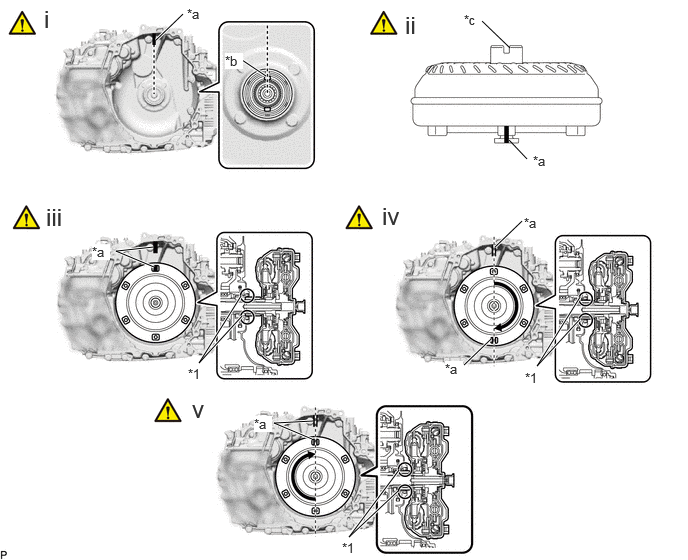
| *1 | CVT Oil Pump Type T Oil Seal | - | - |
| *a | Matchmark | *b | Key |
| *c | Groove | - | - |
Set the key at the top of the drive sprocket and put a matchmark on the transaxle housing.
Place a matchmark on the torque converter assembly so that the position of its groove is clearly indicated.
- HINT:
-
The relative positions of the groove (*c) in the sleeve and the setblock will not necessarily be the same as in the illustration.
Align the matchmark on the housing with the one on the torque converter assembly and engage the splines of the input shaft with the turbine runner splines.
- NOTICE:
- ·
Install the torque converter assembly to the input shaft while keeping it horizontal.
·Do not damage the CVT oil pump type T oil seal.
Rotate the torque converter assembly approximately 180° and engage the splines of the stator shaft with the stator assembly.
- NOTICE:
- ·
Install the torque converter assembly to the input shaft while keeping it horizontal.
·Do not damage the CVT oil pump type T oil seal.
Rotate the torque converter assembly approximately 180° again, align the matchmark on the torque converter assembly with the one on the housing and insert the groove of the torque converter assembly into the key of the drive sprocket.
- NOTICE:
- ·
Install the torque converter assembly to the input shaft while keeping it horizontal.
·Do not push the torque converter assembly excessively when rotating it.
·Do not damage the CVT oil pump type T oil seal.
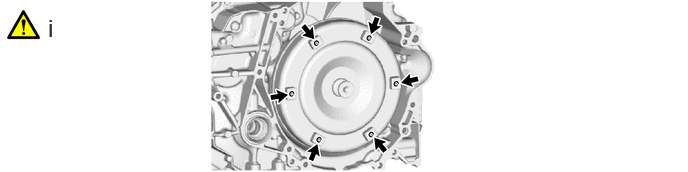
Clean the drive plate and torque converter assembly setting bolt holes.
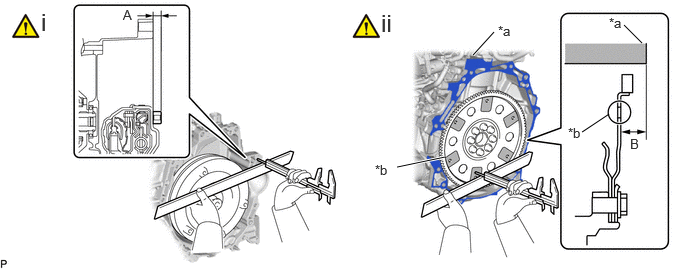
| *a | Engine Assembly Surface | *b | Drive Plate Surface |
Using a vernier caliper and straightedge, measure the dimension (A) between the set block and the end face of the continuously variable transaxle assembly.
- NOTICE:
-
Make sure to deduct the thickness of the straightedge.
Using a vernier caliper and straightedge, measure the dimension (B) between the continuously variable transaxle assembly contact surface of the engine*a and the torque converter assembly contact surfaces of the drive plate*b, and check that dimension (B) is larger than dimension (A).
- Standard:
B = A + 1 mm (0.0394 in.) or more
- NOTICE:
- ·
Make sure to deduct the thickness of the straightedge.
·If the continuously variable transaxle assembly is installed to the engine assembly with the torque converter assembly not sufficiently inserted, the torque converter assembly may be damaged.
30400
6.SUPPORT CONTINUOUSLY VARIABLE TRANSAXLE ASSEMBLY
|
|
Click here()
|
30400
7.INSTALL CONTINUOUSLY VARIABLE TRANSAXLE ASSEMBLY
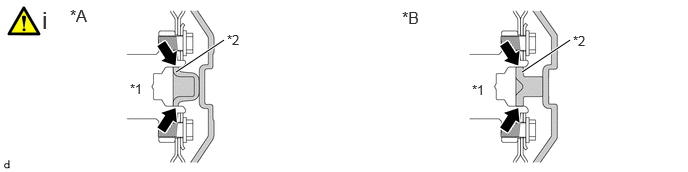
| *A | for Type A | *B | for Type B |
| *1 | Crankshaft | *2 | Torque Converter Assembly Centerpiece |
|
|
Clutch Spline Grease | - | - |
Apply clutch spline grease to the surface of the crankshaft that contacts the torque converter assembly centerpiece.
- Clutch Spline Grease:
Toyota Genuine Clutch Spline Grease or equivalent
- Maximum Grease Amount:
Approximately 1 g (0.0353 oz.)
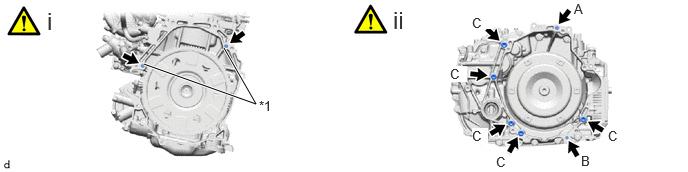
| *1 | Knock Pin | - | - |
Confirm that the 2 knock pins are installed to the engine assembly and are not damaged.
Install the continuously variable transaxle assembly to the engine assembly with the 7 bolts.
- Torque:
- for Bolt A and C : 46 N*m (469 kgf*cm, 34 ft.*lbf)
- for Bolt B : 25 N*m (255 kgf*cm, 18 ft.*lbf)
- NOTICE:
- ·
Make sure that the wire harness or similar items are not pinched between the contact surfaces.
·Do not use excess force when installing the continuously variable transaxle assembly.
·When mounting the continuously variable transaxle assembly to the engine assembly, make sure to securely fit the knock pins into the knock holes.
·Check that the torque converter assembly rotates.
·When tightening the bolts, be sure that the mating surfaces of the engine assembly and the continuously variable transaxle assembly are in close contact with one another.
- HINT:
- ·
Bolt (A), (B): Install from the continuously variable transaxle assembly side.
·Bolt (C): Install from the engine assembly side.
12372A
8.INSTALL ENGINE MOUNTING INSULATOR LH
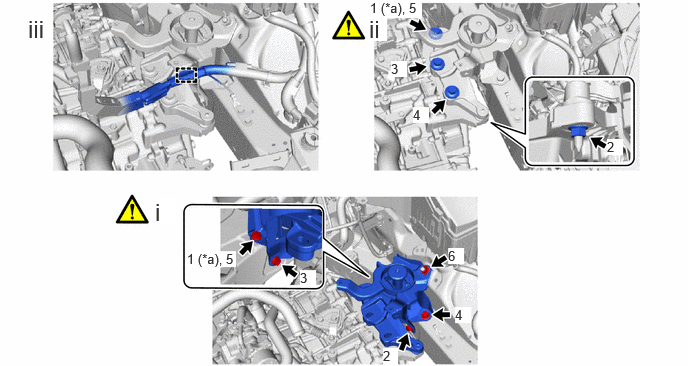
| *a | Temporarily Tighten | - | - |
Install the engine mounting insulator LH to the vehicle body with the 4 bolts and nut in the order shown in the illustration.
- Torque:
- 42 N*m (428 kgf*cm, 31 ft.*lbf)
Install the engine mounting insulator LH from the continuously variable transaxle assembly with the 3 bolts and nut in the order shown in the illustration.
- Torque:
- for Bolt : 42 N*m (428 kgf*cm, 31 ft.*lbf)
- for Nut : 20 N*m (204 kgf*cm, 15 ft.*lbf)
Engage the clamp to install the engine wire to the engine mounting insulator LH.
9.INSTALL DRIVE PLATE AND TORQUE CONVERTER ASSEMBLY SETTING BOLT
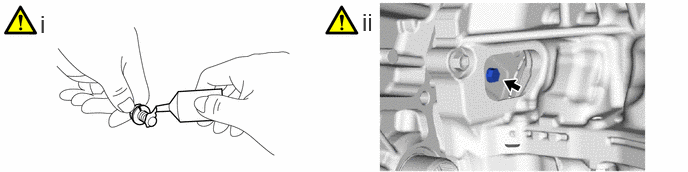
Apply a few drops of adhesive to 2 or 3 threads at the tip of each of the 6 drive plate and torque converter assembly setting bolts.
- Adhesive:
Toyota Genuine Adhesive 1324, Three Bond 1324 or equivalent
Turn the crankshaft to gain access to the installation locations of the 6 drive plate and torque converter assembly setting bolts and install each drive plate and torque converter assembly setting bolt while holding the crankshaft pulley bolt with a wrench.
- Torque:
- 28 N*m (286 kgf*cm, 21 ft.*lbf)
- NOTICE:
-
First install the black colored drive plate and torque converter assembly setting bolt, and then the remaining 5 silver colored drive plate and torque converter assembly setting bolts.
11361J
10.INSTALL FLYWHEEL HOUSING UNDER COVER
17118
11.INSTALL MANIFOLD STAY
|
|
Click here()
|
12364B
12.INSTALL NO. 2 ENGINE MOVING CONTROL ROD
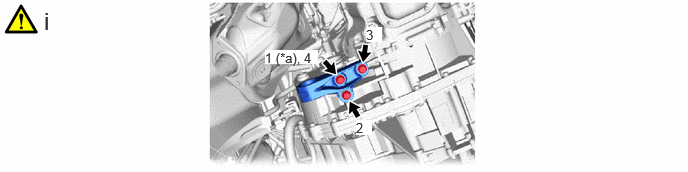
| *a | Temporarily Tighten | - | - |
Install the No. 2 engine moving control rod to the continuously variable transaxle assembly with the 3 bolts in the order shown in the illustration.
- Torque:
- 44 N*m (449 kgf*cm, 32 ft.*lbf)
51201
13.INSTALL FRONT SUSPENSION CROSSMEMBER SUB-ASSEMBLY
|
|
Click here()
|
12364B
14.CONNECT NO. 2 ENGINE MOVING CONTROL ROD
- Torque:
- 170 N*m (1734 kgf*cm, 125 ft.*lbf)
15.REMOVE ENGINE SUPPORT BRIDGE
|
|
|
16.REMOVE ENGINE HANGERS
17.INSTALL FRONT DRIVE SHAFT ASSEMBLIES
17410
18.INSTALL FRONT EXHAUST PIPE ASSEMBLY
|
|
Click here()
|
57543C
19.INSTALL CENTER NO. 1 FLOOR BRACE (for TMMF Made)
51447D
20.INSTALL CENTER NO. 4 ENGINE UNDER COVER
28100
21.INSTALL STARTER ASSEMBLY
33823
22.INSTALL NO. 1 TRANSMISSION CONTROL CABLE BRACKET
- Torque:
- 12 N*m (122 kgf*cm, 9 ft.*lbf)
16290F
23.CONNECT NO. 3 WATER BY-PASS HOSE ASSEMBLY
|
|
Click here()
|
16281N
24.CONNECT NO. 4 WATER BY-PASS HOSE
|
|
Click here()
|
89535B
25.INSTALL TCM
|
|
|
- Torque:
- 12.5 N*m (127 kgf*cm, 9 ft.*lbf)
82121
26.CONNECT ENGINE WIRE
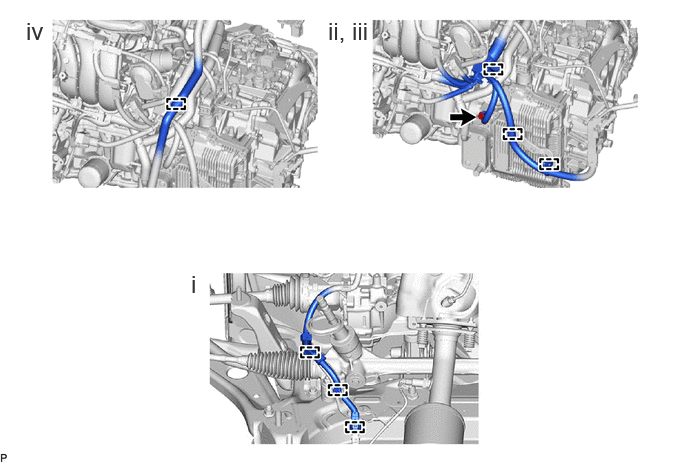
Engage the 3 clamps to install the engine wire.
Engage the 3 clamps to install the engine wire.
Connect the engine wire to the continuously variable transaxle assembly with the bolt.
- Torque:
- 20 N*m (204 kgf*cm, 15 ft.*lbf)
Install the No. 3 water by-pass hose assembly.
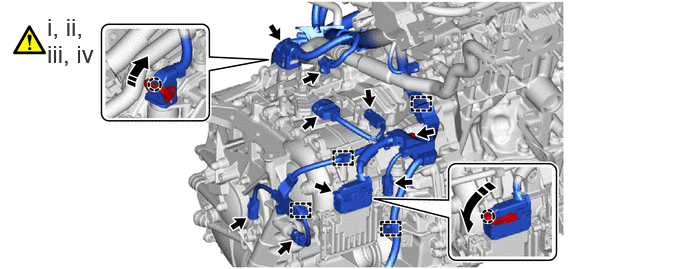

|
Rotate in this Direction | - | - |
Engage the 4 clamps to install the engine wire.
Install the engine wire to the continuously variable transaxle assembly with the bolt.
- Torque:
- 10 N*m (102 kgf*cm, 89 in.*lbf)
Connect the 6 connectors.
Connect the 2 connectors, rotate the 2 lock levers and engage the 2 claws.
- HINT:
-
Rotate the lock lever until the claw of the connector makes a click sound.
33820B
27.CONNECT TRANSMISSION CONTROL CABLE ASSEMBLY
|
|
Click here()
|
74404A
28.INSTALL BATTERY CLAMP SUB-ASSEMBLY
89661
29.INSTALL ECM
17701
30.INSTALL AIR CLEANER CASE SUB-ASSEMBLY
17801
31.INSTALL AIR CLEANER FILTER ELEMENT SUB-ASSEMBLY
32.INSTALL AIR CLEANER CAP WITH AIR CLEANER HOSE
|
|
Click here()
|
33.ALIGN FRONT WHEELS FACING STRAIGHT AHEAD
|
|
Click here()
|
45260
34.CONNECT NO. 2 STEERING INTERMEDIATE SHAFT ASSEMBLY
|
|
Click here()
|
45259A
35.INSTALL COLUMN HOLE COVER SILENCER SHEET
55701J
36.INSTALL OUTER COWL TOP PANEL SUB-ASSEMBLY
55815E
37.INSTALL FRONT NO. 1 VENTILATOR SEAL
55734A
38.INSTALL WATER GUARD PLATE RH (for LHD)
55735A
39.INSTALL WATER GUARD PLATE LH (for RHD)
40.INSTALL WINDSHIELD WIPER MOTOR AND LINK
41.INSTALL FRONT WHEELS
42.CONNECT CABLE TO NEGATIVE AUXILIARY BATTERY TERMINAL
43.ADD ENGINE COOLANT
44.ADD CONTINUOUSLY VARIABLE TRANSAXLE FLUID
45.INSPECT FOR COOLANT LEAK
46.INSPECT FOR CONTINUOUSLY VARIABLE TRANSAXLE FLUID LEAK
47.INSPECT FOR EXHAUST GAS LEAK
48.INSPECT SHIFT LEVER POSITION
for TMC Made:
Click hereDrivetrain>K320 (MULTIDRIVE / CVT)>SHIFT LEVER (for TMC Made)>ON-VEHICLE INSPECTION
for TMMF Made:
Click hereDrivetrain>K320 (MULTIDRIVE / CVT)>SHIFT LEVER (for TMMF Made)>ON-VEHICLE INSPECTION
49.ADJUST SHIFT LEVER POSITION
53876A
50.INSTALL FRONT FENDER LINER LH
53875A
51.INSTALL FRONT FENDER LINER RH
51442C
52.INSTALL ENGINE UNDER COVER LH
51441C
53.INSTALL ENGINE UNDER COVER RH
51410
54.INSTALL NO. 1 ENGINE UNDER COVER ASSEMBLY
55.CHECK FOR SPEED SENSOR SIGNAL
56.INSPECT AND ADJUST FRONT WHEEL ALIGNMENT
57.RESET MEMORY
58. INITIALIZATION AFTER RECONNECTING AUXILIARY BATTERY TERMINAL
Click hereGeneral>SETUP>WHEN DISCONNECTING OR RECONNECTING BATTERY TERMINAL>WORK PROCEDURE
- HINT:
-
When disconnecting and reconnecting the auxiliary battery, there is an automatic learning function that completes learning when the respective system is used.
-
Click hereGeneral>SETUP>WHEN DISCONNECTING OR RECONNECTING BATTERY TERMINAL>AUTOMATIC LEARNING CHART
59.PERFORM INITIALIZATION
| Parking support brake system | ()
|
| Parking assist monitor system | ()
|
| Panoramic view monitor system (w/o Advanced Park) | ()
|