1KR-FE ENGINE MECHANICAL CYLINDER HEAD GASKET INSTALLATION
PROCEDURE

 11101A
1.INSPECT CYLINDER HEAD SET BOLT
11115
2.INSTALL CYLINDER HEAD GASKET
Inspect and clean the installation hole of the cylinder block sub-assembly cylinder head set bolt.
Clean and degrease the lower surface of the cylinder head sub-assembly and upper surface of the cylinder block sub-assembly.
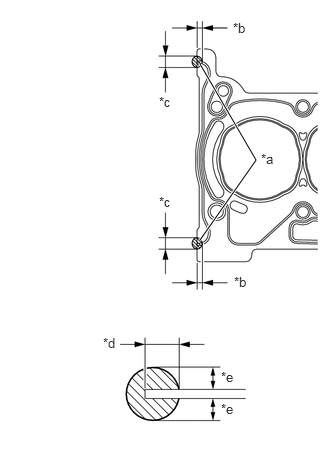
| *a | Seal Packing |
| *b | 5.0 to 7.0 mm (0.197 to 0.276 in.) |
| *c | 7.0 to 9.0 mm (0.276 to 0.354 in.) |
| *d | 5.0 to 7.0 mm (0.197 to 0.276 in.) |
| *e | 3.0 to 5.0 mm (0.118 to 0.197 in.) |
Apply seal packing to a new cylinder head gasket as shown in the illustration.
- Seal packing:
Toyota Genuine Seal Packing Black, Three Bond 1207B or equivalent
- NOTICE:
- ·
Apply seal packing to the bead on the cylinder head gasket.
·Install the cylinder head within 3 minutes and tighten the bolts within 15 minutes after applying seal packing.
·Do not start the engine for at least 2 hours after installation.
Place the cylinder head gasket onto the cylinder block sub-assembly.
11101
3.INSTALL CYLINDER HEAD SUB-ASSEMBLY
- NOTICE:
-
Place the cylinder head sub-assembly gently in order not to damage the gasket.
Place the cylinder head sub-assembly on the cylinder block sub-assembly.
Install the 8 plate washers to the cylinder head sub-assembly.
- NOTICE:
-
Do not drop the washers into the cylinder head sub-assembly.
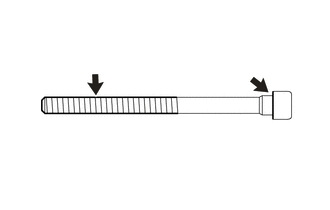
Apply engine oil to the threads and seating surface of each cylinder head set bolt.
Temporarily install the 8 cylinder head set bolts to the cylinder head sub-assembly.
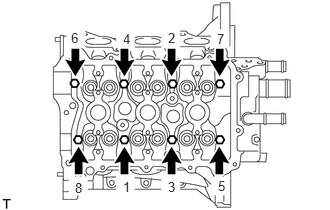
Using an 8 mm bi-hexagon wrench, uniformly tighten the 8 cylinder head bolts in several steps in the sequence shown in the illustration.
- Torque:
- 32 N*m (326 kgf*cm, 24 ft.*lbf)
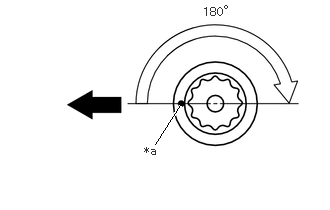
| *a | Paint Mark |
Mark the front of each cylinder head set bolt with paint.
Tighten the cylinder head set bolts by an additional 180° as shown in the illustration.
Check that the paint marks are now at a 180° angle from the front.
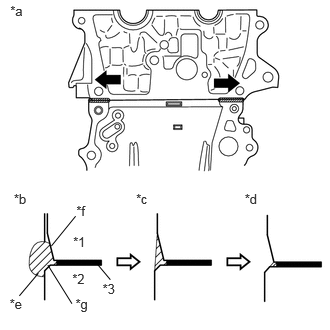
| *1 | Cylinder Head Sub-assembly |
| *2 | Cylinder Block Sub-assembly |
| *3 | Cylinder Head Gasket |
| *a | Direction to wipe off |
| *b | Before wiping with scraper |
| *c | After wiping with scraper |
| *d | After wiping with cloth |
| *e | Seal Packing |
| *f | Chamfer of cylinder head sub-assembly |
| *g | Chamfer of cylinder block sub-assembly |
Wipe off any seal packing that has seeped out from the contact surface between the cylinder head sub-assembly and cylinder block sub-assembly.
- NOTICE:
- ·
Be sure to wipe off the seal packing from inside to outside, parallel to the joint line.
·Be sure to avoid clogging the bolt holes when wiping off the seal packing.
13512
4.INSTALL NO. 2 CAMSHAFT
13511
5.INSTALL CAMSHAFT
15678A
6.INSTALL OIL CONTROL VALVE FILTER
7.INSTALL CAMSHAFT BEARING CAP
13520
8.INSTALL CAMSHAFT TIMING SPROCKET ASSEMBLY
9.INSTALL BRACKET
13566B
10.INSTALL TIMING CHAIN GUIDE
13521
11.INSTALL CRANKSHAFT TIMING SPROCKET
13506
12.INSTALL CHAIN SUB-ASSEMBLY
13591
13.INSTALL TIMING CHAIN TENSION ARM
13540
14.INSTALL NO. 1 CHAIN TENSIONER ASSEMBLY
11302A
15.INSTALL TIMING CHAIN COVER OIL SEAL
11310
16.INSTALL TIMING CHAIN COVER SUB-ASSEMBLY
13471
17.INSTALL CRANKSHAFT PULLEY
12101
18.INSTALL OIL PAN SUB-ASSEMBLY
Remove any old seal packing remaining on the sealing surfaces before applying seal packing.
Clean the contact surfaces of the oil pan sub-assembly and cylinder block sub-assembly, and confirm that no oil, moisture or other foreign matter on the surfaces.
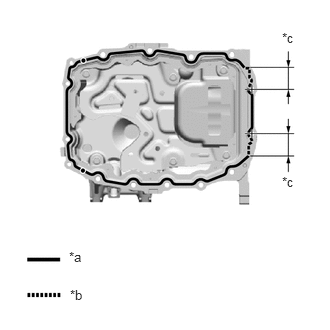
| *a | Continuous Line Area (3.0 to 4.0 mm (0.118 to 0.157 in.)) |
| *b | Dashed Line Area (5.0 to 6.0 mm (0.197 to 0.236 in.)) |
| *c | 39.5 mm (1.56 in.) |
Apply seal packing to the oil pan sub-assembly as shown in the illustration.
- Seal Packing:
Toyota Genuine Seal Packing Black, Three Bond 1207B or equivalent
- NOTICE:
- ·
Apply seal packing to the contact surfaces between the timing chain cover sub-assembly and cylinder block sub-assembly, and between the rear engine oil seal retainer and cylinder block sub-assembly.
·Install the oil pan sub-assembly within 3 minutes and tighten the bolts within 10 minutes of applying seal packing.
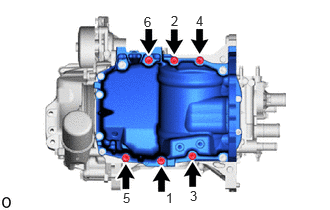
Install the 6 bolts in the order shown in the illustration.
- Torque:
- 24 N*m (245 kgf*cm, 18 ft.*lbf)
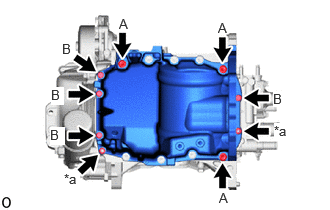
| *a | Nut |
Install the 7 bolts and 2 nuts.
- Torque:
- Bolt (A) : 24 N*m (245 kgf*cm, 18 ft.*lbf)
- Bolt (B), Nut : 10 N*m (102 kgf*cm, 7 ft.*lbf)
16268L
19.INSTALL WATER BY-PASS PIPE
11213
20.INSTALL CYLINDER HEAD COVER GASKET
11201
21.INSTALL CYLINDER HEAD COVER SUB-ASSEMBLY
19500D
22.INSTALL NO. 1 IGNITION COIL
11301K
23.INSTALL CRANKSHAFT POSITION SENSOR
11101J
24.INSTALL CAMSHAFT TIMING OIL CONTROL VALVE ASSEMBLY (for Intake Side)
11101J
25.INSTALL CAMSHAFT TIMING OIL CONTROL VALVE ASSEMBLY (for Exhaust Side)
17140A
26.INSTALL EXHAUST MANIFOLD (TWC: Catalyst)
17118
27.INSTALL MANIFOLD STAY
89481B
28.INSTALL DIFFERENTIAL PRESSURE SENSOR (w/ Differential Pressure Sensor)
11409
29.INSTALL ENGINE OIL LEVEL DIPSTICK GUIDE
15301
30.INSTALL ENGINE OIL LEVEL DIPSTICK
29603B
31.INSTALL OIL LEVEL GAUGE GUIDE OIL HOSE
16261G
32.INSTALL WATER BY-PASS HOSE ASSEMBLY
33.INSTALL ENGINE HANGER
34.REMOVE ENGINE FROM ENGINE STAND