1KR-FE ENGINE MECHANICAL ENGINE UNIT REASSEMBLY
PROCEDURE

 11445
1.INSTALL CYLINDER BLOCK WATER JACKET SPACER
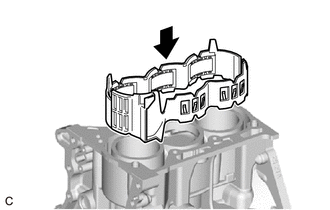
Install the new cylinder block water jacket spacer LH and new cylinder block water jacket spacer RH to the cylinder block sub-assembly.
11115
2.INSTALL CYLINDER HEAD GASKET
11101
3.INSTALL CYLINDER HEAD SUB-ASSEMBLY
13751
4.INSTALL VALVE LIFTER
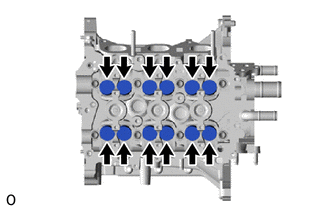
Apply engine oil to the circumference of the 12 valve lifters.
Install the 12 valve lifters to the lifter holes.
- NOTICE:
-
Check that the valve lifters turn smoothly after installing them.
5.INSTALL STUD BOLT
- HINT:
-
Perform this procedure only when replacement of the stud bolt is necessary.
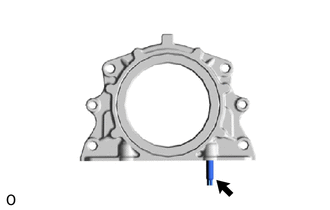
Using an E6 "TORX" socket wrench, install the stud bolt to the rear engine oil seal retainer.
- Torque:
- 5.0 N*m (51 kgf*cm, 44 in.*lbf)
11381A
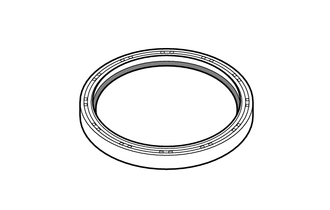
6.INSTALL REAR ENGINE OIL SEAL

|
Apply engine oil |
Apply engine oil to the lip of a new rear engine oil seal.
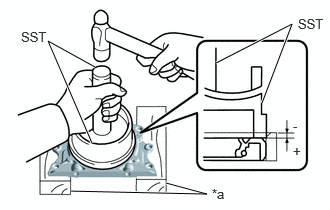
| *a | Wooden Block |
Using SST and wooden blocks, tap in the rear engine oil seal.
- SST
- 09223-15020
09950-70010 (09951-07200)
- Standard Depth:
-0.5 to 1.0 mm (-0.0197 to 0.0394 in.)
- NOTICE:
- ·
Keep the lip free from foreign matter.
·Do not tap in the rear engine oil seal at an angle.
11381
7.INSTALL REAR ENGINE OIL SEAL RETAINER
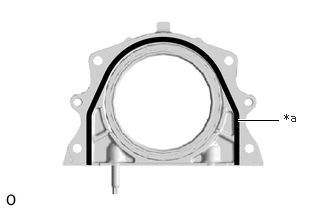
| *a | Seal Packing (3.0 to 4.0 mm (0.118 to 0.157 in.)) |
Apply a continuous bead of seal packing to the rear engine oil seal retainer as shown in the illustration.
- Seal Packing:
Toyota Genuine Seal Packing Black, Three Bond 1207B or equivalent
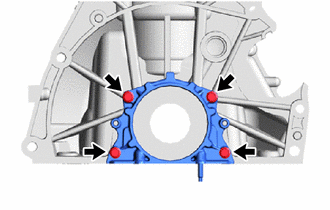
Install the rear engine oil seal retainer with the 4 bolts.
- Torque:
- 10 N*m (102 kgf*cm, 7 ft.*lbf)
- NOTICE:
- ·
Install the rear engine oil seal retainer within 3 minutes and tighten the bolts within 10 minutes of applying seal packing.
·Do not add engine oil for at least 2 hours after installation.
·Do not start the engine for at least 2 hours after installation.
13511
8.INSTALL CAMSHAFT
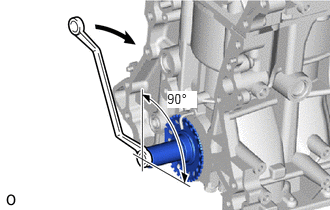

|
Turn |
Before installing the camshaft, set the No. 1 piston to TDC/exhaust, and then turn the crankshaft approximately 90° clockwise so that a lifted valve and piston do not touch each other when the camshaft and No. 2 camshaft are installed.
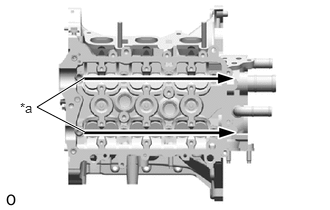
| *a | Apply engine oil |
Apply engine oil to the contact areas of the cams and journals of the camshaft and No. 2 camshaft.
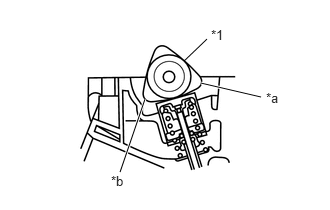
| *1 | Camshaft |
| *a | No. 1 Cylinder |
| *b | No. 3 Cylinder |
Install the camshaft to the cylinder head sub-assembly as shown in the illustration.
13512
9.INSTALL NO. 2 CAMSHAFT
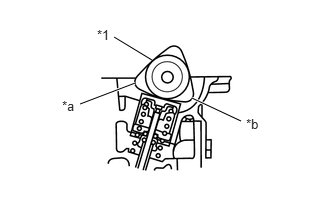
| *1 | No. 2 Camshaft |
| *a | No. 1 Cylinder |
| *b | No. 2 Cylinder |
Install the No. 2 camshaft to the cylinder head sub-assembly as shown in the illustration.
15678A
10.INSTALL OIL CONTROL VALVE FILTER
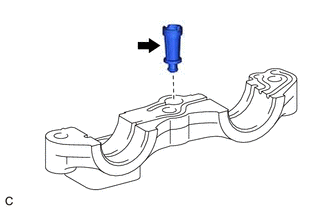
Install the oil control valve filter to the No. 1 camshaft bearing cap.
11.INSTALL CAMSHAFT BEARING CAP
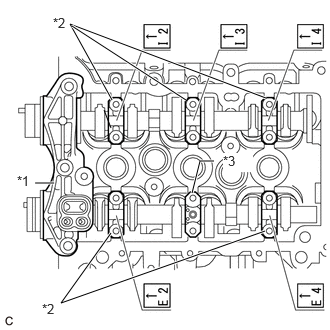
| *1 | No. 1 Camshaft Bearing Cap |
| *2 | No. 2 Camshaft Bearing Cap |
| *3 | No. 3 Camshaft Bearing Cap |
Set the No. 1 camshaft bearing cap, 5 No. 2 camshaft bearing caps and No. 3 camshaft bearing cap.
- NOTICE:
- ·
Install the camshaft bearing caps with the front marks facing the front of the engine.
·Install the bolts to the correct positions by referring to the numbers inscribed on the bolts and the following table.
| Installation Position | Inscribed No. |
|---|---|
| Intake No. 1 cylinder | I2 |
| Intake No. 2 cylinder | I3 |
| Intake No. 3 cylinder | I4 |
| Exhaust No. 1 cylinder | E2 |
| Exhaust No. 2 cylinder | - |
| Exhaust No. 3 cylinder | E4 |
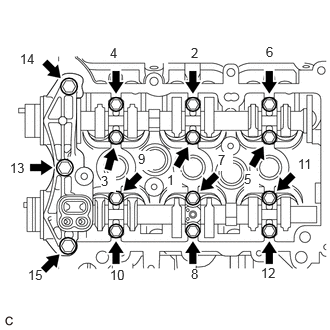
Install the 15 bolts in the order shown in the illustration.
- Torque:
- No. 1 Camshaft Bearing Cap : 15 N*m (153 kgf*cm, 11 ft.*lbf)
- No. 2 Camshaft Bearing Cap and No. 3 Camshaft Bearing Cap : 12.5 N*m (127 kgf*cm, 9 ft.*lbf)
13070A
12.INSTALL CAMSHAFT TIMING EXHAUST GEAR ASSEMBLY
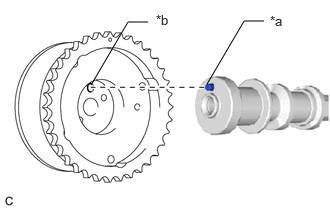
| *a | Straight Pin |
| *b | Straight Pin Hole |
Fit the camshaft timing exhaust gear assembly and No. 2 camshaft together with the straight pin and straight pin hole aligned as shown in the illustration.
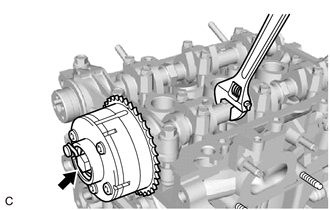
Using a wrench to hold the hexagonal portion of the No. 2 camshaft, tighten the bolt to install the camshaft timing exhaust gear assembly.
- Torque:
- 54 N*m (551 kgf*cm, 40 ft.*lbf)
13520
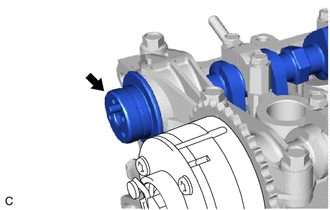
13.INSTALL CAMSHAFT TIMING SPROCKET ASSEMBLY
|
|
Apply engine oil |
Apply engine oil to the camshaft timing sprocket assembly installation portion of the camshaft.
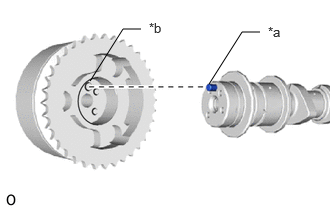
| *a | Straight Pin |
| *b | Straight Pin Hole |
Fit the camshaft timing sprocket assembly and camshaft together with the straight pin and straight pin hole aligned as shown in the illustration.
- NOTICE:
- ·
Slightly turn the camshaft timing sprocket assembly to make sure that the knock pin is securely inserted after installing the camshaft timing sprocket assembly.
·The end surface of the camshaft timing sprocket assembly may be damaged if the camshaft timing sprocket assembly is turned with excessive force when the knock pin is not inserted into the pin hole.
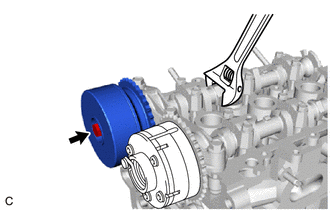
Using a wrench to hold the hexagonal portion of the camshaft, tighten the bolt to install the camshaft timing sprocket assembly.
- Torque:
- 54 N*m (551 kgf*cm, 40 ft.*lbf)
14.INSTALL BRACKET
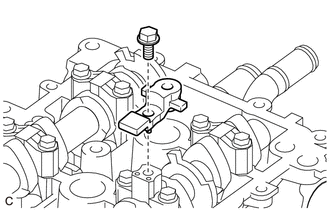
Install the bracket to the No. 3 camshaft bearing cap with the bolt.
- Torque:
- 10 N*m (102 kgf*cm, 7 ft.*lbf)
13411C
15.INSTALL CRANKSHAFT STRAIGHT PIN
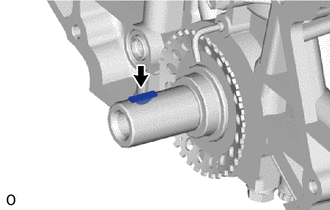
Install the crankshaft straight pin into the crankshaft groove.
13521
16.INSTALL CRANKSHAFT TIMING SPROCKET
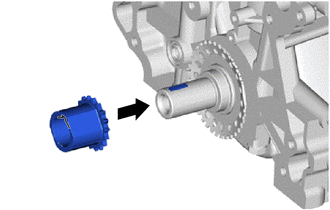
Align the groove of the crankshaft timing sprocket with the key of the crankshaft and install the crankshaft timing sprocket.
13566B
17.INSTALL TIMING CHAIN GUIDE
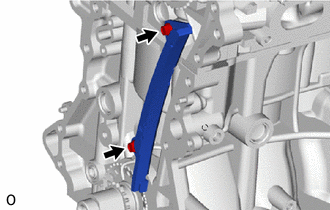
Install the timing chain guide to the cylinder head sub-assembly and cylinder block sub-assembly with the 2 bolts.
- Torque:
- 9.0 N*m (92 kgf*cm, 80 in.*lbf)
13506
18.INSTALL CHAIN SUB-ASSEMBLY
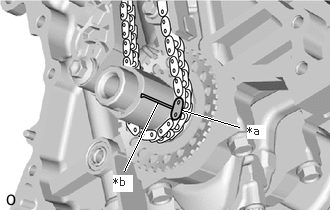
| *a | Mark Plate (Yellow) |
| *b | Timing Mark |
Align the mark plate (yellow) with the timing mark of the crankshaft timing sprocket and install the chain sub-assembly as shown in the illustration.
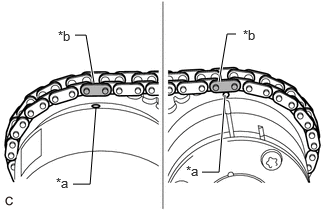
| *a | Timing Mark |
| *b | Mark Plate (Pink) |
Align the 2 mark plates (pink) with the timing marks of the camshaft timing sprocket assembly and camshaft timing exhaust gear assembly, and install the chain sub-assembly as shown in the illustration.
13591
19.INSTALL TIMING CHAIN TENSION ARM
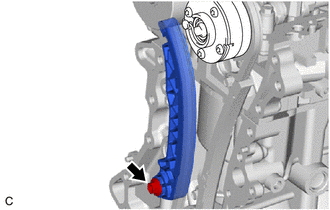
Install the timing chain tension arm to the cylinder block sub-assembly with the bolt.
- Torque:
- 19 N*m (194 kgf*cm, 14 ft.*lbf)
13540
20.INSTALL NO. 1 CHAIN TENSIONER ASSEMBLY
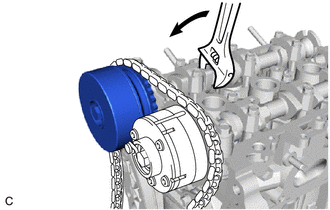
|
|
Turn |
Using a wrench, slightly turn the hexagonal portion of the camshaft (intake side) counterclockwise so that there is some slack in the chain sub-assembly on the No. 1 chain tensioner assembly side.
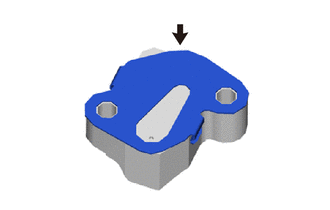
Install a new chain tensioner gasket to the No. 1 chain tensioner assembly.
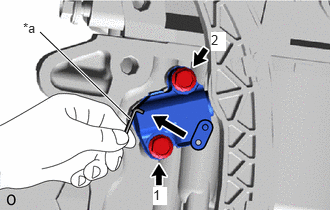
| *a | Hexagon Wrench |
Temporarily install the No. 1 chain tensioner assembly and chain tensioner gasket to the cylinder block sub-assembly with the 2 bolts and then tighten the 2 bolts in the order shown in the illustration.
- Torque:
- 10.5 N*m (107 kgf*cm, 8 ft.*lbf)
Remove the hexagon wrench, turn the crankshaft 2 complete revolutions and adjust the chain tension.
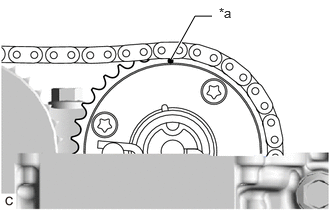
| *a | Timing Mark |
Make sure that the timing mark of the camshaft timing exhaust gear assembly is at the top with the chain sub-assembly tensioned (set No. 1 piston to TDC/ exhaust).
11302A
21.INSTALL TIMING CHAIN COVER OIL SEAL
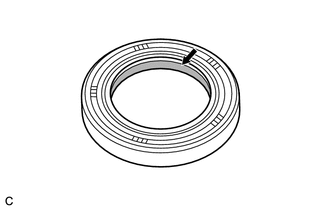

|
Apply engine oil |
Apply engine oil to the lip of a new timing chain cover oil seal.
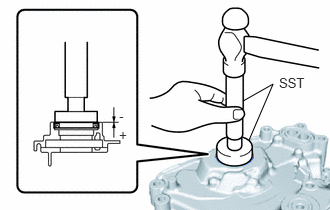
Using SST and a hammer, tap in the timing chain cover oil seal as shown in the illustration.
- SST
- 09950-60010 (09951-00500, 09952-06010)
09950-70010 (09951-07200)
- Standard Depth:
-1.0 to 0.5 mm (-0.0394 to 0.0197 in.)
- NOTICE:
-
Do not tap in the timing chain cover oil seal at an angle.
22.INSTALL STUD BOLT
- HINT:
-
Perform this procedure only when replacement of the stud bolt is necessary.
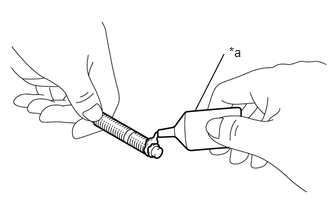
| *a | Adhesive 1324 |
Apply adhesive to 2 or 3 threads (timing chain cover sub-assembly side) of the stud bolt.
- Adhesive:
Toyota Genuine Adhesive 1324, Three Bond 1324 or equivalent
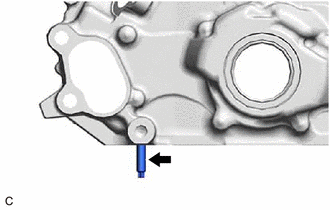
Install the stud bolt to the timing chain cover sub-assembly.
- Torque:
- 5.0 N*m (51 kgf*cm, 44 in.*lbf)
12205B
23.INSTALL VENTILATION CASE SUB-ASSEMBLY
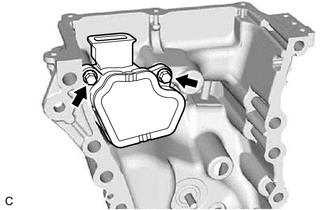
Install the ventilation case sub-assembly to the timing chain cover sub-assembly with the 2 bolts.
- Torque:
- 10 N*m (102 kgf*cm, 7 ft.*lbf)
11310
24.INSTALL TIMING CHAIN COVER SUB-ASSEMBLY
25.INSTALL TIMING CHAIN COVER DRAIN COCK PLUG
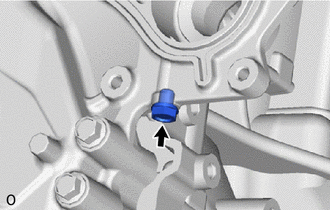
Install a new gasket and the timing chain cover drain cock plug.
- Torque:
- 17.5 N*m (178 kgf*cm, 13 ft.*lbf)
11302R
26.INSTALL TIMING GEAR COVER TIGHT PLUG
13471
27.INSTALL CRANKSHAFT PULLEY
15671
28.INSTALL OIL FILTER BRACKET
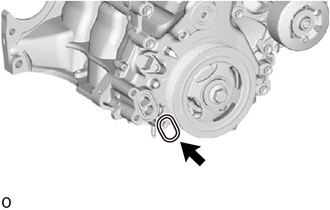
Install the oil filter bracket gasket to the timing chain cover sub-assembly.
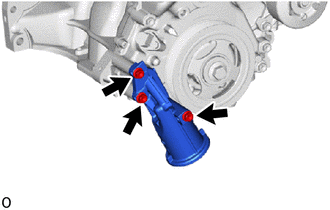
Install the oil filter bracket to the timing chain cover sub-assembly with the 3 bolts.
- Torque:
- 24 N*m (245 kgf*cm, 18 ft.*lbf)
15601
29.INSTALL OIL FILTER SUB-ASSEMBLY
16331A
30.INSTALL THERMOSTAT
16321
31.INSTALL WATER INLET
15104
32.INSTALL OIL STRAINER SUB-ASSEMBLY
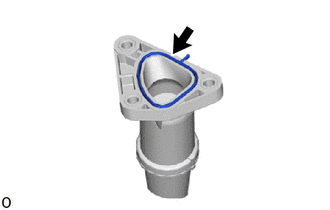
Install a new oil strainer gasket to the oil strainer sub-assembly.
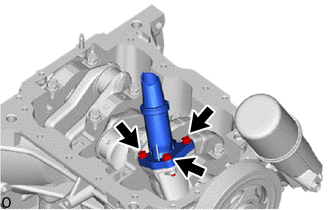
Install the oil strainer sub-assembly to the timing chain cover sub-assembly with the 3 bolts.
- Torque:
- 8.5 N*m (87 kgf*cm, 75 in.*lbf)
33.INSTALL STRAIGHT PIN
- HINT:
-
Perform this procedure only when replacement of the straight pin is necessary.
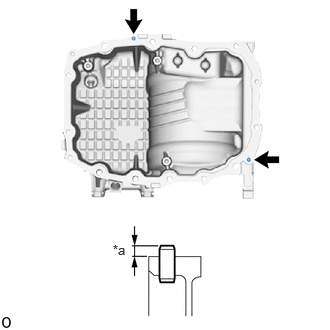
| *a | Protrusion Height |
Using a plastic hammer, tap in 2 new straight pins to the specified protrusion height.
- Protrusion Height:
3.0 to 5.0 mm (0.118 to 0.197 in.)
12121
34.INSTALL NO. 1 OIL PAN BAFFLE PLATE
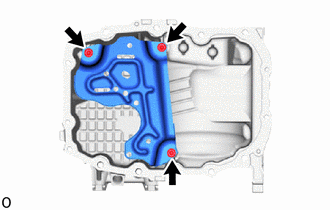
Temporarily install the No. 1 oil pan baffle plate to the oil pan sub-assembly with the 3 bolts.
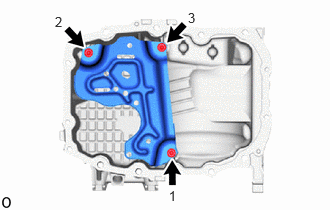
Uniformly tighten the No. 1 oil pan baffle plate in the order shown in the illustration.
- Torque:
- 10 N*m (102 kgf*cm, 7 ft.*lbf)
12101
35.INSTALL OIL PAN SUB-ASSEMBLY
12101A
36.INSTALL OIL PAN DRAIN PLUG
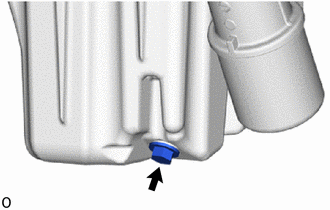
Install a new oil pan drain plug gasket and the oil pan drain plug.
- Torque:
- 29.5 N*m (301 kgf*cm, 22 ft.*lbf)
37.INSTALL GROMMET
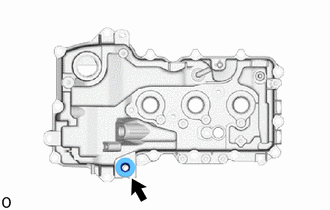
Install the grommet to the cylinder head cover sub-assembly.
12204A
38.INSTALL VENTILATION SYSTEM GROMMET
12204
39.INSTALL PCV VALVE (VENTILATION VALVE SUB-ASSEMBLY)
12261
40.INSTALL VENTILATION HOSE
11213
41.INSTALL CYLINDER HEAD COVER GASKET
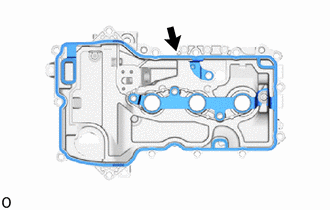
Install a new cylinder head cover gasket to the cylinder head cover sub-assembly.
11201
42.INSTALL CYLINDER HEAD COVER SUB-ASSEMBLY
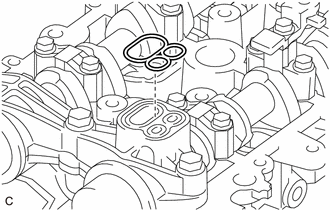
Install a new camshaft bearing cap oil hole gasket.
Clean the cylinder head cover sub-assembly, cylinder head sub-assembly and timing chain cover sub-assembly.
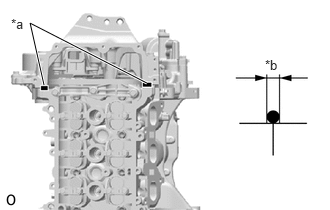
| *a | Seal Packing |
| *b | Diameter |
Apply a continuous bead of seal packing to the contact surface between the cylinder head sub-assembly and timing chain cover sub-assembly as shown in the illustration.
- Seal Packing:
Toyota Genuine Seal Packing Black, Three Bond 1207B or equivalent
- Standard Diameter:
3.0 to 4.0 mm (0.118 to 0.157 in.)
- NOTICE:
-
Install the timing chain cover sub-assembly within 3 minutes and tighten the bolts within 10 minutes of applying seal packing.
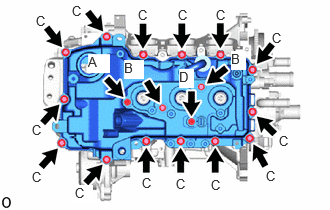
Temporarily install the cylinder head cover sub-assembly with a new bolt (A), the 2 bolts (B), 14 bolts (C) and camshaft position sensor (for Exhaust Side) (D) in the order shown in the illustration.
- Bolt Length:
Item Length Bolt (A) 30 mm (0.0984 in.) Bolt (B) 60 mm (2.36 in.) Bolt (C) 23.5 mm (0.925 in.) Bolt (D) 25 mm (0.984 in.)
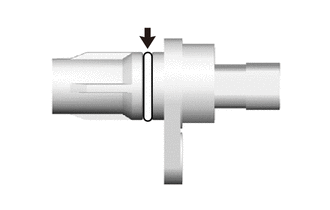
Apply a light coat of engine oil to the O-ring of the camshaft position sensor.
Temporarily install the camshaft position sensor to the cylinder head cover sub-assembly with the bolt (D).
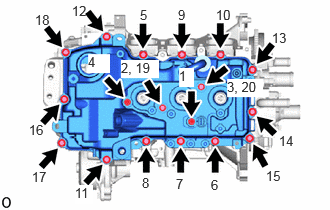
Fully tighten the 18 bolts in the order shown in the illustration.
- Torque:
- 7.7 N*m (79 kgf*cm, 68 in.*lbf)
12108
43.INSTALL OIL FILLER CAP SUB-ASSEMBLY
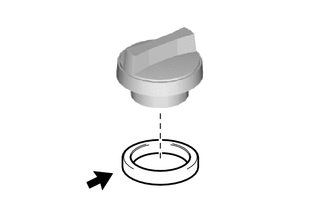
Install the oil filler cap gasket to the oil filler cap sub-assembly.
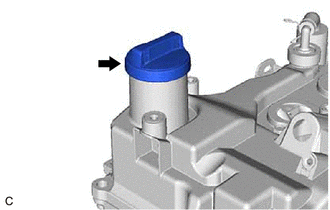
Install the oil filler cap sub-assembly.
15678A
44.INSTALL OIL CONTROL VALVE FILTER
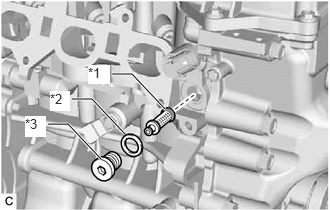
| *1 | Oil Control Valve Filter |
| *2 | Gasket |
| *3 | Head Straight Screw Plug |
Install the oil control valve filter and new gasket to the head straight screw plug.
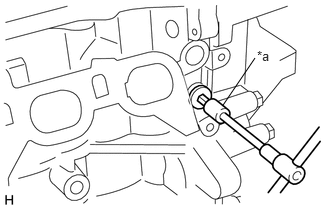
| *a | 8 mm Hexagon Socket Wrench |
Using an 8 mm hexagon socket wrench, install the head straight screw plug with oil control valve filter.
- Torque:
- 24.5 N*m (250 kgf*cm, 18 ft.*lbf)
89615
45.INSTALL KNOCK CONTROL SENSOR
83530
46.INSTALL ENGINE OIL PRESSURE SWITCH ASSEMBLY
11301K
47.INSTALL CRANKSHAFT POSITION SENSOR
11101J
48.INSTALL CAMSHAFT TIMING OIL CONTROL VALVE ASSEMBLY (for Intake Side)
11101J
49.INSTALL CAMSHAFT TIMING OIL CONTROL VALVE ASSEMBLY (for Exhaust Side)
89422A
50.INSTALL ENGINE COOLANT TEMPERATURE SENSOR
11101E
51.INSTALL CAMSHAFT POSITION SENSOR (for Intake Side)
19100P
52.INSTALL SPARK PLUG
11409
53.INSTALL ENGINE OIL LEVEL DIPSTICK GUIDE
Apply a small amount of engine oil to a new O-ring.
Install the O-ring to the engine oil level dipstick guide.
Install the oil level dipstick guide to the cylinder head sub-assembly and oil pan sub-assembly with the bolt.
- Torque:
- 10 N*m (102 kgf*cm, 7 ft.*lbf)
15301
54.INSTALL ENGINE OIL LEVEL DIPSTICK
Install the oil level dipstick sub-assembly to the oil level dipstick guide.
16268L
55.INSTALL WATER BY-PASS PIPE
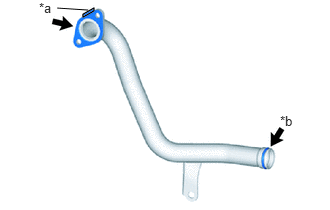
| *a | Folded Tab |
| *b | Apply water |
Install 2 new water by-pass pipe gaskets to the water by-pass pipe as shown in the illustration.
- NOTICE:
-
Install the water by-pass pipe gasket with its folded tab towards the water by-pass pipe.
- HINT:
-
Apply water to the water by-pass pipe before installing the water by-pass gaskets to the water by-pass pipe.
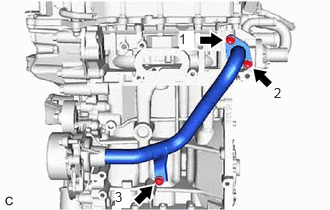
Temporarily install the water by-pass pipe with the 3 bolts.
Fully tighten the 3 bolts in the order shown in the illustration.
- Torque:
- 24 N*m (245 kgf*cm, 18 ft.*lbf)