2AR-FE ENGINE MECHANICAL ENGINE UNIT REASSEMBLY
PROCEDURE

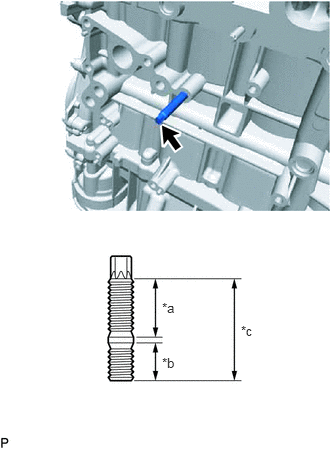
 1.INSTALL STIFFENING CRANKCASE RING PIN
- NOTICE:
-
It is not necessary to remove the stiffening crankcase ring pins unless they are being replaced.
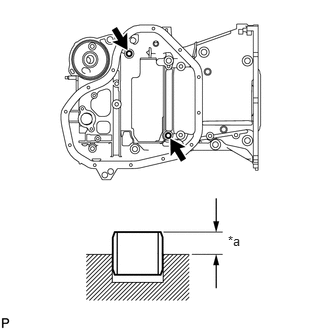
| *a | Protrusion Height |
Using a plastic hammer, tap in 2 new stiffening crankcase ring pins to the stiffening crankcase assembly.
- Standard protrusion height:
4.3 to 5.3 mm (0.169 to 0.209 in.)
2.INSTALL STUD BOLT
- NOTICE:
-
If a stud bolt is deformed or its threads are damaged, replace it.
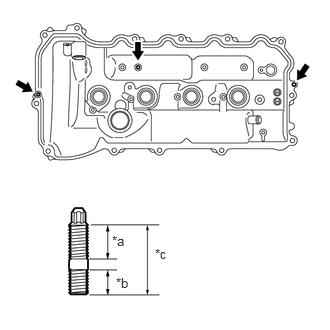
| *a | 16 mm (0.63 in.) |
| *b | 9 mm (0.354 in.) |
| *c | 27 mm (1.06 in.) |
Using an E6 "TORX" socket wrench, install the 3 stud bolts to the cylinder head cover sub-assembly.
- Torque:
- 5.0 N*m (51 kgf*cm, 44 in.*lbf)
When reusing the stud bolt:
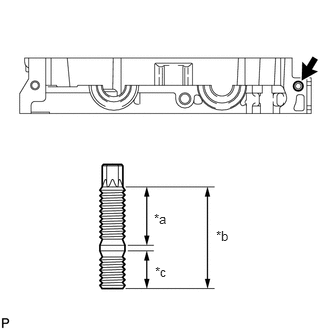
| *a | 20 mm (0.787 in.) |
| *b | 35 mm (1.38 in.) |
| *c | 13 mm (0.512 in.) |
Apply adhesive 1324 to the threaded portion (camshaft housing sub-assembly side) of the stud bolt.
- Adhesive:
Toyota Genuine Adhesive 1324, Three Bond 1324 or equivalent
Using an E8 "TORX" socket wrench, install the stud bolt to the camshaft housing sub-assembly.
- Torque:
- 6.5 N*m (66 kgf*cm, 58 in.*lbf)
Using E5 and E8 "TORX" socket wrenches, install the 3 stud bolts to the stiffening crankcase assembly.
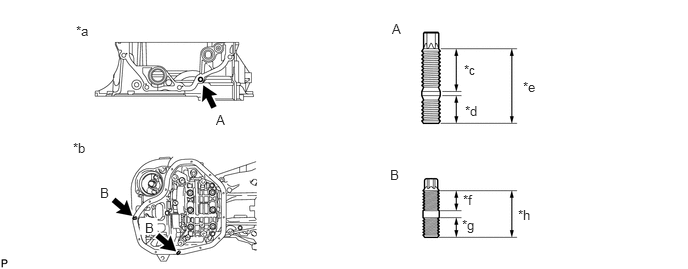
| *a | Front Side | *b | Bottom Side |
| *c | 20 mm (0.787 in.) | *d | 13 mm (0.512 in.) |
| *e | 35 mm (1.38 in.) | *f | 8.5 mm (0.335 in.) |
| *g | 8.0 mm (0.315 in.) | *h | 18 mm (0.709 in.) |
- Torque:
- Stud Bolt (A) : 9.5 N*m (97 kgf*cm, 84 in.*lbf)
- Stud Bolt (B) : 4.0 N*m (41 kgf*cm, 35 in.*lbf)
| *a | 46 mm (1.81 in.) |
| *b | 19 mm (0.748 in.) |
| *c | 67 mm (2.64 in.) |
Using an E10 "TORX" socket wrench, install the stud bolt to the cylinder block sub-assembly.
- Torque:
- 8.5 N*m (87 kgf*cm, 75 in.*lbf)
13620B
3.INSTALL ENGINE BALANCER ASSEMBLY
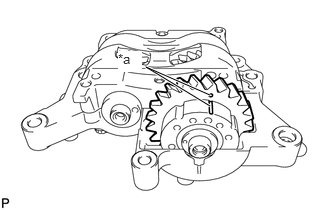
| *a | Alignment Mark |
Check that the alignment marks of the balance shaft damper cover and No. 1 balance shaft driven gear are aligned.
If the alignment marks are not aligned, realign them.
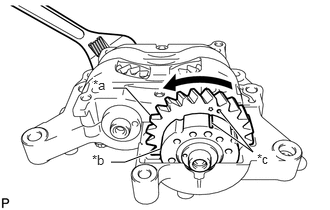
| *a | No. 1 Balance Shaft Driven Gear |
| *b | Balance Shaft Damper Cover |
| *c | Alignment Mark |
Using a wrench, securely hold the No. 2 balance shaft.
Rotate the No. 1 balance shaft driven gear counterclockwise to align the alignment mark of the No. 1 balance shaft driven gear with the alignment mark of the balance shaft damper cover.
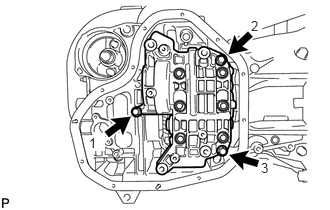
Install the engine balancer assembly to the stiffening crankcase assembly with the 3 bolts in the order shown in the illustration.
- Torque:
- 24 N*m (245 kgf*cm, 18 ft.*lbf)
11420
4.INSTALL STIFFENING CRANKCASE ASSEMBLY
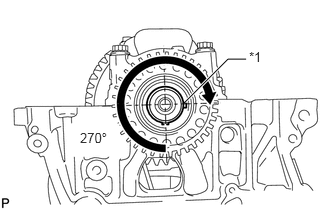
| *1 | Crankshaft Pulley Key |
Rotate the crankshaft clockwise so that the crankshaft pulley key is at the position 270° from the bottom as shown in the illustration.
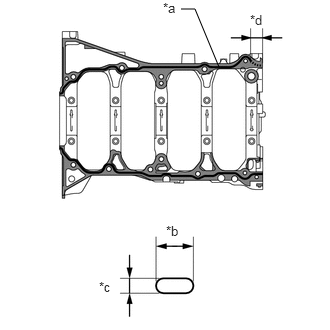
| *a | Seal Packing |
| *b | 7.0 to 9.0 mm (0.276 to 0.354 in.) |
| *c | 2.5 to 3.5 mm (0.0984 to 0.138 in.) |
| *d | 28 mm (1.10 in.) |

|
Stiffening Crankcase Assembly |

|
Cylinder Block Sub-assembly |
Apply seal packing in a continuous line as shown in the illustration.
- Seal Packing:
Toyota Genuine Seal Packing Black, Three Bond 1207B or equivalent
- Standard Seal Packing Dimension:
Area Specified Condition Continuous Line 2.5 to 3.5 mm (0.0984 to 0.138 in.) Dashed Line 7.0 to 9.0 mm (0.276 to 0.354 in.) wide and 2.5 to 3.5 mm (0.0984 to 0.138 in.) thick
- NOTICE:
- ·
Remove any oil from the contact surfaces.
·Install the stiffening crankcase assembly within 3 minutes and tighten the bolts within 15 minutes of applying seal packing.
·Do not add engine oil for at least 2 hours after the installation.
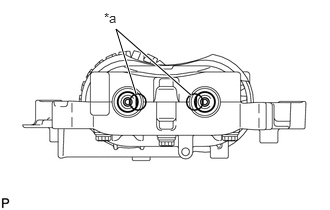
| *a | Cutout |
Check that the rear cutouts are as shown in the illustration.
Clean the bolts and bolt holes.
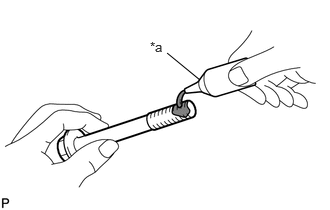
| *a | Adhesive |
Apply adhesive to 3 or more threads at the tips of the bolts (A).
- Adhesive:
Toyota Genuine Adhesive 1344, Three Bond 1344 or equivalent
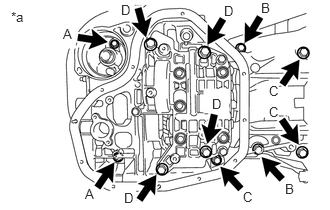
| *a | Bolt Type |
Temporarily install the stiffening crankcase assembly with the 11 bolts.
- Bolt Length:
Item Length Bolt (A) 65 mm (2.56 in.) Bolt (B) 35 mm (1.38 in.) Bolt (C) 125 mm (4.92 in.) Bolt (D) 165 mm (6.50 in.)
- HINT:
-
Apply adhesive to the bolts (A) before installation.
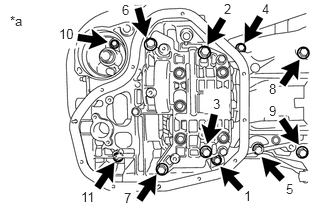
| *a | Tightening Order |
Tighten the 11 bolts in the order shown in the illustration to install the stiffening crankcase assembly.
- Torque:
- Bolt (A) : 24 N*m (245 kgf*cm, 18 ft.*lbf)
- Except Bolt (A) : 43 N*m (438 kgf*cm, 32 ft.*lbf)
12121
5.INSTALL NO. 1 OIL PAN BAFFLE PLATE
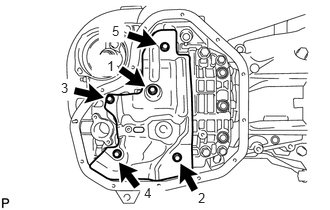
Install the No. 1 oil pan baffle plate and uniformly tighten the 5 bolts in several steps in the order shown in the illustration.
- Torque:
- 10 N*m (102 kgf*cm, 7 ft.*lbf)
15104
6.INSTALL OIL STRAINER SUB-ASSEMBLY
Apply a light coat of engine oil to a new oil strainer gasket.
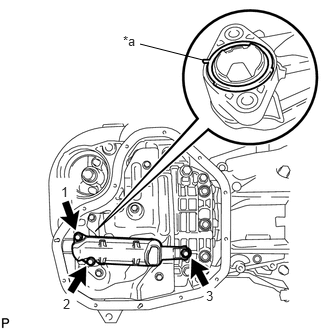
| *a | Protrusion |
Align the protrusion of the oil strainer gasket with the cutout of the oil strainer sub-assembly, and install the oil strainer gasket to the oil strainer sub-assembly.
Install the oil strainer sub-assembly with the 3 bolts in several steps in the order shown in the illustration.
- Torque:
- 9.0 N*m (92 kgf*cm, 80 in.*lbf)
12101
7.INSTALL OIL PAN SUB-ASSEMBLY
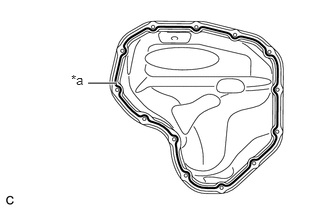
| *a | Seal Packing |
Apply seal packing in a continuous line as shown in the illustration.
- Seal Packing:
Toyota Genuine Seal Packing Black, Three Bond 1207B or equivalent
- Standard Seal Packing Diameter:
2.5 to 3.5 mm (0.0984 to 0.138 in.)
- NOTICE:
- ·
Remove any oil from the contact surfaces.
·Install the oil pan sub-assembly within 3 minutes and tighten the bolts and nuts within 10 minutes of applying seal packing.
·Do not start the engine for at least 2 hours after installation.
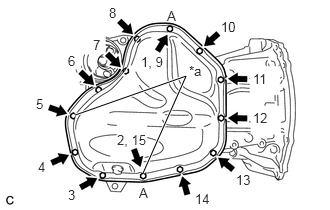
| *a | Nut |
Install the oil pan sub-assembly with the 11 bolts and 2 nuts in several steps in the order shown in the illustration.
- Torque:
- 10 N*m (102 kgf*cm, 7 ft.*lbf)
- HINT:
-
Bolt (A) and nut (A) are tightened twice.
12101A
8.INSTALL OIL PAN DRAIN PLUG
Install a new gasket and the oil pan drain plug to the oil pan sub-assembly.
- Torque:
- 40 N*m (408 kgf*cm, 30 ft.*lbf)
15620
9.INSTALL OIL FILTER CAP ASSEMBLY
11401L
10.INSTALL REAR ENGINE OIL SEAL
11445
11.INSTALL CYLINDER BLOCK WATER JACKET SPACER
Install the cylinder block water jacket spacer to the cylinder block sub-assembly.
11115
12.INSTALL CYLINDER HEAD GASKET
11101
13.INSTALL CYLINDER HEAD SUB-ASSEMBLY
11151A
14.INSTALL CAMSHAFT BEARING CAP SETTING RING PIN
- NOTICE:
-
It is not necessary to remove the camshaft bearing cap setting ring pins unless they are being replaced.
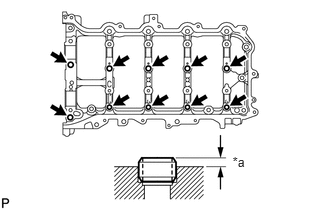
| *a | Protrusion Height |
Using a plastic hammer, tap in 10 camshaft bearing cap setting ring pins to the camshaft housing sub-assembly.
- Standard protrusion height:
2.7 to 3.3 mm (0.106 to 0.130 in.)
11114A
15.INSTALL CAMSHAFT HOUSING STRAIGHT PIN
- NOTICE:
-
It is not necessary to remove the camshaft housing straight pins unless they are being replaced.
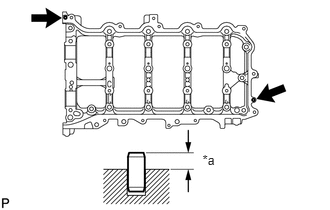
| *a | Protrusion Height |
Using a plastic hammer, tap in 2 camshaft housing straight pins to the camshaft housing sub-assembly.
- Standard protrusion height:
5.0 to 7.0 mm (0.197 to 0.276 in.)
11811
16.INSTALL NO. 1 CAMSHAFT BEARING
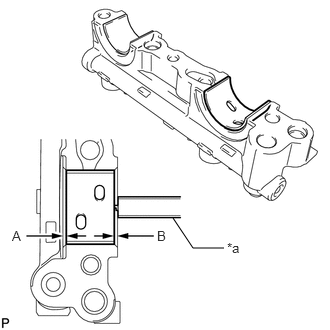
| *a | Vernier Caliper |
Clean the No. 1 camshaft bearing.
Install the No. 1 camshaft bearing to the No. 1 camshaft bearing cap.
Using a vernier caliper, measure the distance between the No. 1 camshaft bearing cap edge and the No. 1 camshaft bearing edge.
- Difference between (A) and (B):
0 to 0.7 mm (0 to 0.0276 in.)
11821
17.INSTALL NO. 2 CAMSHAFT BEARING
Clean the No. 2 camshaft bearing.
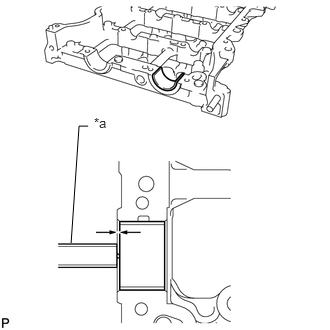
| *a | Vernier Caliper |
Install the No. 2 camshaft bearing to the camshaft housing sub-assembly.
Using a vernier caliper, measure the distance between the camshaft housing sub-assembly edge and the No. 2 camshaft bearing edge.
- Standard distance:
1.15 to 1.85 mm (0.0453 to 0.0728 in.)
15678A
18.INSTALL OIL CONTROL VALVE FILTER
Install the oil control valve filter to the No. 1 camshaft bearing cap.
13512
19.INSTALL NO. 2 CAMSHAFT
13511
20.INSTALL CAMSHAFT
21.INSTALL CAMSHAFT BEARING CAP
13716
22.INSTALL VALVE STEM CAP
13750
23.INSTALL VALVE LASH ADJUSTER ASSEMBLY
13801
24.INSTALL NO. 1 VALVE ROCKER ARM SUB-ASSEMBLY
11103
25.INSTALL CAMSHAFT HOUSING SUB-ASSEMBLY
13050
26.INSTALL CAMSHAFT TIMING GEAR ASSEMBLY
13070A
27.INSTALL CAMSHAFT TIMING EXHAUST GEAR ASSEMBLY
13521
28.INSTALL CRANKSHAFT TIMING SPROCKET
Install the crankshaft timing sprocket to the crankshaft.
29.ADD ENGINE OIL
30.SET NO. 1 CYLINDER TO TDC/COMPRESSION
13561
31.INSTALL NO. 1 CHAIN VIBRATION DAMPER
13506
32.INSTALL CHAIN SUB-ASSEMBLY
13559
33.INSTALL CHAIN TENSIONER SLIPPER
13540
34.INSTALL NO. 1 CHAIN TENSIONER ASSEMBLY
13566B
35.INSTALL TIMING CHAIN GUIDE
36.CHECK NO. 1 CYLINDER TO TDC/COMPRESSION
11324
37.INSTALL TIMING CHAIN COVER PLATE
38.INSTALL OIL PUMP RELIEF VALVE PLUG
Using a 14 mm hexagon wrench, install a new gasket and the oil pump relief valve plug.
- Torque:
- 37.5 N*m (382 kgf*cm, 28 ft.*lbf)
11310
39.INSTALL TIMING CHAIN COVER SUB-ASSEMBLY
12315A
40.INSTALL ENGINE MOUNTING BRACKET RH
11301C
41.INSTALL TIMING CHAIN COVER OIL SEAL
11193
42.INSTALL SPARK PLUG TUBE GASKET
Install 4 new spark plug tube gaskets to the cylinder head cover sub-assembly.
- NOTICE:
-
After pressing in the spark plug tube gasket, make sure the gasket protrudes 1.0 mm (0.0394 in.) or less from the cylinder head cover sub-assembly.
11201
43.INSTALL CYLINDER HEAD COVER SUB-ASSEMBLY
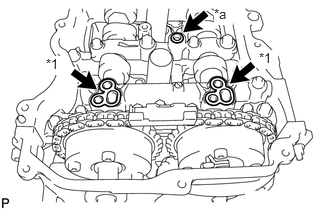
| *1 | Camshaft Bearing Cap Oil Hole Gasket |
| *a | Gasket |
Apply a light coat of engine oil to 2 new camshaft bearing cap oil hole gaskets and a new gasket.
Install the 2 camshaft bearing cap oil hole gaskets to the No. 1 camshaft bearing cap.
Install the gasket to the No. 2 camshaft bearing cap.
Install a new cylinder head cover gasket to the cylinder head cover sub-assembly.
- NOTICE:
-
Remove any oil from the contact surfaces.
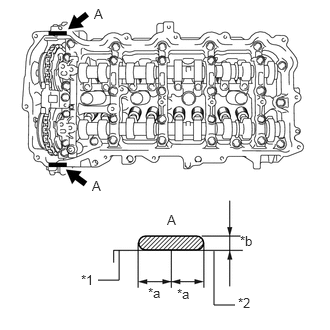
| *1 | Timing Chain Cover Sub-assembly |
| *2 | Camshaft Housing Sub-assembly |
| *a | Application Width: 5.0 mm (0.197 in.) |
| *b | Seal Packing Diameter: 3.0 to 6.0 mm |

|
Seal Packing |
Apply seal packing as shown in the illustration.
- Seal Packing:
Toyota Genuine Seal Packing Black, Three Bond 1207B or equivalent
- Standard Seal Packing Diameter:
3.0 to 6.0 mm (0.118 to 0.236 in.)
- Application Width:
10.0 mm (0.394 in.)
- NOTICE:
- ·
Remove any oil from the contact surfaces.
·Install the cylinder head cover sub-assembly within 3 minutes and tighten the bolts within 15 minutes of applying seal packing.
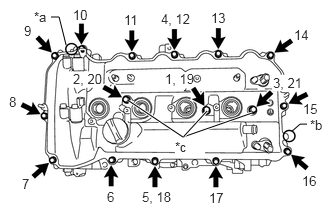
| *a | Pin (A) |
| *b | Pin (B) |
| *c | Seal Washer |
Align the cylinder head cover sub-assembly with the pin (A). Then align the cylinder head cover sub-assembly with the pin (B) and install the cylinder head cover sub-assembly.
Install 3 new seal washers and the 16 bolts, and then tighten the bolts in the order shown in the illustration.
- Torque:
- 12 N*m (122 kgf*cm, 9 ft.*lbf)
- NOTICE:
-
Do not start the engine for at least 2 hours after installation.
13471
44.INSTALL CRANKSHAFT PULLEY
11301K
45.INSTALL CRANKSHAFT POSITION SENSOR
16323
46.INSTALL WATER INLET HOUSING
- NOTICE:
-
If a stud bolt is deformed or its threads are damaged, replace it.
w/o Oil Cooler:
Using an E6 "TORX" socket wrench, install the 4 stud bolts to the water inlet housing.
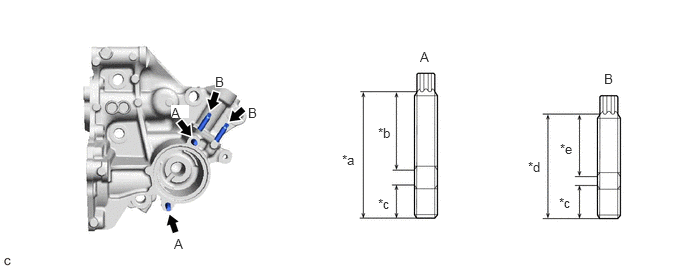
| *a | 34 mm (1.34 in.) | *b | 21 mm (0.827 in.) |
| *c | 9.0 mm (0.354 in.) | *d | 27 mm (1.06 in.) |
| *e | 16 mm (0.630 in.) | - | - |
- Torque:
- 4.4 N*m (45 kgf*cm, 39 in.*lbf)
w/ Oil Cooler:
Using an E6 "TORX" socket wrench, install the 5 stud bolts to the water inlet housing.
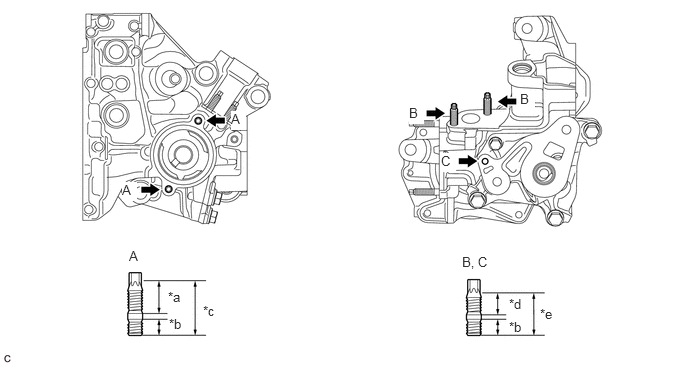
| *a | 21 mm (0.827 in.) | *b | 9.0 mm (0.354 in.) |
| *c | 34 mm (1.34 in.) | *d | 16 mm (0.630 in.) |
| *e | 27 mm (1.06 in.) | - | - |
- Torque:
- Stud Bolt (A), (B) : 4.4 N*m (45 kgf*cm, 39 in.*lbf)
- Stud Bolt (C) : 4.0 N*m (41 kgf*cm, 35 in.*lbf)
Install a new gasket to the cylinder block sub-assembly.
Install the water inlet housing to the cylinder block sub-assembly with the 4 bolts and nut.
- Torque:
- 43 N*m (438 kgf*cm, 32 ft.*lbf)
16100
47.INSTALL ENGINE WATER PUMP ASSEMBLY
48.INSTALL WIRE HARNESS CLAMP BRACKET
Install the wire harness clamp bracket with the bolt.
- Torque:
- 10 N*m (102 kgf*cm, 7 ft.*lbf)
16620
49.INSTALL V-RIBBED BELT TENSIONER ASSEMBLY
Install the V-ribbed belt tensioner assembly with the bolt.
- Torque:
- 21 N*m (214 kgf*cm, 15 ft.*lbf)
15710
50.INSTALL OIL COOLER ASSEMBLY (w/ Oil Cooler)
16331A
51.INSTALL THERMOSTAT
16321
52.INSTALL WATER INLET
16268
53.INSTALL NO. 1 WATER BY-PASS PIPE
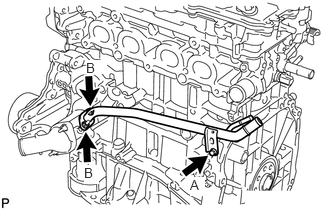
Install a new gasket and the No. 1 water by-pass pipe with the 2 nuts and bolt.
- Torque:
- 10 N*m (102 kgf*cm, 7 ft.*lbf)
- NOTICE:
-
Temporarily tighten the bolt (A), fully tighten the 2 nuts (B), and then fully tighten the bolt (A).
12215
54.INSTALL SEPARATOR CASE
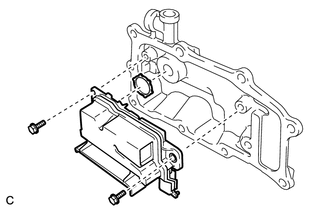
Apply a light coat of engine oil to a new gasket.
Install the gasket to the separator case.
Install the separator case to the ventilation case sub-assembly with the 2 bolts.
- Torque:
- 10 N*m (102 kgf*cm, 7 ft.*lbf)
12205
55.INSTALL VENTILATION CASE SUB-ASSEMBLY
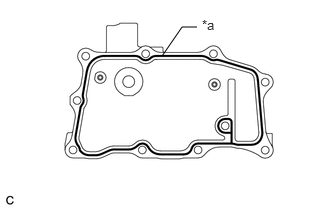
| *a | Seal Packing |
Apply seal packing in a continuous line as shown in the illustration.
- Seal packing:
Toyota Genuine Seal Packing Black, Three Bond 1207B or equivalent
- Standard seal diameter:
2.5 to 3.5 mm (0.0984 to 0.138 in.)
- NOTICE:
- ·
Remove any oil from the contact surfaces.
·Install the ventilation case sub-assembly within 3 minutes and tighten the bolts and nuts within 15 minutes of applying seal packing.
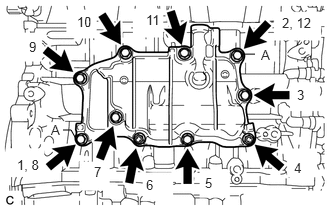
Install the ventilation case sub-assembly with the 8 bolts and 2 nuts in the order shown in the illustration.
- Torque:
- 21 N*m (214 kgf*cm, 15 ft.*lbf)
- HINT:
-
The bolts (A) are tightened twice.
12204
56.INSTALL PCV VALVE (VENTILATION VALVE SUB-ASSEMBLY)
11102A
57.INSTALL CAMSHAFT POSITION SENSOR (for Intake Side)
11102A
58.INSTALL CAMSHAFT POSITION SENSOR (for Exhaust Side)
11101J
59.INSTALL CAMSHAFT TIMING OIL CONTROL VALVE ASSEMBLY (for Intake Side)
11101J
60.INSTALL CAMSHAFT TIMING OIL CONTROL VALVE ASSEMBLY (for Exhaust Side)
12108A
61.INSTALL OIL FILLER CAP GASKET
Install a new oil filler cap gasket to the oil filler cap sub-assembly.
12108
62.INSTALL OIL FILLER CAP SUB-ASSEMBLY
Install the oil filler cap sub-assembly to the cylinder head cover sub-assembly.
19100P
63.INSTALL SPARK PLUG
64.INSTALL ENGINE COVER JOINT
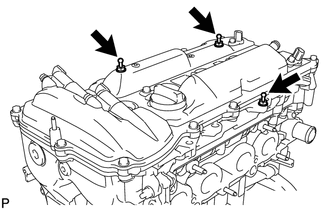
Install the 3 engine cover joints.
- Torque:
- 10 N*m (102 kgf*cm, 7 ft.*lbf)