6AR-FSE ENGINE MECHANICAL CYLINDER HEAD GASKET REMOVAL
CAUTION / NOTICE / HINT
The necessary procedures (adjustment, calibration, initialization, or registration) that must be performed after parts are removed and installed, or replaced during cylinder head gasket removal/installation are shown below.
| Replaced Part or Performed Procedure | Necessary Procedure | Effect/Inoperative Function when Necessary Procedure not Performed | Link | |
|---|---|---|---|---|
|
*1: The vehicle height changes because of suspension or tire replacement. |
||||
| Battery terminal is disconnected/reconnected | Perform steering sensor zero point calibration | Lane departure alert system (w/ Steering Control) | ( ) |
|
| Pre-collision system | ||||
| Memorize steering angle neutral point | Parking assist monitor system | ()
|
||
| Panoramic view monitor system | ()
|
|||
| Replacement of ECM | Perform Vehicle Identification Number (VIN) or frame number registration | MIL comes on | ()
|
|
| Perform code registration (Immobiliser system) | Engine start function | See Service Bulletin for the registration method. | ||
·
Replacement of engine assembly ·
Gas leak from exhaust system is repaired |
Inspection after repair | ·
Poor idle, etc. ·
Engine start function, etc. |
()
|
|
| Replacement of automatic transaxle assembly | Perform the following procedures in the order shown:
1.
Reset Memory 2.
Input transaxle compensation code into ECM 3.
Perform road test to allow ECM to learn |
·
Large shift shock ·
Deterioration of fuel efficiency |
()for U761E Initialization
( )for U761E Registration
|
|
| Replacement of ECM
(If possible, read the transaxle compensation code from the previous ECM) |
Possible | Perform the following procedures in the order shown:
1.
Reset Memory 2.
Transfer transaxle compensation code 3.
Perform road test to allow ECM to learn |
||
| Impossible | Perform the following procedures in the order shown:
1.
Reset Memory 2.
Reset transaxle compensation code 3.
Perform road test to allow ECM to learn |
|||
| Replacement of ECM | Perform code registration (Immobiliser function) | ·
Wireless door lock control system ·
Smart Entry and Start System (for Entry Function) ·
Smart Entry and Start System (for Start Function) ·
Steering lock function |
See Service Bulletin for the registration method. | |
| Suspension, tires, etc.*1 | Rear television camera assembly optical axis (Back camera position setting) | Parking assist monitor system | ()for Initialization
( )for Calibration
|
|
·
Television camera controller initialization ·
Adjust steering angle ·
Rear television camera assembly optical axis (Back camera position setting) |
Panoramic view monitor system | ()for Initialization
( )for Calibration
|
||
| Replacement of front bumper assembly | Front television camera view adjustment | |||
| Front wheel alignment adjustment | Perform system variant learning and acceleration sensor zero point calibration. | ·
VSC disabled or malfunctioning ·
DTCs are output ·
Slip indicator light illuminated ·
ABS warning light illuminated |
()
|
|
PROCEDURE

 11310
1.REMOVE TIMING CHAIN COVER SUB-ASSEMBLY
17167
2.REMOVE NO. 1 EXHAUST MANIFOLD HEAT INSULATOR
25611
3.REMOVE EGR PIPE CONNECTOR
17118
4.REMOVE MANIFOLD STAY
17139
5.REMOVE NO. 2 MANIFOLD STAY
25051
6.REMOVE EXHAUST MANIFOLD CONVERTER SUB-ASSEMBLY (TWC: Front Catalyst)
23901
7.DISCONNECT FUEL TUBE SUB-ASSEMBLY (for Port Injection)
23814B
8.REMOVE FUEL DELIVERY PIPE
23891
9.REMOVE FUEL DELIVERY SPACER
23291
10.REMOVE INJECTOR VIBRATION INSULATOR
23250F
11.REMOVE PORT FUEL INJECTOR ASSEMBLY
22030
12.REMOVE THROTTLE BODY WITH MOTOR ASSEMBLY
22271
13.REMOVE THROTTLE BODY GASKET
25612
14.REMOVE NO. 2 EGR PIPE
17111
15.REMOVE INTAKE MANIFOLD
82125N
16.REMOVE NO. 5 ENGINE WIRE
23807
17.REMOVE FUEL DELIVERY PIPE WITH SENSOR ASSEMBLY
23250E
18.REMOVE DIRECT FUEL INJECTOR ASSEMBLY
23255A
19.REMOVE FUEL INJECTOR SEAL
25680
20.REMOVE EGR VALVE WITH COOLER ASSEMBLY
29300
21.REMOVE VACUUM PUMP ASSEMBLY
22.SET NO. 1 CYLINDER TO TDC/COMPRESSION
13566B
23.REMOVE TIMING CHAIN GUIDE
13540
24.REMOVE NO. 1 CHAIN TENSIONER ASSEMBLY
13559
25.REMOVE CHAIN TENSIONER SLIPPER
13506
26.REMOVE CHAIN SUB-ASSEMBLY
13561
27.REMOVE NO. 1 CHAIN VIBRATION DAMPER
13050
28.REMOVE CAMSHAFT TIMING GEAR ASSEMBLY
13070A
29.REMOVE CAMSHAFT TIMING EXHAUST GEAR ASSEMBLY
11103
30.REMOVE CAMSHAFT HOUSING SUB-ASSEMBLY
31.REMOVE CAMSHAFT BEARING CAP
13511
32.REMOVE CAMSHAFT
13512
33.REMOVE NO. 2 CAMSHAFT
15678A
34.REMOVE OIL CONTROL VALVE FILTER
11811
35.REMOVE NO. 1 CAMSHAFT BEARING
11821
36.REMOVE NO. 2 CAMSHAFT BEARING
13801
37.REMOVE NO. 1 VALVE ROCKER ARM SUB-ASSEMBLY
13750
38.REMOVE VALVE LASH ADJUSTER ASSEMBLY
13716
39.REMOVE VALVE STEM CAP
11101
40.REMOVE CYLINDER HEAD SUB-ASSEMBLY
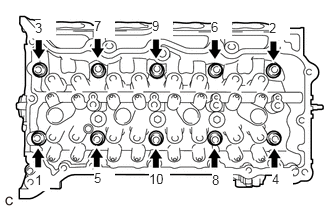
Using a 10 mm bi-hexagon wrench, uniformly loosen the 10 cylinder head set bolts in the order shown in the illustration. Remove the 10 cylinder head set bolts and 10 plate washers.
- NOTICE:
- ·
Be careful not to drop plate washers into the cylinder head sub-assembly.
·Cylinder head warpage or cracking may result from removing bolts in the incorrect order.
- HINT:
-
Be sure to keep the removed parts separate for each installation position.
Remove the cylinder head sub-assembly.
11115
41.REMOVE CYLINDER HEAD GASKET
Remove the cylinder head gasket from the cylinder block sub-assembly.