BRAKE BRAKE BOOSTER(for 2GR-FE) INSTALLATION
PROCEDURE

 44696
1.INSTALL CHECK VALVE GROMMET
Install the check valve grommet to the brake booster assembly.
44730
2.INSTALL BRAKE VACUUM CHECK VALVE ASSEMBLY
Install the brake vacuum check valve to the brake booster assembly.
44785
3.INSTALL BRAKE BOOSTER GASKET
Install a new brake booster gasket to the brake booster assembly.
47264D
4.INSTALL BRAKE MASTER CYLINDER PUSH ROD CLEVIS
Install the push rod clevis to the brake booster assembly.
Temporarily tighten the push rod clevis lock nut.
- HINT:
-
The push rod clevis lock nut will be tightened to a torque specification in the "CHECK AND ADJUST BRAKE PEDAL HEIGHT" procedures.
44610
5.INSTALL BRAKE BOOSTER ASSEMBLY
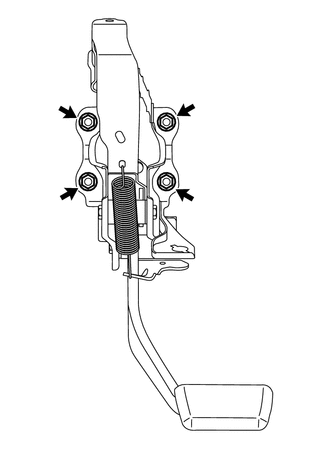
Install the brake booster assembly with the 4 nuts.
- Torque:
- 13 N*m (130 kgf*cm, 9 ft.*lbf)
11101J
6.INSTALL CAMSHAFT TIMING OIL CONTROL VALVE ASSEMBLY (for RHD)
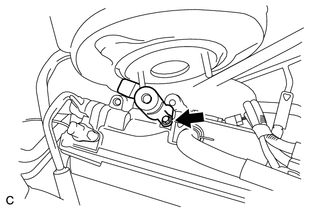
Apply engine oil to a new O-ring, and install it to the camshaft timing oil control valve assembly.
Install the camshaft timing oil control valve assembly with the bolt.
- Torque:
- 10 N*m (102 kgf*cm, 88 in.*lbf)
7.INSTALL WIRE HARNESS (for LHD)
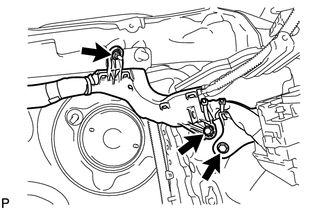
Install the wire harness to the body with the nut and 2 bolts.
8.INSTALL WIRE HARNESS (for RHD)
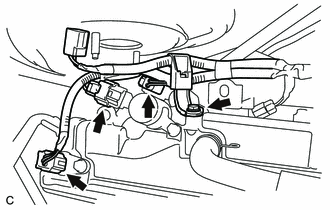
Install the wire harness to the engine assembly with the bolt.
- Torque:
- 7.0 N*m (71 kgf*cm, 62 in.*lbf)
Connect the 3 connectors.
9.INSTALL BRAKE LINE (for LHD)
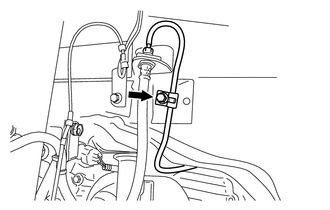
Install the brake line to the body with the bolt.
- Torque:
- 5.0 N*m (51 kgf*cm, 44 in.*lbf)
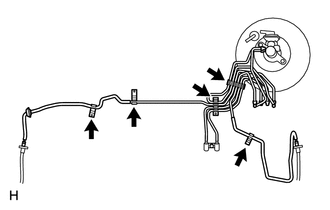
Engage the 5 clamps.
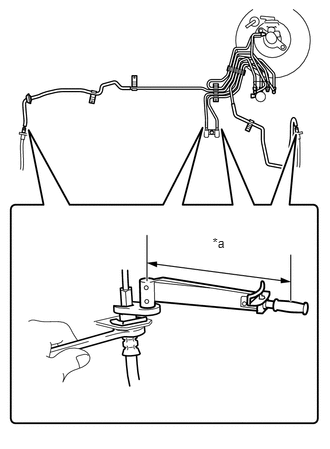
Using a union nut wrench, connect the 4 brake lines.
| *a | Torque Wrench Fulcrum Length |
- Torque:
- 15 N*m (155 kgf*cm, 11 ft.*lbf)
- NOTICE:
- ·
Do not kink or damage the brake lines.
·Do not allow any foreign matter such as dirt or dust to enter the brake lines from the connecting parts.
- HINT:
- ·
Calculate the torque wrench reading when changing the fulcrum length for the torque wrench (See page General>INTRODUCTION>REPAIR INSTRUCTION>PRECAUTION).
·When using a union nut wrench (fulcrum length of 22 mm (0.866 in.)) + torque wrench (fulcrum length of 250 mm (9.84 in.)):
14 N*m (142 kgf*cm, 10 ft.*lbf)
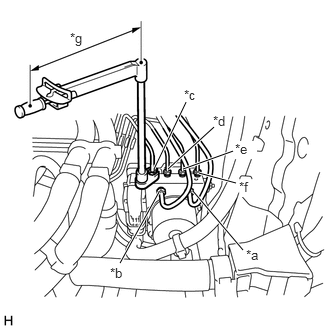
Temporarily tighten each brake line to the correct position on the brake actuator assembly as shown in the illustration.
| *a | From 1st Chamber of Brake Master Cylinder Sub-assembly |
| *b | From 2nd Chamber of Brake Master Cylinder Sub-assembly |
| *c | To Front Wheel Cylinder Assembly LH |
| *d | To Rear Wheel Cylinder Assembly RH |
| *e | To Rear Wheel Cylinder Assembly LH |
| *f | To Front Wheel Cylinder Assembly RH |
| *g | Torque Wrench Fulcrum Length |
Using a union nut wrench, fully tighten the 2 brake lines (*a, *b).
- Torque:
- 20 N*m (199 kgf*cm, 14 ft.*lbf)
- NOTICE:
- ·
Do not kink or damage the brake lines.
·Do not allow any foreign matter such as dirt or dust to enter the brake lines from the connecting parts.
- HINT:
- ·
Calculate the torque wrench reading when changing the fulcrum length for the torque wrench (See page General>INTRODUCTION>REPAIR INSTRUCTION>PRECAUTION).
·When using a union nut wrench (fulcrum length of 20 mm (0.787 in.)) + torque wrench (fulcrum length of 250 mm (9.84 in.)):
18 N*m (184 kgf*cm, 13 ft.*lbf)
Using a union nut wrench, fully tighten the 4 brake lines (*c, *d, *e, *f).
- Torque:
- 15 N*m (155 kgf*cm, 11 ft.*lbf)
- NOTICE:
- ·
Do not kink or damage the brake lines.
·Do not allow any foreign matter such as dirt or dust to enter the brake lines from the connecting parts.
- HINT:
- ·
Calculate the torque wrench reading when changing the fulcrum length for the torque wrench (See page General>INTRODUCTION>REPAIR INSTRUCTION>PRECAUTION).
·When using a union nut wrench (fulcrum length of 22 mm (0.866 in.)) + torque wrench (fulcrum length of 250 mm (9.84 in.)):
14 N*m (142 kgf*cm, 10 ft.*lbf)
10.INSTALL BRAKE LINE (for RHD)
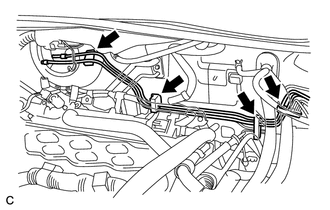
Engage the 4 clamps and install the 2 brake lines.
11.CONNECT VACUUM HOSE
Connect the vacuum hose to the brake vacuum check valve assembly with the clip.
47264A
12.INSTALL PUSH ROD PIN
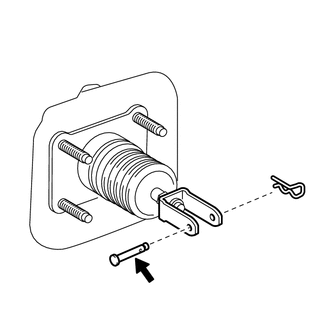
Apply lithium soap base glycol grease to the push rod pin.

|
Lithium Soap Base Glycol Grease |
Install the push rod pin to the push rod clevis.
- NOTICE:
-
The push rod pin must be installed as shown in the illustration.
Install a new clip to the push rod pin.
- NOTICE:
-
The clip must be installed as shown in the illustration.
- HINT:
-
Only the clip in the illustration will be supplied.
47201
13.INSTALL BRAKE MASTER CYLINDER SUB-ASSEMBLY (for LHD)
47201
14.INSTALL BRAKE MASTER CYLINDER SUB-ASSEMBLY (for RHD)
73900
15.INSTALL LOWER NO. 1 INSTRUMENT PANEL AIRBAG ASSEMBLY (w/ Driver Side Knee Airbag)
55432B
16.INSTALL LOWER INSTRUMENT PANEL FINISH PANEL (w/o Driver Side Knee Airbag)
55432B
17.INSTALL LOWER INSTRUMENT PANEL FINISH PANEL (w/ Driver Side Knee Airbag)
55606
18.INSTALL NO. 1 INSTRUMENT PANEL UNDER COVER SUB-ASSEMBLY (for LHD)
55447C
19.INSTALL NO. 1 SWITCH HOLE BASE (for LHD)
55041B
20.INSTALL NO. 1 INSTRUMENT PANEL BOX DOOR SUB-ASSEMBLY (for LHD)
55650
21.INSTALL NO. 1 INSTRUMENT PANEL REGISTER ASSEMBLY (for LHD)
55420A
22.INSTALL INSTRUMENT CLUSTER FINISH PANEL CENTER ASSEMBLY (for LHD)
55606
23.INSTALL NO. 1 INSTRUMENT PANEL UNDER COVER SUB-ASSEMBLY (for RHD)
- HINT:
-
Use the same procedure as for LHD. (See page Vehicle Interior>INTERIOR PANEL>LOWER INSTRUMENT PANEL>INSTALLATION)
62111C
24.INSTALL COWL SIDE TRIM BOARD RH (for RHD)
- HINT:
-
Use the same procedure as for the LH side. (See page Vehicle Interior>INTERIOR PANEL>LOWER INSTRUMENT PANEL>INSTALLATION)
67913B
25.INSTALL FRONT DOOR SCUFF PLATE RH (for RHD)
- HINT:
-
Use the same procedure as for the LH side. (See page Vehicle Interior>INTERIOR PANEL>LOWER INSTRUMENT PANEL>INSTALLATION)
55446A
26.INSTALL NO. 1 SWITCH HOLE BASE (for RHD)
- HINT:
-
Use the same procedure as for LHD. (See page Vehicle Interior>INTERIOR PANEL>LOWER INSTRUMENT PANEL>INSTALLATION)
55041B
27.INSTALL NO. 1 INSTRUMENT PANEL BOX DOOR SUB-ASSEMBLY (for RHD)
28.INSTALL CENTER INSTRUMENT CLUSTER FINISH PANEL ASSEMBLY (for RHD)
33504F
29.INSTALL SHIFT LEVER KNOB SUB-ASSEMBLY (for RHD)
17190
30.INSTALL INTAKE AIR SURGE TANK ASSEMBLY (for RHD)
31.CONNECT CABLE TO NEGATIVE BATTERY TERMINAL
- NOTICE:
-
When disconnecting the cable, some systems need to be initialized after the cable is reconnected (See page General>INTRODUCTION>REPAIR INSTRUCTION>INITIALIZATION).
16470
32.INSTALL RADIATOR RESERVOIR TANK ASSEMBLY (for RHD)
33.ADD ENGINE COOLANT (for RHD)
34.INSPECT FOR COOLANT LEAK (for RHD)
51442
35.INSTALL NO. 2 ENGINE UNDER COVER (for RHD)
11209
36.INSTALL V-BANK COVER SUB-ASSEMBLY (for RHD)
53292A
37.INSTALL UPPER RADIATOR SUPPORT SEAL (for RHD)
38.INSTALL AIR CLEANER CASE SUB-ASSEMBLY
39.INSTALL AIR CLEANER CAP SUB-ASSEMBLY
40.INSTALL FRONT COWL TOP OUTSIDE PANEL WITH WINDSHIELD WIPER MOTOR LINK
41.INSTALL BRAKE MASTER CYLINDER RESERVOIR WITH BRACKET
55781F
42.INSTALL COWL TOP VENTILATOR LOUVER
53867H
43.INSTALL FRONT FENDER TO COWL SIDE SEAL LH
53866J
44.INSTALL FRONT FENDER TO COWL SIDE SEAL RH
45.INSTALL FRONT WIPER ARM AND BLADE ASSEMBLY LH
46.INSTALL FRONT WIPER ARM AND BLADE ASSEMBLY RH
85192
47.INSTALL FRONT WIPER ARM HEAD CAP
48.BLEED BRAKE SYSTEM
(See page Brake>BRAKE>BRAKE FLUID>BLEEDING)
49.INSPECT AND ADJUST BRAKE PEDAL
(See page Brake>BRAKE>BRAKE PEDAL>ADJUSTMENT)
50.INSPECT SRS WARNING LIGHT
Inspect SRS warning light (See page Vehicle Interior>SUPPLEMENTAL RESTRAINT SYSTEMS>AIRBAG SYSTEM>DIAGNOSIS SYSTEM).