K112 CVT TRANSMISSION CONTROL CABLE(for RHD) INSTALLATION
PROCEDURE

 1.INSTALL TRANSMISSION CONTROL CABLE ASSEMBLY
- NOTICE:
-
Before installing the transmission control cable assembly, check that the park/neutral position switch and shift lever are in neutral.
Put the transmission control cable into the cabin and connect the transmission control cable with the 2 bolts.
- Torque:
- 5.0 N*m (51 kgf*cm, 44 in.*lbf)
Connect the transmission control cable clamp with the 2 nuts.
- Torque:
- 5.0 N*m (51 kgf*cm, 44 in.*lbf)
Install the transmission control cable assembly to the bracket with a new clip.
Install the transmission control cable assembly to the control shaft lever with the nut.
- Torque:
- 12 N*m (122 kgf*cm, 9 ft.*lbf)
Connect the transmission control cable to the control cable clamp bracket.
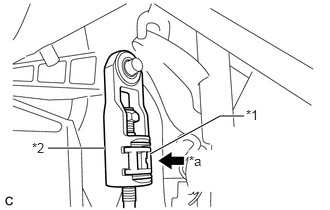
Turn the nut of the transmission control cable 180° counterclockwise. While holding the nut in place, push in the stopper until it clicks twice.
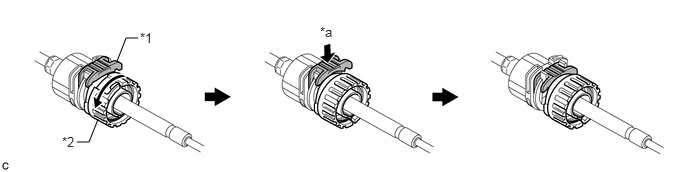
| *1 | Stopper | *2 | Nut |
| *a | Push in | - | - |
Install the outer part of the transmission control cable to the shift lever retainer. Check that the spring is positioned at "A" and push in the stopper.
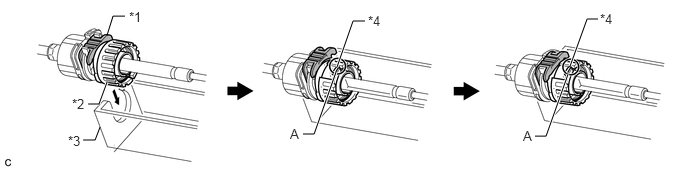
| *1 | Stopper | *2 | Nut |
| *3 | Shift Lever Retainer | *4 | Spring |
- HINT:
-
If the stopper cannot be pushed in, slightly turn the nut clockwise and then push in the stopper again.
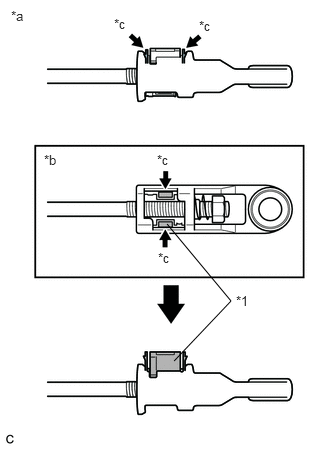
Push the 2 claws together at the top of the transmission control cable lock piece. While holding the 2 claws together, push the 2 lugs on the bottom of the lock piece toward each other and upward to pull out the lock piece.
| *1 | Lock Piece |
| *a | Side View |
| *b | Bottom View |
| *c | Push |
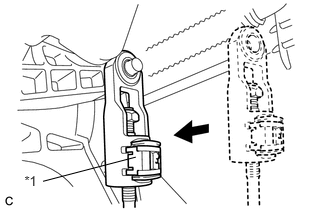
Connect the end of the cable to the shift lever assembly.
- NOTICE:
- ·
Make sure that the lock piece is pulled up.
·Push the end of the cable all the way to the base of the pin.
| *1 | Lock Piece |
Push the lock piece into the adjuster case.
| *1 | Lock Piece |
| *2 | Adjuster Case |
| *a | Push in |
- NOTICE:
-
Securely push in the lock piece until it locks.
55475B
2.INSTALL CENTER INSTRUMENT CLUSTER FINISH PANEL GARNISH
55434B
3.INSTALL INSTRUMENT PANEL FINISH PANEL LOWER CENTER
58533C
4.INSTALL FLOOR CARPET COVER CENTER RH
58534E
5.INSTALL FLOOR CARPET COVER CENTER LH
55432B
6.INSTALL INSTRUMENT PANEL FINISH PANEL LOWER (w/o Knee Airbag)
55432B
7.INSTALL INSTRUMENT PANEL FINISH PANEL LOWER (w/ Knee Airbag)
55606
8.INSTALL NO. 1 INSTRUMENT PANEL UNDER COVER SUB-ASSEMBLY
62111C
9.INSTALL COWL SIDE TRIM BOARD RH
67913B
10.INSTALL FRONT DOOR SCUFF PLATE RH
55607
11.INSTALL NO. 2 INSTRUMENT PANEL UNDER COVER SUB-ASSEMBLY
55550
12.INSTALL GLOVE COMPARTMENT DOOR ASSEMBLY
55042B
13.INSTALL NO. 2 INSTRUMENT PANEL BOX DOOR SUB-ASSEMBLY
55041B
14.INSTALL NO. 1 INSTRUMENT PANEL BOX DOOR SUB-ASSEMBLY
15.INSTALL CENTER INSTRUMENT CLUSTER FINISH PANEL ASSEMBLY
33504F
16.INSTALL SHIFT LEVER KNOB SUB-ASSEMBLY
33554H
17.INSTALL SHIFT LOCK RELEASE BUTTON COVER
74414D
18.INSTALL BATTERY CARRIER SUPPORT
74411
19.INSTALL BATTERY CARRIER
17752
20.INSTALL NO. 2 AIR CLEANER INLET
17751
21.INSTALL NO. 1 AIR CLEANER INLET
17700
22.INSTALL AIR CLEANER CASE SUB-ASSEMBLY
17705
23.INSTALL AIR CLEANER CAP SUB-ASSEMBLY
24.INSTALL BATTERY
55712
25.INSTALL FRONT COWL TOP OUTSIDE PANEL WITH WINDSHIELD WIPER MOTOR AND LINK
16611
26.INSTALL RADIATOR RESERVOIR BRACKET
16470
27.INSTALL RADIATOR RESERVOIR ASSEMBLY
28.CONNECT CABLE TO NEGATIVE BATTERY TERMINAL
29.INSPECT SHIFT LEVER POSITION
30.ADJUST SHIFT LEVER POSITION
31.PERFORM INITIALIZATION
Perform initialization (See page General>INTRODUCTION>REPAIR INSTRUCTION>INITIALIZATION).
- NOTICE:
-
Certain systems need to be initialized after disconnecting and reconnecting the cable from the negative (-) battery terminal.