2GR-FE ENGINE MECHANICAL CAMSHAFT REMOVAL
PROCEDURE

 1.INSTALL ENGINE TO ENGINE STAND
2.REMOVE ENGINE HANGERS
19500
3.REMOVE IGNITION COIL ASSEMBLY
17111
4.REMOVE INTAKE MANIFOLD
17104
5.REMOVE EXHAUST MANIFOLD SUB-ASSEMBLY RH (TWC: Front Catalyst)
12142
6.REMOVE NO. 2 ENGINE OIL LEVEL DIPSTICK GUIDE
17119
7.REMOVE NO. 2 MANIFOLD STAY
17168
8.REMOVE NO. 2 EXHAUST MANIFOLD HEAT INSULATOR
17105
9.REMOVE EXHAUST MANIFOLD SUB-ASSEMBLY LH (TWC: Front Catalyst)
12315A
10.REMOVE ENGINE MOUNTING BRACKET RH
27020
11.REMOVE GENERATOR ASSEMBLY
16620
12.REMOVE V-RIBBED BELT TENSIONER ASSEMBLY
11452
13.REMOVE ENGINE OIL LEVEL DIPSTICK GUIDE
11322F
14.REMOVE NO. 2 TIMING GEAR COVER
16173
15.REMOVE WATER PUMP PULLEY
16604
16.REMOVE NO. 2 IDLER PULLEY SUB-ASSEMBLY
25860A
17.REMOVE NO. 1 VACUUM SWITCHING VALVE
11401G
18.REMOVE CRANKSHAFT POSITION SENSOR
15771
19.REMOVE NO. 1 OIL PIPE
15771M
20.REMOVE OIL PIPE
13471
21.REMOVE CRANKSHAFT PULLEY
15710
22.REMOVE OIL COOLER ASSEMBLY
15781
23.REMOVE NO. 1 OIL COOLER BRACKET
12315
24.REMOVE NO. 1 FRONT ENGINE MOUNTING BRACKET LH
16323
25.REMOVE WATER INLET HOUSING
11201
26.REMOVE CYLINDER HEAD COVER SUB-ASSEMBLY
11202
27.REMOVE CYLINDER HEAD COVER SUB-ASSEMBLY LH
12102A
28.REMOVE NO. 2 OIL PAN SUB-ASSEMBLY
15104
29.REMOVE OIL STRAINER SUB-ASSEMBLY
12101
30.REMOVE OIL PAN SUB-ASSEMBLY
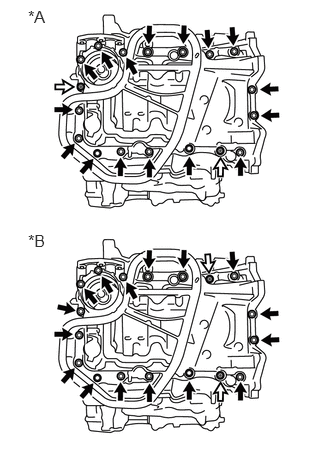
| *A | Type A |
| *B | Type B |

|
Bolt |

|
Nut |
Remove the 16 bolts and 2 nuts.
- HINT:
-
Be sure to clean the bolts and stud bolts and check the threads for cracks or other damage.
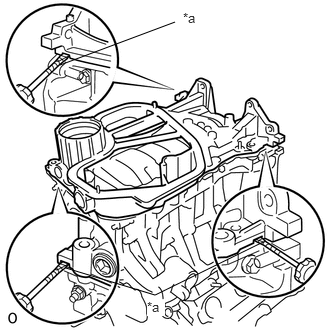
| *a | Protective Tape |
Remove the oil pan sub-assembly by prying between the oil pan sub-assembly and cylinder block sub-assembly with a screwdriver.
- NOTICE:
-
Be careful not to damage the contact surfaces of the cylinder block sub-assembly and oil pan sub-assembly.
- HINT:
-
Tape the screwdriver tip before use.
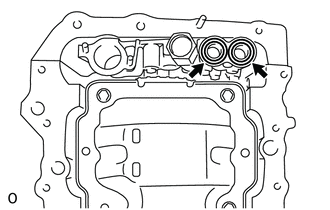
Remove the 2 O-rings.
11302
31.REMOVE TIMING CHAIN COVER SUB-ASSEMBLY
11301C
32.REMOVE TIMING CHAIN CASE OIL SEAL
33.SET NO. 1 CYLINDER TO TDC/COMPRESSION
13540
34.REMOVE NO. 1 CHAIN TENSIONER ASSEMBLY
13559
35.REMOVE CHAIN TENSIONER SLIPPER
13506
36.REMOVE CHAIN SUB-ASSEMBLY
13530
37.REMOVE IDLE SPROCKET ASSEMBLY
13050
38.REMOVE CAMSHAFT TIMING GEAR ASSEMBLY, CAMSHAFT TIMING EXHAUST GEAR ASSEMBLY AND NO. 2 CHAIN SUB-ASSEMBLY (for Bank 1)
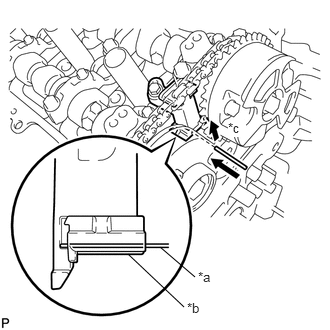
| *a | Pin |
| *b | Plunger |
| *c | Push |
While raising the No. 2 chain tensioner assembly, insert a 1.0 mm (0.0394 in.) diameter pin into the hole to secure the No. 2 chain tensioner assembly.
| *a | Turn |
| *b | Hold |
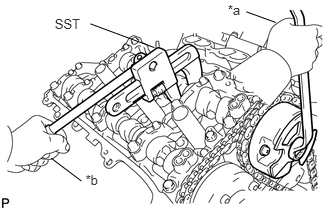
Using SST to hold the hexagonal portion of each camshaft, loosen the bolts of the camshaft timing gear assembly and the camshaft timing exhaust gear assembly.
- SST
- 09922-10010
- NOTICE:
- ·
Be careful not to damage the cylinder head sub-assembly RH with SST.
·Do not loosen the other bolts. If any of the bolts is loosened, replace the camshaft timing gear assembly and/or the camshaft timing exhaust gear assembly with a new one.
Remove the 2 bolts, camshaft timing gear assembly and camshaft timing exhaust gear assembly together with the No. 2 chain sub-assembly.
13550
39.REMOVE NO. 2 CHAIN TENSIONER ASSEMBLY
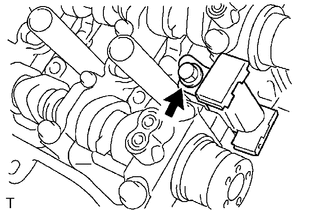
Remove the bolt and No. 2 chain tensioner assembly.
40.REMOVE CAMSHAFT BEARING CAP (for Bank 1)
| *a | Knock Pin |
| *b | Front View |
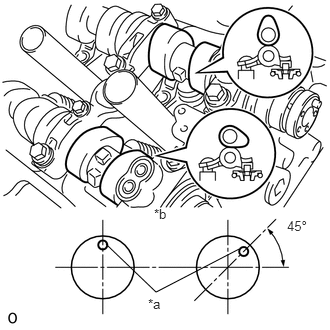
Check that the camshaft and No. 2 camshaft are positioned as shown in the illustration.
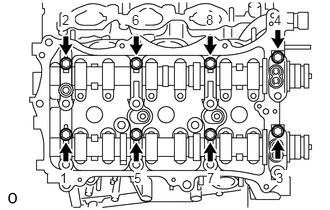
Uniformly loosen and remove the 8 bolts in several steps in the order shown in the illustration.
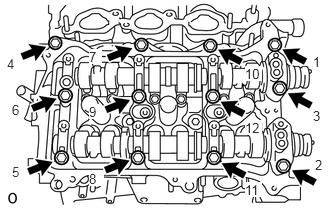
Uniformly loosen and remove the 12 bolts in several steps in the order shown in the illustration.
- NOTICE:
-
Uniformly loosen the bolts while keeping the camshaft and No. 2 camshaft level.
Remove the 5 camshaft bearing caps.
13511
41.REMOVE CAMSHAFT
Remove the camshaft.
13512
42.REMOVE NO. 2 CAMSHAFT
Remove the No. 2 camshaft.
11103C
43.REMOVE CAMSHAFT HOUSING SUB-ASSEMBLY RH
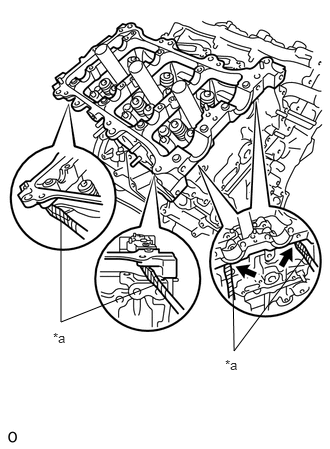
| *a | Protective Tape |
Remove the camshaft housing sub-assembly RH by prying between the cylinder head sub-assembly RH and camshaft housing sub-assembly RH with a screwdriver.
- NOTICE:
-
Be careful not to damage the contact surfaces of the cylinder head sub-assembly RH and camshaft housing sub-assembly RH.
- HINT:
-
Tape the screwdriver tip before use.
13050
44.REMOVE CAMSHAFT TIMING GEAR ASSEMBLY, CAMSHAFT TIMING EXHAUST GEAR ASSEMBLY AND NO. 2 CHAIN SUB-ASSEMBLY (for Bank 2)
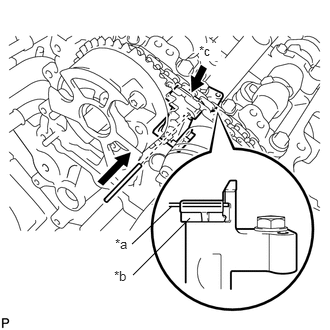
| *a | Pin |
| *b | Plunger |
| *c | Push |
While pushing down the No. 3 chain tensioner assembly, insert a 1.0 mm (0.0394 in.) diameter pin into the hole to secure the No. 3 chain tensioner assembly.
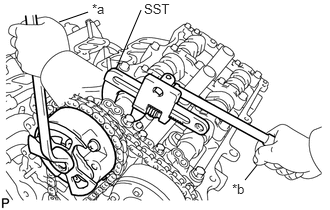
| *a | Turn |
| *b | Hold |
Using SST to hold the hexagonal portion of each camshaft, loosen the bolts of the camshaft timing gear assembly and the camshaft timing exhaust gear assembly.
- SST
- 09922-10010
- NOTICE:
- ·
Be careful not to damage the cylinder head sub-assembly LH with SST.
·Do not loosen the other bolts. If any of the bolts is loosened, replace the camshaft timing gear assembly and/or the camshaft timing exhaust gear assembly with a new one.
Remove the 2 bolts, camshaft timing gear assembly and camshaft timing exhaust gear assembly together with the No. 2 chain sub-assembly.
13560A
45.REMOVE NO. 3 CHAIN TENSIONER ASSEMBLY
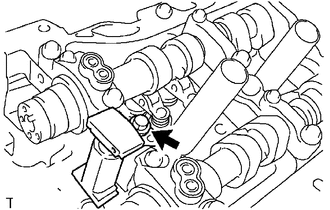
Remove the bolt and No. 3 chain tensioner assembly.
46.REMOVE CAMSHAFT BEARING CAP (for Bank 2)
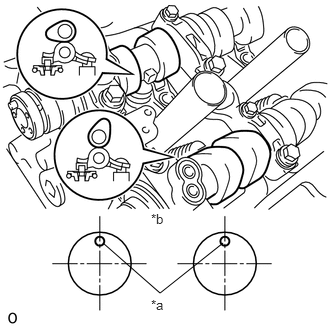
| *a | Knock Pin |
| *b | Front View |
Check that the No. 3 camshaft and No. 4 camshaft are positioned as shown in the illustration.
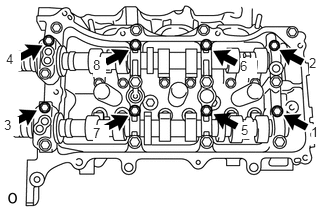
Uniformly loosen and remove the 8 bolts in several steps in the order shown in the illustration.
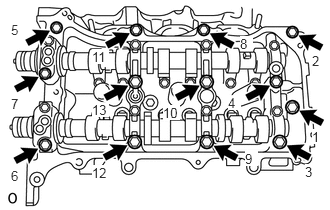
Uniformly loosen and remove the 13 bolts in several steps in the order shown in the illustration.
- NOTICE:
-
Uniformly loosen the bolts while keeping the No. 3 camshaft and No. 4 camshaft level.
Remove the 5 camshaft bearing caps.
13053
47.REMOVE NO. 3 CAMSHAFT
Remove the No. 3 camshaft.
13054
48.REMOVE NO. 4 CAMSHAFT
Remove the No. 4 camshaft.
11104A
49.REMOVE CAMSHAFT HOUSING SUB-ASSEMBLY LH
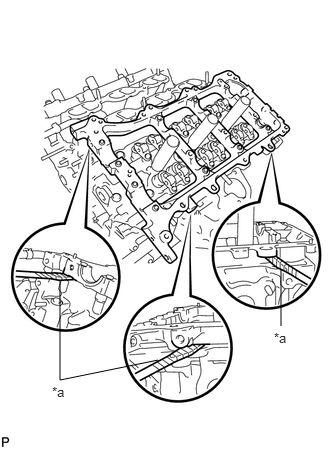
| *a | Protective Tape |
Remove the camshaft housing sub-assembly LH by prying between the cylinder head sub-assembly LH and camshaft housing sub-assembly LH with a screwdriver.
- NOTICE:
-
Be careful not to damage the contact surfaces of the cylinder head sub-assembly LH and camshaft housing sub-assembly LH.
- HINT:
-
Tape the screwdriver tip before use.