REAR SUSPENSION REAR SUSPENSION MEMBER(for HV Model) REMOVAL
CAUTION / NOTICE / HINT
The necessary procedures (adjustment, calibration, initialization, or registration) that must be performed after parts are removed and installed, or replaced during rear suspension member sub-assembly removal/installation are shown below.
| Replaced Part or Performed Procedure | Necessary Procedure | Effect/Inoperative Function when Necessary Procedure not Performed | Link |
|---|---|---|---|
|
*1: Learning can also be performed using the GTS. Click here( |
|||
for 4WD/AWD:
Auxiliary battery terminal is disconnected/reconnected |
Perform steering sensor zero point calibration | Lane Control System | ( ) |
| Parking Support Brake System*1 | |||
| Pre-collision System | |||
| Memorize steering angle neutral point | Parking Assist Monitor System | ()
|
|
| Panoramic View Monitor System | ()
|
||
| Initialize back door lock | Power Door Lock Control System | ()
|
|
| Reset back door close position | Power Back Door System | ()
|
|
| Rear wheel alignment adjustment | Perform "Calibration". | ·
DTCs are stored ·
ABS warning light illuminates ·
Brake system warning light (yellow indicator) illuminates ·
Slip indicator light illuminates ·
VSC disabled or malfunctions |
()
|
| Suspension, tires, etc.
(The vehicle height changes because of suspension or tire replacement) |
·
Measurement of ultrasonic sensor detection angle ·
Ultrasonic sensor detection angle registration |
Parking Support Brake System | ()
|
| Rear television camera assembly optical axis (Back camera position setting) | Parking Assist Monitor System | ()
|
|
·
Parking assist ECU initialization ·
Adjust steering angle |
Panoramic View Monitor System | ()
|
|
| Gas leak from exhaust system is repaired | Perform Inspection After Repair | ·
Poor idle, etc. ·
Engine start function, etc. |
()
|
- CAUTION:
- ·
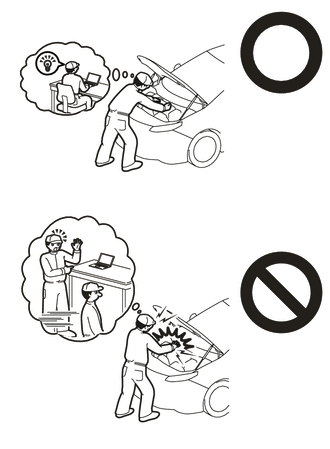
Orange wire harnesses and connectors indicate high-voltage circuits. To prevent electric shock, always follow the procedure described in the repair manual. (for 4WD/AWD)
Click hereEngine / Hybrid System>HYBRID / BATTERY CONTROL>HYBRID CONTROL SYSTEM (for 4WD/AWD)>PRECAUTION
·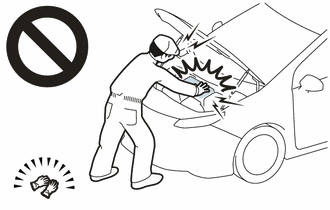
To prevent electric shock, wear insulated gloves when working on wire harnesses and components of the high voltage system. (for 4WD/AWD)
·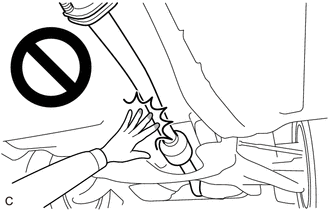
To prevent burns, do not touch the engine, exhaust pipe or other high temperature components while the engine is hot.
- NOTICE:
-
After the ignition switch is turned off, the radio and display receiver assembly or the radio receiver assembly records various types of memory and settings. As a result, after turning the ignition switch off, make sure to wait at least 120 seconds before disconnecting the cable from the negative (-) auxiliary battery terminal. (for 4WD/AWD)
PROCEDURE

 G3834
1.REMOVE SERVICE PLUG GRIP (for 4WD/AWD)
82111
2.DISCONNECT ENGINE ROOM MAIN WIRE (for 4WD/AWD)
3.REMOVE CONNECTOR COVER ASSEMBLY (for 4WD/AWD)
4.CHECK TERMINAL VOLTAGE (for 4WD/AWD)
5.INSTALL CONNECTOR COVER ASSEMBLY (for 4WD/AWD)
82111
6.CONNECT ENGINE ROOM MAIN WIRE (for 4WD/AWD)
7.REMOVE REAR WHEEL
17430
8.REMOVE TAIL EXHAUST PIPE ASSEMBLY
48738
9.REMOVE REAR SUSPENSION ARM COVER LH
48737
10.REMOVE REAR SUSPENSION ARM COVER RH
- HINT:
-
Perform the same procedure as for the LH side.
42312B
11.REMOVE REAR AXLE SHAFT NUT LH (for 4WD/AWD)
42311N
12.REMOVE REAR AXLE SHAFT NUT RH (for 4WD/AWD)
- HINT:
-
Perform the same procedure as for the LH side.
47319F
13.SEPARATE REAR FLEXIBLE HOSE LH
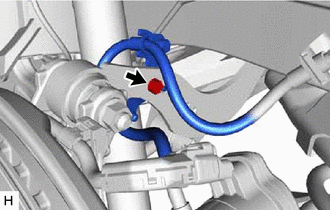
Remove the bolt and separate the rear flexible hose LH from the rear upper control arm assembly LH.
47318F
14.SEPARATE REAR FLEXIBLE HOSE RH
- HINT:
-
Perform the same procedure as for the LH side.
890C0A
15.DISCONNECT NO. 2 PARKING BRAKE WIRE ASSEMBLY (for 4WD/AWD)
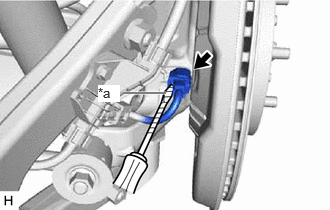
| *a | Protective Tape |
Using a screwdriver with its tip wrapped with protective tape, disconnect the No. 2 parking brake wire assembly connector from the rear skid control sensor.
- NOTICE:
- ·
Remove any dirt or foreign matter on and around the No. 2 parking brake wire assembly connector before performing this step.
·Do not allow water, oil or dirt to enter the No. 2 parking brake wire assembly connector.
·Be careful not to damage the rear skid control sensor or connector cover.
890C0
16.DISCONNECT NO. 1 PARKING BRAKE WIRE ASSEMBLY (for 4WD/AWD)
- HINT:
-
Perform the same procedure as for the LH side.
89544E
17.REMOVE REAR SKID CONTROL SENSOR LH (for 4WD/AWD)
89544D
18.REMOVE REAR SKID CONTROL SENSOR RH (for 4WD/AWD)
- HINT:
-
Perform the same procedure as for the LH side.
19.REMOVE REAR STABILIZER LINK ASSEMBLY LH
20.REMOVE REAR STABILIZER LINK ASSEMBLY RH
- HINT:
-
Perform the same procedure as for the LH side.
48812
21.REMOVE REAR STABILIZER BAR
48835
22.REMOVE REAR LOWER STABILIZER BRACKET
48231B
23.REMOVE REAR COIL SPRING LH
48231A
24.REMOVE REAR COIL SPRING RH
- HINT:
-
Perform the same procedure as for the LH side.
48258C
25.REMOVE REAR LOWER COIL SPRING INSULATOR LH
48258B
26.REMOVE REAR LOWER COIL SPRING INSULATOR RH
- HINT:
-
Perform the same procedure as for the LH side.
48740F
27.REMOVE REAR NO. 2 SUSPENSION ARM ASSEMBLY LH
48730F
28.REMOVE REAR NO. 2 SUSPENSION ARM ASSEMBLY RH
- HINT:
-
Perform the same procedure as for the LH side.
48720A
29.REMOVE REAR NO. 1 SUSPENSION ARM ASSEMBLY LH
48710A
30.REMOVE REAR NO. 1 SUSPENSION ARM ASSEMBLY RH
- HINT:
-
Perform the same procedure as for the LH side.
48790
31.SEPARATE REAR UPPER CONTROL ARM ASSEMBLY LH
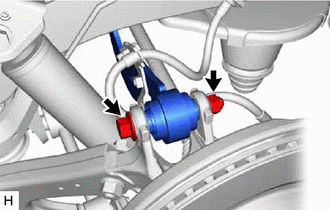
Remove the bolt and nut and separate the rear upper control arm assembly LH from the rear axle carrier sub-assembly LH.
- NOTICE:
-
Because the nut has its own stopper, do not turn the nut. Loosen the bolt with the nut secured.
48770A
32.SEPARATE REAR UPPER CONTROL ARM ASSEMBLY RH
- HINT:
-
Use the same procedure as for the LH side.
33.DRAIN HYBRID TRANSAXLE FLUID (for 4WD/AWD)
42340B
34.REMOVE REAR DRIVE SHAFT ASSEMBLY LH (for 4WD/AWD)
42330
35.REMOVE REAR DRIVE SHAFT ASSEMBLY RH (for 4WD/AWD)
- HINT:
-
Use the same procedure as for the LH side.
42341C
36.REMOVE REAR DRIVE SHAFT LH SNAP RING (for 4WD/AWD)
42341B
37.REMOVE REAR DRIVE SHAFT RH SNAP RING (for 4WD/AWD)
- HINT:
-
Use the same procedure as for the LH side.
82164
38.SEPARATE FRAME WIRE (for 4WD/AWD)
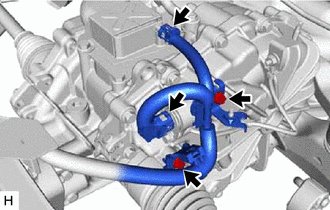
Disconnect the 2 connectors.
Remove the 2 bolts to separate the frame wire from the rear traction motor with transaxle assembly.
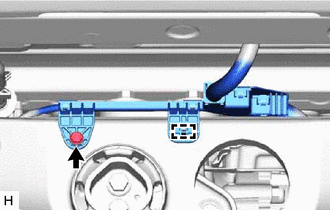
Remove the bolt and disengage the clamp to separate the frame wire from the rear suspension member sub-assembly.
821H1
39.DISCONNECT FLOOR UNDER WIRE (for 4WD/AWD)
- CAUTION:
-
Be sure to wear insulated gloves.
- NOTICE:
-
Insulate the disconnected connectors with insulating tape.
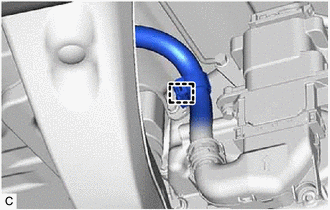
Disengage the clamp.
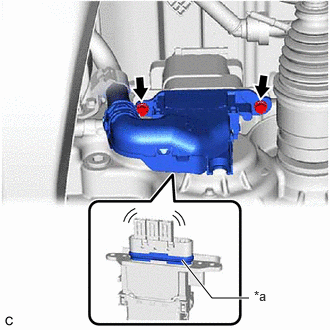
| *a | Waterproof Seal |
Remove the 2 bolts and HV floor under wire from the rear traction motor with transaxle assembly.
- NOTICE:
- ·
Do not damage the terminals, interlock connector or rear traction motor with transaxle assembly during disconnection.
·Do not touch the waterproof seal or terminals of the connector.
·Do not allow any foreign matter or water to enter the rear traction motor with transaxle assembly.
·Although the connector may feel loose, this is not due to a malfunction.
51206A
40.REMOVE REAR SUSPENSION MEMBER SUB-ASSEMBLY
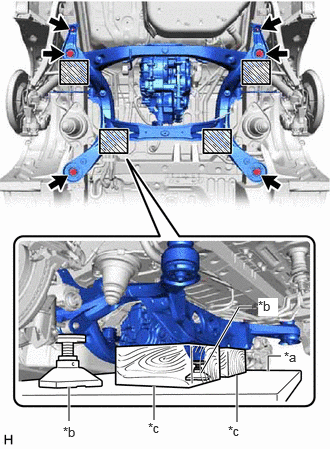
| *a | Engine Lifter |
| *b | Attachment |
| *c | Wooden Block |

|
Attachment and Wooden Block Placement Location |
Using an engine lifter, 2 attachments and 2 wooden blocks or equivalent tools, support the rear suspension member sub-assembly as shown in the illustration.
- CAUTION:
-
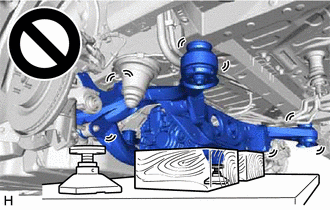
- ·
The rear suspension member sub-assembly is a very heavy component. Make sure that it is supported securely.
·If the rear suspension member sub-assembly is not securely supported, it may drop, resulting in serious injury.
- NOTICE:
-
Use attachments and wooden blocks to keep the rear suspension member sub-assembly level.
Remove the 4 bolts, 2 nuts, 2 rear lower suspension braces, rear lower suspension member stopper LH and rear lower suspension member stopper RH.
Slowly lower the rear suspension member sub-assembly.
- NOTICE:
-
When lowering the rear suspension member sub-assembly, be careful not to damage the vehicle body or other components installed to the vehicle.
G1050
41.REMOVE REAR TRACTION MOTOR WITH TRANSAXLE ASSEMBLY (for 4WD/AWD)
52272
42.REMOVE REAR SUSPENSION MEMBER UPPER STOPPER
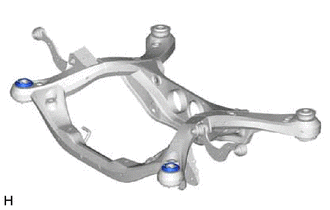
Remove the 2 rear suspension member upper stoppers from the rear suspension member sub-assembly.
52278A
43.REMOVE REAR SUSPENSION MEMBER LOWER STOPPER RETAINER
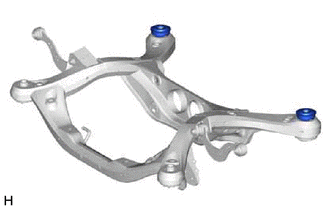
Remove the 2 rear suspension member lower stopper retainers from the rear suspension member sub-assembly.
48790
44.REMOVE REAR UPPER CONTROL ARM ASSEMBLY LH
48770A
45.REMOVE REAR UPPER CONTROL ARM ASSEMBLY RH
- HINT:
-
Perform the same procedure as for the LH side.
41651G
46.REMOVE DIFFERENTIAL MOUNT CUSHION (for 4WD/AWD)
Using SST, remove the differential mount cushion from the rear suspension member sub-assembly.
- SST
- 09570-24011
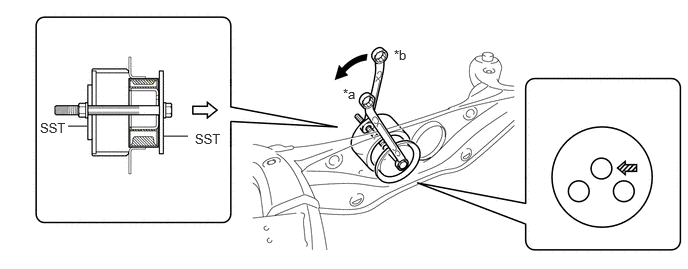
| *a | Hold | *b | Turn |

|
Front of the Vehicle | 
|
SST Bolt Position |
- NOTICE:
- ·
Apply molybdenum grease to the threads and tip of the SST center bolt before use.
·Be sure to install the SST bolt straight.
52271D
47.REMOVE REAR SUSPENSION MEMBER FRONT BODY MOUNTING CUSHION (for LH Side)
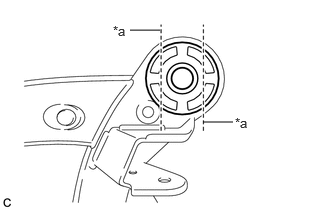
| *a | Bend Portion |
Using a chisel and hammer, bend the 2 portions of the rear suspension member front body mounting cushion rib.
- NOTICE:
-
Make sure to bend the 2 portions of the cushion rib until the claws of SST can fit securely.
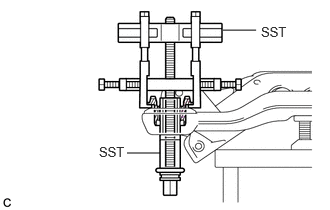
Install SST as shown in the illustration.
- SST
- 09830-10010 (09830-01010, 09830-01040, 09830-01050)
09950-40011 (09951-04020, 09952-04010, 09954-04010, 09955-04051, 09958-04011)
- NOTICE:
-
Apply molybdenum grease to the threads and tip of the SST center bolt before use.
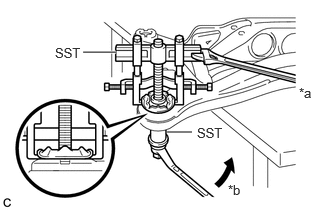
| *a | Hold |
| *b | Turn |
Using SST, remove the rear suspension member front body mounting cushion while applying lubricant into the clearance between the rear suspension member front body mounting cushion and the rear suspension member sub-assembly.
- SST
- 09830-10010 (09830-01010, 09830-01040, 09830-01050)
09950-40011 (09951-04020, 09952-04010, 09954-04010, 09955-04051, 09958-04011)
- NOTICE:
- ·
Set the claws of SST onto the rear suspension member sub-assembly securely as shown in the illustration.
·Tighten SST slowly and evenly.
·Be careful as the rear suspension member front body mounting cushion may fly out.
·The rear suspension member front body mounting cushion cannot be reused.
Remove SST and the rear suspension member front body mounting cushion (LH Side) from the rear suspension member sub-assembly.
52271D
48.REMOVE REAR SUSPENSION MEMBER FRONT BODY MOUNTING CUSHION (for RH Side)
- HINT:
-
Perform the same procedure as for the LH side.
52276A
49.REMOVE REAR SUSPENSION MEMBER REAR BODY MOUNT CUSHION LH
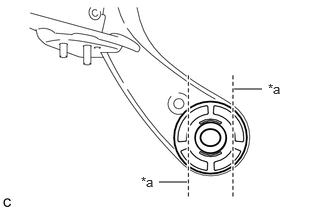
| *a | Bend Portion |
Using a chisel and hammer, bend the 2 portions of the rear suspension member rear body mount cushion LH rib.
- NOTICE:
-
Make sure to bend the 2 portions of the cushion rib until the claws of SST can fit securely.
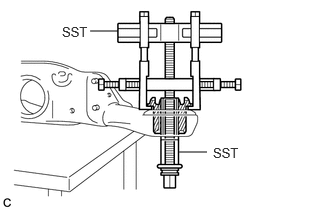
Install SST as shown in the illustration.
- SST
- 09830-10010 (09830-01010, 09830-01040, 09830-01050)
09950-40011 (09951-04020, 09952-04010, 09954-04010, 09955-04051, 09958-04011)
- NOTICE:
-
Apply molybdenum grease to the threads and tip of the SST center bolt before use.
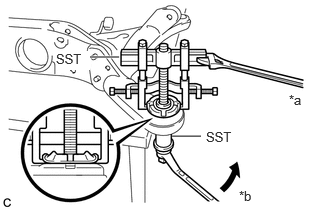
| *a | Hold |
| *b | Turn |
Using SST, remove the rear suspension member rear body mount cushion LH while applying lubricant into the clearance between the rear suspension member rear body mount cushion LH and the rear suspension member sub-assembly.
- SST
- 09830-10010 (09830-01010, 09830-01040, 09830-01050)
09950-40011 (09951-04020, 09952-04010, 09954-04010, 09955-04051, 09958-04011)
- NOTICE:
- ·
Set the claws of SST onto the rear suspension member sub-assembly securely as shown in the illustration.
·Tighten SST slowly and evenly.
·Be careful as the rear suspension member rear body mount cushion LH may fly out.
·The rear suspension member rear body mount cushion LH cannot be reused.
Remove SST and the rear suspension member rear body mount cushion LH from the rear suspension member sub-assembly.
52275B
50.REMOVE REAR SUSPENSION MEMBER REAR BODY MOUNT CUSHION RH
- HINT:
-
Perform the same procedure as for the LH side.
51.REMOVE BOLT (for 2WD)
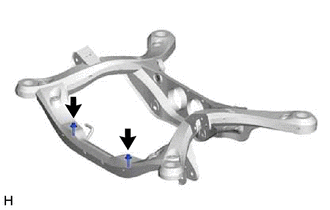
Remove the 2 bolts from the rear suspension member sub-assembly.
52.REMOVE HOLE PLUG
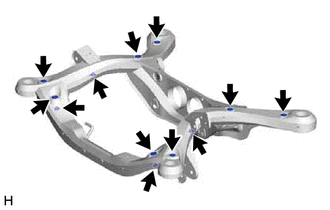
Remove the 12 hole plugs from the rear suspension member sub-assembly as shown in the illustration.