1KD-FTV ENGINE MECHANICAL CYLINDER HEAD GASKET INSTALLATION
CAUTION / NOTICE / HINT
- NOTICE:
- ·
When replacing the injectors (including shuffling the injectors between the cylinders), common rail or cylinder head, it is necessary to replace the injection pipes with new ones.
·When replacing the fuel supply pump, common rail, cylinder block, cylinder head, cylinder head gasket or timing gear case, it is necessary to replace the fuel inlet pipe with a new one.
PROCEDURE

 11115
1.INSTALL CYLINDER HEAD GASKET
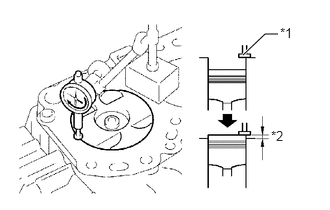
Find where the piston head protrudes most by slowly turning the crankshaft clockwise and counterclockwise.
| *1 | Measuring Tip |
| *2 | Protrusion |
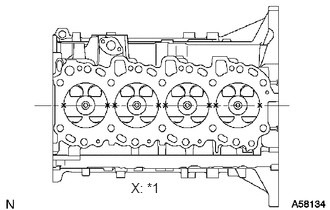
Measure the piston protrusion of each cylinder at 2 points as shown in the illustration.
| *1 | Measuring Point |
For the piston protrusion value of each cylinder, use the average of the 2 measurements of each cylinder.
- Piston protrusion:
0.005 to 0.255 mm (0.000197 to 0.0100 in.)
- HINT:
-
After installing the piston and connecting rod assembly, if the protrusion is not as specified, remove the piston and connecting rod assembly and reinstall them.
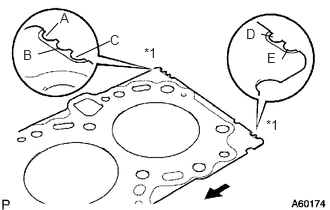
Select a new cylinder head gasket.
| *1 | Cutout Mark |

|
Front |
- HINT:
-
New cylinder head gaskets are available in 5 sizes, and are marked A, B, C, D or E.
- New Cylinder Head Gasket Thickness:
Mark Specified Condition A 0.80 to 0.90 mm (0.0315 to 0.0354 in.) B 0.85 to 0.95 mm (0.0335 to 0.0374 in.) C 0.90 to 1.00 mm (0.0354 to 0.0394 in.) D 0.95 to 1.05 mm (0.0374 to 0.0413 in.) E 1.00 to 1.10 mm (0.0394 to 0.0433 in.)
Select the largest piston protrusion value from the measurements made. Then select a new gasket to the table below.
- Gasket Size:
Item Specified Condition Piston protrusion 0.005 to 0.054 mm (0.000197 to 0.00213 in.) 0.055 to 0.104 mm (0.00217 to 0.00409 in.) 0.105 to 0.154 mm (0.00413 to 0.00606 in.) 0.155 to 0.204 mm (0.00610 to 0.00803 in.) 0.205 to 0.255 mm (0.00807 to 0.0100 in.) Use gasket A B C D E
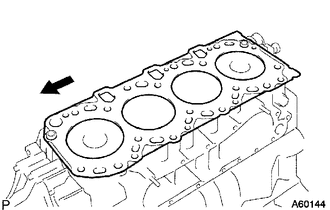
Place the cylinder head gasket on the cylinder block.
|
|
Front |
- NOTICE:
-
Make sure the gasket is installed facing the proper direction.
11101
2.INSTALL CYLINDER HEAD SUB-ASSEMBLY
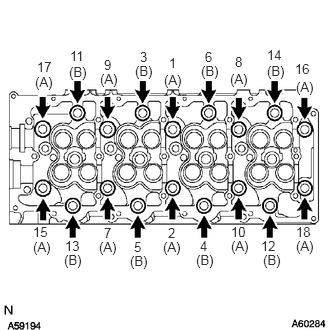
- HINT:
- ·
The cylinder head bolts are tightened in 3 progressive steps.
·If any bolt is broken or deformed, replace it (See page Engine / Hybrid System>1KD-FTV (ENGINE MECHANICAL)>ENGINE UNIT>INSPECTION).
Place the cylinder head on the cylinder head gasket.
Apply a light coat of engine oil on the threads and under the heads of the cylinder head bolts.
Install the 18 washers with the 18 cylinder head bolts, and uniformly tighten the bolts, in several passes in the sequence shown in the illustration.
- Torque:
- 85 N*m (867 kgf*cm, 63 ft.*lbf)
- Bolt length A:
110 mm (4.33 in.)
- Bolt length B:
167 mm (6.57 in.)
If any of the cylinder head bolts does not meet the torque specification, replace it.
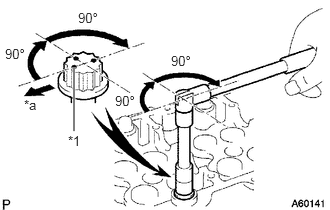
Mark the front of each cylinder head bolt with paint.
| *1 | Painted Mark |
| *a | Front |
Further tighten the cylinder head bolts by 90° in the sequence shown in the illustration above.
Tighten the cylinder head bolts by an additional 90°.
Check that the painted marks are now facing rearward.
13511
3.INSTALL CAMSHAFT
12581C
4.INSTALL CYLINDER BLOCK INSULATOR
Install the cylinder block insulator to the cylinder head.
11322B
5.INSTALL NO. 2 TIMING BELT COVER
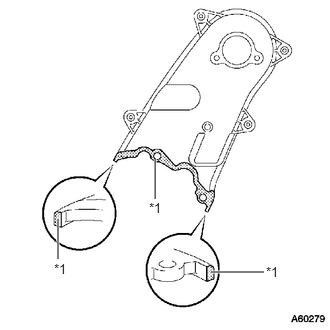
Apply seal packing (FIPG) to the specified areas shown in the illustration.
- Seal packing:
Toyota Genuine Seal Packing Black, Three Bond 1207B or equivalent
| *1 | Seal Packing |
- NOTICE:
-
After applying seal packing, install the No. 2 timing belt cover within 3 minutes and tighten the bolts and nut within 15 minutes.
Install the No. 2 timing belt cover with the 4 bolts and nut.
- Torque:
- 10 N*m (102 kgf*cm, 7 ft.*lbf)
13523P
6.INSTALL CAMSHAFT TIMING PULLEY
Install the camshaft timing pulley.
Install the bolt of the camshaft timing pulley while holding the camshaft with a wrench.
- Torque:
- 98 N*m (1000 kgf*cm, 72 ft.*lbf)
13505
7.INSTALL NO. 1 TIMING BELT IDLER SUB-ASSEMBLY
13568
8.INSTALL TIMING BELT
Install the timing belt (See page Engine / Hybrid System>1KD-FTV (ENGINE MECHANICAL)>TIMING BELT>INSTALLATION).
9.INSPECT AND ADJUST VALVE CLEARANCE
23670
10.INSTALL INJECTOR ASSEMBLY
11.INSPECT FOR FUEL LEAK
11201
12.INSTALL CYLINDER HEAD COVER SUB-ASSEMBLY
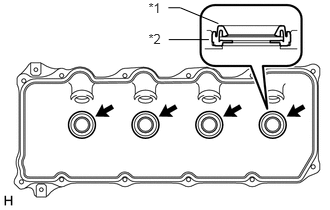
Install 4 new No. 3 cylinder head cover gaskets to the cylinder head cover in the directions shown in the illustration.
| *1 | No. 3 Cylinder Head Cover Gasket |
| *2 | Cylinder Head Cover |
- NOTICE:
- ·
Do not install the No. 3 cylinder head cover gaskets at an angle.
·Check that there is no foreign matter at the installation location of the No. 3 cylinder head cover gaskets.
Remove any old seal packing (FIPG material) from the cylinder head.
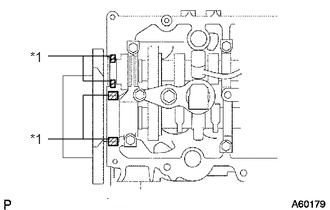
Apply seal packing to the areas shown in the illustration.
- Seal packing:
Toyota Genuine Seal Packing Black, Three Bond 1207B or equivalent
| *1 | Seal Packing |
- NOTICE:
- ·
Remove any oil from the contact surface.
·Install the cylinder head cover within 3 minutes after applying seal packing.
·Do not start the engine for at least 2 hours after installation.
Install a new gasket and the cylinder head cover with the 10 bolts and 2 nuts.
- Torque:
- 9.0 N*m (92 kgf*cm, 80 in.*lbf)
23681A
13.INSTALL NOZZLE HOLDER SEAL
Install 4 new nozzle holder seals.
25708
14.INSTALL NO. 3 VACUUM TRANSMITTING PIPE SUB-ASSEMBLY
Install the No. 3 vacuum transmitting pipe with the bolt.
- Torque:
- 18 N*m (184 kgf*cm, 13 ft.*lbf)
Connect the vacuum hose.
11202D
15.INSTALL NO. 2 CYLINDER HEAD COVER SUB-ASSEMBLY
23810A
16.INSTALL COMMON RAIL ASSEMBLY
17136
17.INSTALL NO. 2 INTAKE MANIFOLD INSULATOR
23804C
18.INSTALL FUEL INLET PIPE SUB-ASSEMBLY
19850
19.INSTALL GLOW PLUG ASSEMBLY
Install the glow plugs (See page Engine / Hybrid System>1KD-FTV (STARTING)>GLOW PLUG>INSTALLATION).
17111
20.INSTALL INTAKE MANIFOLD
Install the intake manifold (See page Engine / Hybrid System>1KD-FTV (INTAKE / EXHAUST)>INTAKE MANIFOLD>INSTALLATION).
17141
21.INSTALL EXHAUST MANIFOLD WITH TURBOCHARGER
Install the exhaust manifold with turbocharger (See page Engine / Hybrid System>1KD-FTV (INTAKE / EXHAUST)>EXHAUST MANIFOLD W/ TURBOCHARGER>INSTALLATION).
23.CONNECT CABLE TO NEGATIVE BATTERY TERMINAL
- NOTICE:
-
When disconnecting the cable, some systems need to be initialized after the cable is reconnected (See page General>INTRODUCTION>REPAIR INSTRUCTION>INITIALIZATION).
24.BLEED AIR FROM FUEL SYSTEM
25.ADD ENGINE COOLANT
26.INSPECT FOR COOLANT LEAK
27.INSPECT FOR OIL LEAK
28.INSPECT FOR FUEL LEAK
29.INSPECT ENGINE OIL LEVEL
51405A
30.INSTALL NO. 1 ENGINE UNDER COVER SUB-ASSEMBLY
52129B
31.INSTALL FRONT BUMPER LOWER COVER