1KD-FTV COOLING WATER PUMP REMOVAL
PROCEDURE

 1.DISCONNECT CABLE FROM NEGATIVE BATTERY TERMINAL
- NOTICE:
- ·
After turning the ignition switch off, waiting time may be required before disconnecting the cable from the battery terminal. Therefore, make sure to read the disconnecting the cable from the battery terminal notice before proceeding with work (See page General>INTRODUCTION>REPAIR INSTRUCTION>PRECAUTION).
·When disconnecting the cable, some systems need to be initialized after the cable is reconnected (See page General>INTRODUCTION>REPAIR INSTRUCTION>INITIALIZATION).
53292A
2.REMOVE UPPER RADIATOR SUPPORT SEAL
52129B
3.REMOVE FRONT BUMPER LOWER COVER
51405A
4.REMOVE NO. 1 ENGINE UNDER COVER SUB-ASSEMBLY
51450
5.REMOVE ENGINE REAR UNDER COVER ASSEMBLY
6.DRAIN ENGINE COOLANT
25800
7.REMOVE ELECTRIC EGR CONTROL VALVE ASSEMBLY (w/ EGR System)
Remove the electric EGR control valve assembly (See page Engine / Hybrid System>1KD-FTV (EMISSION CONTROL)>EGR COOLER>REMOVAL).
87245A
8.DISCONNECT INLET HEATER WATER HOSE (w/o EGR System)
25709E
9.DISCONNECT NO. 4 VACUUM TRANSMITTING PIPE SUB-ASSEMBLY (w/o EGR System)
17113E
10.REMOVE NO. 1 INTAKE PIPE (w/o EGR System)
22267A
11.REMOVE THROTTLE BODY BRACKET (w/o EGR System)
23701
12.REMOVE NO. 1, NO. 2 AND NO. 3 INJECTION PIPE (w/o EGR System)
17871A
13.REMOVE AIR CONNECTOR STAY (w/o EGR System)
14.DISCONNECT ENGINE WIRE (w/o EGR System)
26100G
15.REMOVE INTAKE AIR CONNECTOR WITH DIESEL THROTTLE BODY ASSEMBLY (w/o EGR System)
17118
16.REMOVE MANIFOLD STAY WITH VACUUM SWITCHING VALVE
23704
17.REMOVE NO. 4 INJECTION PIPE SUB-ASSEMBLY
11202D
18.REMOVE NO. 2 CYLINDER HEAD COVER SUB-ASSEMBLY
87452A
19.REMOVE FRONT HEATER BRACKET (for Cold Area Specification Vehicles)
16571C
20.REMOVE NO. 1 RADIATOR HOSE
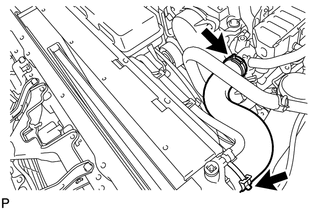
82123
21.REMOVE NO. 3 ENGINE WIRE (for Cold Area Specification Vehicles)
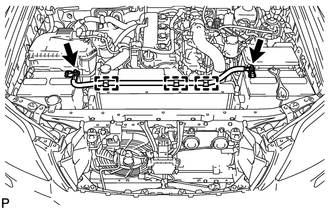
Remove the 2 nuts from the battery terminal.
Detach the 3 wire harness clamps.
Remove the No. 3 engine wire from the fan shroud.
17341F
22.REMOVE NO. 1 AIR HOSE
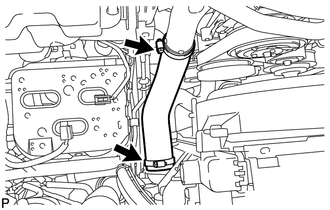
Loosen the 2 clamps.
Remove the No. 1 air hose from the inlet pipe and intercooler.
17342F
23.REMOVE INTERCOOLER AIR HOSE
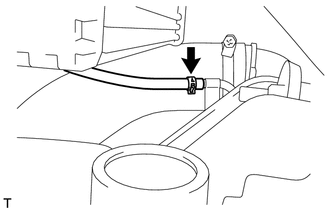
Disconnect the No. 2 vacuum transmitting hose from the intercooler.
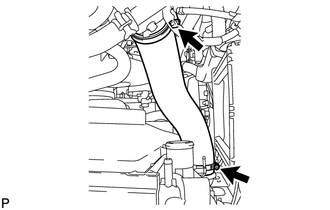
Loosen the 2 clamps.
Remove the intercooler hose from the intake pipe and intercooler.
16711
24.REMOVE FAN SHROUD
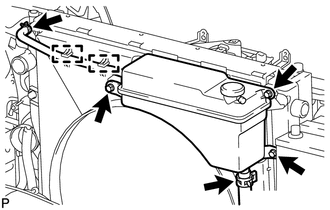
Disconnect the No. 1 water by-pass hose and detach the 2 clamps from the fan shroud.
Disconnect the No. 2 water by-pass hose from the radiator reservoir.
Remove the 3 bolts and radiator reservoir.
for Automatic Transmission:
Remove the inlet and outlet oil cooler hoses and detach the clamp from the fan shroud.
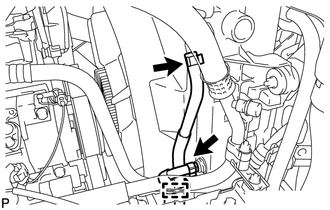
Disconnect the 2 oil cooler hoses from the radiator.
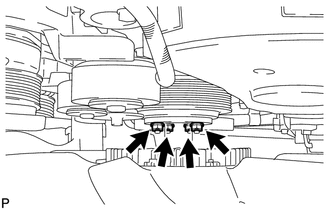
Loosen the 4 nuts holding the fluid coupling and fan.
Remove the fan and generator V belt (See page Engine / Hybrid System>1KD-FTV (ENGINE MECHANICAL)>DRIVE BELT>REMOVAL).
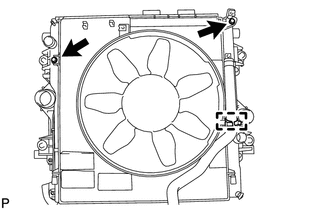
Remove the 2 bolts holding the fan shroud.
Remove the 4 nuts for the fan with fluid coupling fan, and then remove the shroud together with the coupling fan.
- NOTICE:
-
Be careful not to damage the radiator core.
Detach the No. 2 water by-pass hose from the hose clamp on the fan shroud.
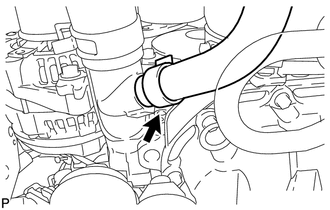
Remove the No. 2 water by-pass hose from the water inlet.
Remove the fan pulley from the water pump.
17881
25.REMOVE NO. 1 AIR CLEANER HOSE
17705
26.REMOVE AIR CLEANER CAP SUB-ASSEMBLY
17801
27.REMOVE AIR CLEANER FILTER ELEMENT SUB-ASSEMBLY
28.REMOVE AIR CLEANER CASE SUB-ASSEMBLY
17275A
29.REMOVE COMPRESSOR OUTLET ELBOW
87120G
30.REMOVE VISCOUS WITH MAGNET CLUTCH HEATER ASSEMBLY (for Cold Area Specification Vehicles)
87101
31.REMOVE NO. 1 VISCOUS HEATER BRACKET SUB-ASSEMBLY (for Cold Area Specification Vehicles)
88320
32.DISCONNECT COOLER COMPRESSOR ASSEMBLY (w/ Air Conditioning System)
12511C
33.REMOVE GENERATOR BRACKET
27020
34.REMOVE GENERATOR ASSEMBLY
88431
35.REMOVE NO. 1 COMPRESSOR MOUNTING BRACKET
12229
36.REMOVE VENTILATION PIPE
11201
37.REMOVE CYLINDER HEAD COVER SUB-ASSEMBLY
11322A
38.REMOVE NO. 1 TIMING BELT COVER
13568
39.REMOVE TIMING BELT
13523P
40.REMOVE CAMSHAFT TIMING PULLEY
13505
41.REMOVE NO. 1 TIMING BELT IDLER SUB-ASSEMBLY
11322B
42.REMOVE NO. 2 TIMING BELT COVER
12581C
43.REMOVE CYLINDER BLOCK INSULATOR
16100
44.REMOVE ENGINE WATER PUMP ASSEMBLY
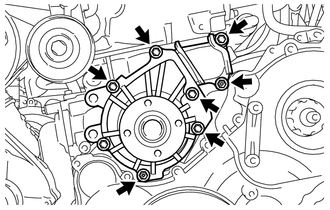
Remove the 2 nuts, 5 bolts, engine water pump assembly and the gasket from the cylinder block sub-assembly.
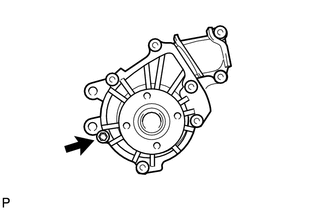
Remove the bolt, water pump assembly without cover and the gasket from the water pump cover.
45.REPLACE STUD BOLT
- HINT:
-
Perform this procedure only when replacement of the stud bolts is necessary.
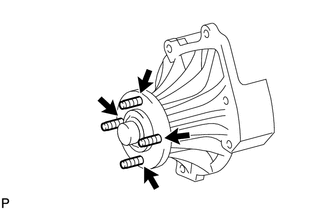
Remove the 4 stud bolts from the water pump assembly without cover.
Install the 4 stud bolts to the water pump assembly without cover.
- Torque:
- 7.8 N*m (80 kgf*cm, 69 in.*lbf)
16100B
46.REPLACE WATER PUMP SET RING PIN
- HINT:
-
Perform this procedure only when replacement of the water pump set ring pin is necessary.
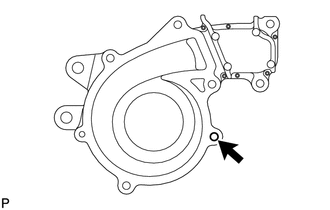
Remove the water pump set ring pin from the water pump cover.
Using a plastic-faced hammer, tap in the water pump set ring pin to the water pump cover.