DOOR / HATCH BACK DOOR REASSEMBLY
PROCEDURE

 67290
1.INSTALL BACK DOOR DAMPER ASSEMBLY (w/ Power Back Door)
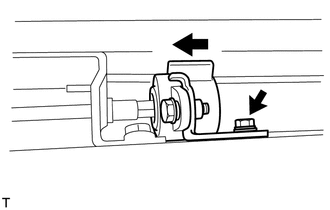
When reusing the back door damper assembly:
Install the back door damper assembly with the bolt.
- Torque:
- 7.5 N*m (76 kgf*cm, 66 in.*lbf)
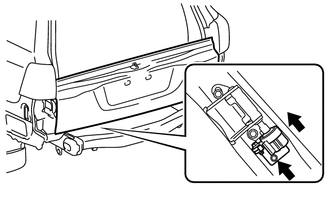
When installing a new back door damper assembly:
With closing the tail gate, install a new back door damper assembly with the bolt.
- Torque:
- 7.5 N*m (76 kgf*cm, 66 in.*lbf)
65707A
2.INSTALL TAIL GATE STAY SUB-ASSEMBLY LH
Clean the threaded surface on the vehicle body with a non-residue solvent.
Apply adhesive to the threads of the screws.
- Adhesive:
Toyota Genuine Adhesive 1324, Three Bond 1324 or equivalent
Using a T40 "TORX" wrench, install the 2 screws and tail gate stay.
65706A
3.INSTALL TAIL GATE STAY SUB-ASSEMBLY RH
- HINT:
-
Use the same procedure described for the LH side.
69390A
4.INSTALL LOWER TAIL GATE LOCK ASSEMBLY LH
w/o Power Back Door:
Using a T30 "TORX" wrench, install the 3 screws and lower tail gate lock assembly LH.
- Torque:
- 5.0 N*m (51 kgf*cm, 44 in.*lbf)
w/ Power Back Door:
Using a T30 "TORX" wrench, install the 4 screws and lower tail gate lock assembly LH.
- Torque:
- 5.0 N*m (51 kgf*cm, 44 in.*lbf)
Connect the connector.
69690
5.INSTALL BACK DOOR REMOTE CONTROL ASSEMBLY
w/o Power Back Door:
Connect the left side cable.
Using a T30 "TORX" wrench, install the 2 screws and back door remote control assembly.
- Torque:
- 5.0 N*m (51 kgf*cm, 44 in.*lbf)
w/ Power Back Door:
Connect the connector.
Using a T30 "TORX" wrench, install the 2 screws and back door remote control assembly.
- Torque:
- 5.0 N*m (51 kgf*cm, 44 in.*lbf)
69380A
6.INSTALL LOWER TAIL GATE LOCK ASSEMBLY RH
w/o Power Back Door:
Connect the cable to the lower tail gate lock assembly RH.
Using a T30 "TORX" wrench, install the 3 screws and lower tail gate lock assembly RH.
- Torque:
- 5.0 N*m (51 kgf*cm, 44 in.*lbf)
w/ Power Back Door:
Using a T30 "TORX" wrench, install the 4 screws and lower tail gate lock assembly RH.
- Torque:
- 5.0 N*m (51 kgf*cm, 44 in.*lbf)
Connect the connector.
69291
7.INSTALL BACK DOOR INSIDE HANDLE ASSEMBLY
Install the back door handle grommet.
Install the screw and back door inside handle assembly.
- Torque:
- 5.0 N*m (51 kgf*cm, 44 in.*lbf)
68846B
8.INSTALL BACK DOOR TORSION BAR GUIDE
Attach the 2 claws to install the back door torsion bar guide.
68870
9.INSTALL LOWER BACK DOOR TORSION BAR ASSEMBLY
Install the 4 bolts and lower back door torsion bar assembly.
- Torque:
- 7.5 N*m (76 kgf*cm, 66 in.*lbf)
10.INSTALL SPARE TIRE
11.INSTALL REAR BUMPER ASSEMBLY
for Standard:
Install the rear bumper assembly (See page Vehicle Exterior>EXTERIOR PANELS / TRIM>REAR BUMPER(for Standard)>INSTALLATION).
w/ Towing Hitch:
Install the rear bumper assembly (See page Vehicle Exterior>EXTERIOR PANELS / TRIM>REAR BUMPER (w/ Towing Hitch)>INSTALLATION).
w/ Pintle Hook:
Install the rear bumper assembly (See page Vehicle Exterior>EXTERIOR PANELS / TRIM>REAR BUMPER(w/ Pintle Hook)>INSTALLATION).
75132C
12.INSTALL REAR LICENSE LIGHT COVER (w/ Tire Carrier)
81270
13.INSTALL LICENSE PLATE LIGHT ASSEMBLY (w/ Tire Carrier)
76802C
14.INSTALL NO. 2 BACK DOOR OUTSIDE GARNISH SUB-ASSEMBLY (w/ Tire Carrier)
64780A
15.INSTALL BACK DOOR TRIM PANEL ASSEMBLY
Attach the 16 clips to install the back door trim panel assembly.
Install the 4 bolts.
64893
16.INSTALL BACK DOOR TRIM COVER RH
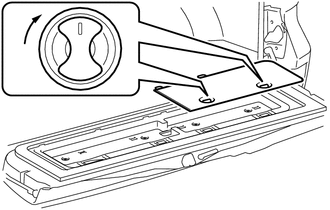
Install the back door trim cover RH as shown in the illustration.
64894
17.INSTALL BACK DOOR TRIM COVER LH
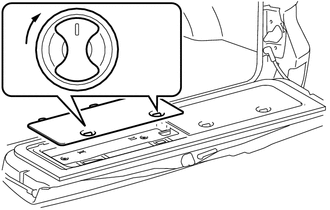
Install the back door trim cover LH as shown in the illustration.
58574A
18.INSTALL REAR FLOOR MAT REAR SUPPORT PLATE
68960
19.INSTALL BACK DOOR STAY ASSEMBLY LH
68950C
20.INSTALL BACK DOOR STAY ASSEMBLY RH
- HINT:
-
Use the same procedure described for the LH side.
85345R
21.INSTALL REAR WASHER NOZZLE
76085
22.INSTALL REAR SPOILER SUB-ASSEMBLY (w/ Rear Spoiler)
64886B
23.INSTALL BACK DOOR GLASS CHANNEL LH (w/o Power Back Door)
64885C
24.INSTALL BACK DOOR GLASS CHANNEL RH (w/o Power Back Door)
- HINT:
-
Use the same procedure described for the LH side.
76801B
25.INSTALL BACK DOOR OUTSIDE GARNISH SUB-ASSEMBLY
81590A
26.INSTALL REAR LIGHT ASSEMBLY LH
81580D
27.INSTALL REAR LIGHT ASSEMBLY RH
- HINT:
-
Use the same procedure described for the LH side.
67281F
28.INSTALL LOWER BACK DOOR STOPPER
Install the bolt and lower back door stopper.
29.INSTALL CUSHION
Install the 2 cushions.
68281B
30.INSTALL LIFT GATE WEATHERSTRIP
Attach the 25 clips to install the lift gate weatherstrip.
- NOTICE:
-
Do not pull strongly on the lift gate weatherstrip as it may tear.
86790D
31.INSTALL REAR TELEVISION CAMERA ASSEMBLY (w/ Parking Assist Monitor System or Rear View Monitor System)
84840G
32.INSTALL BACK DOOR OPENER SWITCH ASSEMBLY
81270
33.INSTALL LICENSE PLATE LIGHT ASSEMBLY (for Standard)
84930
34.INSTALL DOOR CONTROL SWITCH ASSEMBLY (w/ Power Back Door)
69350
35.INSTALL BACK DOOR LOCK ASSEMBLY
69321
36.INSTALL BACK DOOR LOCK COVER
85110R
37.INSTALL REAR WIPER MOTOR ASSEMBLY
85143R
38.INSTALL REAR WIPER MOTOR GROMMET
39.INSTALL REAR WIPER ARM AND BLADE ASSEMBLY
84280D
40.INSTALL POWER BACK DOOR SENSOR ASSEMBLY LH (w/ Power Back Door)
84270G
41.INSTALL POWER BACK DOOR SENSOR ASSEMBLY RH (w/ Power Back Door)
- HINT:
-
Use the same procedure described for the LH side.
86160T
42.INSTALL REAR HEADER SPEAKER ASSEMBLY (for 14 Speakers)
67935B
43.INSTALL BACK DOOR GARNISH
Attach the 14 clips to install the back door garnish.
67847
44.INSTALL BACK DOOR SERVICE HOLE COVER RH (w/ Power Back Door)
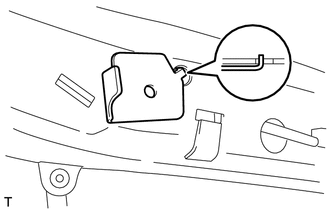
Install the back door stay plate.
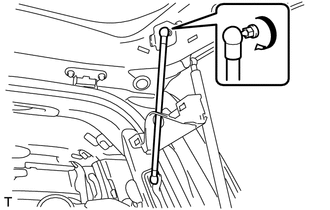
Pass the power back door rod through the hole of the back door service hole cover RH and install the rod with the bolt.
- Torque:
- : 18 N*m (184 kgf*cm, 13 ft.*lbf)
Move the back door to a half-open position so that the hole in the center of the back door service hole cover RH is aligned lengthwise with the power back door rod.
Attach the 2 clips and install the back door service hole cover RH.
- NOTICE:
-
If the back door is in a fully-open position, the power back door rod will interfere with the hole of the back door service hole cover, so do not perform this operation with the back door in a fully open position.
67938A
45.INSTALL BACK DOOR SIDE GARNISH LH
Attach the 3 clips and 2 claws to install the back door side garnish LH.
67937B
46.INSTALL BACK DOOR SIDE GARNISH RH
w/o Power Back Door:
- HINT:
-
Use the same procedure described for the LH side.
w/ Power Back Door:
Attach the clip and 4 claws to install the back door side garnish RH.
81570
47.INSTALL CENTER STOP LIGHT ASSEMBLY
67939B
48.INSTALL CENTER BACK DOOR GARNISH
Attach the 5 clips and 4 claws to install the center back door garnish.
69478
49.INSTALL LOWER BACK DOOR STOPPER CUSHION
Install the 2 lower back door stopper cushions with the 4 bolts.
69195
50.INSTALL BACK DOOR GRIP
Attach the claw.
Install the back door grip with the 2 screws.
Attach the 5 claws to close the cover.
51.CONNECT CABLE TO NEGATIVE BATTERY TERMINAL
- NOTICE:
-
When disconnecting the cable, some systems need to be initialized after the cable is reconnected (See page General>INTRODUCTION>REPAIR INSTRUCTION>INITIALIZATION).
86790D
52.ADJUST REAR TELEVISION CAMERA ASSEMBLY
w/ Parking Assist Monitor System:
(See page Audio / Visual / Telematics>PARK ASSIST / MONITORING>PARKING ASSIST MONITOR SYSTEM>CALIBRATION)
w/ Multi-terrain Monitor System:
(See page Audio / Visual / Telematics>PARK ASSIST / MONITORING>MULTI-TERRAIN MONITOR SYSTEM>CALIBRATION)