METER / GAUGE / DISPLAY METER / GAUGE SYSTEM B150718 Turn Signal Light Circuit Current Below Threshold
DESCRIPTION
| DTC No. | Detection Item | DTC Detection Condition | Trouble Area |
|---|---|---|---|
| B150718 | Turn Signal Light Circuit Current Below Threshold |
Diagnosis Condition:
Battery voltage is 10 V or more
Malfunction Status:
·
Open in front turn signal light circuit
·
Open in side turn signal light circuit
·
Open in rear turn signal light circuit |
·
Headlight unit assembly (w/ Headlight ECU)
·
Headlight housing (w/o Headlight ECU)
·
Headlight lens sub-assembly
·
Headlight ECU sub-assembly (w/ Headlight ECU)
·
Side turn signal light assembly
·
Outer mirror retractor
·
Outer mirror control ECU assembly (w/ Outer Mirror Control ECU Assembly)
·
Rear combination light cord
·
Rear combination light assembly
·
Rear light socket and wire (for Sequential Type Turn Signal Light)
·
Rear light assembly (for Sequential Type Turn Signal Light)
·
Harness or connector
·
Combination meter assembly |
WIRING DIAGRAM
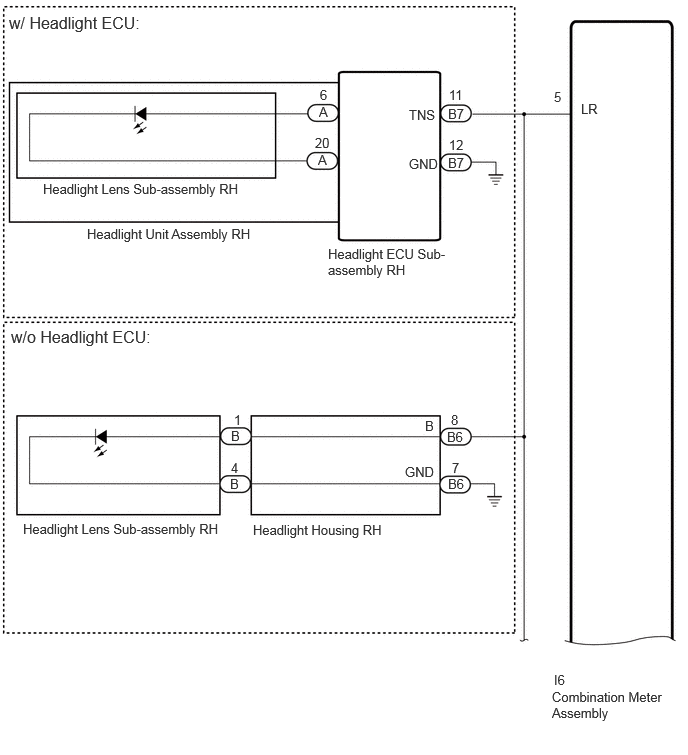
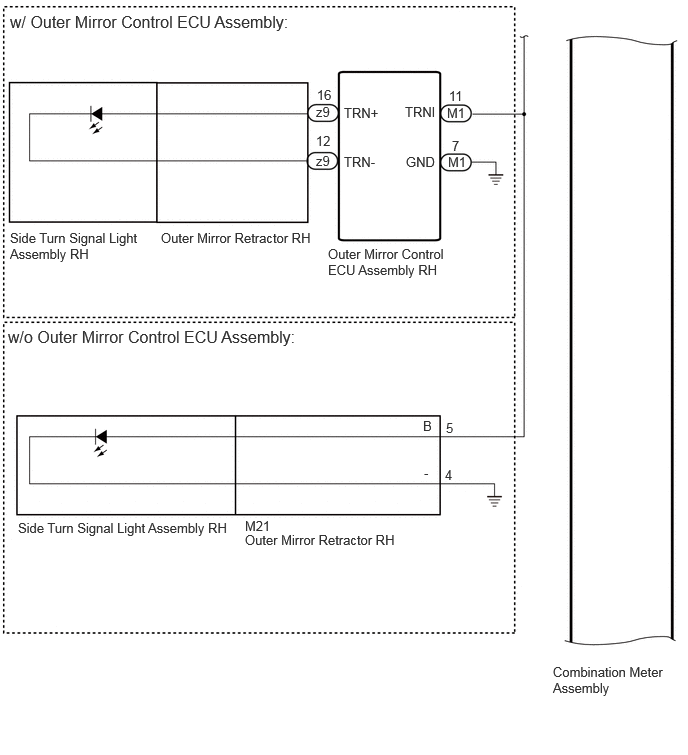
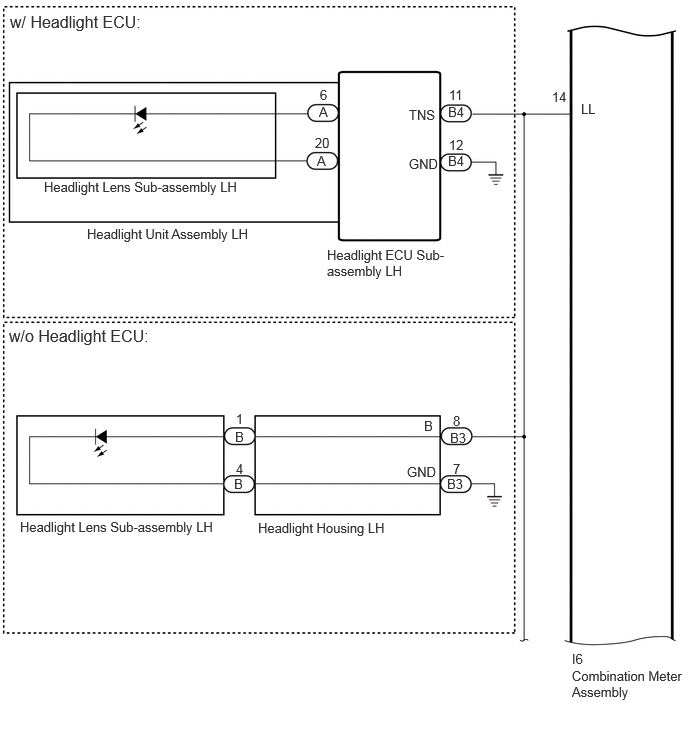
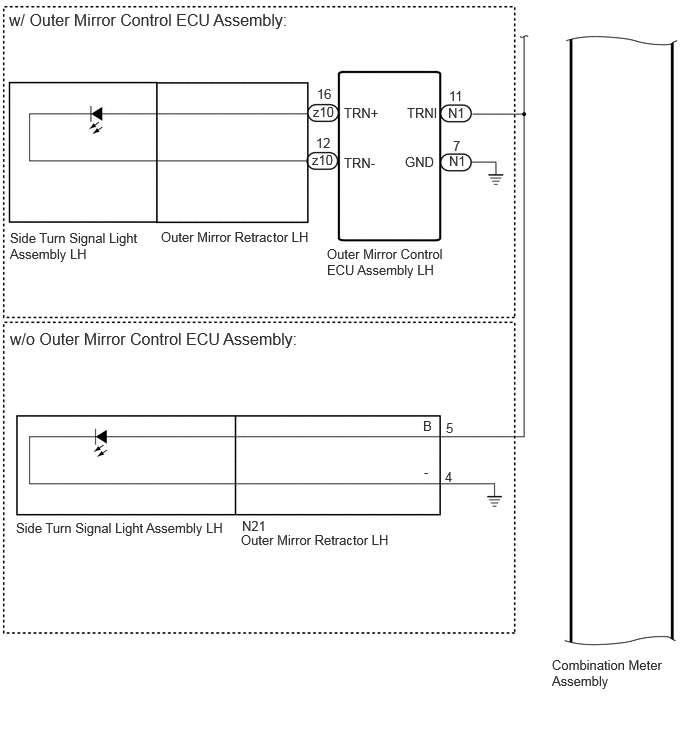
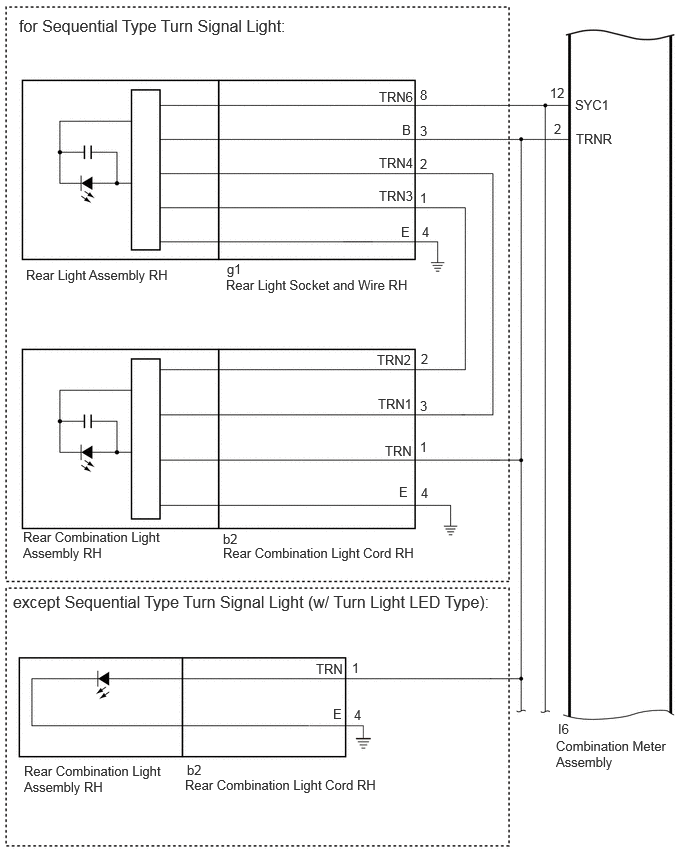
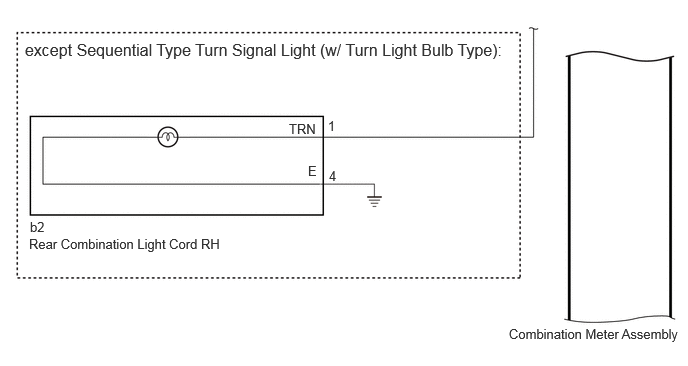
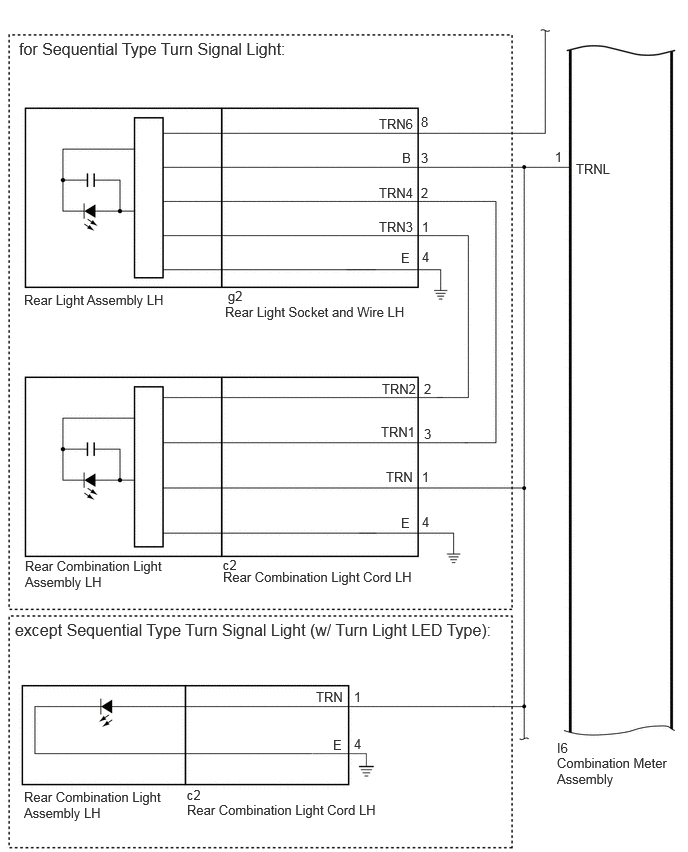
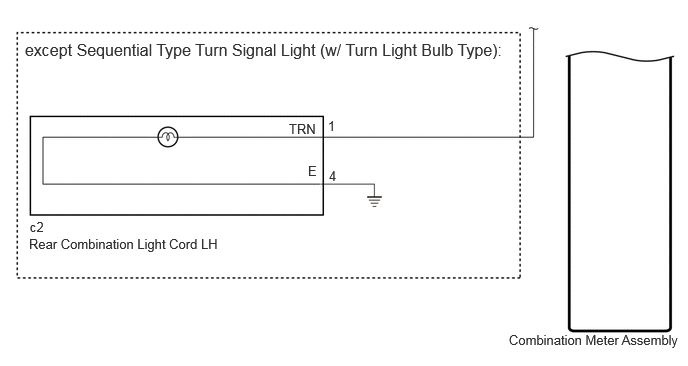
CAUTION / NOTICE / HINT
- NOTICE:
-
·
When replacing the combination meter assembly, always replace it with a new one. If a combination meter assembly which was installed to another vehicle is used, the information stored in it will not match the information from the vehicle and a DTC may be stored.
·Inspect the bulbs before performing the following procedure. (w/ Turn Light Bulb Type)
-
w/ Headlight ECU:
-
·
If the headlight ECU sub-assembly LH has been replaced, it is necessary to synchronize the vehicle information and initialize the headlight ECU sub-assembly LH.
Click hereVehicle Exterior>LIGHTING (EXT)>LIGHTING SYSTEM (w/ Headlight ECU)>REGISTRATION
·When the combination meter assembly is replaced, update the ECU security key.
Click hereGeneral>SETUP>WHEN REPLACING OR REMOVING/INSTALLING PARTS>UPDATE ECU SECURITY KEY
PROCEDURE
Inspect the illumination of each turn signal light.
- Result:
-
Result Proceed to Front turn signal light LH and side turn signal light LH do not blink. A Front turn signal light RH and side turn signal light RH do not blink. B Front turn signal light LH does not blink. C Front turn signal light RH does not blink. D Side turn signal light LH does not blink. E Side turn signal light RH does not blink. F Rear turn signal light LH does not blink. G Rear turn signal light RH does not blink. H
A
B
C
D
E
F
G
H
Check vehicle condition.
- Result:
-
Result Proceed to w/ Headlight ECU A w/o Headlight ECU B
A
B
Disconnect the I6 combination meter assembly connector.
Disconnect the B4 headlight ECU sub-assembly LH connector.
Measure the resistance according to the value(s) in the table below.
- Standard Resistance:
-
Tester Connection Condition Specified Condition Click Location & Routing(I6,B4)Location & Routingewd_type=routing;type=c,c;code=I6,B4
I6-14 (LL) - B4-11 (TNS) Always Below 1 Ω
- Result:
-
Proceed to OK NG
OK
NG
Disconnect the I6 combination meter assembly connector.
Disconnect the B3 headlight housing LH connector.
Measure the resistance according to the value(s) in the table below.
- Standard Resistance:
-
Tester Connection Condition Specified Condition Click Location & Routing(I6,B3)Location & Routingewd_type=routing;type=c,c;code=I6,B3
I6-14 (LL) - B3-8 (B) Always Below 1 Ω
- Result:
-
Proceed to OK NG
OK
NG
Check vehicle condition.
- Result:
-
Result Proceed to w/ Headlight ECU A w/o Headlight ECU B
A
B
Disconnect the I6 combination meter assembly connector.
Disconnect the B7 headlight ECU sub-assembly RH connector.
Measure the resistance according to the value(s) in the table below.
- Standard Resistance:
-
Tester Connection Condition Specified Condition Click Location & Routing(I6,B7)Location & Routingewd_type=routing;type=c,c;code=I6,B7
I6-5 (LR) - B7-11 (TNS) Always Below 1 Ω
- Result:
-
Proceed to OK NG
OK
NG
Disconnect the I6 combination meter assembly connector.
Disconnect the B6 headlight housing RH connector.
Measure the resistance according to the value(s) in the table below.
- Standard Resistance:
-
Tester Connection Condition Specified Condition Click Location & Routing(I6,B6)Location & Routingewd_type=routing;type=c,c;code=I6,B6
I6-5 (LR) - B6-8 (B) Always Below 1 Ω
- Result:
-
Proceed to OK NG
OK
NG
Check vehicle condition.
- Result:
-
Result Proceed to w/ Headlight ECU A w/o Headlight ECU B
A
B
Disconnect the I6 combination meter assembly connector.
Disconnect the B4 headlight ECU sub-assembly LH connector.
Measure the resistance according to the value(s) in the table below.
- Standard Resistance:
-
Tester Connection Condition Specified Condition Click Location & Routing(I6,B4)Location & Routingewd_type=routing;type=c,c;code=I6,B4
I6-14 (LL) - B4-11 (TNS) Always Below 1 Ω
- Result:
-
Proceed to OK NG
OK
NG
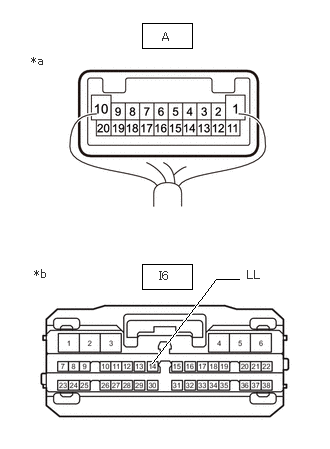
| *a | Component with harness connected (Headlight ECU Sub-assembly LH) |
| *b | Front view of wire harness connector (to Combination Meter Assembly) |
Remove the headlight ECU sub-assembly LH as a unit with the connectors still connected.
Click hereVehicle Exterior>LIGHTING (EXT)>HEADLIGHT ECU>REMOVAL
Disconnect the I6 combination meter assembly connector.
Measure the resistance according to the value(s) in the table below.
- Standard Resistance:
-
Tester Connection Condition Specified Condition Click Location & Routing(I6)Location & Routingewd_type=routing;type=c;code=I6
A-6 - I6-14 (LL) Always Below 1 Ω A-20 - Body ground Always Below 1 Ω
- Result:
-
Proceed to OK NG
OK
NG
Remove the headlight unit assembly LH and RH.
Interchange the headlight unit assembly LH with RH and connect the connectors.
Operate the turn signal switch and check that the LH side turn signal light operates normally.
- NOTICE:
-
If the LH side front turn signal light operates normally, return the headlight unit assembly LH and headlight unit assembly RH that were interchanged in a previous step back to their original conditions so that a component of the headlight unit assembly LH can be inspected in the next step.
- Result:
-
Result Proceed to LH side front turn signal light operates normally A Problem symptoms do not change
(LH side front turn signal light does not blink)B
A
B
Disconnect the I6 combination meter assembly connector.
Disconnect the B3 headlight housing LH connector.
Measure the resistance according to the value(s) in the table below.
- Standard Resistance:
-
Tester Connection Condition Specified Condition Click Location & Routing(I6,B3)Location & Routingewd_type=routing;type=c,c;code=I6,B3
I6-14 (LL) - B3-8 (B) Always Below 1 Ω B3-7 (GND) - Body ground Always Below 1 Ω
- Result:
-
Proceed to OK NG
OK
NG
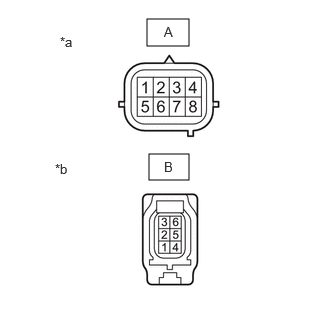
| *a | Component without harness connected (Headlight Housing LH) |
| *b | Component without harness connected (to Headlight Lens Sub-assembly LH) |
Remove the headlight housing LH.
Click hereVehicle Exterior>LIGHTING (EXT)>HEADLIGHT ASSEMBLY>DISASSEMBLY
Measure the resistance according to the value(s) in the table below.
- Standard Resistance:
-
Tester Connection Condition Specified Condition A-8 - B-1 Always Below 1 Ω A-7 - B-4 Always Below 1 Ω
- Result:
-
Proceed to OK NG
OK
NG
Check vehicle condition.
- Result:
-
Result Proceed to w/ Headlight ECU A w/o Headlight ECU B
A
B
Disconnect the I6 combination meter assembly connector.
Disconnect the B7 headlight ECU sub-assembly RH connector.
Measure the resistance according to the value(s) in the table below.
- Standard Resistance:
-
Tester Connection Condition Specified Condition Click Location & Routing(I6,B7)Location & Routingewd_type=routing;type=c,c;code=I6,B7
I6-5 (LR) - B7-11 (TNS) Always Below 1 Ω
- Result:
-
Proceed to OK NG
OK
NG
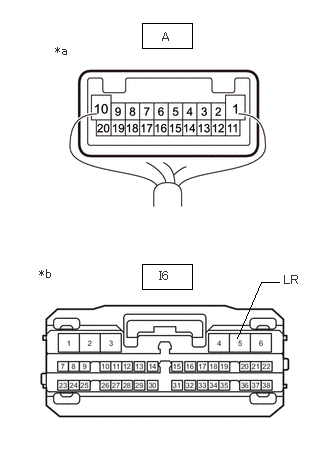
| *a | Component with harness connected (Headlight ECU Sub-assembly RH) |
| *b | Front view of wire harness connector (to Combination Meter Assembly) |
Remove the headlight ECU sub-assembly RH as a unit with the connectors still connected.
Click hereVehicle Exterior>LIGHTING (EXT)>HEADLIGHT ECU>REMOVAL
Disconnect the I6 combination meter assembly connector.
Measure the resistance according to the value(s) in the table below.
- Standard Resistance:
-
Tester Connection Condition Specified Condition Click Location & Routing(I6)Location & Routingewd_type=routing;type=c;code=I6
A-6 - I6-5 (LR) Always Below 1 Ω A-20 - Body ground Always Below 1 Ω
- Result:
-
Proceed to OK NG
OK
NG
Remove the headlight unit assembly LH and RH.
Interchange the headlight unit assembly LH with RH and connect the connectors.
Operate the turn signal switch and check that the RH side turn signal light operates normally.
- NOTICE:
-
If the RH side front turn signal light operates normally, return the headlight unit assembly LH and headlight unit assembly RH that were interchanged in a previous step back to their original conditions so that a component of the headlight unit assembly RH can be inspected in the next step.
- Result:
-
Result Proceed to RH side front turn signal light operates normally A Problem symptoms do not change
(RH side front turn signal light does not blink)B
A
B
Disconnect the I6 combination meter assembly connector.
Disconnect the B6 headlight housing RH connector.
Measure the resistance according to the value(s) in the table below.
- Standard Resistance:
-
Tester Connection Condition Specified Condition Click Location & Routing(I6,B6)Location & Routingewd_type=routing;type=c,c;code=I6,B6
I6-5 (LR) - B6-8 (B) Always Below 1 Ω B6-7 (GND) - Body ground Always Below 1 Ω
- Result:
-
Proceed to OK NG
OK
NG
| *a | Component without harness connected (to Headlight Housing RH) |
| *b | Component without harness connected (to Headlight Lens Sub-assembly RH) |
Remove the headlight housing RH.
Click hereVehicle Exterior>LIGHTING (EXT)>HEADLIGHT ASSEMBLY>DISASSEMBLY
Measure the resistance according to the value(s) in the table below.
- Standard Resistance:
-
Tester Connection Condition Specified Condition A-8 - B-1 Always Below 1 Ω A-7 - B-4 Always Below 1 Ω
- Result:
-
Proceed to OK NG
OK
NG
Check vehicle condition.
- Result:
-
Result Proceed to w/ Outer Mirror Control ECU Assembly A w/o Outer Mirror Control ECU Assembly B
A
B
Disconnect the N1 outer mirror control ECU assembly LH connector.
Disconnect the I6 combination meter assembly connector.
Measure the resistance according to the value(s) in the table below.
- Standard Resistance:
-
Tester Connection Condition Specified Condition Click Location & Routing(I6,N1)Location & Routingewd_type=routing;type=c,c;code=I6,N1
Click Connector(N1)Body>Front Door Wire LH>Outer Mirror Control ECU Assembly LHewd_type=component;type=c;code=N1;pinno=11,7
I6-14 (LL) - N1-11 (TRNI) Always Below 1 Ω N1-7 (GND) - Body ground Always Below 1 Ω
- Result:
-
Proceed to OK NG
OK
NG
OK
NG
Click hereVehicle Exterior>LIGHTING (EXT)>SIDE TURN SIGNAL LIGHT ASSEMBLY>INSPECTION
- Result:
-
Proceed to OK NG
OK
NG
OK
NG
Click hereVehicle Exterior>LIGHTING (EXT)>SIDE TURN SIGNAL LIGHT ASSEMBLY>INSPECTION
- Result:
-
Proceed to OK NG
OK
NG
Check vehicle condition.
- Result:
-
Result Proceed to w/ Outer Mirror Control ECU Assembly A w/o Outer Mirror Control ECU Assembly B
A
B
Disconnect the M1 outer mirror control ECU assembly RH connector.
Disconnect the I6 combination meter assembly connector.
Measure the resistance according to the value(s) in the table below.
- Standard Resistance:
-
Tester Connection Condition Specified Condition Click Location & Routing(I6,M1)Location & Routingewd_type=routing;type=c,c;code=I6,M1
Click Connector(M1)Body>Front Door Wire RH>Outer Mirror Control ECU Assembly RHewd_type=component;type=c;code=M1;pinno=11,7
I6-5 (LR) - M1-11 (TRNI) Always Below 1 Ω M1-7 (GND) - Body ground Always Below 1 Ω
- Result:
-
Proceed to OK NG
OK
NG
OK
NG
Click hereVehicle Exterior>LIGHTING (EXT)>SIDE TURN SIGNAL LIGHT ASSEMBLY>INSPECTION
- Result:
-
Proceed to OK NG
OK
NG
OK
NG
Click hereVehicle Exterior>LIGHTING (EXT)>SIDE TURN SIGNAL LIGHT ASSEMBLY>INSPECTION
- Result:
-
Proceed to OK NG
OK
NG
Check vehicle condition.
- Result:
-
Result Proceed to for Sequential Type Turn Signal Light A except Sequential Type Turn Signal Light (w/ Turn Light LED Type) B except Sequential Type Turn Signal Light (w/ Turn Light Bulb Type) C
A
B
C
Inspect the illumination of each turn signal light.
- Result:
-
Result Proceed to All LH side rear turn signal lights do not blink. A Rear light assembly LH does not illuminate. B Rear combination light assembly LH does not illuminate. C
A
B
C
Disconnect the I6 combination meter assembly connector.
Disconnect the c2 rear combination light cord LH connector.
Measure the resistance according to the value(s) in the table below.
- Standard Resistance:
-
Tester Connection Condition Specified Condition Click Location & Routing(I6,c2)Location & Routingewd_type=routing;type=c,c;code=I6,c2
Click Connector(c2)Body>No. 8 Floor Wire>Rear Combination Light Assembly LHewd_type=component;type=c;code=c2;pinno=1,4
I6-1 (TRNL) - c2-1 (TRN) Always Below 1 Ω c2-4 (E) - Body ground Always Below 1 Ω
- Result:
-
Proceed to OK NG
OK
NG
Disconnect the I6 combination meter assembly connector.
Disconnect the g2 rear light socket and wire LH connector.
Measure the resistance according to the value(s) in the table below.
- Standard Resistance:
-
Tester Connection Condition Specified Condition Click Location & Routing(I6,g2)Location & Routingewd_type=routing;type=c,c;code=I6,g2
Click Connector(g2)Body>No. 1 Rear Window Wire / No. 2 Back Door Wire>Rear Light Assembly LHewd_type=component;type=c;code=g2;pinno=3,4
I6-1 (TRNL) - g2-3 (B) Always Below 1 Ω g2-4 (E) - Body ground Always Below 1 Ω
- Result:
-
Proceed to OK NG
OK
NG
Disconnect the g2 rear light socket and wire LH connector.
Disconnect the c2 rear combination light cord LH connector.
Measure the resistance according to the value(s) in the table below.
- Standard Resistance:
-
Tester Connection Condition Specified Condition Click Location & Routing(g2,c2)Location & Routingewd_type=routing;type=c,c;code=g2,c2
Click Connector(g2)Body>No. 1 Rear Window Wire / No. 2 Back Door Wire>Rear Light Assembly LHewd_type=component;type=c;code=g2;pinno=2,1
Click Connector(c2)Body>No. 8 Floor Wire>Rear Combination Light Assembly LHewd_type=component;type=c;code=c2;pinno=3,2
g2-2 (TRN4) - c2-3 (TRN1) Always Below 1 Ω g2-1(TRN3) - c2-2 (TRN2) Always Below 1 Ω
- Result:
-
Proceed to OK NG
OK
NG
OK
NG
Click hereVehicle Exterior>LIGHTING (EXT)>REAR COMBINATION LIGHT ASSEMBLY>INSPECTION
- Result:
-
Proceed to OK NG
OK
NG
Measure the voltage according to the value(s) in the table below.
- Standard Voltage:
-
Tester Connection Condition Specified Condition Click Location & Routing(I6)Location & Routingewd_type=routing;type=c;code=I6
I6-1 (TRNL) - Body ground Ignition switch ON, LH turn indicator light blinking 11 to 14 V ←→ Below 1 V
- Result:
-
Proceed to OK NG
OK
NG
Remove the rear light assembly LH and RH.
Interchange the rear light assembly LH with RH and connect the connectors.
Operate the turn signal switch and check that the LH side front turn signal light operates normally.
- NOTICE:
-
If the LH side rear turn signal light operates normally, return the rear light assembly LH and rear light assembly RH that were interchanged in a previous step back to their original conditions so that a component of the rear light assembly LH can be inspected in the next step.
- Result:
-
Proceed to OK NG
OK
NG
Disconnect the I6 combination meter assembly connector.
Disconnect the g2 rear light socket and wire LH connector.
Measure the resistance according to the value(s) in the table below.
- Standard Resistance:
-
Tester Connection Condition Specified Condition Click Location & Routing(I6,g2)Location & Routingewd_type=routing;type=c,c;code=I6,g2
Click Connector(g2)Body>No. 1 Rear Window Wire / No. 2 Back Door Wire>Rear Light Assembly LHewd_type=component;type=c;code=g2;pinno=3,4
I6-1 (TRNL) - g2-3 (B) Always Below 1 Ω g2-4 (E) - Body ground Always Below 1 Ω
- Result:
-
Proceed to OK NG
OK
NG
OK
NG
Measure the voltage according to the value(s) in the table below.
- Standard Voltage:
-
Tester Connection Condition Specified Condition Click Location & Routing(I6)Location & Routingewd_type=routing;type=c;code=I6
I6-1 (TRNL) - Body ground Ignition switch ON, LH turn indicator light blinking 11 to 14 V ←→ Below 1 V
- Result:
-
Proceed to OK NG
OK
NG
Disconnect the I6 combination meter assembly connector.
Disconnect the c2 rear combination light cord LH connector.
Measure the resistance according to the value(s) in the table below.
- Standard Resistance:
-
Rear combination light assembly LH Tester Connection Condition Specified Condition Click Location & Routing(I6,c2)Location & Routingewd_type=routing;type=c,c;code=I6,c2
Click Connector(c2)Body>No. 8 Floor Wire>Rear Combination Light Assembly LHewd_type=component;type=c;code=c2;pinno=1,4
I6-1 (TRNL) - c2-1 (TRN) Always Below 1 Ω c2-4 (E) - Body ground Always Below 1 Ω
- Result:
-
Proceed to OK NG
OK
NG
Click hereVehicle Exterior>LIGHTING (EXT)>REAR COMBINATION LIGHT ASSEMBLY>INSPECTION
- Result:
-
Proceed to OK NG
OK
NG
Measure the voltage according to the value(s) in the table below.
- Standard Voltage:
-
Tester Connection Condition Specified Condition Click Location & Routing(I6)Location & Routingewd_type=routing;type=c;code=I6
I6-1 (TRNL) - Body ground Ignition switch ON, LH turn indicator light blinking 11 to 14 V ←→ Below 1 V
- Result:
-
Proceed to OK NG
OK
NG
Disconnect the I6 combination meter assembly connector.
Disconnect the c2 rear combination light cord LH connector.
Measure the resistance according to the value(s) in the table below.
- Standard Resistance:
-
Tester Connection Condition Specified Condition Click Location & Routing(I6,c2)Location & Routingewd_type=routing;type=c,c;code=I6,c2
Click Connector(c2)Body>No. 8 Floor Wire>Rear Combination Light Assembly LHewd_type=component;type=c;code=c2;pinno=1,4
I6-1 (TRNL) - c2-1 (TRN) Always Below 1 Ω c2-4 (E) - Body ground Always Below 1 Ω
- Result:
-
Proceed to OK NG
OK
NG
Click hereVehicle Exterior>LIGHTING (EXT)>REAR COMBINATION LIGHT ASSEMBLY>INSPECTION
- Result:
-
Proceed to OK NG
OK
NG
Click hereVehicle Exterior>LIGHTING (EXT)>REAR COMBINATION LIGHT ASSEMBLY>INSPECTION
- Result:
-
Proceed to OK NG
OK
NG
Disconnect the I6 combination meter assembly connector.
Disconnect the c2 rear combination light cord LH connector.
Measure the resistance according to the value(s) in the table below.
- Standard Resistance:
-
Tester Connection Condition Specified Condition Click Location & Routing(I6,c2)Location & Routingewd_type=routing;type=c,c;code=I6,c2
Click Connector(c2)Body>No. 8 Floor Wire>Rear Combination Light Assembly LHewd_type=component;type=c;code=c2;pinno=1,4
I6-1 (TRNL) - c2-1 (TRN) Always Below 1 Ω c2-4 (E) - Body ground Always Below 1 Ω
- Result:
-
Proceed to OK NG
OK
NG
Click hereVehicle Exterior>LIGHTING (EXT)>REAR COMBINATION LIGHT ASSEMBLY>INSPECTION
- Result:
-
Proceed to OK NG
OK
NG
Check vehicle condition.
- Result:
-
Result Proceed to for Sequential Type Turn Signal Light A except Sequential Type Turn Signal Light (w/ Turn Light LED Type) B except Sequential Type Turn Signal Light (w/ Turn Light Bulb Type) C
A
B
C
Inspect the illumination of each turn signal light.
- Result:
-
Result Proceed to All RH side rear turn signal lights do not blink. A Rear light assembly RH does not illuminate. B Rear combination light assembly RH does not illuminate. C
A
B
C
Disconnect the I6 combination meter assembly connector.
Disconnect the g1 rear combination light cord RH connector.
Measure the resistance according to the value(s) in the table below.
- Standard Resistance:
-
Tester Connection Condition Specified Condition Click Location & Routing(I6,g1)Location & Routingewd_type=routing;type=c,c;code=I6,g1
Click Connector(g1)Body>No. 1 Rear Window Wire / No. 2 Back Door Wire>Rear Light Assembly RHewd_type=component;type=c;code=g1;pinno=3,4
I6-2 (TRNR) - g1-3 (B) Always Below 1 Ω g1-4 (E) - Body ground Always Below 1 Ω
- Result:
-
Proceed to OK NG
OK
NG
Disconnect the I6 combination meter assembly connector.
Disconnect the b2 rear light socket and wire RH connector.
Measure the resistance according to the value(s) in the table below.
- Standard Resistance:
-
Tester Connection Condition Specified Condition Click Location & Routing(I6,b2)Location & Routingewd_type=routing;type=c,c;code=I6,b2
Click Connector(b2)Body>No. 7 Floor Wire>Rear Combination Light Assembly RHewd_type=component;type=c;code=b2;pinno=1,4
I6-2 (TRNR) - b2-1 (TRN) Always Below 1 Ω b2-4 (E) - Body ground Always Below 1 Ω
- Result:
-
Proceed to OK NG
OK
NG
Disconnect the g1 rear light socket and wire RH connector.
Disconnect the b2 rear combination light cord RH connector.
Measure the resistance according to the value(s) in the table below.
- Standard Resistance:
-
Tester Connection Condition Specified Condition Click Location & Routing(b2,g1)Location & Routingewd_type=routing;type=c,c;code=b2,g1
Click Connector(b2)Body>No. 7 Floor Wire>Rear Combination Light Assembly RHewd_type=component;type=c;code=b2;pinno=2,3
Click Connector(g1)Body>No. 1 Rear Window Wire / No. 2 Back Door Wire>Rear Light Assembly RHewd_type=component;type=c;code=g1;pinno=1,2
b2-2 (TRN2) - g1-1 (TRN3) Always Below 1 Ω b2-3 (TRN1) - g1-2 (TRN4) Always Below 1 Ω
- Result:
-
Proceed to OK NG
OK
NG
OK
NG
Click hereVehicle Exterior>LIGHTING (EXT)>REAR COMBINATION LIGHT ASSEMBLY>INSPECTION
- Result:
-
Proceed to OK NG
OK
NG
Measure the voltage according to the value(s) in the table below.
- Standard Voltage:
-
Tester Connection Condition Specified Condition Click Location & Routing(I6)Location & Routingewd_type=routing;type=c;code=I6
I6-2 (TRNR) - Body ground Ignition switch ON, RH turn indicator light blinking 11 to 14 V ←→ Below 1 V
- Result:
-
Proceed to OK NG
OK
NG
Remove the rear light assembly LH and RH.
Interchange the rear light assembly RH with LH and connect the connectors.
Operate the turn signal switch and check that the RH side front turn signal light operates normally.
- NOTICE:
-
If the RH side rear turn signal light operates normally, return the rear light assembly LH and rear light assembly RH that were interchanged in a previous step back to their original conditions so that a component of the rear light assembly LH can be inspected in the next step.
- Result:
-
Proceed to OK NG
OK
NG
Disconnect the I6 combination meter assembly connector.
Disconnect the b2 rear light socket and wire RH connector.
Measure the resistance according to the value(s) in the table below.
- Standard Resistance:
-
Tester Connection Condition Specified Condition Click Location & Routing(I6,b2)Location & Routingewd_type=routing;type=c,c;code=I6,b2
Click Connector(b2)Body>No. 7 Floor Wire>Rear Combination Light Assembly RHewd_type=component;type=c;code=b2;pinno=1,4
I6-2 (TRNR) - b2-1 (TRN) Always Below 1 Ω b2-4 (E) - Body ground Always Below 1 Ω
- Result:
-
Proceed to OK NG
OK
NG
OK
NG
Disconnect the I6 combination meter assembly connector.
Disconnect the b2 rear combination light cord RH connector.
Measure the resistance according to the value(s) in the table below.
- Standard Resistance:
-
Tester Connection Condition Specified Condition Click Location & Routing(I6,b2)Location & Routingewd_type=routing;type=c,c;code=I6,b2
Click Connector(b2)Body>No. 7 Floor Wire>Rear Combination Light Assembly RHewd_type=component;type=c;code=b2;pinno=1,4
I6-2 (TRNR) - b2-1 (TRN) Always Below 1 Ω b2-4 (E) - Body ground Always Below 1 Ω
- Result:
-
Proceed to OK NG
OK
NG
Click hereVehicle Exterior>LIGHTING (EXT)>REAR COMBINATION LIGHT ASSEMBLY>INSPECTION
- Result:
-
Proceed to OK NG
OK
NG
Disconnect the I6 combination meter assembly connector.
Disconnect the b2 rear combination light cord RH connector.
Measure the resistance according to the value(s) in the table below.
- Standard Resistance:
-
Tester Connection Condition Specified Condition Click Location & Routing(I6,g1,b2)Location & Routingewd_type=routing;type=c,c,c;code=I6,g1,b2
Click Connector(g1)Body>No. 1 Rear Window Wire / No. 2 Back Door Wire>Rear Light Assembly RHewd_type=component;type=c;code=g1;pinno=3
Click Connector(b2)Body>No. 7 Floor Wire>Rear Combination Light Assembly RHewd_type=component;type=c;code=b2;pinno=4
I6-2 (TRNR) - g1-3 (B) Always Below 1 Ω b2-4 (E) - Body ground Always Below 1 Ω
- Result:
-
Proceed to OK NG
OK
NG
Click hereVehicle Exterior>LIGHTING (EXT)>REAR COMBINATION LIGHT ASSEMBLY>INSPECTION
- Result:
-
Proceed to OK NG
OK
NG
Click hereVehicle Exterior>LIGHTING (EXT)>REAR COMBINATION LIGHT ASSEMBLY>INSPECTION
- Result:
-
Proceed to OK NG
OK
NG
Disconnect the I6 combination meter assembly connector.
Disconnect the b2 rear combination light cord RH connector.
Measure the resistance according to the value(s) in the table below.
- Standard Resistance:
-
Tester Connection Condition Specified Condition Click Location & Routing(I6,b2)Location & Routingewd_type=routing;type=c,c;code=I6,b2
Click Connector(b2)Body>No. 7 Floor Wire>Rear Combination Light Assembly RHewd_type=component;type=c;code=b2;pinno=1,4
I6-2 (TRNR) - b2-1 (TRN) Always Below 1 Ω b2-4 (E) - Body ground Always Below 1 Ω
- Result:
-
Proceed to OK NG
OK
NG
Click hereVehicle Exterior>LIGHTING (EXT)>REAR COMBINATION LIGHT ASSEMBLY>INSPECTION
- Result:
-
Proceed to OK NG
OK
NG