V35A-FTS ENGINE MECHANICAL CAMSHAFT REMOVAL
CAUTION / NOTICE / HINT
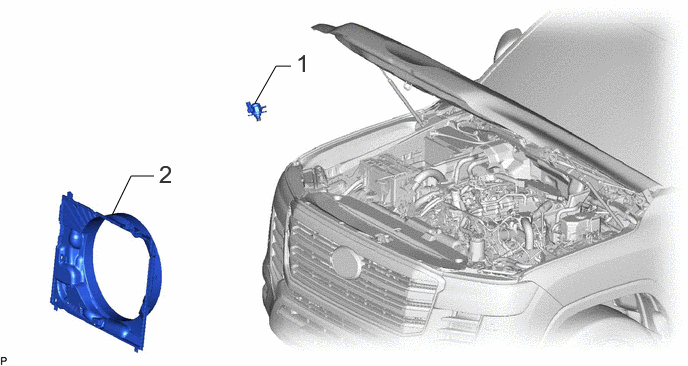
| Procedure | Part Name Code |

|

|

|
|
|---|---|---|---|---|---|
| 1 | FUEL (ENGINE ROOM SIDE) PUMP ASSEMBLY | 23100X | - | - | - |
| 2 | FAN SHROUD | 16711 | - | - | - |
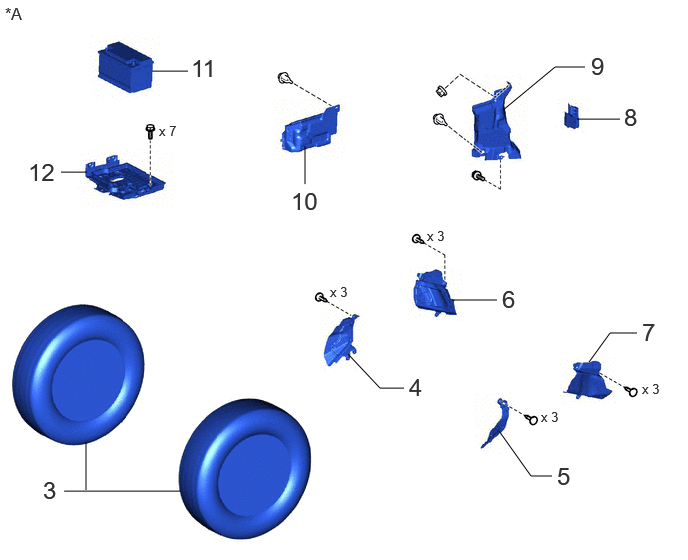
| Procedure | Part Name Code |
|
|
|
|
|---|---|---|---|---|---|
| 3 | FRONT WHEEL | - | - | - | - |
| 4 | FRONT FENDER APRON TRIM PACKING A | 53782 | - | - | - |
| 5 | FRONT FENDER APRON TRIM PACKING B | 53783 | - | - | - |
| 6 | FRONT FENDER APRON TRIM PACKING C | 53784 | - | - | - |
| 7 | FRONT FENDER APRON TRIM PACKING D | 53785B | - | - | - |
| 8 | REAR ENGINE SIDE UNDER COVER ASSEMBLY LH | 51470C | - | - | - |
| 9 | UPPER ENGINE SIDE UNDER COVER PLATE LH | 51478C | - | - | - |
| 10 | ENGINE SIDE UNDER COVER RH | 51448M | - | - | - |
| 11 | BATTERY | 28800 | - | - | - |
| 12 | BATTERY CARRIER ASSEMBLY | 74410 | - | - | - |
| *A | for LHD | *B | for RHD |
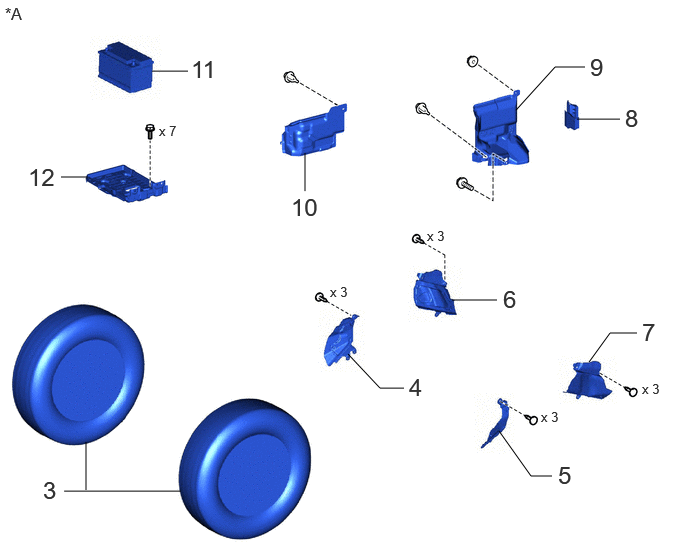
| Procedure | Part Name Code |
|
|
|
|
|---|---|---|---|---|---|
| 3 | FRONT WHEEL | - | - | - | - |
| 4 | FRONT FENDER APRON TRIM PACKING A | 53782 | - | - | - |
| 5 | FRONT FENDER APRON TRIM PACKING B | 53783 | - | - | - |
| 6 | FRONT FENDER APRON TRIM PACKING C | 53784 | - | - | - |
| 7 | FRONT FENDER APRON TRIM PACKING D | 53785B | - | - | - |
| 8 | REAR ENGINE SIDE UNDER COVER ASSEMBLY LH | 51470C | - | - | - |
| 9 | UPPER ENGINE SIDE UNDER COVER PLATE LH | 51478C | - | - | - |
| 10 | ENGINE SIDE UNDER COVER RH | 51448M | - | - | - |
| 11 | BATTERY | 28800 | - | - | - |
| 12 | BATTERY CARRIER ASSEMBLY | 74410 | - | - | - |
| *A | for RHD | - | - |
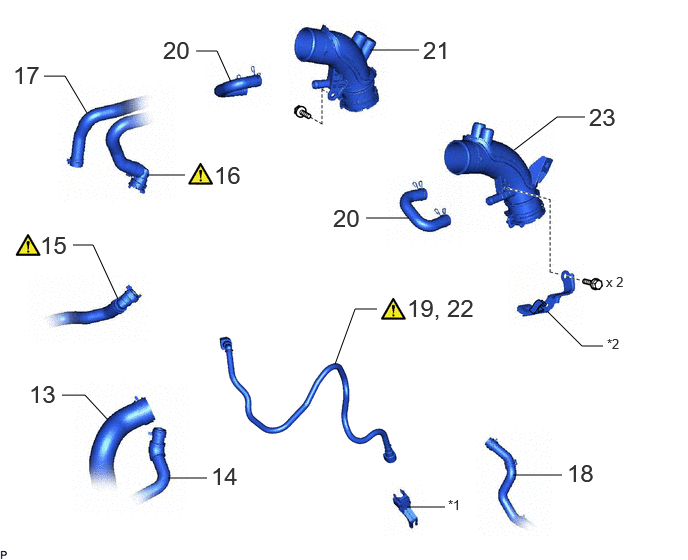
| Procedure | Part Name Code |
|
|
|
|
|---|---|---|---|---|---|
| 13 | NO. 2 RADIATOR HOSE | 16572D | - | - | - |
| 14 | NO. 4 WATER BY-PASS HOSE | 16267C | - | - | - |
| 15 | NO. 4 WATER BY-PASS HOSE ASSEMBLY | 162A0 | ( ) |
- | - |
| 16 | WATER HOSE SUB-ASSEMBLY | 87209 | () |
- | - |
| 17 | HEATER WATER HOSE OUTLET A | - | - | - | - |
| 18 | NO. 1 FUEL VAPOR FEED HOSE | 23826 | - | - | - |
| 19 | DISCONNECT FUEL TUBE SUB-ASSEMBLY | 23901 | () |
- | - |
| 20 | NO. 2 PCV HOSE | 12262 | - | - | - |
| 21 | NO. 1 AIR INLET DUCT | 17311 | - | - | - |
| 22 | REMOVE FUEL TUBE SUB-ASSEMBLY | 23901 | () |
- | - |
| 23 | NO. 2 AIR INLET DUCT | 17312D | - | - | - |
| *1 | COOL AIR INLET BRACKET | *2 | FUEL PIPE CLAMP |
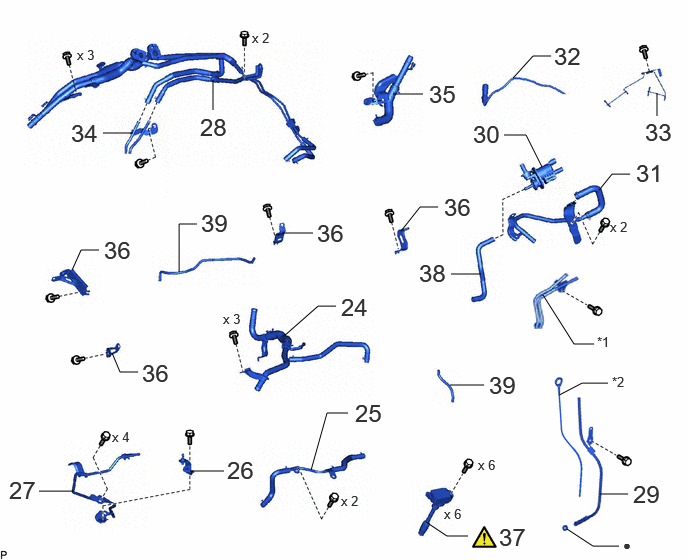
| Procedure | Part Name Code |
|
|
|
|
|---|---|---|---|---|---|
| 24 | NO. 5 WATER BY-PASS PIPE | 16289 | - | - | - |
| 25 | NO. 6 WATER BY-PASS PIPE | 1628A | - | - | - |
| 26 | NO. 2 V-BANK COVER BRACKET | 11256 | - | - | - |
| 27 | FUEL INLET PIPE SUB-ASSEMBLY | 23804J | - | - | - |
| 28 | INTERCOOLER COOLING WATER PIPE ASSEMBLY AND TURBO WATER HOSE | - | - | - | - |
| 29 | ENGINE OIL LEVEL DIPSTICK GUIDE | 11452 | - | - | - |
| 30 | PURGE VSV | 17650G | - | - | - |
| 31 | FUEL VAPOR FEED PIPE | 23818 | - | - | - |
| 32 | AIR FUEL RATIO SENSOR | - | - | - | - |
| 33 | NO. 2 WIRING HARNESS CLAMP BRACKET | 82715X | - | - | - |
| 34 | NO. 1 TURBO WATER PIPE SUB-ASSEMBLY | 16027 | - | - | - |
| 35 | NO. 3 WATER BY-PASS PIPE | 16279 | - | - | - |
| 36 | WIRE HARNESS CLAMP BRACKET | - | - | - | - |
| 37 | IGNITION COIL ASSEMBLY | 19500 | () |
- | - |
| 38 | NO. 4 FUEL VAPOR FEED HOSE | 2382A | - | - | - |
| 39 | VACUUM HOSE | - | - | - | - |
| *1 | NO. 2 TURBO WATER PIPE SUB-ASSEMBLY | *2 | ENGINE OIL LEVEL DIPSTICK |
| ● | Non-reusable part | - | - |
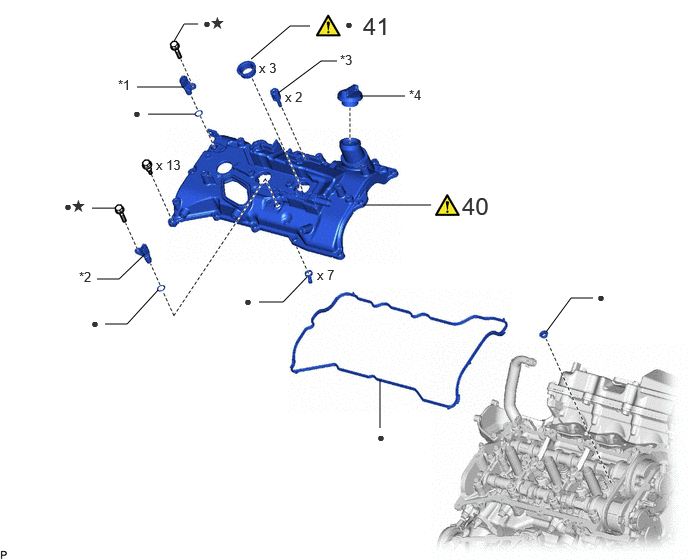
| Procedure | Part Name Code |
|
|
|
|
|---|---|---|---|---|---|
| 40 | CYLINDER HEAD COVER SUB-ASSEMBLY RH | 11201M | () |
- | - |
| 41 | SPARK PLUG TUBE GASKET RH | 11193B | () |
- | - |
| *1 | CAMSHAFT POSITION SENSOR (for Intake Side of Bank 1) | *2 | CAMSHAFT POSITION SENSOR (for Exhaust Side of Bank 1) |
| *3 | NO. 1 INTERCOOLER AIR GUIDE | *4 | OIL FILLER CAP ASSEMBLY |
| ● | Non-reusable part | ★ | Precoated part |
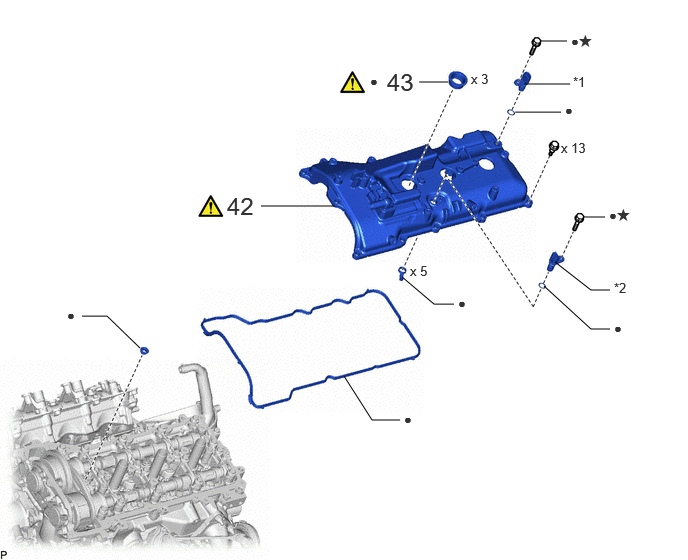
| Procedure | Part Name Code |
|
|
|
|
|---|---|---|---|---|---|
| 42 | CYLINDER HEAD COVER SUB-ASSEMBLY LH | 11202 | () |
- | - |
| 43 | SPARK PLUG TUBE GASKET LH | 11193A | () |
- | - |
| *1 | CAMSHAFT POSITION SENSOR (for Intake Side of Bank 2) | *2 | CAMSHAFT POSITION SENSOR (for Exhaust Side of Bank 2) |
| ● | Non-reusable part | ★ | Precoated part |
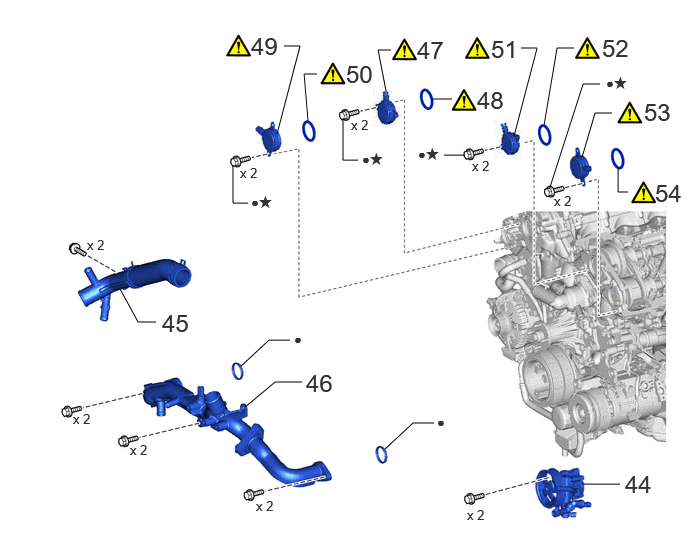
| Procedure | Part Name Code |
|
|
|
|
|---|---|---|---|---|---|
| 44 | VANE PUMP ASSEMBLY | 44310 | - | - | - |
| 45 | WATER INLET PIPE WITH WATER INLET HOSE | - | - | - | - |
| 46 | WATER OUTLET PIPE WITH WATER BY-PASS JOINT | - | - | - | - |
| 47 | CAM TIMING OIL CONTROL SOLENOID ASSEMBLY RH (for Intake Side of Bank 1) | 15370B | () |
- | - |
| 48 | CAM TIMING OIL CONTROL SOLENOID RH O-RING (for Intake Side of Bank 1) | 15370D | () |
- | - |
| 49 | CAM TIMING OIL CONTROL SOLENOID ASSEMBLY RH (for Exhaust Side of Bank 1) | 15370B | () |
- | - |
| 50 | CAM TIMING OIL CONTROL SOLENOID RH O-RING (for Exhaust Side of Bank 1) | 15370D | () |
- | - |
| 51 | CAM TIMING OIL CONTROL SOLENOID ASSEMBLY LH (for Intake Side of Bank 2) | 15370C | () |
- | - |
| 52 | CAM TIMING OIL CONTROL SOLENOID LH O-RING (for Intake Side of Bank 2) | 15370E | () |
- | - |
| 53 | CAM TIMING OIL CONTROL SOLENOID ASSEMBLY LH (for Exhaust Side of Bank 2) | 15370C | () |
- | - |
| 54 | CAM TIMING OIL CONTROL SOLENOID LH O-RING (for Exhaust Side of Bank 2) | 15370E | () |
- | - |
| ● | Non-reusable part | ★ | Precoated part |
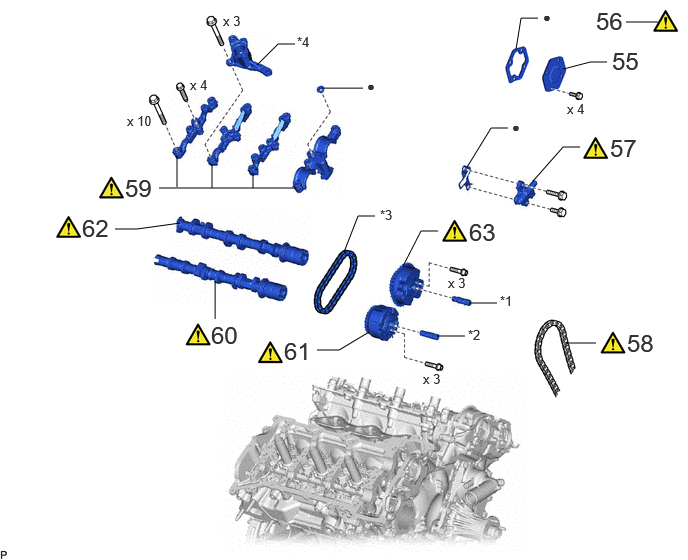
| Procedure | Part Name Code |
|
|
|
|
|---|---|---|---|---|---|
| 55 | TIMING CHAIN COVER PLATE | 11324 | - | - | - |
| 56 | SET NO. 1 CYLINDER TO TDC/COMPRESSION (for Bank 1) | - | () |
- | - |
| 57 | NO. 1 CHAIN TENSIONER ASSEMBLY (for Bank 1) | 13540 | () |
- | - |
| 58 | NO. 1 CHAIN SUB-ASSEMBLY (for Bank 1) | 13506A | () |
- | - |
| 59 | CAMSHAFT BEARING CAP (for Bank 1) | - | () |
- | - |
| 60 | EXHAUST CAMSHAFT SUB-ASSEMBLY RH | 13502C | () |
- | - |
| 61 | CAMSHAFT TIMING EXHAUST GEAR ASSEMBLY RH (for Exhaust Side of Bank 1) | 13070 | () |
- | - |
| 62 | INTAKE CAMSHAFT SUB-ASSEMBLY RH | 13501B | () |
- | - |
| 63 | CAMSHAFT TIMING INTAKE GEAR ASSEMBLY RH (for Intake Side of Bank 1) | 13050B | () |
- | - |
| *1 | CAMSHAFT TIMING OIL CONTROL VALVE ASSEMBLY (INTAKE CAMSHAFT TIMING GEAR BOLT ASSEMBLY) | *2 | CAMSHAFT TIMING OIL CONTROL VALVE ASSEMBLY (EXHAUST CAMSHAFT TIMING GEAR BOLT ASSEMBLY) |
| *3 | NO. 2 CHAIN SUB-ASSEMBLY | *4 | FUEL PUMP LIFTER HOUSING RH |
| ● | Non-reusable part | - | - |
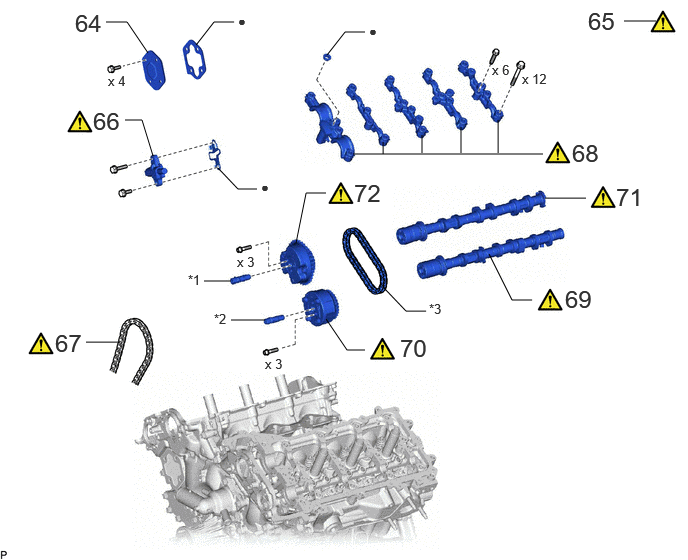
| Procedure | Part Name Code |
|
|
|
|
|---|---|---|---|---|---|
| 64 | TIMING CHAIN COVER PLATE | 11324 | - | - | - |
| 65 | SET NO. 1 CYLINDER TO TDC/COMPRESSION (for Bank 2) | - | () |
- | - |
| 66 | NO. 1 CHAIN TENSIONER ASSEMBLY (for Bank 2) | 13540 | () |
- | - |
| 67 | NO. 1 CHAIN SUB-ASSEMBLY (for Bank 2) | 13506A | () |
- | - |
| 68 | CAMSHAFT BEARING CAP (for Bank 2) | - | () |
- | - |
| 69 | EXHAUST CAMSHAFT SUB-ASSEMBLY LH | 13054A | () |
- | - |
| 70 | CAMSHAFT TIMING EXHAUST GEAR ASSEMBLY LH (for Exhaust Side of Bank 2) | 13080 | () |
- | - |
| 71 | INTAKE CAMSHAFT SUB-ASSEMBLY LH | 13053B | () |
- | - |
| 72 | CAMSHAFT TIMING INTAKE GEAR ASSEMBLY LH (for Intake Side of Bank 2) | 13060B | () |
- | - |
| *1 | CAMSHAFT TIMING OIL CONTROL VALVE ASSEMBLY (INTAKE CAMSHAFT TIMING GEAR BOLT ASSEMBLY) | *2 | CAMSHAFT TIMING OIL CONTROL VALVE ASSEMBLY (EXHAUST CAMSHAFT TIMING GEAR BOLT ASSEMBLY) |
| *3 | NO. 2 CHAIN SUB-ASSEMBLY | - | - |
| ● | Non-reusable part | - | - |
CAUTION / NOTICE / HINT
The necessary procedures (adjustment, calibration, initialization, or registration) that must be performed after parts are removed, installed, or replaced during the camshaft removal/installation are shown below.
| Replaced Part or Performed Procedure | Necessary Procedure | Effect/Inoperative Function when Necessary Procedure not Performed | Link |
|---|---|---|---|
| Battery terminal is disconnected/reconnected | Memorize steering angle neutral point | Parking assist monitor system | () |
| Multi-terrain monitor system | () |
||
| Panoramic view monitor system | () |
||
|
·
Throttle body with motor assembly
·
Cleaning the deposits from the throttle body with motor assembly
·
Camshaft (for intake or exhaust camshaft)
·
Camshaft timing intake gear assembly
·
Camshaft timing exhaust gear assembly
·
Port fuel injector assembly
·
Direct fuel injector assembly
·
Fuel pump assembly (for high pressure side)
·
Ignition coil assembly
·
Air leaks from intake system
·
Gas leaks from exhaust system |
Inspection after repairs |
·
Poor idle, etc.
·
Engine start function, etc. |
() |
- HINT:
-
When the cable is disconnected/reconnected to the battery terminal, systems temporarily stop operating. However, each system has a function that completes learning the first time the system is used.
-
·
Learning completes when vehicle is driven
Effect/Inoperative Function When Necessary Procedures are not Performed Necessary Procedures Link Stop and start system Drive the vehicle until stop and start control is permitted (approximately 5 to 60 minutes). ( )Lighting system (EXT) Cornering lights Drive the vehicle straight ahead at 35 km/h (22 mph) or more for 5 seconds or more. ( )Pre-collision system Lane tracing assist system Lane departure alert system Adaptive high beam system
·Learning completes when vehicle is operated normally
Effect/Inoperative Function When Necessary Procedures are not Performed Necessary Procedures Link Power back door system Fully close the back door by hand.
- HINT:
-
Initialization is not necessary if the above procedures are performed while the back door is closed.
( )Air conditioning system After the ignition switch is turned to ON, the servo motor and expansion valve standard position is recognized. -
- NOTICE:
-
This procedure includes the removal of small-head bolts. Refer to Small-Head Bolts of Basic Repair Hint to identify the small-head bolts.
-
Click hereGeneral>INTRODUCTION>REPAIR INSTRUCTION>PRECAUTION
PROCEDURE

 23100X 1.REMOVE FUEL (ENGINE ROOM SIDE) PUMP ASSEMBLY
16711 2.REMOVE FAN SHROUD
3.REMOVE FRONT WHEEL
53782 4.REMOVE FRONT FENDER APRON TRIM PACKING A
53783 5.REMOVE FRONT FENDER APRON TRIM PACKING B
53784 6.REMOVE FRONT FENDER APRON TRIM PACKING C
53785B 7.REMOVE FRONT FENDER APRON TRIM PACKING D
51470C 8.REMOVE REAR ENGINE SIDE UNDER COVER ASSEMBLY LH
51478C 9.REMOVE UPPER ENGINE SIDE UNDER COVER PLATE LH
51448M 10.REMOVE ENGINE SIDE UNDER COVER RH
28800 11.REMOVE BATTERY
74410 12.REMOVE BATTERY CARRIER ASSEMBLY
16572D 13.DISCONNECT NO. 2 RADIATOR HOSE
16267C 14.DISCONNECT NO. 4 WATER BY-PASS HOSE
162A0 15.DISCONNECT NO. 4 WATER BY-PASS HOSE ASSEMBLY
|
|
Click here() |
87209 16.DISCONNECT WATER HOSE SUB-ASSEMBLY
|
|
Click here() |
17.DISCONNECT HEATER WATER HOSE OUTLET A
23826 18.DISCONNECT NO. 1 FUEL VAPOR FEED HOSE
23901 19.DISCONNECT FUEL TUBE SUB-ASSEMBLY
|
|
Click here() |
12262 20.REMOVE NO. 2 PCV HOSE
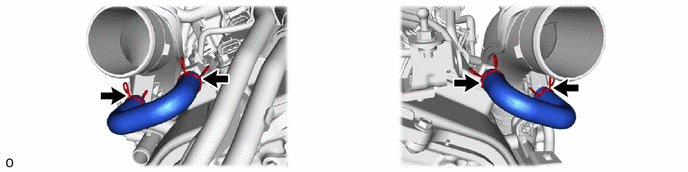
17311 21.REMOVE NO. 1 AIR INLET DUCT

23901 22.REMOVE FUEL TUBE SUB-ASSEMBLY
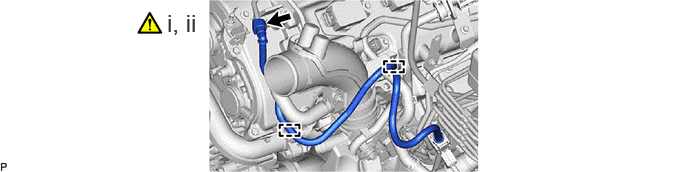
Disconnect the fuel tube sub-assembly.
Click hereEngine / Hybrid System>V35A-FTS (FUEL)>FUEL SYSTEM>PRECAUTION
Detach the 2 clamps and remove the fuel tube sub-assembly.
17312D 23.REMOVE NO. 2 AIR INLET DUCT

16289 24.REMOVE NO. 5 WATER BY-PASS PIPE
1628A 25.REMOVE NO. 6 WATER BY-PASS PIPE
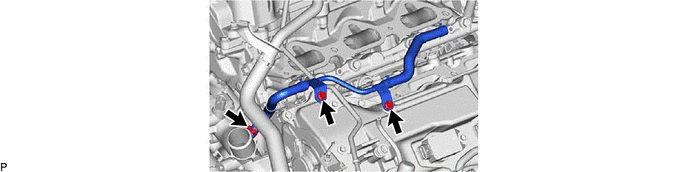
11256 26.REMOVE NO. 2 V-BANK COVER BRACKET
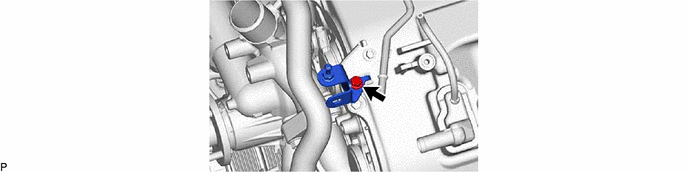
23804J 27.REMOVE FUEL INLET PIPE SUB-ASSEMBLY
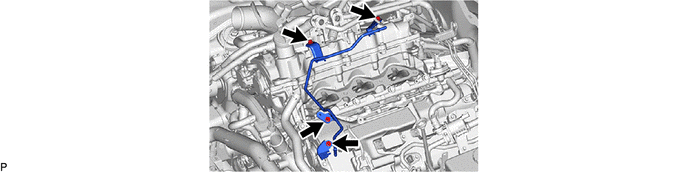
28.REMOVE INTERCOOLER COOLING WATER PIPE ASSEMBLY AND TURBO WATER HOSE
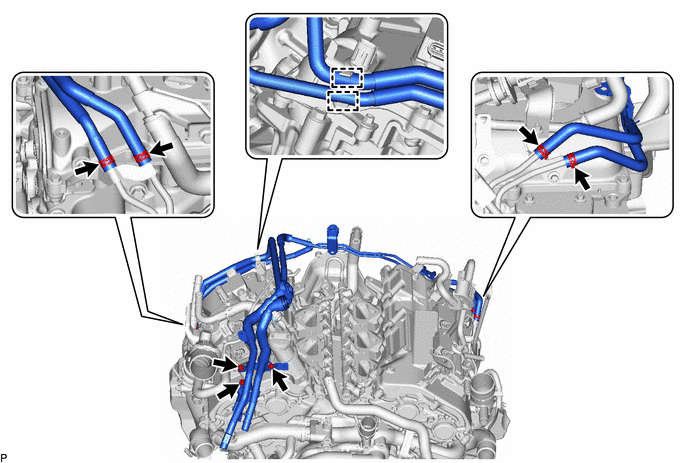
11452 29.REMOVE ENGINE OIL LEVEL DIPSTICK GUIDE
17650G 30.REMOVE PURGE VSV
23818 31.REMOVE FUEL VAPOR FEED PIPE
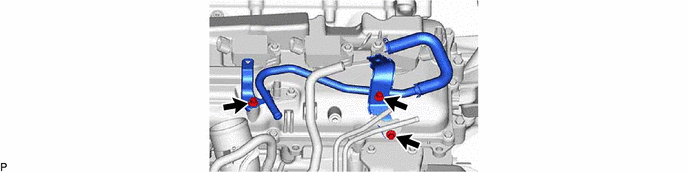
32.DISCONNECT AIR FUEL RATIO SENSOR

82715X 33.REMOVE NO. 2 WIRING HARNESS CLAMP BRACKET
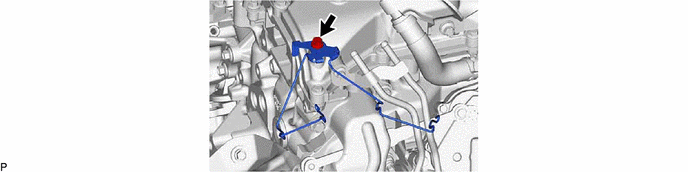
16027 34.DISCONNECT NO. 1 TURBO WATER PIPE SUB-ASSEMBLY
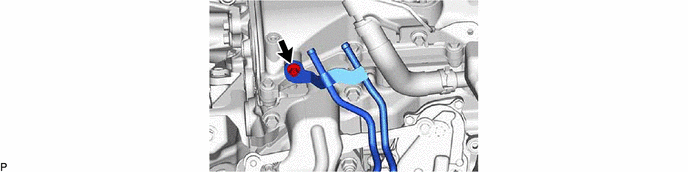
16279 35.REMOVE NO. 3 WATER BY-PASS PIPE
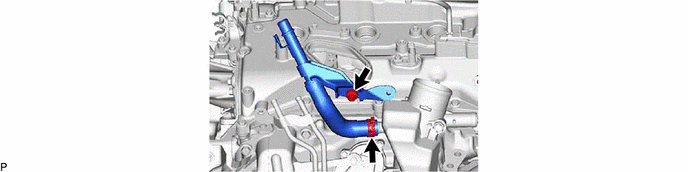
36.REMOVE WIRE HARNESS CLAMP BRACKET
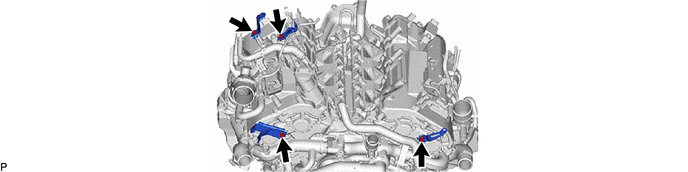
19500 37.REMOVE IGNITION COIL ASSEMBLY
|
|
Click here() |
2382A 38.REMOVE NO. 4 FUEL VAPOR FEED HOSE
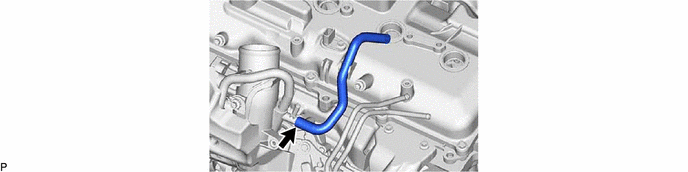
39.REMOVE VACUUM HOSE
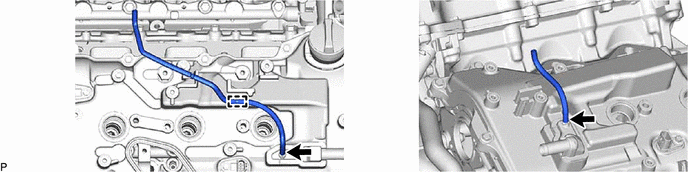
11201M 40.REMOVE CYLINDER HEAD COVER SUB-ASSEMBLY RH
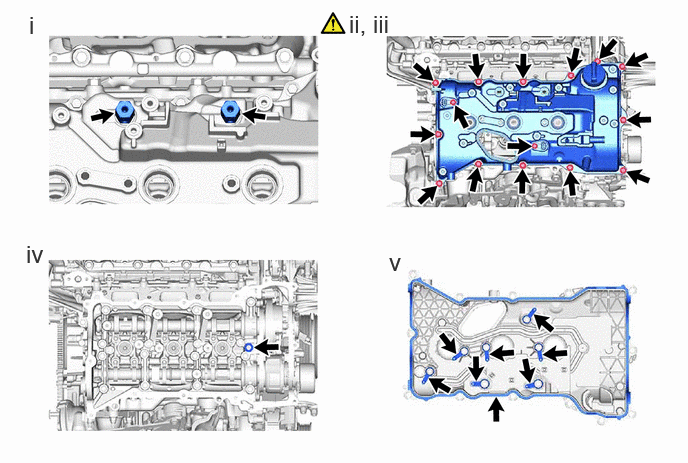
Remove the 2 No. 1 intercooler air guides from the cylinder head cover sub-assembly RH.
Remove the 2 bolts and 2 camshaft position sensors.
- NOTICE:
-
If the camshaft position sensor has been struck or dropped, replace it.
Remove the 13 bolts and cylinder head cover sub-assembly RH.
Remove the camshaft bearing cap oil hole gasket RH.
Remove the 7 gaskets and No. 1 cylinder head cover gasket RH.
11193B 41.REMOVE SPARK PLUG TUBE GASKET RH
11202 42.REMOVE CYLINDER HEAD COVER SUB-ASSEMBLY LH
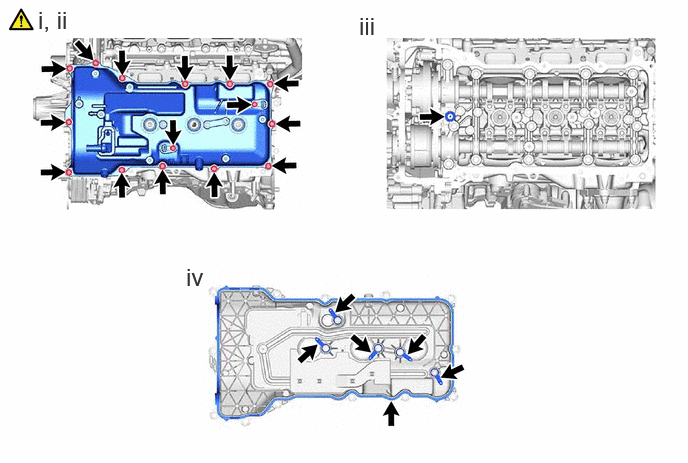
Remove the 2 bolts and 2 camshaft position sensors.
- NOTICE:
-
If the camshaft position sensor has been struck or dropped, replace it.
Remove the 13 bolts and cylinder head cover sub-assembly LH.
Remove the camshaft bearing cap oil hole gasket LH.
Remove the 5 gaskets and No. 1 cylinder head cover gasket LH.
11193A 43.REMOVE SPARK PLUG TUBE GASKET LH
44310 44.DISCONNECT VANE PUMP ASSEMBLY
45.REMOVE WATER INLET PIPE WITH WATER INLET HOSE
46.REMOVE WATER OUTLET PIPE WITH WATER BY-PASS JOINT
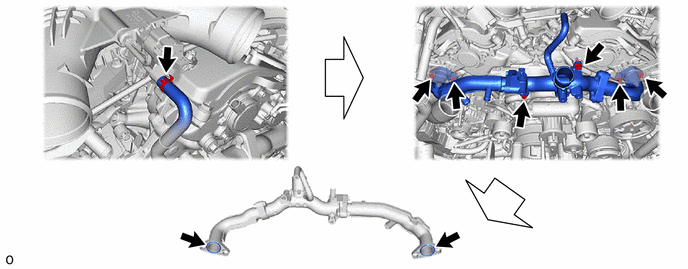
15370B 47.REMOVE CAM TIMING OIL CONTROL SOLENOID ASSEMBLY RH (for Intake Side of Bank 1)
|
|
Click here() |
15370D 48.REMOVE CAM TIMING OIL CONTROL SOLENOID RH O-RING (for Intake Side of Bank 1)
|
|
Click here() |
15370B 49.REMOVE CAM TIMING OIL CONTROL SOLENOID ASSEMBLY RH (for Exhaust Side of Bank 1)
|
|
Click here() |
15370D 50.REMOVE CAM TIMING OIL CONTROL SOLENOID RH O-RING (for Exhaust Side of Bank 1)
|
|
Click here() |
15370C 51.REMOVE CAM TIMING OIL CONTROL SOLENOID ASSEMBLY LH (for Intake Side of Bank 2)
|
|
Click here() |
15370E 52.REMOVE CAM TIMING OIL CONTROL SOLENOID LH O-RING (for Intake Side of Bank 2)
|
|
Click here() |
15370C 53.REMOVE CAM TIMING OIL CONTROL SOLENOID ASSEMBLY LH (for Exhaust Side of Bank 2)
|
|
Click here() |
15370E 54.REMOVE CAM TIMING OIL CONTROL SOLENOID LH O-RING (for Exhaust Side of Bank 2)
|
|
Click here() |
11324 55.REMOVE TIMING CHAIN COVER PLATE
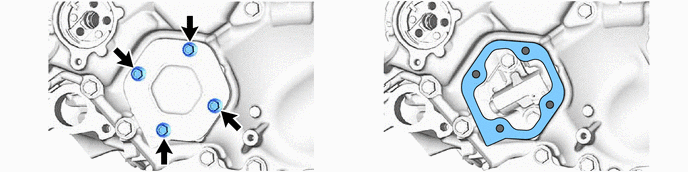
56.SET NO. 1 CYLINDER TO TDC/COMPRESSION (for Bank 1)
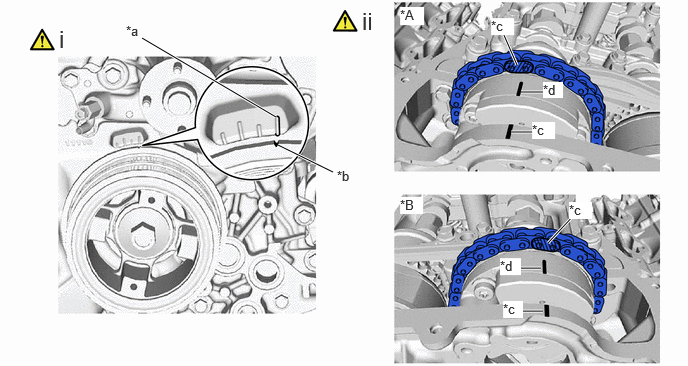
| *A | for Bank 2 | *B | for Bank 1 |
| *a | "0" Timing Mark | *b | Timing Mark (Cutout) |
| *c | Paint Mark | *d | Timing Mark |
Turn the crankshaft clockwise to align the timing mark (cutout) on the crankshaft pulley assembly with the "0" timing mark on the timing chain cover assembly.
Place paint marks on the timing marks and sprockets of each camshaft timing gear and on the links of the chain.
- HINT:
-
Attach paint marks to the 2 chain links at the position where the timing mark of the camshaft timing gear is located and at the opposite position of the timing chain or belt cover sub-assembly.
13540 57.REMOVE NO. 1 CHAIN TENSIONER ASSEMBLY (for Bank 1)
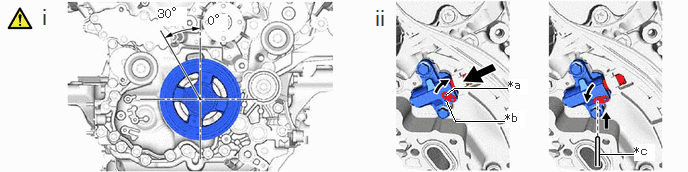
| *a | Lever Hole | *b | Tensioner Hole |
| *c | Pin | - | - |
Turn the crankshaft approximately 30° counterclockwise so that there is some slack in the chain.
- HINT:
-
This prevents the valves and pistons from interfering with each other.
Align the hole in the lever of the No. 1 chain tensioner assembly with the hole in the tensioner body as shown in the illustration, and then insert a pin with a diameter of 1.27 mm (0.0500 in.) into the hole.
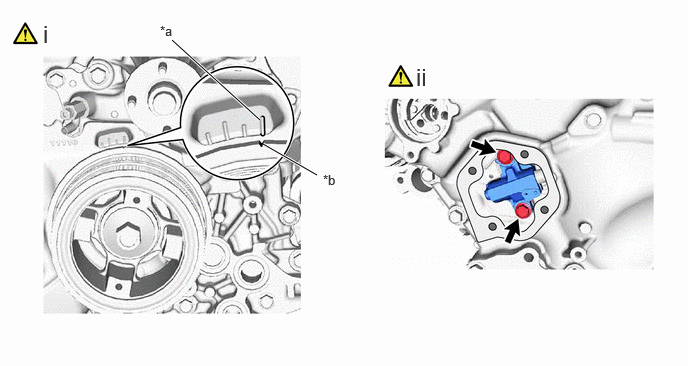
| *a | "0" Timing Mark | *b | Timing Mark (Cutout) |
Turn the crankshaft clockwise to align the timing mark (cutout) on the crankshaft pulley assembly with the "0" timing mark on the timing chain cover assembly.
Remove the 2 bolts and No. 1 chain tensioner assembly.
- NOTICE:
-
Do not drop the No. 1 chain tensioner assembly or bolts into the timing chain cover assembly.
13506A 58.DISCONNECT NO. 1 CHAIN SUB-ASSEMBLY (for Bank 1)
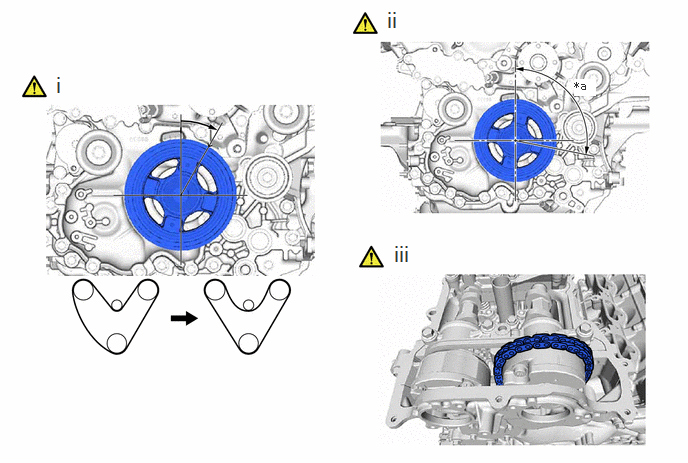
| *a | 95° to 100° | - | - |
Turn the crankshaft clockwise until it is in the position shown in the illustration so that there is some slack in the No. 1 chain sub-assembly between the banks.
- CAUTION:
-
As the camshafts turn suddenly, do not touch the camshafts or camshaft timing gears.
- HINT:
-
When turning the crankshaft, engine oil may spray out of the oil holes.
Turn the crankshaft clockwise until it is in the position shown in the illustration so that the chain can be removed easily.
- NOTICE:
-
When turning the crankshaft, engine oil may spray out of the oil holes.
Remove the No. 1 chain sub-assembly from the sprocket of the camshaft timing gear and set it on the gear.
- CAUTION:
-
As the camshaft may turn suddenly and pinch your fingers when the No. 1 chain sub-assembly is removed, pinch the No. 1 chain sub-assembly and lift it upward to remove it from the sprocket.
59.REMOVE CAMSHAFT BEARING CAP (for Bank 1)
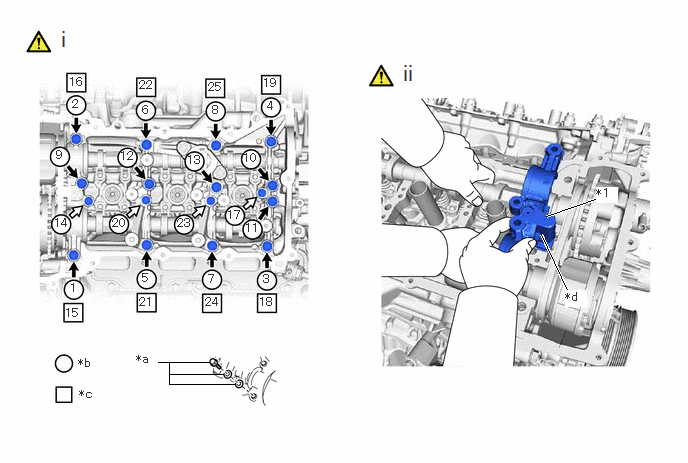
| *1 | No. 2 Chain Tensioner Assembly | - | - |
| *a | Replacement Bolt and Washer | *b | Part Removal |
| *c | Replacement Bolt and Washer Installation | *d | No. 2 Chain Tensioner Assembly Chain Plunger |
Remove the bolts and bearing caps in the order shown in the illustration. Immediately after removing a bearing cap, install replacement bolts and washers in the order shown in the illustration.
- Torque:
- 10 N*m (102 kgf*cm, 7 ft.*lbf)
- NOTICE:
-
·
Do not install the bearing caps when installing temporarily bolts and washers.
·Be sure to follow the numerical order when performing this procedure.
·Do not allow temporarily bolts or washers to contact the camshaft.
·Do not drop temporarily bolts or washers into the cylinder head sub-assembly.
- HINT:
-
·
Arrange the removed parts so that they can be reinstalled in their original locations.
·Part number for temporarily bolts: 91551-F0840 (8 bolts)
·Part number for temporarily washers: 90201-12028 (16 washers)
While one person lifts up the intake camshaft sub-assembly RH and exhaust camshaft sub-assembly RH, have another person remove the No. 1 camshaft bearing cap.
- NOTICE:
-
Remove the No. 1 camshaft bearing cap while holding down the chain plunger of the No. 2 chain tensioner assembly.
13502C 60.REMOVE EXHAUST CAMSHAFT SUB-ASSEMBLY RH
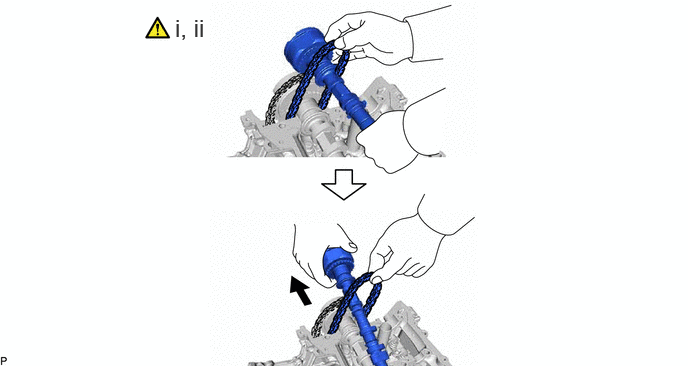
Lift up the rear of the exhaust camshaft sub-assembly RH so that it is at an angle.
With the No. 2 chain sub-assembly raised, pass it out through the exhaust camshaft sub-assembly LH towards the front of the vehicle to remove it.
13070 61.REMOVE CAMSHAFT TIMING EXHAUST GEAR ASSEMBLY RH (for Exhaust Side of Bank 1)
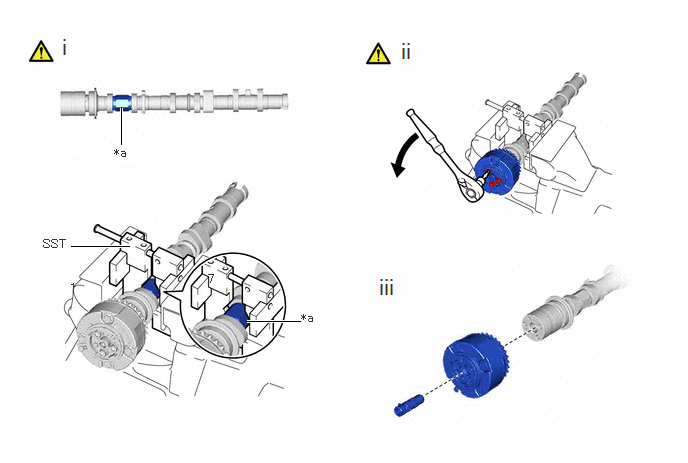
| *a | Hexagonal Portion | - | - |
Using SST, grip the hexagonal portion, and then secure SST and exhaust camshaft sub-assembly RH in a vise as shown in the illustration.
- SST
-
09212-31010
- NOTICE:
-
·
Do not damage the exhaust camshaft sub-assembly RH.
·Never grip areas other than the hexagonal portion, as this may cause damage.
Using a 5 mm hexagon socket wrench, remove the 3 bolts.
- NOTICE:
-
·
Be careful not to damage the exhaust camshaft sub-assembly RH and camshaft timing exhaust gear assembly RH.
·Do not disassemble the camshaft timing exhaust gear assembly RH.
Remove the camshaft timing oil control valve assembly (exhaust camshaft timing gear bolt assembly) and camshaft timing exhaust gear assembly RH.
13501B 62.REMOVE INTAKE CAMSHAFT SUB-ASSEMBLY RH
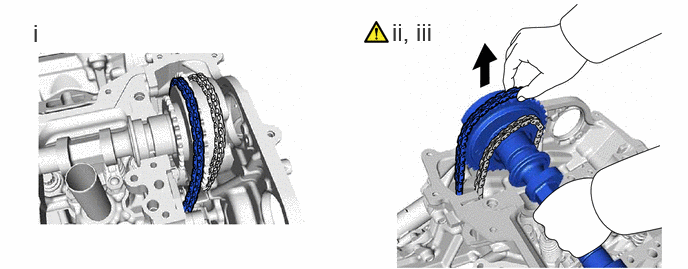
Remove the No. 2 chain sub-assembly from the sprocket of the camshaft timing gear and set it on the gear.
Lift up the rear end of the camshaft so that it is tilted to remove the No. 1 chain sub-assembly.
Remove the intake camshaft sub-assembly RH.
13050B 63.REMOVE CAMSHAFT TIMING INTAKE GEAR ASSEMBLY RH (for Intake Side of Bank 1)
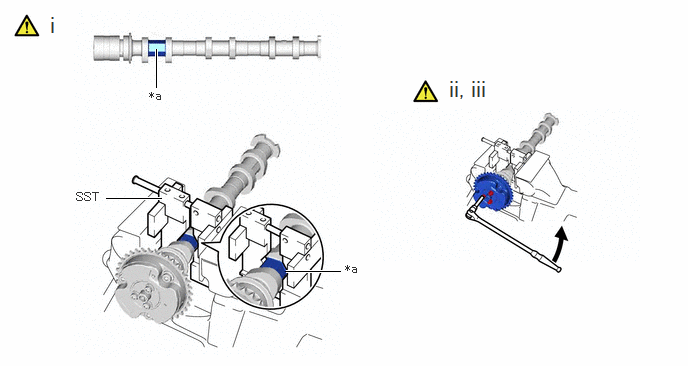
| *a | Hexagonal Portion | - | - |
Using SST, grip the hexagonal portion, and then secure SST and intake camshaft sub-assembly RH in a vise as shown in the illustration.
- SST
-
09212-31010
- NOTICE:
-
·
Do not damage the intake camshaft sub-assembly RH.
·Never grip areas other than the hexagonal portion, as this may cause damage.
Using a 5 mm hexagon socket wrench, remove the 3 bolts.
- NOTICE:
-
·
Be careful not to damage the intake camshaft sub-assembly RH and camshaft timing intake gear assembly RH.
·Do not disassemble the camshaft timing intake gear assembly RH.
Remove the camshaft timing oil control valve assembly (intake camshaft timing gear bolt assembly) and camshaft timing intake gear assembly RH.
11324 64.REMOVE TIMING CHAIN COVER PLATE
65.SET NO. 1 CYLINDER TO TDC/COMPRESSION (for Bank 2)
|
|
Click here() |
13540 66.REMOVE NO. 1 CHAIN TENSIONER ASSEMBLY (for Bank 2)
|
|
Click here() |
13506A 67.DISCONNECT NO. 1 CHAIN SUB-ASSEMBLY (for Bank 2)
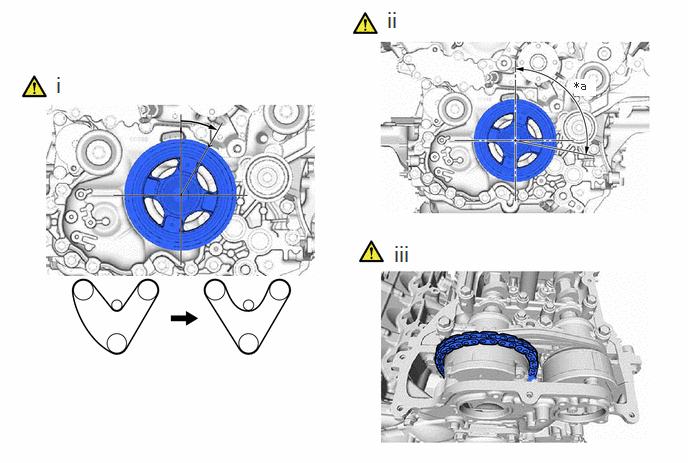
| *a | 95° to 100° | - | - |
Turn the crankshaft clockwise until it is in the position shown in the illustration so that there is some slack in the No. 1 chain sub-assembly between the banks.
- CAUTION:
-
As the camshafts turn suddenly, do not touch the camshafts or camshaft timing gears.
- HINT:
-
When turning the crankshaft, engine oil may spray out of the oil holes.
Turn the crankshaft clockwise until it is in the position shown in the illustration so that the chain can be removed easily.
- NOTICE:
-
When turning the crankshaft, engine oil may spray out of the oil holes.
Remove the No. 1 chain sub-assembly from the sprocket of the camshaft timing gear and set it on the gear.
- CAUTION:
-
As the camshaft may turn suddenly and pinch your fingers when the No. 1 chain sub-assembly is removed, pinch the No. 1 chain sub-assembly and lift it upward to remove it from the sprocket.
68.REMOVE CAMSHAFT BEARING CAP (for Bank 2)
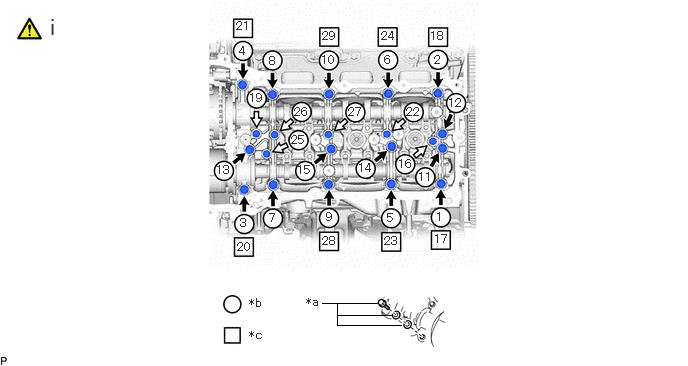
| *a | Replacement Bolt and Washer | *b | Part Removal |
| *c | Replacement Bolt and Washer Installation | - | - |
Remove the bolts and bearing caps in the order shown in the illustration. Immediately after removing a bearing cap, install replacement bolts and washers in the order shown in the illustration.
- Torque:
- 10 N*m (102 kgf*cm, 7 ft.*lbf)
- NOTICE:
-
·
Do not install the bearing caps when installing temporarily bolts and washers.
·Be sure to follow the numerical order when performing this procedure.
·Do not allow temporarily bolts or washers to contact the camshaft.
·Do not drop temporarily bolts or washers into the cylinder head sub-assembly.
- HINT:
-
·
Arrange the removed parts so that they can be reinstalled in their original locations.
·Part number for temporarily bolts: 91551-F0840 (8 bolts)
·Part number for temporarily washers: 90201-12028 (16 washers)
13054A 69.REMOVE EXHAUST CAMSHAFT SUB-ASSEMBLY LH
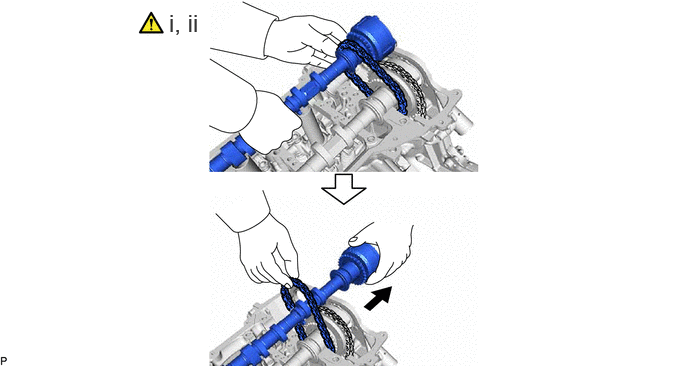
Lift up the rear of the exhaust camshaft sub-assembly LH so that it is at an angle.
With the No. 2 chain sub-assembly raised, pass it out through the exhaust camshaft sub-assembly LH towards the front of the vehicle to remove it.
13080 70.REMOVE CAMSHAFT TIMING EXHAUST GEAR ASSEMBLY LH (for Exhaust Side of Bank 2)
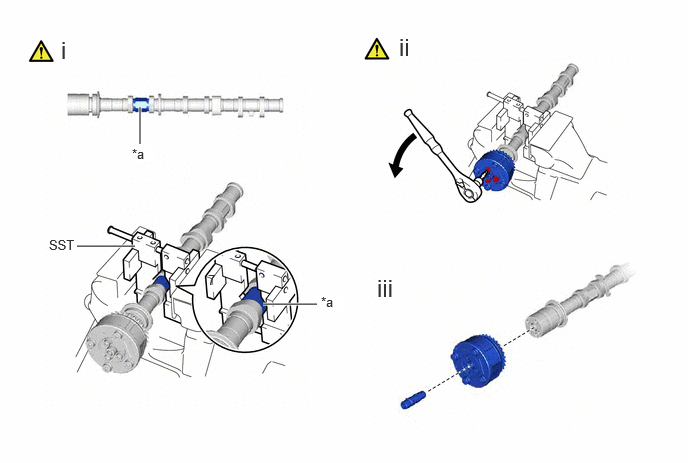
| *a | Hexagonal Portion | - | - |
Using SST, grip the hexagonal portion, and then secure SST and exhaust camshaft sub-assembly LH in a vise as shown in the illustration.
- SST
-
09212-31010
- NOTICE:
-
·
Do not damage the exhaust camshaft sub-assembly LH.
·Never grip areas other than the hexagonal portion, as this may cause damage.
Using a 5 mm hexagon socket wrench, remove the 3 bolts.
- NOTICE:
-
·
Be careful not to damage the exhaust camshaft sub-assembly LH and camshaft timing exhaust gear assembly LH.
·Do not disassemble the camshaft timing exhaust gear assembly LH.
Remove the camshaft timing oil control valve assembly (exhaust camshaft timing gear bolt assembly) and camshaft timing exhaust gear assembly LH.
13053B 71.REMOVE INTAKE CAMSHAFT SUB-ASSEMBLY LH
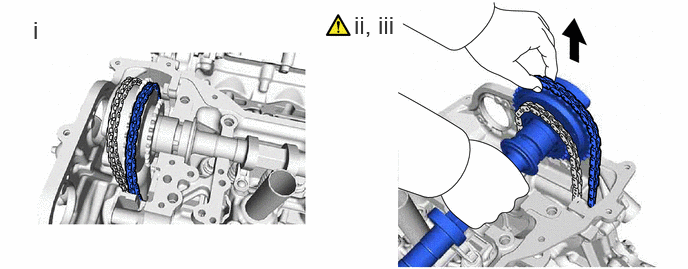
Remove the No. 2 chain sub-assembly from the sprocket of the camshaft timing gear and set it on the gear.
Lift up the rear end of the camshaft so that it is tilted to remove the No. 1 chain sub-assembly.
Remove the intake camshaft sub-assembly LH.
13060B 72.REMOVE CAMSHAFT TIMING INTAKE GEAR ASSEMBLY LH (for Intake Side of Bank 2)
| *a | Hexagonal Portion | - | - |
Using SST, grip the hexagonal portion, and then secure SST and intake camshaft sub-assembly LH in a vise as shown in the illustration.
- SST
-
09212-31010
- NOTICE:
-
·
Do not damage the intake camshaft sub-assembly LH.
·Never grip areas other than the hexagonal portion, as this may cause damage.
Using a 5 mm hexagon socket wrench, remove the 3 bolts.
- NOTICE:
-
·
Be careful not to damage the intake camshaft sub-assembly LH and camshaft timing intake gear assembly LH.
·Do not disassemble the camshaft timing intake gear assembly LH.
Remove the camshaft timing oil control valve assembly (intake camshaft timing gear bolt assembly) and camshaft timing intake gear assembly LH.