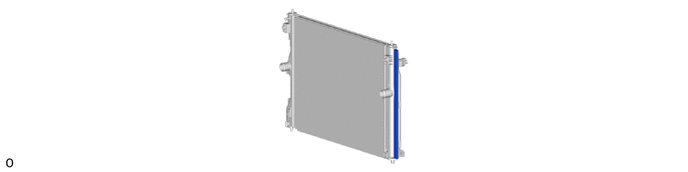
COOLING RADIATOR REMOVAL
CAUTION / NOTICE / HINT
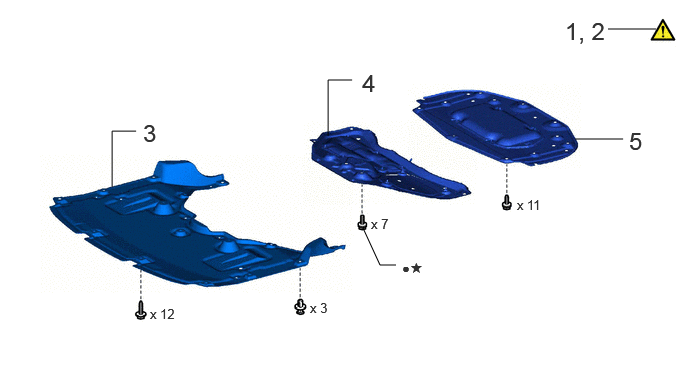
| Procedure | Part Name Code | 
|

|

|
|
|---|---|---|---|---|---|
| 1 | PRECAUTION | - | ( ) |
- | - |
| 2 | CAUTIONS FOR COOLANT (TOYOTA GENUINE FC STACK COOLANT(Pre-mixed)) | - | ()
|
- | - |
| 3 | FRONT COMPARTMENT UNDER COVER | 51441N | - | - | - |
| 4 | FRONT LOWER SUSPENSION MEMBER PROTECTOR | 51219 | - | - | - |
| 5 | FRONT COMPARTMEMT UNDER COVER ASSEMBLY | 51420A | - | - | - |
| ● | Non-reusable part | ★ | Precoated part |
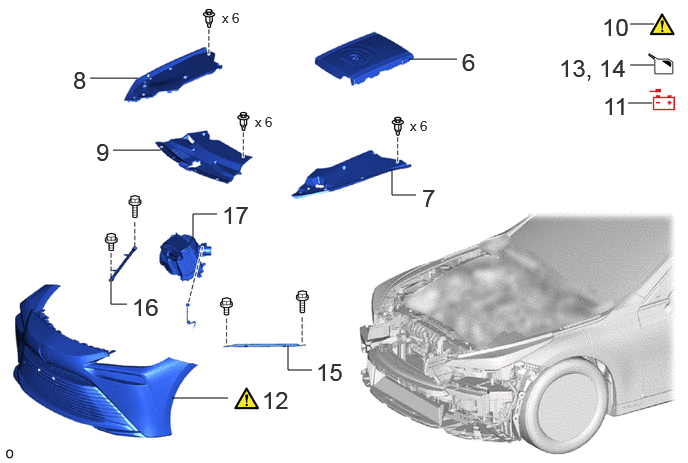
| Procedure | Part Name Code |
|
|
|
|
|---|---|---|---|---|---|
| 6 | FC STACK COVER SUB-ASSEMBLY | 1A906 | - | - | - |
| 7 | UPPER RADIATOR SUPPORT SEAL | 53292A | - | - | - |
| 8 | RADIATOR COVER PLATE | 53291B | - | - | - |
| 9 | LOWER RADIATOR AIR DEFLECTOR | 53295 | - | - | - |
| 10 | RECOVER REFRIGERANT FROM REFRIGERATION SYSTEM | - | ()
|
- | - |
| 11 | DISCONNECT CABLE FROM NEGATIVE AUXILIARY BATTERY TERMINAL | - | - | - | - |
| 12 | FRONT BUMPER ASSEMBLY | - | ()
|
- | - |
| 13 | DRAIN COOLANT (TOYOTA GENUINE FC STACK COOLANT(Pre-mixed)) | - | - | ()
|
- |
| 14 | DRAIN COOLANT (for Inverter) | - | - | ()
|
- |
| 15 | RADIATOR SUPPORT TO CROSS MEMBER BRACE SUB-ASSEMBLY LH | 53204E | - | - | - |
| 16 | RADIATOR SUPPORT TO CROSS MEMBER BRACE SUB-ASSEMBLY RH | 53209F | - | - | - |
| 17 | AIR CLEANER WITH ELEMENT ASSEMBLY WITH AIR CLEANER INLET | - | - | - | - |
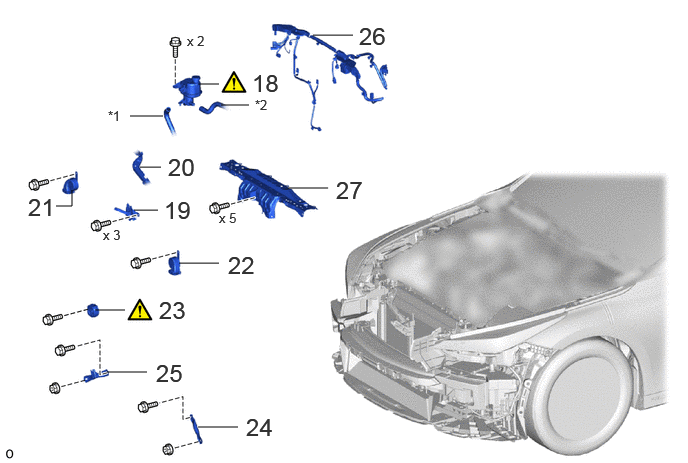
| Procedure | Part Name Code |
|
|
|
|
|---|---|---|---|---|---|
| 18 | EV RESERVE TANK ASSEMBLY | G91H0D | ()
|
- | - |
| 19 | HOOD LOCK ASSEMBLY | 53510 | ()
|
- | - |
| 20 | HOOD LOCK CONTROL CABLE COVER | 53629A | - | - | - |
| 21 | HIGH PITCHED HORN ASSEMBLY | 86510 | - | - | - |
| 22 | LOW PITCHED HORN ASSEMBLY | 86520 | - | - | - |
| 23 | VEHICLE APPROACHING SPEAKER ASSEMBLY | 86570 | ()
|
- | - |
| 24 | UPPER RADIATOR SUPPORT BRACE LH | 51466 | - | - | - |
| 25 | UPPER RADIATOR SUPPORT BRACE RH | 51465 | - | - | - |
| 26 | FRONT COMPARTMENT MAIN WIRE | 82111C | - | - | - |
| 27 | UPPER RADIATOR SUPPORT SUB-ASSEMBLY | 53205 | - | - | - |
| *1 | NO. 6 FC INVERTER COOLING HOSE | *2 | NO. 7 FC INVERTER COOLING HOSE |
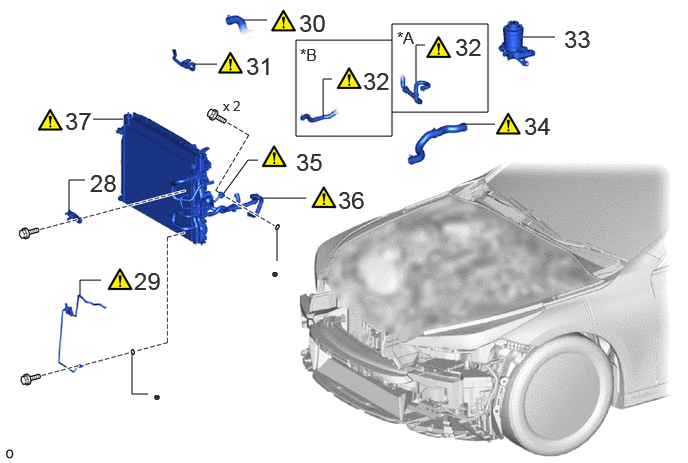
| Procedure | Part Name Code |
|
|
|
|
|---|---|---|---|---|---|
| 28 | NO. 1 COOLER BRACKET | 88689E | - | - | - |
| 29 | LIQUID TUBE SUB-ASSEMBLY A | 88706A | ()
|
- | - |
| 30 | NO. 1 FC RADIATOR HOSE | 16571G | ()
|
- | - |
| 31 | RADIATOR TO RESERVE TANK HOSE | 16567D | ()
|
- | - |
| 32 | NO. 2 FC INVERTER COOLING HOSE | G91C2 | ()
|
- | - |
| 33 | FC COOLING WATER ION EXCHANGER ASSEMBLY | 16A40 | - | - | - |
| 34 | NO. 7 FC RADIATOR HOSE | 16577D | ()
|
- | - |
| 35 | NO. 1 DISCHARGE HOSE SUB-ASSEMBLY | 88703A | ()
|
- | - |
| 36 | NO. 13 FC INVERTER COOLING HOSE | G91CD | ()
|
- | - |
| 37 | RADIATOR WITH COOLER CONDENSER ASSEMBLY | - | ()
|
- | - |
| *A | for LHD | *B | for RHD |
| ● | Non-reusable part | - | - |
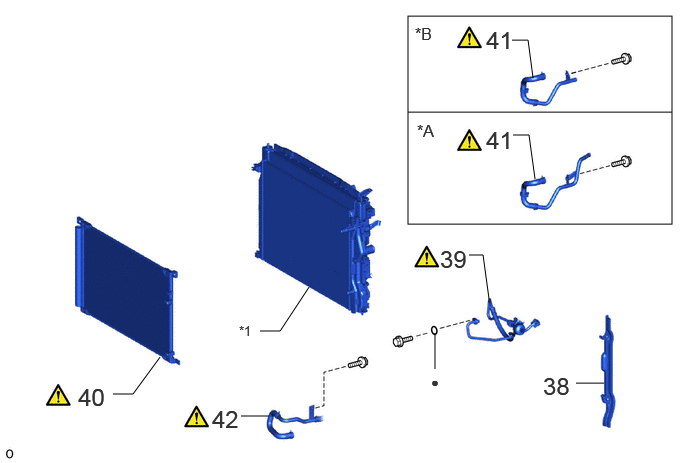
| Procedure | Part Name Code |
|
|
|
|
|---|---|---|---|---|---|
| 38 | REAR RADIATOR SIDE AIR GUIDE PLATE LH | 16697A | - | - | - |
| 39 | NO. 1 DISCHARGE HOSE SUB-ASSEMBLY | 88703A | ()
|
- | - |
| 40 | COOLER CONDENSER ASSEMBLY | 884A0 | ()
|
- | - |
| 41 | NO. 1 FC INVERTER COOLING PIPE | G91D1A | ()
|
- | - |
| 42 | NO. 5 FC INVERTER COOLING PIPE | G91D5 | ()
|
- | - |
| *A | for LHD | *B | for RHD |
| *1 | RADIATOR WITH FAN | - | - |
| ● | Non-reusable part | - | - |
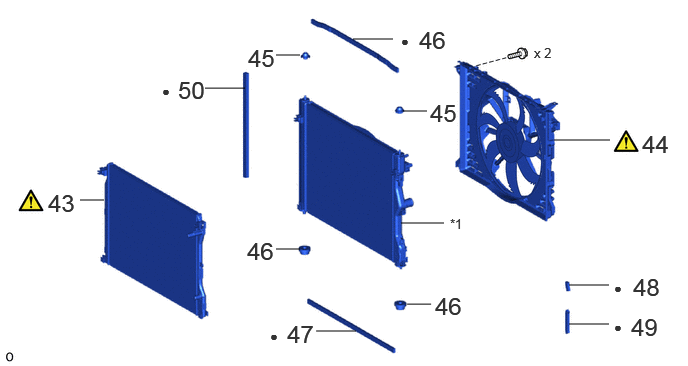
| Procedure | Part Name Code |
|
|
|
|
|---|---|---|---|---|---|
| 43 | EV RADIATOR ASSEMBLY | 16550A | ()
|
- | - |
| 44 | FAN WITH MOTOR ASSEMBLY | 16360B | ()
|
- | - |
| 45 | RADIATOR SUPPORT CUSHION | 16523F | - | - | - |
| 46 | LOWER RADIATOR SUPPORT | - | - | - | - |
| 47 | NO. 1 RADIATOR TO SUPPORT SEAL | 16561B | - | - | - |
| 48 | NO. 2 RADIATOR TO SUPPORT SEAL | 16561E | - | - | - |
| 49 | NO. 3 RADIATOR TO SUPPORT SEAL | 16561F | - | - | - |
| 50 | NO. 4 RADIATOR TO SUPPORT SEAL | 16561G | - | - | - |
| *1 | FC RADIATOR ASSEMBLY | - | - |
| ● | Non-reusable part | - | - |
CAUTION / NOTICE / HINT
The necessary procedures (adjustment, calibration, initialization, or registration) that must be performed after parts are removed, installed, or replaced during the FC radiator assembly receptacle removal/installation are shown below.
| Replacement Part or Procedure | Necessary Procedure | Effects/Inoperative when not Performed | Link |
|---|---|---|---|
| Disconnect cable from negative auxiliary battery terminal | Memorize steering angle neutral point | Parking assist monitor system | ()
|
| Panoramic view monitor system | ()
|
||
| Front bumper assembly (Including removal and installation) | ·
Measurement of ultrasonic sensor detection angle ·
Ultrasonic sensor detection angle registration |
·
TOYOTA Parking assist- sensor system ·
Parking support brake system ·
Advanced park |
w/ Advanced Park:
( )
w/o Advanced Park: ( )
|
| Front television camera view adjustment | Panoramic view monitor system | ()
|
- HINT:
-
When the cable is disconnected/reconnected to the auxiliary battery terminal, systems temporarily stop operating. However, each system has a function that completes learning the first time the system is used.
- ·
Learning completes when vehicle is driven
Effect/Inoperative Function When Necessary Procedures are not Performed Necessary Procedures Link Lane tracing assist system Drive the vehicle straight ahead at 35 km/h (22 mph) or more for 5 seconds or more. ( )
Pre-collision system Adaptive high beam system
·Learning completes when vehicle is operated normally
Effect/Inoperative Function When Necessary Procedures are not Performed Necessary Procedures Link Air conditioning system After the ignition switch is turned to ON, the servo motor and expansion valve standard position is recognized. -
PROCEDURE

 1. PRECAUTION
|
|
|
2. CAUTIONS FOR COOLANT (TOYOTA GENUINE FC STACK COOLANT(Pre-mixed))
51441N
3.REMOVE FRONT COMPARTMENT UNDER COVER
51219
4.REMOVE FRONT LOWER SUSPENSION MEMBER PROTECTOR
51420A
5.REMOVE FRONT COMPARTMEMT UNDER COVER ASSEMBLY
1A906
6.REMOVE FC STACK COVER SUB-ASSEMBLY
53292A
7.REMOVE UPPER RADIATOR SUPPORT SEAL
53291B
8.REMOVE RADIATOR COVER PLATE
53295
9.REMOVE LOWER RADIATOR AIR DEFLECTOR
10.RECOVER REFRIGERANT FROM REFRIGERATION SYSTEM
for HFC-134a(R134a)
Click hereVehicle Interior>HEATING / AIR CONDITIONING>REFRIGERANT (for HFC-134a(R134a))>REPLACEMENT
for HFO-1234yf(R1234yf)
Click hereVehicle Interior>HEATING / AIR CONDITIONING>REFRIGERANT (for HFO-1234yf(R1234yf))>REPLACEMENT
11.DISCONNECT CABLE FROM NEGATIVE AUXILIARY BATTERY TERMINAL
12.REMOVE FRONT BUMPER ASSEMBLY
|
|
()
|
13.DRAIN COOLANT (TOYOTA GENUINE FC STACK COOLANT(Pre-mixed))
14.DRAIN COOLANT (for Inverter)
53204E
15.REMOVE RADIATOR SUPPORT TO CROSS MEMBER BRACE SUB-ASSEMBLY LH
53209F
16.REMOVE RADIATOR SUPPORT TO CROSS MEMBER BRACE SUB-ASSEMBLY RH
17.REMOVE AIR CLEANER WITH ELEMENT ASSEMBLY WITH AIR CLEANER INLET
G91H0D
18.REMOVE EV RESERVE TANK ASSEMBLY
|
|
()
|
53510
19.REMOVE HOOD LOCK ASSEMBLY
53629A
20.REMOVE HOOD LOCK CONTROL CABLE COVER
86510
21.REMOVE HIGH PITCHED HORN ASSEMBLY
Click hereVehicle Exterior>HORN>HORN>REMOVAL
86520
22.REMOVE LOW PITCHED HORN ASSEMBLY
Click hereVehicle Exterior>HORN>HORN>INSTALLATION
86570
23.REMOVE VEHICLE APPROACHING SPEAKER ASSEMBLY
|
|
()
|
51466
24.REMOVE UPPER RADIATOR SUPPORT BRACE LH
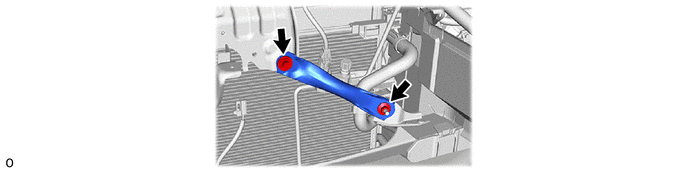
51465
25.REMOVE UPPER RADIATOR SUPPORT BRACE RH
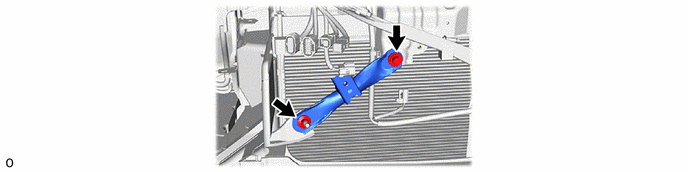
82111C
26.DISCONNECT FRONT COMPARTMENT MAIN WIRE
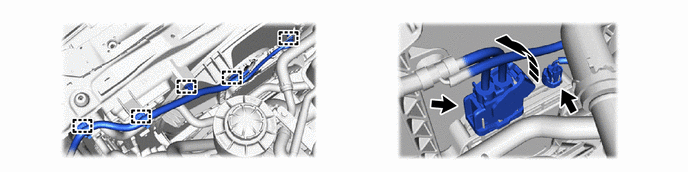
- NOTICE:
-
After disconnecting the cooling fan motor connector, make sure that dirt, water or other foreign matter does not contact the connecting parts of the cooling fan motor connector.
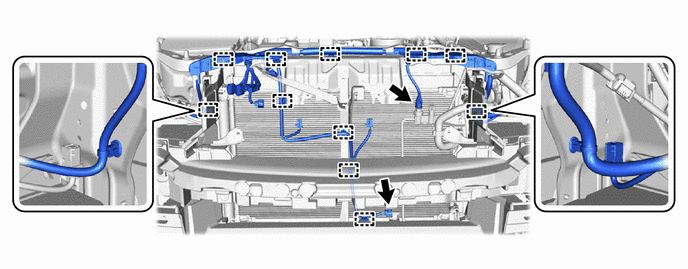
53205
27.REMOVE UPPER RADIATOR SUPPORT SUB-ASSEMBLY
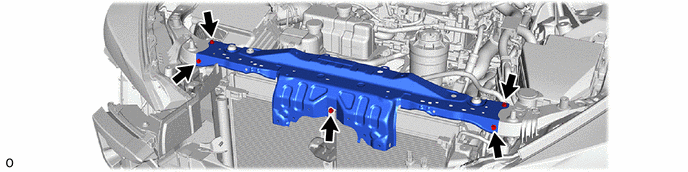
88689E
28.REMOVE NO. 1 COOLER BRACKET
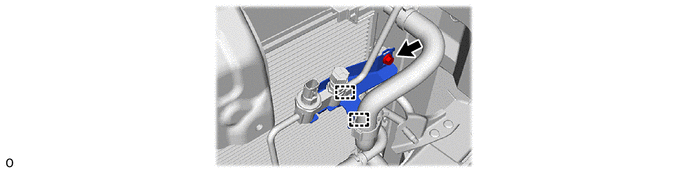
88706A
29.DISCONNECT LIQUID TUBE SUB-ASSEMBLY A
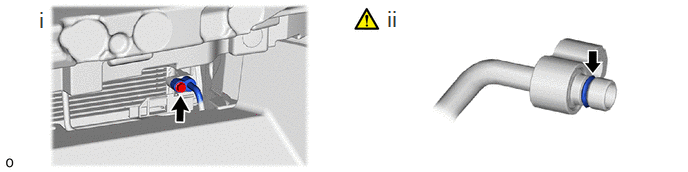
Remove the bolt and disconnect the liquid tube sub-assembly A.
Remove the O-ring from the liquid tube sub-assembly A.
- NOTICE:
-
Seal the openings of the disconnected parts using vinyl tape to prevent moisture and foreign matter from entering them.
16571G
30.DISCONNECT NO. 1 FC RADIATOR HOSE
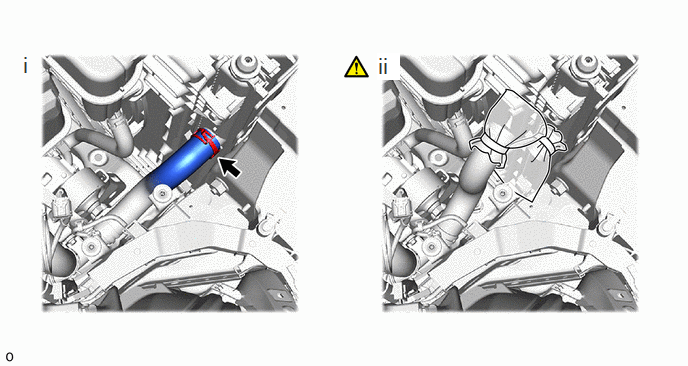
Slide the hose clip and disconnect the No. 1 FC radiator hose from the FC radiator assembly.
To prevent contamination by foreign matter, cover the connecting portions of the No. 1 FC radiator hose and FC radiator assembly with plastic bags.
16567D
31.DISCONNECT RADIATOR TO RESERVE TANK HOSE
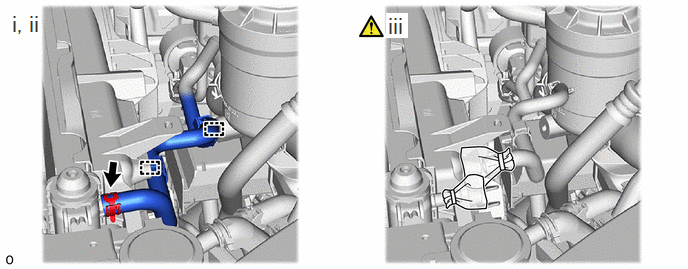
Detach the 2 clamps.
Slide the hose clip and disconnect the radiator to reserve tank hose from the FC radiator assembly.
To prevent contamination by foreign matter, cover the connecting portions of the radiator to reserve tank hose and FC radiator assembly with plastic bags.
G91C2
32.DISCONNECT NO. 2 FC INVERTER COOLING HOSE
for LHD:
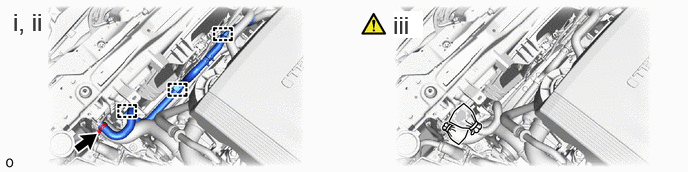
Detach the 3 clamps.
Slide the hose clip and disconnect the No. 2 FC inverter cooling hose from the No. 1 FC inverter cooling pipe.
To prevent contamination by foreign matter, cover the connecting portions of the No. 2 FC inverter cooling hose and No. 1 FC inverter cooling pipe with plastic bags.
for RHD:
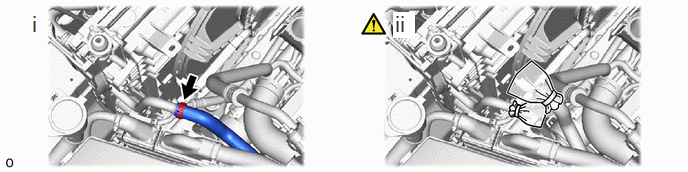
Slide the hose clip and disconnect the No. 2 FC inverter cooling hose from the No. 1 FC inverter cooling pipe.
To prevent contamination by foreign matter, cover the connecting portions of the No. 2 FC inverter cooling hose and No. 1 FC inverter cooling pipe with plastic bags.
16A40
33.REMOVE FC COOLING WATER ION EXCHANGER ASSEMBLY
16577D
34.REMOVE NO. 7 FC RADIATOR HOSE
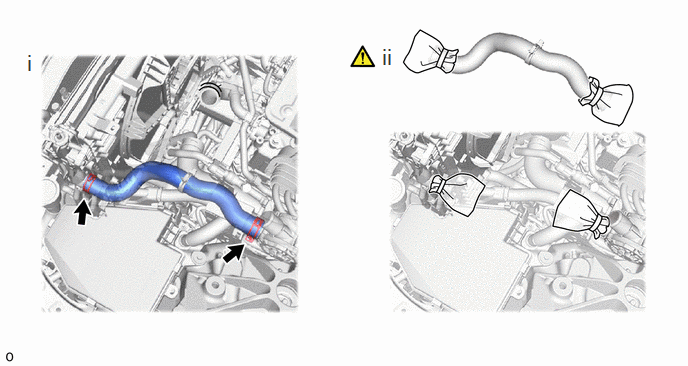
Slide the 2 hose clips and remove the No. 7 FC radiator hose from the FC cooling water temperature control valve and FC radiator assembly.
To prevent contamination by foreign matter, cover the connecting portions of the No. 7 FC radiator hose, FC cooling water temperature control valve and FC radiator assembly with plastic bags.
88703A
35.DISCONNECT NO. 1 DISCHARGE HOSE SUB-ASSEMBLY
|
|
()
|
G91CD
36.DISCONNECT NO. 13 FC INVERTER COOLING HOSE
|
|
()
|
37.REMOVE RADIATOR WITH COOLER CONDENSER ASSEMBLY
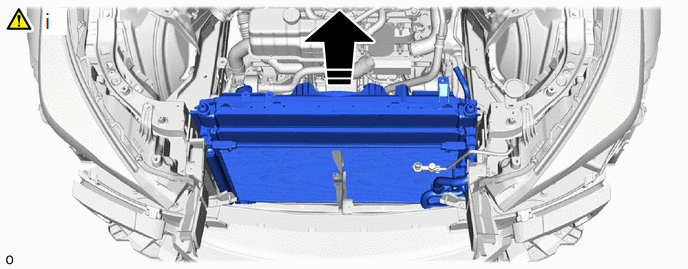

|
Remove in this Direction | - | - |
While lifting the radiator with cooler condenser assembly in the direction of the arrow shown in the illustration, remove the cooler condenser assembly.
- NOTICE:
- ·
Perform the following procedure with 2 or more people to prevent damage to the radiator with cooler condenser assembly.
·When removing the radiator with cooler condenser assembly from the vehicle, do not apply excessive force to the cooler pipe or cooling hoses.
- HINT:
-
Prepare a drain pan or cloth in case the coolant leaks.
16697A
38.REMOVE REAR RADIATOR SIDE AIR GUIDE PLATE LH
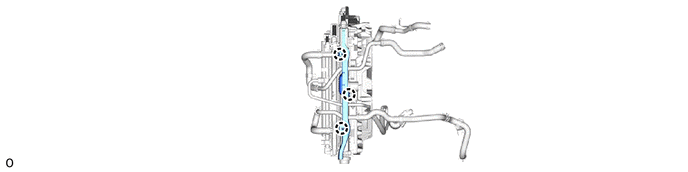
88703A
39.REMOVE NO. 1 DISCHARGE HOSE SUB-ASSEMBLY
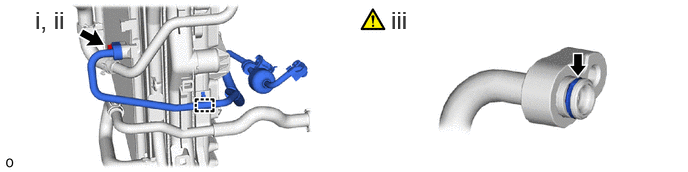
Detach the clamp.
Remove the bolt and disconnect the No. 1 discharge hose sub-assembly.
Remove the O-ring from the No. 1 discharge hose sub-assembly.
- NOTICE:
-
Seal the openings of the disconnected parts using vinyl tape to prevent moisture and foreign matter from entering them.
884A0
40.REMOVE COOLER CONDENSER ASSEMBLY
|
|
()
|
G91D1A
41.REMOVE NO. 1 FC INVERTER COOLING PIPE
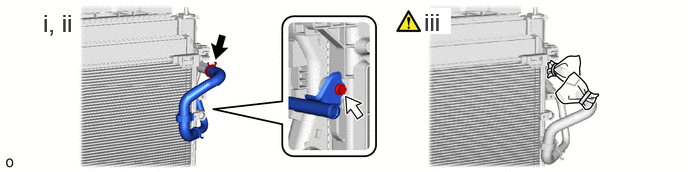
Remove the bolt.
Slide the hose clip and remove the No. 1 FC inverter cooling pipe from the EV radiator assembly.
To prevent contamination by foreign matter, cover the connecting portions of the No. 1 FC inverter cooling pipe and EV radiator assembly with plastic bags.
G91D5
42.REMOVE NO. 5 FC INVERTER COOLING PIPE
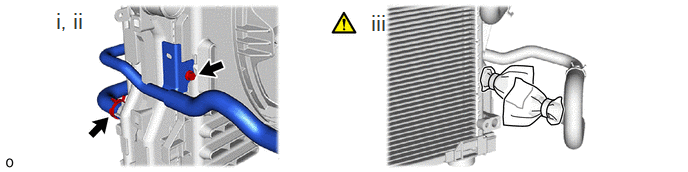
Remove the bolt.
Slide the hose clip and remove the No. 5 FC inverter cooling pipe from the EV radiator assembly.
To prevent contamination by foreign matter, cover the connecting portions of the No. 5 FC inverter cooling pipe and EV radiator assembly with plastic bags.
16550A
43.REMOVE EV RADIATOR ASSEMBLY
|
|
()
|
16360B
44.REMOVE FAN WITH MOTOR ASSEMBLY
|
|
|
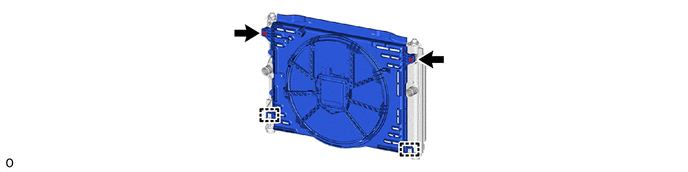
16523F
45.REMOVE RADIATOR SUPPORT CUSHION
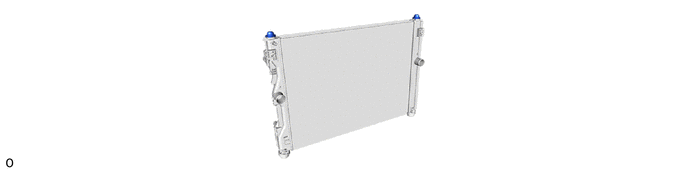
46.REMOVE LOWER RADIATOR SUPPORT
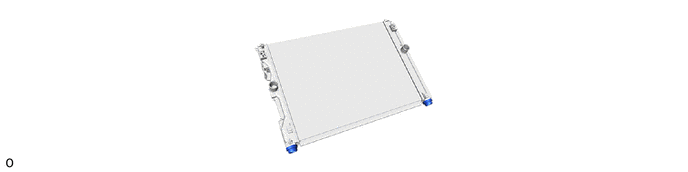
16561B
47.REMOVE NO. 1 RADIATOR TO SUPPORT SEAL
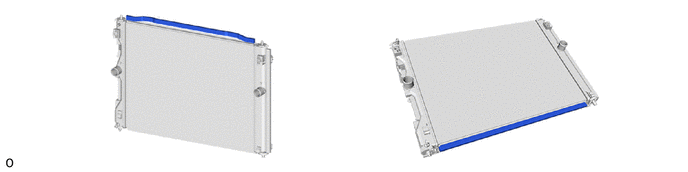
16561E
48.REMOVE NO. 2 RADIATOR TO SUPPORT SEAL
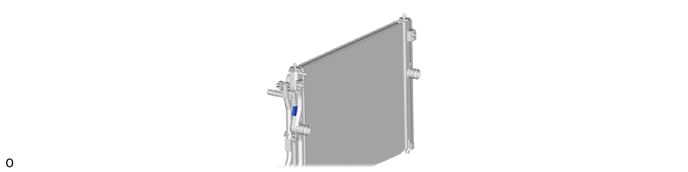
16561F
49.REMOVE NO. 3 RADIATOR TO SUPPORT SEAL
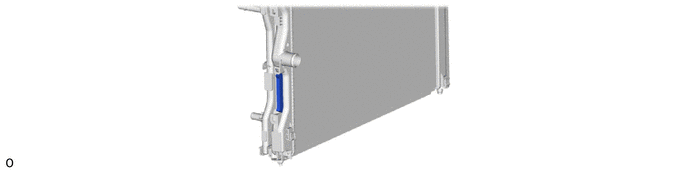
16561G
50.REMOVE NO. 4 RADIATOR TO SUPPORT SEAL