1AD-FTV ENGINE MECHANICAL ENGINE ASSEMBLY INSTALLATION
CAUTION / NOTICE / HINT
- CAUTION:
-
As the engine assembly with transaxle is extremely heavy, the engine lifter may suddenly drop if the instructions listed in the repair manual are not followed. Therefore, always follow the instructions listed in the repair manual when performing this procedure.
PROCEDURE

 12305
1.INSTALL ENGINE MOUNTING INSULATOR SUB-ASSEMBLY RH
- HINT:
-
Perform this procedure only when replacement of the engine mounting insulator sub-assembly RH is necessary.
Install the engine mounting insulator sub-assembly RH with the 3 bolts.
- Torque:
- 95 N*m (969 kgf*cm, 70 ft.*lbf)
12372A
2.INSTALL ENGINE MOUNTING INSULATOR LH
- HINT:
-
Perform this procedure only when replacement of the engine mounting insulator LH is necessary.
Install the engine mounting insulator LH with the 4 bolts.
- Torque:
- 95 N*m (969 kgf*cm, 70 ft.*lbf)
12371A
3.INSTALL REAR ENGINE MOUNTING INSULATOR
- HINT:
-
Perform this procedure only when replacement of the rear engine mounting insulator is necessary.
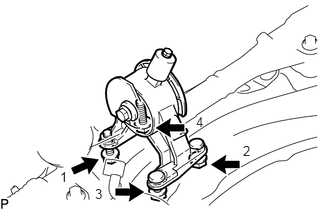
Install the rear engine mounting insulator with the 2 bolts and 2 nuts in the order shown in the illustration.
- Torque:
- 95 N*m (969 kgf*cm, 70 ft.*lbf)
4.INSTALL ENGINE HANGER
5.REMOVE ENGINE FROM ENGINE STAND
- NOTICE:
- ·
Pay attention to the angle of the sling device as the engine assembly or engine hangers may be damaged or deformed if the angle is incorrect.
·With the exception of installing the engine assembly to an engine stand or removing the engine assembly from an engine stand, do not perform any work on the engine while it is suspended, as doing so is dangerous.
Install a sling device and chain block to the engine and hang the engine.
Remove the engine from the engine stand.
6.FIX ENGINE ASSEMBLY
13450
7.INSTALL FLYWHEEL WITH DAMPER ASSEMBLY
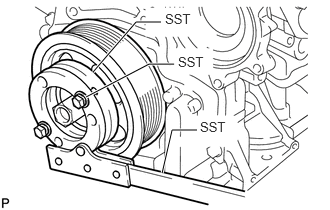
Using SST, hold the crankshaft pulley.
- SST
- 09213-58014 (91551-80840)
09330-00021
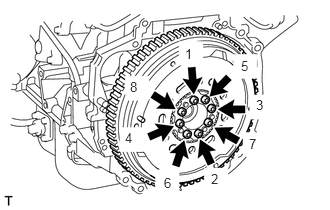
Using a T55 "TORX" socket wrench, install the flywheel with damper assembly with 8 new bolts and uniformly tighten the bolts in several steps in the sequence shown in the illustration.
- Torque:
- 71 N*m (724 kgf*cm, 52 ft.*lbf)
- NOTICE:
- ·
Do not reuse the flywheel installation bolts.
·Be sure to check the tightening torque within 5 minutes after tightening.
·Do not impact or damage the flywheel installation bolts. Be sure to handle them carefully.
·Make sure there is no oil on the bolts.
- HINT:
-
Make sure that the seating surface of the flywheel installation bolts and installation surfaces of the crankshaft and flywheel with damper assembly are free from oil and foreign matter.
31250
8.INSTALL CLUTCH DISC ASSEMBLY
31210
9.INSTALL CLUTCH COVER ASSEMBLY
31210
10.INSPECT AND ADJUST CLUTCH COVER ASSEMBLY
30300
11.INSTALL MANUAL TRANSAXLE ASSEMBLY
33119C
12.INSTALL STIFFENER PLATE LH
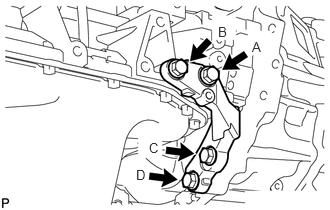
Temporarily install the stiffener plate LH with the 4 bolts.
While holding the stiffener plate LH against the transaxle, tighten bolt A, and then tighten bolts B, C and D.
- Torque:
- 46 N*m (469 kgf*cm, 34 ft.*lbf)
33118D
13.INSTALL STIFFENER PLATE RH
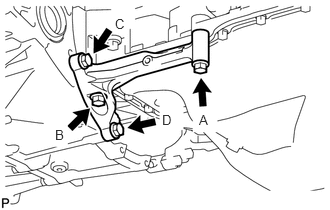
Temporarily install the stiffener plate RH with the 4 bolts.
While holding the stiffener plate RH against the transaxle, tighten bolt A, and then tighten bolts B, C and D.
- Torque:
- 46 N*m (469 kgf*cm, 34 ft.*lbf)
12156
14.INSTALL OIL PAN INSULATOR
Install the oil pan insulator with the 2 bolts.
- Torque:
- 9.0 N*m (92 kgf*cm, 80 in.*lbf)
12325A
15.INSTALL ENGINE MOUNTING BRACKET LH
- HINT:
-
Perform this procedure only when replacement of the engine mounting bracket LH is necessary.
Install the engine mounting bracket LH with the 4 bolts.
- Torque:
- 64 N*m (653 kgf*cm, 47 ft.*lbf)
12321A
16.INSTALL REAR ENGINE MOUNTING BRACKET
for 2WD:
Temporarily install the rear engine mounting bracket with the 5 bolts.
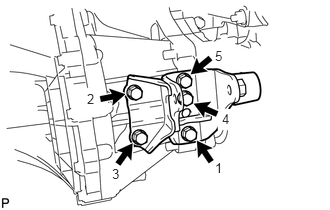
Tighten the 5 bolts of the rear engine mounting bracket in the order shown in the illustration.
- Torque:
- 45 N*m (459 kgf*cm, 33 ft.*lbf)
for 4WD:
Temporarily install the rear engine mounting bracket with the 4 bolts.
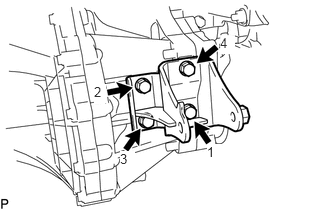
Tighten the 4 bolts of the rear engine mounting bracket in the order shown in the illustration.
- Torque:
- 45 N*m (459 kgf*cm, 33 ft.*lbf)
12311A
17.INSTALL FRONT ENGINE MOUNTING BRACKET
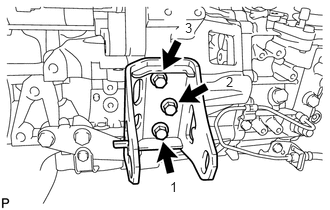
Temporarily install the front engine mounting bracket with the 3 bolts.
Tighten the 3 bolts of the front engine mounting bracket in the order shown in the illustration.
- Torque:
- 64 N*m (653 kgf*cm, 47 ft.*lbf)
82121
18.INSTALL ENGINE WIRE
28100
19.INSTALL STARTER ASSEMBLY
w/ Stop And Sart System:
Click hereEngine / Hybrid System>1AD-FTV STARTING>STARTER(w/ Stop And Start System)>INSTALLATION
w/o Stop And Start System:
Click hereEngine / Hybrid System>1AD-FTV STARTING>STARTER(w/o Stop And Start System)>INSTALLATION
17361J
20.INSTALL NO. 1 AIR TUBE
Install the No. 1 air tube with the 2 bolts and tighten the clamp.
- Torque:
- for bolt : 24 N*m (245 kgf*cm, 18 ft.*lbf)
- for clamp : 6.5 N*m (66 kgf*cm, 58 in.*lbf)
- NOTICE:
-
Before installation, remove any oil residue from the inside of the No. 1 air tube and air hose.
21.INSTALL ENGINE WITH TRANSAXLE
Set the engine assembly with transaxle on the engine lifter.
- HINT:
-
Place the engine on wooden blocks or equivalent so that the engine is level.
Temporarily install the front suspension member with the through bolt.
Operate the engine lifter and lift the engine assembly with transaxle to the position where the engine mounting insulator LH and engine mounting insulator sub-assembly RH can be installed.
- CAUTION:
-
Do not raise the engine more than necessary. If the engine is raised excessively, the vehicle may also be lifted up.
- NOTICE:
- ·
Make sure that the engine is clear of all wiring and hoses.
·While raising the engine into the vehicle, do not allow it to contact the vehicle.
·Align the matchmarks on the intermediate shaft and pinion.
Temporarily install the front suspension member rear brace RH and front suspension member rear brace LH with the 6 bolts.
Temporarily install the 2 bolts to the front suspension member sub-assembly.
Connect the engine mounting insulator LH with the bolt and nut.
- Torque:
- 56 N*m (571 kgf*cm, 41 ft.*lbf)
- HINT:
-
While holding the bolt in place, tighten the nut.
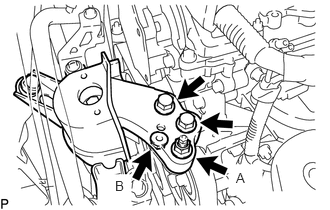
Connect the engine mounting insulator sub-assembly RH with the 2 bolts and 2 nuts.
- Torque:
- for bolt and nut A : 95 N*m (969 kgf*cm, 70 ft.*lbf)
- for nut B : 52 N*m (530 kgf*cm, 38 ft.*lbf)
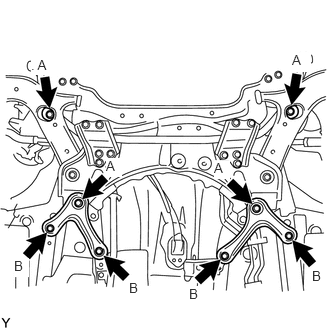
Tighten the 8 bolts.
- Torque:
- for bolt A : 137 N*m (1397 kgf*cm, 101 ft.*lbf)
- for bolt B : 93 N*m (948 kgf*cm, 69 ft.*lbf)
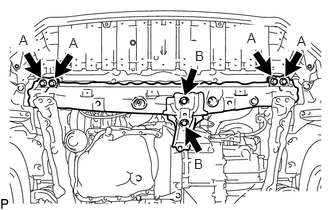
Install the front crossmember sub-assembly with the 6 bolts.
- Torque:
- for bolt A : 99 N*m (1010 kgf*cm, 73 ft.*lbf)
- for bolt B : 95 N*m (969 kgf*cm, 70 ft.*lbf)
Remove the 2 bolts, No. 1 engine hanger and No. 2 engine hanger.
Install the front suspension member sub-assembly with the through bolt.
- Torque:
- 95 N*m (969 kgf*cm, 70 ft.*lbf)
Install the front engine mounting insulator with the through bolt and nut.
- Torque:
- 145 N*m (1479 kgf*cm, 107 ft.*lbf)
- NOTICE:
-
While holding the nut in place, tighten the through bolt.
23292D
22.INSTALL FUEL HOSE PROTECTOR
Install the fuel hose protector to the cylinder head sub-assembly.
- Torque:
- 40 N*m (408 kgf*cm, 30 ft.*lbf)
51218A
23.INSTALL FRONT SUSPENSION MEMBER REINFORCEMENT LH
Install the front suspension member reinforcement LH with the 4 bolts.
- Torque:
- 99 N*m (1010 kgf*cm, 73 ft.*lbf)
51217A
24.INSTALL FRONT SUSPENSION MEMBER REINFORCEMENT RH
51425B
25.INSTALL FRONT LOWER ENGINE MOUNTING BRACKET REINFORCEMENT
Install the front lower engine mounting bracket reinforcement with the 2 bolts.
- Torque:
- 99 N*m (1010 kgf*cm, 73 ft.*lbf)
43420
26.INSTALL FRONT DRIVE SHAFT ASSEMBLY LH
43410
27.INSTALL FRONT DRIVE SHAFT ASSEMBLY RH
28.INSTALL FRONT AXLE ASSEMBLY LH
29.INSTALL FRONT AXLE ASSEMBLY RH
- HINT:
-
Perform the same procedure as for the LH side.
48810
30.CONNECT FRONT STABILIZER LINK ASSEMBLY LH
48820B
31.CONNECT FRONT STABILIZER LINK ASSEMBLY RH
- HINT:
-
Perform the same procedure as for the LH side.
43502H
32.INSTALL FRONT AXLE SHAFT NUT LH
43501H
33.INSTALL FRONT AXLE SHAFT NUT RH
- HINT:
-
Perform the same procedure as for the LH side.
45025D
34.INSTALL NO. 1 STEERING COLUMN HOLE COVER SUB-ASSEMBLY
45260
35.CONNECT NO. 2 STEERING INTERMEDIATE SHAFT ASSEMBLY
45259A
36.INSTALL COLUMN HOLE COVER SILENCER SHEET
31470
37.CONNECT CLUTCH RELEASE CYLINDER ASSEMBLY
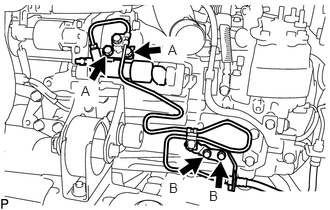
Connect the clutch release cylinder assembly and clutch flexible hose bracket with the 4 bolts.
- Torque:
- for bolt A : 12 N*m (122 kgf*cm, 9 ft.*lbf)
- for bolt B : 19 N*m (194 kgf*cm, 14 ft.*lbf)
33820B
38.CONNECT TRANSMISSION CONTROL CABLE ASSEMBLY
Connect the transmission control cable assembly to the transmission control cable bracket with 2 new clips.
Install the 2 pins.
88704
39.CONNECT SUCTION HOSE SUB-ASSEMBLY
Sufficiently apply compressor oil to a new O-ring and the fitting surface of the hose joint.
- Compressor Oil:
ND-OIL 8 or equivalent
Install the O-ring to the suction hose sub-assembly.
Connect the suction hose sub-assembly to the cooler compressor assembly with the bolt.
- Torque:
- 9.8 N*m (100 kgf*cm, 87 in.*lbf)
Connect the connector to the cooler compressor assembly.
88703
40.CONNECT DISCHARGE HOSE SUB-ASSEMBLY
Sufficiently apply compressor oil to a new O-ring and the fitting surface of the hose joint.
- Compressor Oil:
ND-OIL 8 or equivalent
Install the O-ring to the discharge hose sub-assembly.
Connect the discharge hose sub-assembly to the cooler compressor assembly with the bolt.
- Torque:
- 9.8 N*m (100 kgf*cm, 87 in.*lbf)
16470
41.INSTALL RADIATOR RESERVOIR ASSEMBLY
Install the radiator reservoir assembly with the 2 bolts.
- Torque:
- 5.0 N*m (51 kgf*cm, 44 in.*lbf)
Connect the water by-pass hose to the radiator reservoir assembly, and slide the clamp to secure the hose.
16264D
42.CONNECT NO. 2 WATER BY-PASS HOSE
Connect the No. 2 water by-pass hose to the No. 4 water by-pass pipe, and slide the clamp to secure the hose.
16572D
43.CONNECT NO. 2 RADIATOR HOSE
Connect the No. 2 radiator hose to the water inlet housing, and slide the clamp to secure the hose.
17342F
44.INSTALL INTERCOOLER AIR HOSE
16057
45.CONNECT RADIATOR HOSE SUB-ASSEMBLY
Connect the radiator hose sub-assembly to the cylinder head sub-assembly and slide the clamp to secure the hose.
87246A
46.CONNECT OUTLET HEATER WATER HOSE
Connect the outlet heater water hose to the No. 3 water by-pass pipe and slide the clamp to secure the hose.
87245A
47.CONNECT INLET HEATER WATER HOSE
Connect the inlet heater water hose to the cylinder head sub-assembly and slide the clamp to secure the hose.
48.CONNECT HOSES AND CONNECTORS
Connect the vacuum pump hose to the vacuum pump assembly and slide the clip to secure the hose.
Install the injector driver assembly with the 2 nuts.
- Torque:
- 8.0 N*m (82 kgf*cm, 71 in.*lbf)
Connect the 4 injector driver connectors and attach the 2 wire harness clamps.
Attach the 3 wire harness clamps to the 3 wire harness clamp brackets.
Install the bolt to the manual transaxle assembly.
- Torque:
- 19 N*m (194 kgf*cm, 14 ft.*lbf)
Connect the 2 connectors and attach the wire harness clamp.
Install the ground cable with the bolt and attach the wire harness clamp.
- Torque:
- 19 N*m (194 kgf*cm, 14 ft.*lbf)
Install the bolt to the wire harness clamp bracket.
- Torque:
- 7.7 N*m (79 kgf*cm, 68 in.*lbf)
Connect the starter wire with the nut.
- Torque:
- 9.8 N*m (100 kgf*cm, 87 in.*lbf)
Install the bolt and attach the engine wire cover clamp and engine wire harness clamp.
- Torque:
- 7.7 N*m (79 kgf*cm, 68 in.*lbf)
Connect the 2 connectors to the No. 8 engine wire.
Attach the 2 claws and connect the engine wire to the engine room No. 1 relay block with the nut.
- Torque:
- 13 N*m (133 kgf*cm, 10 ft.*lbf)
Connect the 3 connectors to the engine room No. 1 relay block.
Install the engine room relay block and junction block cover.
89661
49.INSTALL ECM
17119A
50.INSTALL AIR CLEANER BRACKET
Install the air cleaner bracket with the 3 bolts.
- Torque:
- 7.5 N*m (76 kgf*cm, 66 in.*lbf)
Connect the 2 fuel hoses to the air cleaner bracket.
Attach the 3 wire harness clamps.
Connect the glow plug relay and level warning switch connector.
51.INSTALL FUEL FILTER ASSEMBLY
Install the fuel filter assembly to the air cleaner bracket with the bolt.
- Torque:
- 7.0 N*m (71 kgf*cm, 62 in.*lbf)
Connect the 2 fuel hoses to the fuel filter assembly and slide the clamp to secure the hoses.
17769
52.INSTALL AIR CLEANER SUPPORT
Install the air cleaner support with the 2 nuts.
- Torque:
- 7.0 N*m (71 kgf*cm, 62 in.*lbf)
53.INSTALL AIR CLEANER CASE
Install the air cleaner case with the 3 bolts.
- Torque:
- 5.0 N*m (51 kgf*cm, 44 in.*lbf)
17801
54.INSTALL AIR CLEANER FILTER ELEMENT SUB-ASSEMBLY
17705
55.INSTALL AIR CLEANER CAP SUB-ASSEMBLY
Install the air cleaner cap sub-assembly and attach the 3 clips.
Connect the mass air flow meter connector and wire harness clamp.
Connect the air cleaner hose and tighten the hose clamp.
Connect the PCV hose.
17343D
56.INSTALL NO. 3 AIR HOSE
25770A
57.CONNECT NO. 2 VACUUM TRANSMITTING HOSE ASSEMBLY
74414B
58.INSTALL BATTERY BRACKET REINFORCEMENT
Install the battery bracket reinforcement with the 2 bolts.
- Torque:
- 20 N*m (204 kgf*cm, 15 ft.*lbf)
74411B
59.INSTALL FRONT BATTERY BRACKET
Install the front battery bracket with the 4 bolts.
- Torque:
- 20 N*m (204 kgf*cm, 15 ft.*lbf)
Attach the 2 wire harness clamps.
74431
60.INSTALL BATTERY TRAY
28800
61.INSTALL BATTERY
28899
62.INSTALL BATTERY INSULATOR
74404A
63.INSTALL BATTERY CLAMP SUB-ASSEMBLY
Attach the hook of the battery clamp sub-assembly to the front battery bracket.
Partially tighten the nut and temporarily install the bolt.
Attach the 2 wire harness clamps.
Adjust the battery clamp position.
Tighten the nut and bolt.
- Torque:
- for bolt : 17 N*m (173 kgf*cm, 13 ft.*lbf)
- for nut : 4.9 N*m (50 kgf*cm, 43 in.*lbf)
89480A
64.INSTALL DIFFERENTIAL PRESSURE SENSOR ASSEMBLY
17410
65.INSTALL FRONT EXHAUST PIPE ASSEMBLY
66.ADD MANUAL TRANSAXLE OIL
67.ADD ENGINE OIL
68.CONNECT CABLE TO POSITIVE BATTERY TERMINAL
69.CONNECT CABLE TO NEGATIVE BATTERY TERMINAL
- NOTICE:
-
When disconnecting the cable, some systems need to be initialized after the cable is reconnected.
-
Click hereGeneral>INTRODUCTION>REPAIR INSTRUCTION>INITIALIZATION
70.ADD ENGINE COOLANT
71.BLEED AIR FROM FUEL SYSTEM
72.CHARGE REFRIGERANT
73.WARM UP ENGINE
74.INSPECT FOR REFRIGERANT LEAK
75.PERFORM REGISTRATION
Perform registration of the injector compensation codes.
Click hereEngine / Hybrid System>1AD-FTV ENGINE CONTROL>ECD SYSTEM>REGISTRATION
Perform registration of the pilot quantity learning.
Click hereEngine / Hybrid System>1AD-FTV ENGINE CONTROL>ECD SYSTEM>REGISTRATION
76.PERFORM INITIALIZATION
Perform initialization of the crank time compensation reset function.
Click hereEngine / Hybrid System>1AD-FTV ENGINE CONTROL>ECD SYSTEM>INITIALIZATION
77.PERFORM THROTTLE VALVE FULLY CLOSED POSITION LEARNING
78.INSPECT FOR OIL LEAK
79.INSPECT FOR COOLANT LEAK
80.INSPECT FOR FUEL LEAK
81.INSPECT FOR EXHAUST GAS LEAK
82.INSPECT FOR MANUAL TRANSAXLE OIL LEAK
51443
83.INSTALL REAR ENGINE UNDER COVER RH
51444
84.INSTALL REAR ENGINE UNDER COVER LH
Install the rear engine under cover LH with the 2 clips.
58165C
85.INSTALL FRONT FLOOR COVER RH
Install the front floor cover RH with the 3 nuts and 3 clips.
51442
86.INSTALL NO. 2 ENGINE UNDER COVER
Install the No. 2 engine under cover with the bolt and clip.
- Torque:
- 5.5 N*m (56 kgf*cm, 49 in.*lbf)
50819
87.INSTALL FRONT FLOOR COVER
51441
88.INSTALL NO. 1 ENGINE UNDER COVER
Install the No. 1 engine under cover with the 11 clips.
Install the 4 bolts and 2 screws.
12611
89.INSTALL NO. 1 ENGINE COVER
Attach the 4 clips to install the No. 1 engine cover.
90.CHECK IDLE SPEED
91.CHECK MAXIMUM ENGINE SPEED
92.ADJUST FRONT WHEEL ALIGNMENT
93.CHECK ABS SPEED SENSOR SIGNAL