BRAKE SYSTEM (OTHER) BRAKE BOOSTER(for LHD) INSTALLATION
PROCEDURE

 44696
1.INSTALL VACUUM SENSOR GROMMET (w/ Stop And Start System)
89420H
2.INSTALL VACUUM SENSOR ASSEMBLY (w/ Stop And Start System)
44696
3.INSTALL CHECK VALVE GROMMET
Install a new check valve grommet to the brake booster assembly.
44730
4.INSTALL BRAKE VACUUM CHECK VALVE ASSEMBLY
Install the brake vacuum check valve assembly to the check valve grommet.
44785
5.INSTALL BRAKE BOOSTER GASKET
Install a new brake booster gasket to the brake booster assembly.
47264D
6.INSTALL BRAKE MASTER CYLINDER PUSH ROD CLEVIS
Install the push rod clevis to the brake booster assembly.
44610
7.INSTALL BRAKE BOOSTER ASSEMBLY
Install the brake booster assembly with the 4 nuts.
- Torque:
- 12.7 N*m (130 kgf*cm, 9 ft.*lbf)
47264A
8.INSTALL PUSH ROD PIN
47101A
9.INSTALL BRAKE PEDAL RETURN SPRING
10.CHECK AND ADJUST BRAKE BOOSTER PUSH ROD
11.CONNECT VACUUM HOSE
Connect the vacuum hose to the brake vacuum check valve assembly, and slide the clip to secure it.
47201
12.INSTALL BRAKE MASTER CYLINDER SUB-ASSEMBLY
44510
13.INSTALL BRAKE ACTUATOR ASSEMBLY WITH BRACKET
14.CONNECT BRAKE LINE
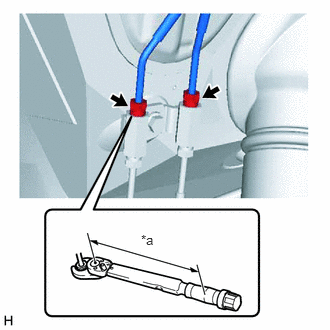
| *a | Torque Wrench Fulcrum Length |
Using a union nut wrench, connect the 2 brake tubes to the 2-way.
- Torque:
- Specified tightening torque : 15.2 N*m (155 kgf*cm, 11 ft.*lbf)
- HINT:
- ·
Calculate the torque wrench reading when changing the fulcrum length of the torque wrench.
Click hereGeneral>INTRODUCTION>REPAIR INSTRUCTION>PRECAUTION
·When using a union nut wrench (fulcrum length of 22 mm (0.866 in.)) + torque wrench (fulcrum length of 162 mm (6.378 in.)) : 13.4 N*m (137kgf*cm, 10 ft.*lbf)
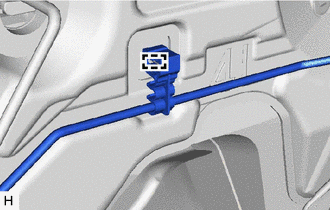
Install a new No. 4 brake tube clamp and the brake tube to the body.
55736D
15.INSTALL COWL BODY MOUNTING REINFORCEMENT LH
Install the cowl body mounting reinforcement LH with the 2 nuts.
- Torque:
- 50 N*m (510 kgf*cm, 37 ft.*lbf)
55701J
16.INSTALL COWL TOP PANEL OUTER SUB-ASSEMBLY
Install the cowl top panel outer sub-assembly with the 13 bolts.
- Torque:
- 5.5 N*m (56 kgf*cm, 49 in.*lbf)
55081E
17.INSTALL COWL VENTILATOR HOUSING SUB-ASSEMBLY
Engage the 3 clips to install the cowl ventilator housing sub-assembly.
85160
18.INSTALL WINDSHIELD WIPER MOTOR AND LINK ASSEMBLY
19.INSTALL AIR CLEANER CASE SUB-ASSEMBLY
for 2AR-FE:
Click hereEngine / Hybrid System>2AR-FE ENGINE CONTROL>ECM>INSTALLATION
for 3ZR-FE:
Click hereEngine / Hybrid System>3ZR-FE ENGINE CONTROL>ECM>INSTALLATION
for 3ZR-FAE:
Click hereEngine / Hybrid System>3ZR-FAE ENGINE CONTROL>ECM>INSTALLATION
for 2AD-FHV:
Click hereEngine / Hybrid System>2AD-FHV ENGINE CONTROL>ECM>INSTALLATION
for 2AD-FTV:
Click hereEngine / Hybrid System>2AD-FTV ENGINE CONTROL>ECM>INSTALLATION
for 2WW:
Click hereEngine / Hybrid System>2WW ENGINE CONTROL>ECM>INSTALLATION
73900
20.INSTALL LOWER NO. 1 INSTRUMENT PANEL AIRBAG ASSEMBLY (w/ Driver Side Knee Airbag)
55432B
21.INSTALL LOWER INSTRUMENT PANEL FINISH PANEL (w/o Driver Side Knee Airbag)
22.CONNECT CABLE TO NEGATIVE BATTERY TERMINAL
- NOTICE:
-
When disconnecting the cable, some systems need to be initialized after the cable is reconnected (Click hereGeneral>INTRODUCTION>REPAIR INSTRUCTION>INITIALIZATION).
23.BLEED BRAKE SYSTEM
24.BLEED CLUTCH LINE (for Manual Transaxle)
for 2AD-FTV:
Click hereDrivetrain>CLUTCH>CLUTCH SYSTEM(for 2AD-FTV)>BLEEDING
for 2AR-FE:
Click hereDrivetrain>CLUTCH>CLUTCH SYSTEM(for 2AR-FE)>BLEEDING
for 3ZR-FE:
Click hereDrivetrain>CLUTCH>CLUTCH SYSTEM(for 3ZR-FE)>BLEEDING
for 3ZR-FAE:
Click hereDrivetrain>CLUTCH>CLUTCH SYSTEM(for 3ZR-FAE)>BLEEDING
for 2WW:
25.INSPECT AND ADJUST BRAKE PEDAL