1NZ-FE ENGINE MECHANICAL CYLINDER HEAD GASKET REMOVAL
PROCEDURE

 1. PRECAUTION
- NOTICE:
-
After turning the ignition switch off, waiting time may be required before disconnecting the cable from the battery terminal. Therefore, make sure to read the disconnecting the cable from the battery terminal notice before proceeding with work.
-
Click hereGeneral>INTRODUCTION>REPAIR INSTRUCTION>PRECAUTION
2. DISCHARGE FUEL SYSTEM PRESSURE
3.REMOVE FRONT WHEEL RH
51442C
4.REMOVE ENGINE UNDER COVER LH
51441C
5.REMOVE ENGINE UNDER COVER RH
6.DRAIN ENGINE OIL
7.DRAIN ENGINE COOLANT
8.DISCONNECT CABLE FROM NEGATIVE BATTERY TERMINAL
55781E
9.REMOVE COWL TOP VENTILATOR LOUVER SUB-ASSEMBLY
58910C
10.REMOVE REAR CONSOLE BOX ASSEMBLY
57533B
11.REMOVE FRONT FLOOR CENTER BRACE
17410
12.REMOVE FRONT EXHAUST PIPE ASSEMBLY
27060
13.REMOVE GENERATOR WITH REGULATOR ASSEMBLY
23820
14.DISCONNECT FUEL VAPOR FEED HOSE ASSEMBLY
23827A
15.DISCONNECT NO. 2 FUEL VAPOR FEED HOSE
17341T
16.DISCONNECT NO. 1 AIR HOSE
17735
17.REMOVE AIR CLEANER CAP WITH NO. 1 AIR CLEANER HOSE
23820
18.REMOVE FUEL VAPOR FEED HOSE ASSEMBLY
28800
19.REMOVE BATTERY
Separate the terminal cover from the positive (+) battery terminal.
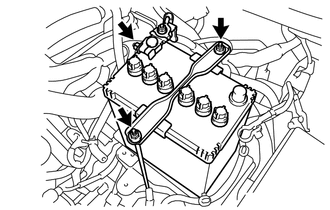
Loosen the nut and disconnect the positive (+) battery terminal from the battery.
Remove the 2 nuts, battery clamp bolt and battery clamp sub-assembly from the battery carrier assembly.
Remove the battery from the battery tray.
74431
20.REMOVE BATTERY TRAY
17361M
21.SEPARATE AIR TUBE
23842A
22.REMOVE EFI FUEL PIPE CLAMP
23901
23.DISCONNECT FUEL TUBE SUB-ASSEMBLY
87245
24.DISCONNECT INLET HEATER WATER HOSE
87246
25.DISCONNECT OUTLET HEATER WATER HOSE
26.DISCONNECT RADIATOR RESERVOIR TANK HOSE
16573B
27.DISCONNECT NO. 3 RADIATOR HOSE
16502
28.REMOVE WATER FILLER SUB-ASSEMBLY
12261
29.REMOVE VENTILATION HOSE
44774
30.DISCONNECT UNION TO CONNECTOR TUBE HOSE
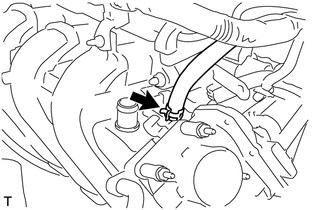
Loosen the hose clip and disconnect the union to connector tube hose from the intake manifold.
15301
31.REMOVE OIL LEVEL DIPSTICK SUB-ASSEMBLY
17111
32.REMOVE INTAKE MANIFOLD WITH THROTTLE BODY WITH MOTOR ASSEMBLY
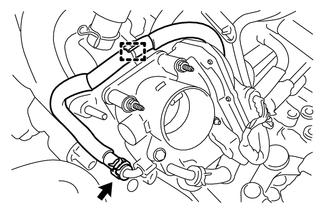
Disengage the clamp to disconnect the No. 2 water by-pass hose from the hose clamp.
Loosen the hose clip and disconnect the No. 2 water by-pass hose from the throttle body with motor assembly.
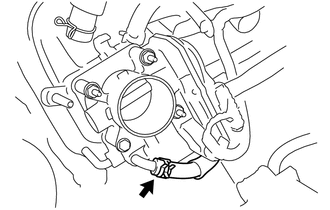
Loosen the hose clip and disconnect the water by-pass hose from the throttle body with motor assembly.
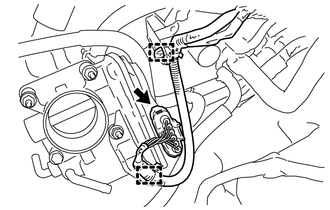
Disengage the 2 clamps to disconnect the engine wire from the 2 wire harness clamp brackets.
Disconnect the throttle body with motor assembly connector.
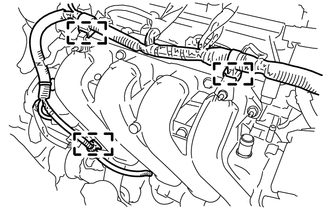
Disengage the 3 clamps to separate the engine wire from the 3 wire harness clamp brackets.
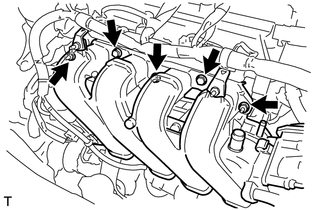
Remove the 3 bolts, 2 nuts and intake manifold with throttle body with motor assembly from the cylinder head sub-assembly.
Remove the intake manifold to head gasket from the intake manifold.
11452
33.REMOVE OIL LEVEL DIPSTICK GUIDE
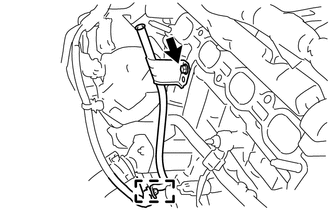
Disengage the clamp to disconnect the engine wire from the oil level dipstick guide.
Remove the bolt and oil level dipstick guide from the cylinder block sub-assembly.
Remove the O-ring from the oil level dipstick guide.
89615
34.REMOVE KNOCK SENSOR
16268
35.REMOVE NO. 1 WATER BY-PASS PIPE
44772
36.DISCONNECT CHECK VALVE TO CONNECTOR TUBE HOSE
82121
37.DISCONNECT ENGINE WIRE
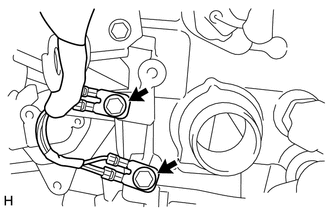
Remove the 2 bolts to disconnect the engine wire from the cylinder head sub-assembly.
Disconnect the engine wire from the cylinder head sub-assembly.
25591
38.REMOVE MANIFOLD SUPPORT BRACKET
19500D
39.REMOVE NO. 1 IGNITION COIL
11201
40.REMOVE CYLINDER HEAD COVER SUB-ASSEMBLY
12305
41.REMOVE ENGINE MOUNTING INSULATOR SUB-ASSEMBLY RH
13407
42.REMOVE CRANKSHAFT DAMPER SUB-ASSEMBLY
15100Q
43.REMOVE CRANKSHAFT POSITION SENSOR
11101J
44.REMOVE CAMSHAFT TIMING OIL CONTROL VALVE ASSEMBLY
16173
45.REMOVE WATER PUMP PULLEY
16100
46.REMOVE ENGINE WATER PUMP ASSEMBLY
12315A
47.REMOVE ENGINE MOUNTING BRACKET RH
15100
48.REMOVE OIL PUMP ASSEMBLY
15100C
49.REMOVE OIL PUMP SEAL
13540
50.REMOVE NO. 1 CHAIN TENSIONER ASSEMBLY
13559
51.REMOVE CHAIN TENSIONER SLIPPER
13561
52.REMOVE NO. 1 CHAIN VIBRATION DAMPER
13506
53.REMOVE CHAIN SUB-ASSEMBLY
13512
54.REMOVE NO. 2 CAMSHAFT
13511
55.REMOVE CAMSHAFT
11101
56.REMOVE CYLINDER HEAD SUB-ASSEMBLY
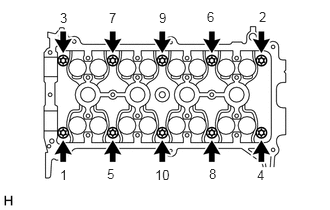
Using an 8 mm bi-hexagon wrench, uniformly loosen and remove the 10 cylinder head set bolts and 10 plate washers in several steps and in the sequence shown in the illustration.
- NOTICE:
- ·
Do not drop the plate washers into the cylinder head sub-assembly.
·Head warpage or cracking could result from removing the cylinder head set bolts in the wrong sequence.
Remove the cylinder head sub-assembly from the cylinder block sub-assembly.
11115
57.REMOVE CYLINDER HEAD GASKET
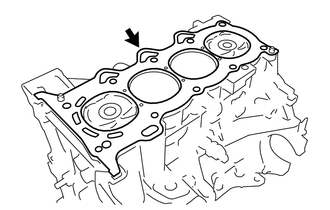
Remove the cylinder head gasket from the cylinder block sub-assembly.