1GD-FTV ENGINE MECHANICAL CAMSHAFT(w/o EGR Cooler) INSTALLATION
CAUTION / NOTICE / HINT
- NOTICE:
- ·
When replacing the parts in the following chart (A), replace the No. 1 injection pipe sub-assembly, No. 2 injection pipe sub-assembly and/or fuel inlet pipe sub-assembly with new ones.
Replaced Parts (A) Pipes Requiring New Replacement Injector assembly (including shuffling the injector assemblies between the cylinders) ·No. 1 injection pipe sub-assembly
·No. 2 injection pipe sub-assembly
Supply pump assembly Fuel inlet pipe sub-assembly ·Common rail assembly
·Cylinder block sub-assembly
·Cylinder head sub-assembly
·Cylinder head gasket
·Timing chain case assembly
·No. 1 injection pipe sub-assembly
·No. 2 injection pipe sub-assembly
·Fuel inlet pipe sub-assembly
·After removing the No. 1 injection pipe sub-assembly, No. 2 injection pipe sub-assembly and/or fuel inlet pipe sub-assembly, clean them with a brush and compressed air.
·The injector assembly is a precision instrument. Do not use the injector assembly if it is struck or dropped.
·The supply pump assembly is a precision instrument. Do not use the supply pump assembly if it is struck or dropped.
·The common rail assembly is a precision instrument. Do not use the common rail assembly if it is struck or dropped.
·Hold the supply pump assembly itself during removal and installation. Do not hold the pre-stroke control valve or fuel pipe, etc.
·Hold the common rail assembly itself during removal and installation. Do not hold the pressure discharge valve or fuel pressure sensor, etc.
·Make sure foreign matter does not enter the fuel path.
PROCEDURE

 1.INSTALL CAMSHAFT
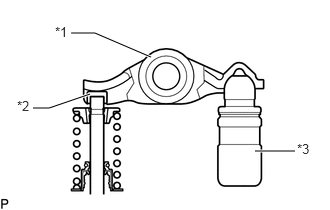
| *1 | Valve Rocker Arm Sub-assembly |
| *2 | Valve Stem Cap |
| *3 | Valve Lash Adjuster Assembly |
Check that the valve rocker arm sub-assembly is firmly set to the valve lash adjuster assembly.
Apply a light coat of engine oil to the camshaft journals of the cylinder head sub-assembly and the thrust portion of the camshaft.
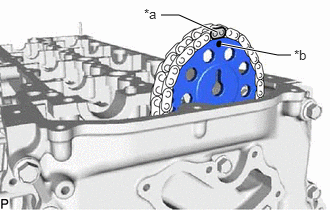
| *a | Paint Mark |
| *b | Timing Mark |
Align the paint mark of the No. 2 chain sub-assembly and timing mark of the camshaft timing sprocket, and install the camshaft timing sprocket to the No. 2 chain sub-assembly.
- HINT:
-
Make sure the timing mark of the camshaft timing sprocket faces the front side.
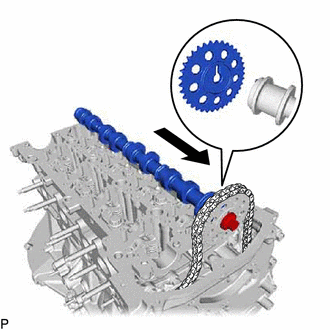
Align the knock pin of the No. 1 camshaft to the groove of the sprocket, install the No. 1 camshaft to the camshaft timing sprocket, and set the bolt.
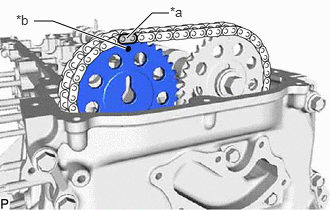
| *a | Paint Mark |
| *b | Timing Mark |
Align the paint mark of the No. 2 chain sub-assembly and timing mark of the camshaft timing sprocket, and install the camshaft timing sprocket to the No. 2 chain sub-assembly.
- HINT:
-
Make sure the timing mark of the camshaft timing sprocket faces the front side.
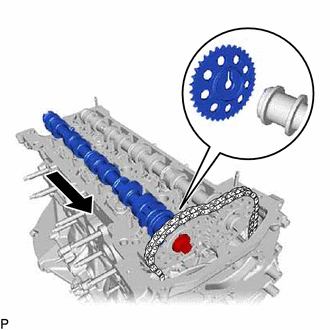
Align the knock pin of the No. 2 camshaft to the groove of the sprocket, install the No. 2 camshaft to the camshaft timing sprocket, and set the bolt.
- HINT:
-
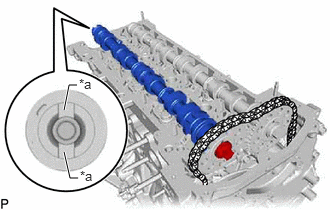 0.667,1.583 0.729,1.854 0.729,1.854 0.813,1.854 true 0.667,1.146 0.719,0.885 0.719,0.885 0.802,0.885 true 0.833,1.75 1.146,1.948 0.313,0.198 10 false *a 0.823,0.792 1.135,0.99 0.313,0.198 10 false *a
*a Groove
-
The groove is at the rear end of the No. 2 camshaft.
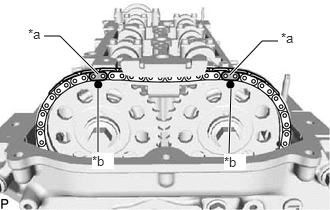
| *a | Paint Mark |
| *b | Timing Mark |
Check the timing mark of the camshaft timing sprocket and paint mark of the No. 2 chain sub-assembly.
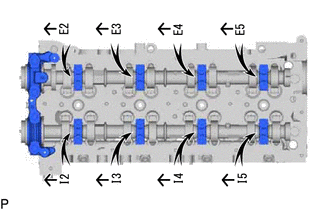
Set the No. 1 camshaft bearing cap and 8 No. 2 camshaft bearing caps to the cylinder head sub-assembly as shown in the illustration.
Temporarily install the 20 bolts.
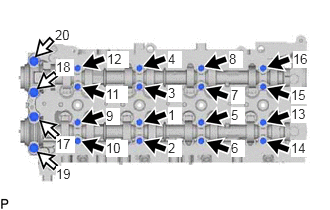

|
Bolt A |

|
Bolt B |
Uniformly tighten the 20 bolts in several steps in the order shown in the illustration.
- Torque:
- for bolt A : 10 N*m (102 kgf*cm, 7 ft.*lbf)
- for bolt B : 21 N*m (214 kgf*cm, 15 ft.*lbf)
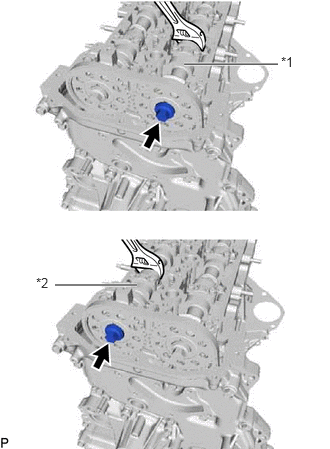
| *1 | No. 1 Camshaft |
| *2 | No. 2 Camshaft |
Hold the hexagonal portion of the No. 1 camshaft and No. 2 camshaft with a wrench, and tighten the 2 bolts.
- Torque:
- 81 N*m (826 kgf*cm, 60 ft.*lbf)
- NOTICE:
-
Be careful not to damage the cylinder head sub-assembly with the wrench.
Remove the pin from the No. 2 chain tensioner assembly.
Install a new gasket and the oil pump relief valve plug to the timing chain cover.
- Torque:
- 46 N*m (469 kgf*cm, 34 ft.*lbf)
13566B
2.INSTALL TIMING CHAIN GUIDE
Install the timing chain guide to the cylinder head sub-assembly with the bolt.
- Torque:
- 10 N*m (102 kgf*cm, 7 ft.*lbf)
11382C
3.INSTALL CAMSHAFT OIL SEAL RETAINER
29300
4.TEMPORARILY INSTALL VACUUM PUMP ASSEMBLY
5.INSTALL NO. 3 CAMSHAFT BEARING CAP
Clean and degrease the contact surfaces of the cylinder head sub-assembly and No. 3 camshaft bearing cap.
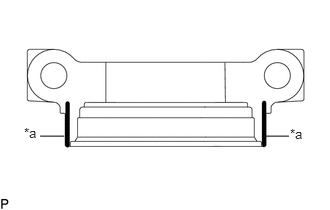
| *a | Seal Packing |
Apply seal packing to the specified areas as shown in the illustration.
- Seal packing:
Toyota Genuine Seal Packing Black, Three Bond 1207B or equivalent
- Standard seal diameter:
3.0 mm (0.118 in.)
- NOTICE:
- ·
Do not allow seal packing to contact the oil passage of the No. 3 camshaft bearing cap.
·After applying seal packing, install the No. 3 camshaft bearing cap within 3 minutes and tighten the bolts within 10 minutes.
·Do not start the engine for at least 2 hours after installation.
Install the No. 3 camshaft bearing cap with the 2 bolts.
- Torque:
- 21 N*m (214 kgf*cm, 15 ft.*lbf)
Wipe off excess seal packing from between the No. 3 camshaft bearing cap and cylinder head sub-assembly.
29300
6.INSTALL VACUUM PUMP ASSEMBLY
11201
7.INSTALL CYLINDER HEAD COVER SUB-ASSEMBLY
23682
8.INSTALL NOZZLE HOLDER GASKET
23670
9.TEMPORARILY INSTALL INJECTOR ASSEMBLY
10.TEMPORARILY INSTALL NO. 1 INJECTION PIPE SUB-ASSEMBLY AND NO. 2 INJECTION PIPE SUB-ASSEMBLY
23670
11.TIGHTEN INJECTOR ASSEMBLY
12.TIGHTEN NO. 1 INJECTION PIPE SUB-ASSEMBLY AND NO. 2 INJECTION PIPE SUB-ASSEMBLY
23760
13.INSTALL NOZZLE LEAKAGE PIPE ASSEMBLY
14.INSTALL HARNESS BRACKET
15.INSTALL WIRING HARNESS CLAMP BRACKET
25624
16.INSTALL EGR VALVE ADAPTER SUB-ASSEMBLY
25800
17.INSTALL ELECTRIC EGR CONTROL VALVE ASSEMBLY (w/ EGR System)
25612
18.INSTALL NO. 2 EGR PIPE (w/ EGR System)
25625
19.INSTALL EGR VALVE BRACKET (w/ EGR System)
82121
20.CONNECT ENGINE WIRE
23941
21.CONNECT NO. 1 FUEL FILTER PROTECTOR
12632
22.INSTALL NO. 2 ENGINE COVER BRACKET
23265C
23.INSTALL GAS FILTER
89421C
24.INSTALL DIESEL TURBO PRESSURE SENSOR
16278
25.INSTALL NO. 2 WATER BY-PASS PIPE
87209
26.INSTALL WATER HOSE SUB-ASSEMBLY (w/ Heater)
26100G
27.INSTALL DIESEL THROTTLE BODY ASSEMBLY
17303T
28.INSTALL AIR PIPE SUB-ASSEMBLY
25760F
29.INSTALL VACUUM TRANSMITTING HOSE ASSEMBLY
12601B
30.INSTALL NO. 1 ENGINE COVER SUB-ASSEMBLY (w/ Cover)
16400
31.INSTALL RADIATOR ASSEMBLY
32922A
32.CONNECT OIL COOLER OUTLET HOSE (for Automatic Transmission)
32921D
33.CONNECT OIL COOLER INLET HOSE (for Automatic Transmission)
53205
34.INSTALL UPPER RADIATOR SUPPORT SUB-ASSEMBLY
86510
35.INSTALL HIGH PITCHED HORN ASSEMBLY (for 2-piece Type)
Click hereVehicle Exterior>HORN>HORN>INSTALLATION
86520
36.INSTALL LOW PITCHED HORN ASSEMBLY
Click hereVehicle Exterior>HORN>HORN>INSTALLATION
16546
37.INSTALL RADIATOR PROTECTOR (w/o Air Conditioning System)
53209B
38.INSTALL HOOD LOCK SUPPORT BRACE SUB-ASSEMBLY
88590
39.INSTALL BLOWER ASSEMBLY WITH SHROUD (w/ Condenser Fan)
for LH Side:
Click hereVehicle Interior>HEATING / AIR CONDITIONING>CONDENSER FAN>INSTALLATION
for RH Side:
Click hereVehicle Interior>HEATING / AIR CONDITIONING>CONDENSER FAN>INSTALLATION
17311B
40.INSTALL NO. 1 AIR INLET DUCT
53510
41.INSTALL HOOD LOCK ASSEMBLY
42.INSTALL FRONT BUMPER
16572D
43.INSTALL NO. 2 RADIATOR HOSE
16711
44.INSTALL FAN SHROUD
88359
45.INSTALL VISCOUS HEATER V BELT (w/ Viscous Heater)
16571C
46.INSTALL NO. 1 RADIATOR HOSE
16470
47.INSTALL RADIATOR RESERVE TANK ASSEMBLY
17030
48.INSTALL AIR HOSE ASSEMBLY
44360
49.CONNECT VANE PUMP OIL RESERVOIR ASSEMBLY
17751
50.INSTALL NO. 1 AIR CLEANER INLET
53106B
51.INSTALL RADIATOR COVER SUB-ASSEMBLY
55701J
52.INSTALL OUTER COWL TOP PANEL SUB-ASSEMBLY
85110
53.INSTALL WINDSHIELD WIPER MOTOR ASSEMBLY
54.CONNECT CABLE TO NEGATIVE BATTERY TERMINAL
55. INITIALIZATION AFTER RECONNECTING BATTERY TERMINAL
Click hereGeneral>SETUP>WHEN DISCONNECTING OR RECONNECTING BATTERY TERMINAL>WORK PROCEDURE
- HINT:
-
When disconnecting and reconnecting the battery, there is an automatic learning function that completes learning when the respective system is used.
-
Click hereGeneral>SETUP>WHEN DISCONNECTING OR RECONNECTING BATTERY TERMINAL>AUTOMATIC LEARNING CHART
56.ADD ENGINE COOLANT
57.INSPECT FOR COOLANT LEAK
58.BLEED AIR FROM FUEL SYSTEM
59.INSPECT FOR FUEL LEAK
51405A
60.INSTALL NO. 1 ENGINE UNDER COVER SUB-ASSEMBLY
52618
61.INSTALL LOWER FRONT BUMPER ABSORBER
51406A
62.INSTALL NO. 2 ENGINE UNDER COVER SUB-ASSEMBLY (w/ No. 2 Engine Under Cover Sub-assembly)