2GR-FKS ENGINE MECHANICAL ENGINE ASSEMBLY INSTALLATION
CAUTION / NOTICE / HINT
- CAUTION:
- ·
The engine assembly with transaxle is very heavy. Be sure to follow the procedure described in the repair manual, or the engine lifter may suddenly drop or the engine assembly with transaxle may fall off the engine lifter.
·To prevent burns, do not touch the engine, exhaust manifold or other high temperature components while the engine is hot.
PROCEDURE

 12372A
1.INSTALL ENGINE MOUNTING INSULATOR LH
- HINT:
-
Perform this procedure only when replacement of the engine mounting insulator LH is necessary.
12304
2.INSTALL ENGINE MOUNTING BRACKET SUB-ASSEMBLY LH
- HINT:
-
Perform this procedure only when replacement of the engine mounting bracket sub-assembly LH is necessary.
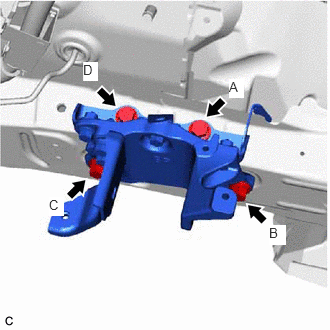
Temporarily tighten the bolt (A), and then fully tighten the 4 bolts in the order of (B), (C), (D) and (A).
- Torque:
- 72 N*m (734 kgf*cm, 53 ft.*lbf)
- NOTICE:
-
Make sure that there is no gap between the engine mounting bracket sub-assembly LH and vehicle body before tightening the bolts.
12341
3.INSTALL ENGINE MOUNTING SPACER
- HINT:
-
Perform this procedure only when replacement of the engine mounting spacer is necessary.
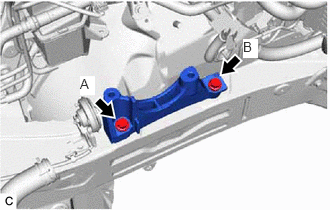
Install the engine mounting spacer to the vehicle body with the 2 bolts.
- Torque:
- 72 N*m (734 kgf*cm, 53 ft.*lbf)
- NOTICE:
-
Temporarily tighten the bolt (A), and then fully tighten the 2 bolts in the order of (B) and (A).
12305
4.INSTALL ENGINE MOUNTING INSULATOR SUB-ASSEMBLY RH
- HINT:
-
Perform this procedure only when replacement of the engine mounting insulator sub-assembly RH is necessary.
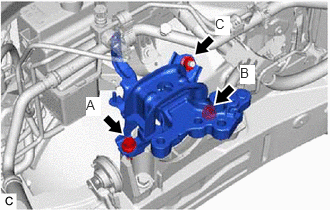
Install the engine mounting insulator sub-assembly RH to the engine mounting spacer and vehicle body with the nut and 2 bolts.
- Torque:
- 72 N*m (734 kgf*cm, 53 ft.*lbf)
- NOTICE:
-
Temporarily tighten the bolt (A), and then fully tighten the 2 bolts and nut in the order of (B), (A) and (C).
Connect the No. 2 earth wire to the engine mounting insulator sub-assembly RH with the bolt.
- Torque:
- 10 N*m (102 kgf*cm, 7 ft.*lbf)
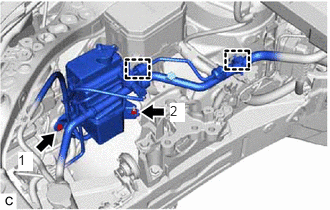
Install the radiator reserve tank assembly with the bolt and nut in the order shown in the illustration.
- Torque:
- 5.0 N*m (51 kgf*cm, 44 in.*lbf)
Engage the 2 clamps.
5.INSTALL ENGINE HANGERS
6.REMOVE ENGINE ASSEMBLY FROM ENGINE STAND
Remove the engine assembly from the engine stand.
19315
7.INSTALL NO. 1 CRANKSHAFT POSITION SENSOR PLATE
32101
8.INSTALL DRIVE PLATE AND RING GEAR SUB-ASSEMBLY
30500
9.INSTALL AUTOMATIC TRANSAXLE ASSEMBLY
12311A
10.INSTALL FRONT ENGINE MOUNTING BRACKET
12371A
11.INSTALL REAR ENGINE MOUNTING INSULATOR
- HINT:
-
Perform this procedure only when replacement of the rear engine mounting insulator is necessary.
Install the rear engine mounting insulator to the front frame assembly with the 4 nuts.
- Torque:
- 72 N*m (734 kgf*cm, 53 ft.*lbf)
12361A
12.INSTALL FRONT ENGINE MOUNTING INSULATOR
- HINT:
-
Perform this procedure only when replacement of the front engine mounting insulator is necessary.
Install the front engine mounting insulator to the front frame assembly with the 3 nuts.
- Torque:
- 72 N*m (734 kgf*cm, 53 ft.*lbf)
51100G
13.INSTALL FRONT FRAME ASSEMBLY
Install the rear engine mounting insulator to the rear engine mounting bracket sub-assembly with the bolt.
- Torque:
- 72 N*m (734 kgf*cm, 53 ft.*lbf)
Install the front engine mounting insulator to the front engine mounting bracket with the bolt.
- Torque:
- 72 N*m (734 kgf*cm, 53 ft.*lbf)
14.REMOVE ENGINE HANGERS
82121
15.INSTALL ENGINE WIRE
Connect all connectors and clamps, and install the engine wire to the engine assembly with transaxle.
16.CONNECT HOSE CLAMP
16260
17.CONNECT WATER BY-PASS HOSE ASSEMBLY
33197C
18.INSTALL TRANSMISSION BREATHER CLAMP
35104V
19.INSTALL BREATHER PLUG HOSE
28100
20.INSTALL STARTER ASSEMBLY
w/ Stop and Start System:
Click hereEngine / Hybrid System>2GR-FKS (STARTING)>STARTER (w/ Stop And Start System)>INSTALLATION
w/o Stop and Start System:
Click hereEngine / Hybrid System>2GR-FKS (STARTING)>STARTER (w/o Stop And Start System)>INSTALLATION
21.CONNECT VACUUM HOSE
22.INSTALL ENGINE ASSEMBLY WITH TRANSAXLE
- HINT:
-
Perform Inspection After Repair after replacing the engine assembly.
-
Click hereEngine / Hybrid System>2GR-FKS (ENGINE CONTROL)>SFI SYSTEM>INITIALIZATION
Using height adjustment attachments and plate lift attachments to keep the engine assembly with transaxle and front frame assembly level, set an engine lifter underneath the engine assembly with transaxle and front frame assembly.
- NOTICE:
- ·
Do not perform any procedures while the engine assembly is suspended because doing so may cause the engine assembly to drop, resulting in injury. However, the engine assembly needs to be suspended when it is installed to or removed from an engine stand.
·To prevent the engine assembly from unexpectedly moving, securely support the engine assembly until it is secured to an engine stand.
Operate the engine lifter and install the engine assembly with transaxle to the vehicle.
- CAUTION:
-
Do not raise the engine assembly with transaxle more than necessary. If the engine is raised excessively, the vehicle may also be lifted up.
- NOTICE:
- ·
Make sure that the engine assembly with transaxle is clear of all wiring and hoses.
·While raising the engine assembly with transaxle into the vehicle, do not allow it to contact the vehicle.
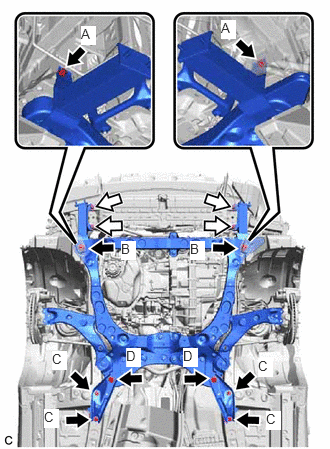

|
Bolt |

|
Nut |
Install the front bumper extension sub-assembly RH and front bumper extension sub-assembly LH to the front frame assembly and vehicle body with the 4 bolts and 4 nuts.
- Torque:
- Bolt (A) : 9.5 N*m (97 kgf*cm, 84 in.*lbf)
- Bolt (B) : 135 N*m (1377 kgf*cm, 100 ft.*lbf)
- Nut : 12.5 N*m (127 kgf*cm, 9 ft.*lbf)
Install the front suspension member brace rear RH and front suspension member brace rear LH to the front frame assembly and vehicle body with the 6 bolts.
- Torque:
- Bolt (C) : 60 N*m (612 kgf*cm, 44 ft.*lbf)
- Bolt (D) : 135 N*m (1377 kgf*cm, 100 ft.*lbf)
Install the engine mounting insulator LH to the engine mounting bracket sub-assembly LH with the bolt and nut.
- Torque:
- 42 N*m (428 kgf*cm, 31 ft.*lbf)
Install the engine mounting insulator sub-assembly RH to the front No. 1 engine mounting bracket LH with the 3 bolts and nut.
- Torque:
- Bolt : 72 N*m (734 kgf*cm, 53 ft.*lbf)
- Nut : 42 N*m (428 kgf*cm, 31 ft.*lbf)
Install the No. 2 engine mounting stay RH with the bolt and 2 nuts.
- Torque:
- 20 N*m (204 kgf*cm, 15 ft.*lbf)
52132A
23.INSTALL NO. 2 FRONT BUMPER REINFORCEMENT
52618
24.INSTALL FRONT BUMPER LOWER ABSORBER
32101A
25.INSTALL DRIVE PLATE AND TORQUE CONVERTER ASSEMBLY SETTING BOLT (for 2WD)
32101A
26.INSTALL DRIVE PLATE AND TORQUE CONVERTER ASSEMBLY SETTING BOLT (for AWD)
11361J
27.INSTALL FLYWHEEL HOUSING UNDER COVER
Install the flywheel housing under cover with the 2 bolts.
- Torque:
- 10 N*m (102 kgf*cm, 7 ft.*lbf)
28.INSTALL FRONT DRIVE SHAFT ASSEMBLY
29.INSTALL EXHAUST MANIFOLD
37100
30.INSTALL PROPELLER WITH CENTER BEARING SHAFT ASSEMBLY (for AWD)
45220
31.CONNECT STEERING INTERMEDIATE SHAFT ASSEMBLY
32942
32.CONNECT OUTLET NO. 1 OIL COOLER HOSE
Connect the outlet No. 1 oil cooler hose to the oil cooler union sub-assembly and slide the clip to secure it.
32943C
33.CONNECT NO. 3 TRANSMISSION OIL COOLER HOSE
Engage the clamp.
Connect the No. 3 transmission oil cooler hose to the No. 1 oil cooler tube sub-assembly without hose and slide the clip to secure it.
82121
34.CONNECT ENGINE WIRE
Engage the 3 clamps.
Engage the 2 clamps and connect the engine wire to the vehicle body.
Connect the engine wire with the bolt.
- Torque:
- 8.0 N*m (82 kgf*cm, 71 in.*lbf)
Engage the 2 clamps.
Engage the claw and connect the engine wire to the engine room relay block and junction block assembly.
Install the nut to the engine room relay block and junction block assembly.
- Torque:
- 8.0 N*m (82 kgf*cm, 71 in.*lbf)
Connect the 5 connectors to the engine room relay block and junction block assembly.
Install the No. 1 relay block cover to the engine room relay block and junction block assembly.
88704
35.CONNECT SUCTION HOSE SUB-ASSEMBLY
88703
36.CONNECT DISCHARGE HOSE SUB-ASSEMBLY
23801F
37.CONNECT NO. 1 FUEL HOSE
Connect the No. 1 fuel hose (for Port Injection).
Connect the No. 1 fuel hose to the fuel pipe.
Click hereEngine / Hybrid System>2GR-FKS (FUEL)>FUEL SYSTEM>PRECAUTION
Connect the No. 1 fuel hose (for Direct Injection).
Connect the No. 1 fuel hose to the fuel pipe.
Click hereEngine / Hybrid System>2GR-FKS (FUEL)>FUEL SYSTEM>PRECAUTION
Install the No. 1 fuel pipe clamp to the fuel tube connector.
Engage the 2 claws to install the No. 2 fuel pipe clamp.
16260
38.CONNECT WATER BY-PASS HOSE ASSEMBLY
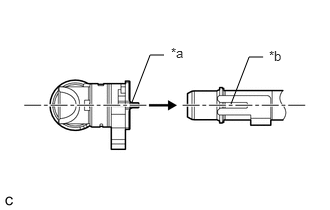
| *a | Protrusion |
| *b | Cutout |
Align the protrusion of the water by-pass hose assembly connector with the cutout in the water hose sub-assembly and securely insert the water by-pass hose assembly connector to the stopper of the pipe.
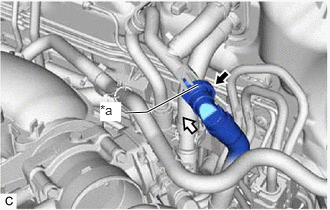
| *a | Retainer |
|
|
Push in |
|
|
Push |
Push in the retainer.
Check that the water hose sub-assembly and water by-pass hose assembly connector are securely connected by pulling on them.
87245B
39.CONNECT INLET HEATER WATER HOSE B
Connect the inlet heater water hose B to the water outlet and slide the clip to secure it.
Engage the 2 clamps.
40.CONNECT RADIATOR HOSE SUB-ASSEMBLY
Connect the radiator hose sub-assembly to the water outlet and slide the clip to secure it.
Connect the No. 4 water by-pass hose to the radiator hose sub-assembly and slide the clip to secure it.
Install the radiator hose sub-assembly to the engine assembly with the 2 bolts.
- Torque:
- 8.0 N*m (82 kgf*cm, 71 in.*lbf)
Engage the clamp.
16572D
41.CONNECT NO. 2 RADIATOR HOSE
Connect the No. 2 radiator hose to the water inlet and slide the clip to secure it.
44778
42.CONNECT CONNECTOR TO CHECK VALVE HOSE
Connect the connector to check valve hose to the brake booster assembly and slide the clip to secure it.
23826
43.CONNECT NO. 1 FUEL VAPOR FEED HOSE
Connect the No. 1 fuel vapor feed hose to the purge valve (purge VSV) and slide the clip to secure it.
33820B
44.CONNECT TRANSMISSION CONTROL CABLE ASSEMBLY
Connect the transmission control cable assembly to the No. 1 transmission control cable bracket with a new clip.
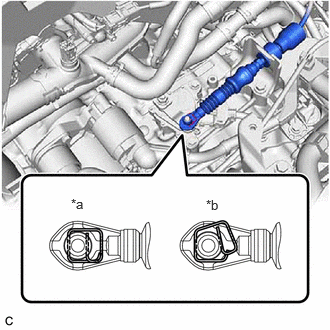
| *a | Correct |
| *b | Incorrect |
Connect the transmission control cable assembly to the transmission control shaft lever as shown in the illustration.
- NOTICE:
-
Before installing the transmission control cable assembly, check that the park/neutral position switch assembly and shift lever are in N.
74404B
45.INSTALL BATTERY CLAMP SUB-ASSEMBLY
Install the battery clamp sub-assembly with the 3 bolts.
- Torque:
- 18.5 N*m (189 kgf*cm, 14 ft.*lbf)
Engage the 5 clamps to the battery clamp sub-assembly.
46.INSTALL BATTERY
82121
47.CONNECT ENGINE WIRE
Connect the engine wire to the negative (-) battery terminal with the nut.
- Torque:
- 7.6 N*m (77 kgf*cm, 67 in.*lbf)
82111
48.CONNECT ENGINE ROOM MAIN WIRE
Connect the engine wire with engine room main wire to the positive (+) battery terminal with the nut.
- Torque:
- 7.6 N*m (77 kgf*cm, 67 in.*lbf)
89661
49.INSTALL ECM
50.INSTALL AIR CLEANER ASSEMBLY WITH AIR CLEANER HOSE
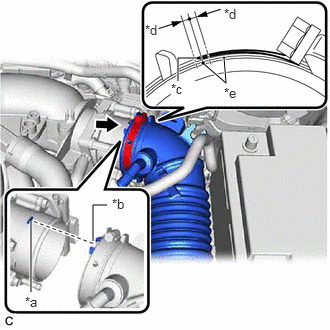
| *a | Protrusion |
| *b | Cutout |
| *c | Hose Clamp End |
| *d | 2.0 mm (0.0787 in.) |
| *e | Paint Mark |
Install the air cleaner assembly with air cleaner hose to the throttle body with motor assembly.
- NOTICE:
-
Align the cutout of the air cleaner hose with the protrusion of the throttle body with motor assembly.
Tighten the hose clamp in the position shown in the illustration.
- NOTICE:
-
Make sure that the end of the hose clamp is positioned as shown in the illustration.
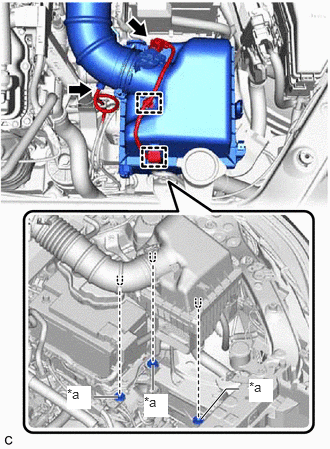
| *a | Air Cleaner Support |
Insert the 3 pins of the air cleaner assembly into the 3 air cleaner supports as shown in the illustration.
- NOTICE:
- ·
Insert the 3 pins of the air cleaner assembly into the 3 air cleaner supports at the same time.
·Check that the pins are securely inserted into air cleaner supports.
Connect the vacuum hose to the air cleaner hose.
Engage the 2 wire harness clamps.
Connect the mass air flow meter sub-assembly connector.
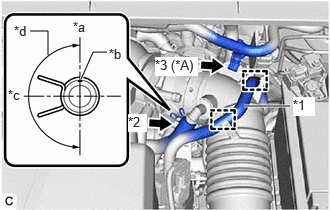
| *A | for LHD |
| *1 | No. 1 Fuel Vapor Feed Hose |
| *2 | No. 2 Ventilation Hose |
| *3 | Vacuum Hose Bracket |
| *a | Top |
| *b | Paint Mark |
| *c | Rear of Vehicle |
| *d | 180° (Claw of Clip Location) |
Connect the No. 2 ventilation hose to the air cleaner hose and slide the clip to secure it.
- NOTICE:
-
Make sure that the condition of the clip is as shown in the illustration.
Engage the 2 clamps to connect the No. 1 fuel vapor feed hose to the air cleaner hose.
for LHD:
Install the vacuum hose bracket to the air cleaner hose.
17750A
51.INSTALL INLET AIR CLEANER ASSEMBLY
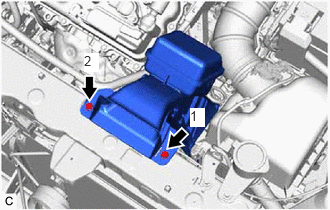
Install the inlet air cleaner assembly with the 2 bolts in the order shown in the illustration.
- Torque:
- 8.0 N*m (82 kgf*cm, 71 in.*lbf)
11209
52.INSTALL V-BANK COVER SUB-ASSEMBLY
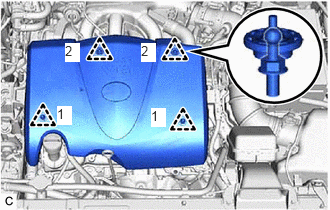
Engage the 4 clips in the order shown in the illustration to install the V-bank cover sub-assembly.
- NOTICE:
- ·
Securely engage the clips.
·If the clips are forcibly engaged or struck with an object, they may be damaged.
53.INSPECT VACUUM HOSES
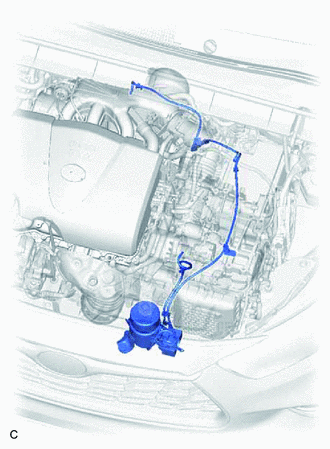
Inspect the vacuum hoses.
54.CONNECT CABLE TO NEGATIVE BATTERY TERMINAL
- NOTICE:
-
When disconnecting the cable, some systems need to be initialized after the cable is reconnected.
-
Click hereGeneral>INTRODUCTION>REPAIR INSTRUCTION>INITIALIZATION
55.ADD ENGINE OIL
56.ADD ENGINE COOLANT
57.ADD AUTOMATIC TRANSAXLE FLUID (for 2WD)
58.ADD AUTOMATIC TRANSAXLE FLUID (for AWD)
59.ADD TRANSFER OIL (for AWD)
60.CHARGE AIR CONDITIONING SYSTEM WITH REFRIGERANT
61. WARM UP ENGINE
62.INSPECT SHIFT LEVER POSITION (for 2WD)
63.INSPECT SHIFT LEVER POSITION (for AWD)
64.ADJUST SHIFT LEVER POSITION (for 2WD)
65.ADJUST SHIFT LEVER POSITION (for AWD)
66.INSPECT FOR ENGINE OIL LEAK
67.INSPECT FOR COOLANT LEAK
68.INSPECT FOR REFRIGERANT LEAK
69.INSPECT FOR FUEL LEAK
70.INSPECT FOR EXHAUST GAS LEAK
71.CHECK ENGINE OIL LEVEL
72.INSPECT ENGINE COOLANT LEVEL IN RESERVOIR TANK
52119A
73.INSTALL FRONT BUMPER COVER
53737B
74.INSTALL FRONT FENDER APRON SEAL LH
Install the front fender apron seal LH with the 2 bolts and clip.
- Torque:
- 7.5 N*m (76 kgf*cm, 66 in.*lbf)
53736
75.INSTALL FRONT FENDER APRON SEAL RH
Install the front fender apron seal RH with the 2 bolts and clip.
- Torque:
- 7.5 N*m (76 kgf*cm, 66 in.*lbf)
58165C
76.INSTALL FRONT FLOOR COVER RH
Install the front floor cover RH with the 5 bolts, 3 screws and 3 clips.
- Torque:
- Bolt : 7.5 N*m (76 kgf*cm, 66 in.*lbf)
58166A
77.INSTALL FRONT FLOOR COVER LH
Install the front floor cover LH with the 4 bolts, 5 screws and 3 clips.
- Torque:
- Bolt : 7.5 N*m (76 kgf*cm, 66 in.*lbf)
51443C
78.INSTALL REAR ENGINE UNDER COVER RH
Install the rear engine under cover RH with the bolt, screw and 3 clips.
- Torque:
- Bolt : 7.5 N*m (76 kgf*cm, 66 in.*lbf)
51444A
79.INSTALL REAR ENGINE UNDER COVER LH
Install the rear engine under cover LH with the bolt, screw and 3 clips.
- Torque:
- Bolt : 7.5 N*m (76 kgf*cm, 66 in.*lbf)
51441
80.INSTALL NO. 1 ENGINE UNDER COVER
Install the No. 1 engine under cover with the 3 bolts, 8 screws and 2 clips.
- Torque:
- Bolt : 7.5 N*m (76 kgf*cm, 66 in.*lbf)
53852B
81.INSTALL FRONT WHEEL OPENING EXTENSION PAD LH
Install the front wheel opening extension pad LH with the 4 screws.
53851D
82.INSTALL FRONT WHEEL OPENING EXTENSION PAD RH
Install the front wheel opening extension pad RH with the 4 screws.
83.INSTALL FRONT WHEELS
84.ALIGN FRONT WHEELS FACING STRAIGHT AHEAD
85.INSPECT AND ADJUST FRONT WHEEL ALIGNMENT
86.PERFORM INITIALIZATION
87.INSPECT IGNITION TIMING
88.INSPECT ENGINE IDLE SPEED
89.INSPECT CO/HC
90.CHECK FOR SPEED SENSOR SIGNAL