HEATING / AIR CONDITIONING FRONT AIR CONDITIONING UNIT(for LHD) INSTALLATION
PROCEDURE

 1.INSTALL AIR CONDITIONING UNIT ASSEMBLY
Install the air conditioning unit with the 2 nuts.
- Torque:
- 9.8 N*m (100 kgf*cm, 87 in.*lbf)
88720A
2.INSTALL AIR CONDITIONING HOSE AND ACCESSORY (w/ Cool Box)
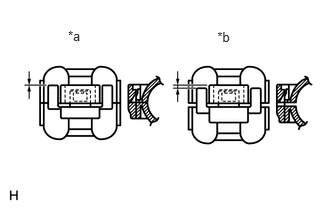
Lubricate 2 new O-rings with compressor oil and install them to the air conditioning hose and accessory.
- Compressor oil:
ND-OIL 8 or equivalent
| *a | Correct |
| *b | Incorrect |
Install the air conditioning hose and accessory with the piping clamp.
- NOTICE:
-
After connection, check the claw engagement of the piping clamp.
Install the bolt.
- Torque:
- 9.8 N*m (100 kgf*cm, 87 in.*lbf)
55330B
3.INSTALL INSTRUMENT PANEL REINFORCEMENT ASSEMBLY
Install the instrument panel reinforcement.
Install the instrument panel reinforcement with the 7 bolts and screw.
- Torque:
- for bolt : 9.8 N*m (100 kgf*cm, 87 in.*lbf)
- for screw : 6.0 N*m (61 kgf*cm, 53 in.*lbf)
for Passenger Side:
Using a 12 mm hexagon wrench, install the 2 collars.
- Torque:
- 18 N*m (184 kgf*cm, 13 ft.*lbf)
for Passenger Side:
Using a T40 "TORX" socket, install the 2 "TORX" bolts.
- Torque:
- 18 N*m (184 kgf*cm, 13 ft.*lbf)
for Passenger Side:
Install the 2 caps.
for Driver Side:
Install the 3 bolts.
- Torque:
- 18 N*m (184 kgf*cm, 13 ft.*lbf)
for Driver Side:
Install the 3 caps.
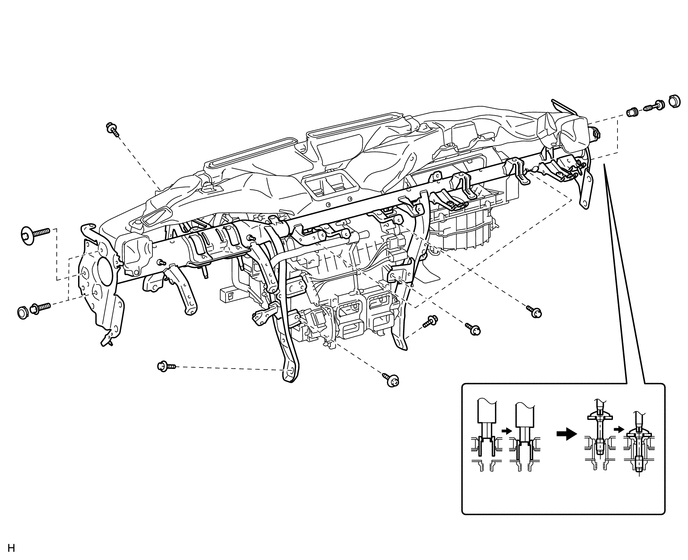
Attach the 17 clamps.
Install the 8 nuts, 6 bolts, connectors to the wire harness.
55870B
4.INSTALL HEATER TO REGISTER DUCT ASSEMBLY
Attach the 2 claws to install the duct.
Install the 3 clips.
45250
5.INSTALL STEERING COLUMN ASSEMBLY
for Power Tilt and Power Telescopic Steering Column:
for Manual Tilt and Manual Telescopic Steering Column:
87201F
6.INSTALL NO. 3 AIR DUCT SUB-ASSEMBLY
Attach the 2 claws to install the duct.
Install the clip.
55301
7.INSTALL INSTRUMENT PANEL SUB-ASSEMBLY
8.INSTALL FRONT WIPER MOTOR AND BRACKET
87246A
9.CONNECT HEATER WATER INLET HOSE AND HEATER WATER OUTLET HOSE
Connect the 2 heater water hoses.
Using pliers, grip the claws of the clips and slide the 2 clips.
88710
10.CONNECT AIR CONDITIONING TUBE ASSEMBLY
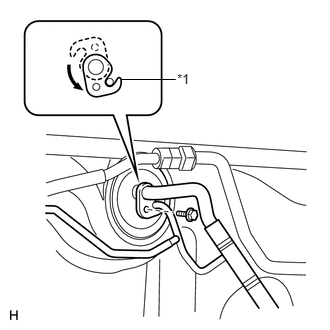
Remove the attached vinyl tape from the tubes.
Sufficiently apply compressor oil to 2 new O-rings and the fitting surface of the air conditioning tube assembly.
- Compressor oil:
ND-OIL 8 or equivalent
| *1 | Plate |
Install the 2 O-rings to the air conditioning tube assembly.
Connect the air conditioning tube assembly.
Attach the plate as shown in the illustration and install the bolt.
- Torque:
- 9.8 N*m (100 kgf*cm, 87 in.*lbf)
11.CONNECT CABLE TO NEGATIVE BATTERY TERMINAL
- NOTICE:
-
When disconnecting the cable, some systems need to be initialized after the cable is reconnected (See page General>INTRODUCTION>REPAIR INSTRUCTION>INITIALIZATION).
12.CHECK SRS WARNING LIGHT
13.ADD ENGINE COOLANT
for 1GR-FE:
(See page Engine / Hybrid System>1GR-FE (COOLING)>COOLANT>REPLACEMENT)
for 1UR-FE:
(See page Engine / Hybrid System>1UR-FE (COOLING)>COOLANT>REPLACEMENT)
for 3UR-FE:
(See page Engine / Hybrid System>3UR-FE (COOLING)>COOLANT>REPLACEMENT)
for 1VD-FTV:
(See page Engine / Hybrid System>1VD-FTV (COOLING)>COOLANT>REPLACEMENT)
14.CHARGE REFRIGERANT
15.WARM UP ENGINE
16.CHECK FOR ENGINE COOLANT LEAK
for 1GR-FE:
(See page Engine / Hybrid System>1GR-FE (COOLING)>COOLANT>REPLACEMENT)
for 1UR-FE:
(See page Engine / Hybrid System>1UR-FE (COOLING)>COOLANT>REPLACEMENT)
for 3UR-FE:
(See page Engine / Hybrid System>3UR-FE (COOLING)>COOLANT>REPLACEMENT)
for 1VD-FTV:
(See page Engine / Hybrid System>1VD-FTV (COOLING)>COOLANT>REPLACEMENT)
17.CHECK FOR REFRIGERANT GAS LEAK
53292A
18.INSTALL UPPER RADIATOR SUPPORT SEAL
51405A
19.INSTALL NO. 1 ENGINE UNDER COVER SUB-ASSEMBLY
for 1GR-FE:
(See page Engine / Hybrid System>1GR-FE (ENGINE MECHANICAL)>ENGINE ASSEMBLY>INSTALLATION)
for 1UR-FE:
(See page Engine / Hybrid System>1UR-FE (ENGINE MECHANICAL)>ENGINE ASSEMBLY>INSTALLATION)
for 3UR-FE:
(See page Engine / Hybrid System>3UR-FE (ENGINE MECHANICAL)>ENGINE ASSEMBLY>INSTALLATION)
for 1VD-FTV:
(See page Engine / Hybrid System>1VD-FTV (ENGINE MECHANICAL)>ENGINE ASSEMBLY>INSTALLATION)
53806
20.INSTALL FRONT FENDER SPLASH SHIELD SUB-ASSEMBLY LH
for Standard:
(See page Vehicle Exterior>EXTERIOR PANELS / TRIM>FRONT BUMPER(for Standard)>INSTALLATION)
w/ Winch:
(See page Vehicle Exterior>EXTERIOR PANELS / TRIM>FRONT BUMPER(w/ Winch)>INSTALLATION)
53805
21.INSTALL FRONT FENDER SPLASH SHIELD SUB-ASSEMBLY RH
for Standard:
(See page Vehicle Exterior>EXTERIOR PANELS / TRIM>FRONT BUMPER(for Standard)>INSTALLATION)
w/ Winch:
(See page Vehicle Exterior>EXTERIOR PANELS / TRIM>FRONT BUMPER(w/ Winch)>INSTALLATION)