FC CONTROL HYDROGEN RECIRCULATION PUMP REMOVAL
CAUTION / NOTICE / HINT
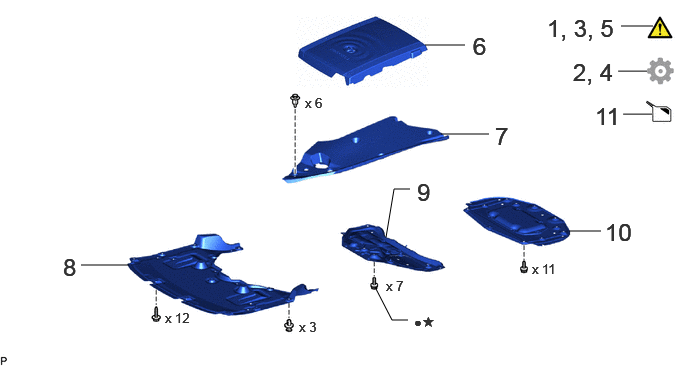
| Procedure | Part Name Code | 
|

|

|
|
|---|---|---|---|---|---|
| 1 | CAUTIONS FOR HIGH VOLTAGE SYSTEM COMPONENTS | - | ( ) |
- | - |
| 2 | CAUTIONS FOR COMPRESSED HYDROGEN GAS | - | - | - | ()
|
| 3 | CAUTIONS FOR COOLANT (TOYOTA GENUINE FC STACK COOLANT (Pre-mixed)) | - | ()
|
- | - |
| 4 | PRESSURE RELEASE OPERATION (for Low Pressure and Medium Pressure) | - | - | - | ()
|
| 5 | PRECAUTION | - | ()
|
- | - |
| 6 | FC STACK COVER SUB-ASSEMBLY | 1A906 | - | - | - |
| 7 | UPPER RADIATOR SUPPORT SEAL | 53292A | - | - | - |
| 8 | FRONT COMPARTMENT UNDER COVER | 51441N | - | - | - |
| 9 | FRONT LOWER SUSPENSION MEMBER PROTECTOR | 51219 | - | - | - |
| 10 | FRONT COMPARTMENT UNDER COVER ASSEMBLY | 51420A | - | - | - |
| 11 | DRAIN COOLANT (TOYOTA GENUINE FC STACK COOLANT (Pre-mixed)) | - | - | ()
|
- |
| ● | Non-reusable part | ★ | Precoated part |
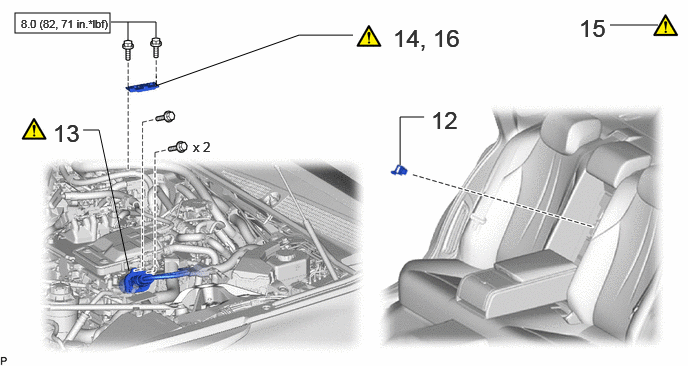
| Procedure | Part Name Code |
|
|
|
|
|---|---|---|---|---|---|
| 12 | SERVICE PLUG GRIP | G3834 | - | - | - |
| 13 | FC CONVERTER POWER OUTLET CABLE (INVERTER WITH CONVERTER ASSEMBLY) | G9200A | ()
|
- | - |
| 14 | REMOVE CONNECTOR COVER ASSEMBLY | - | ()
|
- | - |
| 15 | CHECK TERMINAL VOLTAGE | - | ()
|
- | - |
| 16 | INSTALL CONNECTOR COVER ASSEMBLY | - | ()
|
- | - |

|
N*m (kgf*cm, ft.*lbf): Specified torque | - | - |
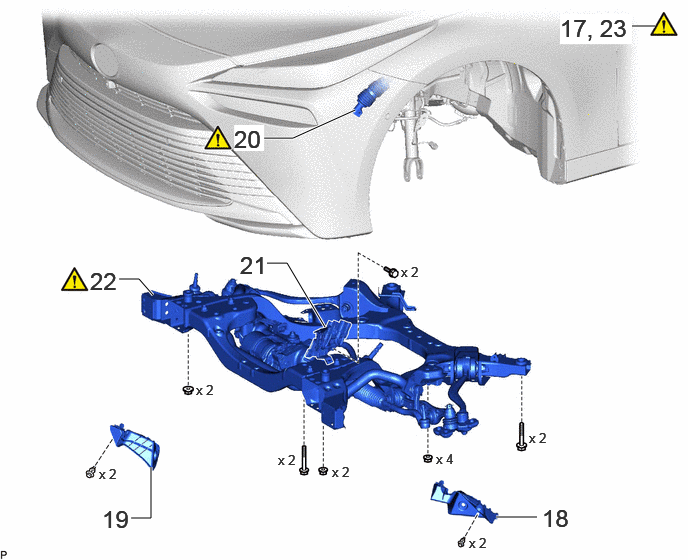
| Procedure | Part Name Code |
|
|
|
|
|---|---|---|---|---|---|
| 17 | ENGINE SUPPORT BRIDGE | - | ()
|
- | - |
| 18 | FRONT COMPARTMENT SIDE COVER LH | 51474C | - | - | - |
| 19 | FRONT COMPARTMENT SIDE COVER RH | 51473D | - | - | - |
| 20 | NO. 2 STEERING INTERMEDIATE SHAFT ASSEMBLY | 45260 | ()
|
- | - |
| 21 | WIRE HARNESS CLAMP BRACKET | - | - | - | - |
| 22 | FRONT FRAME ASSEMBLY | 51100G | ()
|
- | - |
| 23 | HOLDING BAR | - | ()
|
- | - |
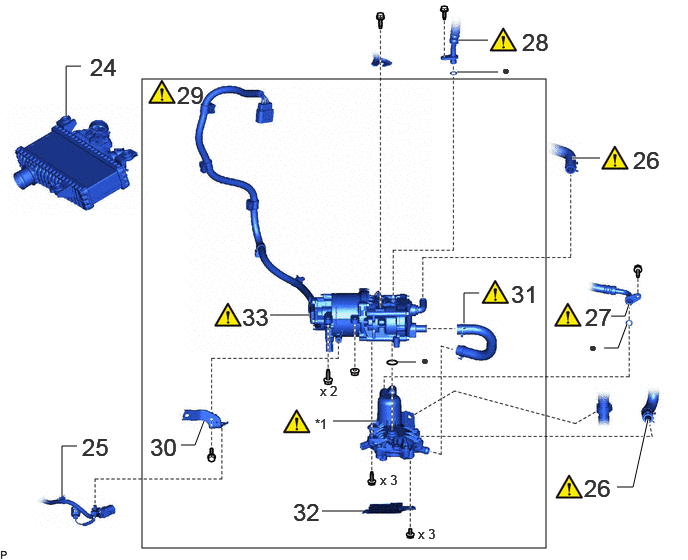
| Procedure | Part Name Code |
|
|
|
|
|---|---|---|---|---|---|
| 24 | INTERCOOLER WITH SENSOR ASSEMBLY | 17900 | - | - | - |
| 25 | WIRE HARNESS | - | - | - | - |
| 26 | WATER HOSE SUB-ASSEMBLY | 87209 | ()
|
- | - |
| 27 | NO. 3 HYDROGEN TUBE | 23B13 | ()
|
- | - |
| 28 | NO. 2 HYDROGEN TUBE | 23B12 | ()
|
- | - |
| 29 | HYDROGEN RECIRCULATION PUMP ASSEMBLY WITH HYDROGEN RECIRCULATION SEPARATOR ASSEMBLY | - | ()
|
- | - |
| 30 | WIRE HARNESS CLAMP BRACKET | - | - | - | - |
| 31 | HYDROGEN PUMP COOLING INLET HOSE | 23C21 | ()
|
- | - |
| 32 | HYDROGEN RECIRCULATION SEPARATOR COVER | 23C77 | - | - | - |
| 33 | HYDROGEN RECIRCULATION PUMP ASSEMBLY | 23C10 | ()
|
- | - |
| *1 | HYDROGEN RECIRCULATION SEPARATOR ASSEMBLY | - | - |
| ● | Non-reusable part | - | - |
CAUTION / NOTICE / HINT
The necessary procedures (adjustment, calibration, initialization, or registration) that must be performed after parts are removed, installed, or replaced during the hydrogen recirculation pump assembly removal/installation are shown below.
| Replaced Part or Performed Procedure | Necessary Procedures | Effect/Inoperative Function When Necessary Procedures are not Performed | Link |
|---|---|---|---|
|
*: The vehicle height changes because of suspension or tire replacement. |
|||
| Disconnect cable from negative auxiliary battery terminal | Memorize steering angle neutral point | Parking assist monitor system | ()
|
| Panoramic view monitor system | ()
|
||
| Wheel alignment adjustment | Perform "Calibration" | Electronically controlled brake system malfunctions | ()
|
| Front bumper assembly (Including removal and installation) | ·
Measurement of ultrasonic sensor detection angle ·
Ultrasonic sensor detection angle registration |
·
TOYOTA Parking assist- sensor system ·
Parking support brake system ·
Advanced park |
w/ Advanced Park:()
w/o Advanced Park:( )
|
| Front television camera view adjustment | Panoramic view monitor system | ()
|
|
| Suspension, tires, etc.* | ·
Measurement of ultrasonic sensor detection angle ·
Ultrasonic sensor detection angle registration |
·
Parking support brake system ·
Advanced park |
w/ Advanced Park:()
w/o Advanced Park:( )
|
| Rear television camera assembly optical axis (Back camera position setting) | Parking assist monitor system | ()
|
|
·
Parking assist ECU initialization ·
Adjust steering angle ·
Rear television camera view adjustment (for Rear camera detection system) |
Panoramic view monitor system | ()
|
|
| Perform headlight ECU sub-assembly LH initialization | Automatic headlight beam level control system | ()
|
|
- HINT:
-
When the cable is disconnected/reconnected to the auxiliary battery terminal, systems temporarily stop operating. However, each system has a function that completes learning the first time the system is used.
- ·
Learning completes when vehicle is driven
Effect/Inoperative Function When Necessary Procedures are not Performed Necessary Procedures Link Lane tracing assist system Drive the vehicle straight ahead at 35 km/h (22 mph) or more for 5 seconds or more. ( )
Pre-collision system Adaptive high beam system
·Learning completes when vehicle is operated normally
Effect/Inoperative Function When Necessary Procedures are not Performed Necessary Procedures Link Air conditioning system After the ignition switch is turned to ON, the servo motor and expansion valve standard position is recognized. -
·The procedure listed below is for the LH side.
·Use the same procedure for the RH and LH sides.
- NOTICE:
- ·
Immediately after installing the brake pads, the braking performance may be reduced. Always perform a road test in a safe place while paying attention to the surroundings.
·After replacing the front disc brake pads, the brake pedal may feel soft due to clearance between the front disc brake pads and front disc. Depress the brake pedal several times until the brake pedal feels firm.
·After replacing the front disc brake pads, always perform a road test to check the braking performance and check for vibrations.
·When removing or installing the front disc brake cylinder assembly, pushing back the disc brake piston may cause a large clearance between the brake pads and brake disc. When the brake pedal is depressed with a large clearance between the brake pads and the brake disc, DTC C13DB00, C13DC00, C13DD00, C13DE00, C140000 and/or C140A00 related to abnormal brake fluid pressure may be stored. Make sure to clear any DTCs after performing this procedure.
·While the auxiliary battery is connected, even if the ignition switch is off, the brake control system activates when the brake pedal is depressed or any door courtesy switch turns on. Therefore, when servicing the brake system components, do not operate the brake pedal or open/close the doors while the auxiliary battery is connected.
PROCEDURE

 1. CAUTIONS FOR HIGH VOLTAGE SYSTEM COMPONENTS
|
|
Click here()
|
2. CAUTIONS FOR COMPRESSED HYDROGEN GAS
3. CAUTIONS FOR COOLANT (TOYOTA GENUINE FC STACK COOLANT (Pre-mixed))
4. PRESSURE RELEASE OPERATION (for Low Pressure and Medium Pressure)
5. PRECAUTION
1A906
6.REMOVE FC STACK COVER SUB-ASSEMBLY
53292A
7.REMOVE UPPER RADIATOR SUPPORT SEAL
51441N
8.REMOVE FRONT COMPARTMENT UNDER COVER
51219
9.REMOVE FRONT LOWER SUSPENSION MEMBER PROTECTOR
51420A
10.REMOVE FRONT COMPARTMENT UNDER COVER ASSEMBLY
11.DRAIN COOLANT (TOYOTA GENUINE FC STACK COOLANT (Pre-mixed))
G3834
12.REMOVE SERVICE PLUG GRIP
G9200A
13.DISCONNECT FC CONVERTER POWER OUTLET CABLE (INVERTER WITH CONVERTER ASSEMBLY)
|
|
Click here()
|
14.REMOVE CONNECTOR COVER ASSEMBLY
|
|
Click here()
|
15.CHECK TERMINAL VOLTAGE
|
|
Click here()
|
16.INSTALL CONNECTOR COVER ASSEMBLY
|
|
Click here()
|
17.INSTALL ENGINE SUPPORT BRIDGE
51474C
18.REMOVE FRONT COMPARTMENT SIDE COVER LH
51473D
19.REMOVE FRONT COMPARTMENT SIDE COVER RH
Use the same procedure as for the LH side.
45260
20.DISCONNECT NO. 2 STEERING INTERMEDIATE SHAFT ASSEMBLY
|
|
Click here()
|
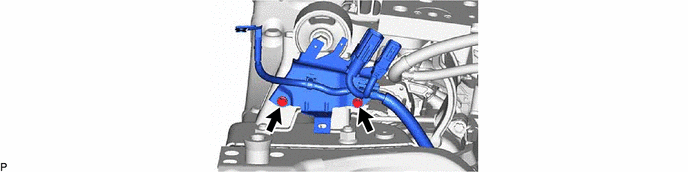
21.DISCONNECT WIRE HARNESS CLAMP BRACKET
51100G
22.REMOVE FRONT FRAME ASSEMBLY
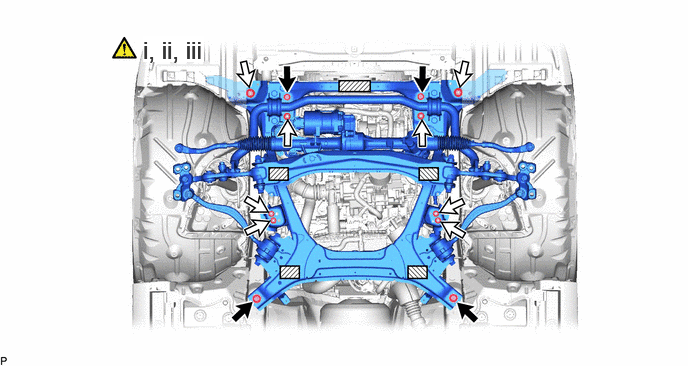

|
Bolt | 
|
Nut |

|
Attachments | - | - |
Set the front frame assembly on an engine lifter.
- CAUTION:
-
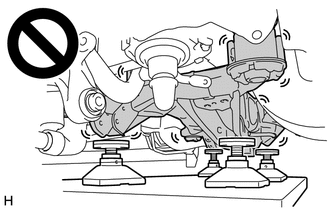
- ·
The front frame assembly is a heavy component. Make sure that it is supported securely.
·If it is not supported securely, it could fall and result in a serious accident.
- NOTICE:
-
Place wooden blocks or plate lift attachments so that the front frame assembly is level.
Remove the 4 bolts and 8 nuts.
Operate the engine lifter, then slowly remove the front frame assembly from the vehicle.
- NOTICE:
- ·
Perform this procedure with several people supporting the front frame assembly so that it does not tilt or fall.
·Remove while paying attention to the wire harnesses and steering shaft.
23.INSTALL HOLDING BAR
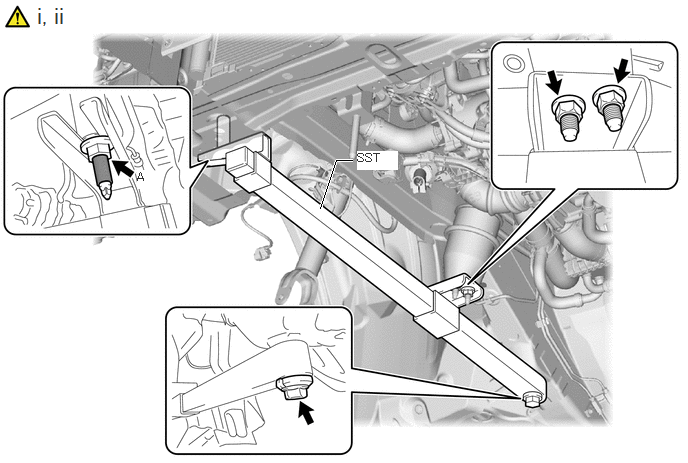
Install the SST to the right side of the vehicle.
- SST
- 09940-78020
- CAUTION:
-
Do not remove the SST (holding bar) to prevent the FC stack assembly from falling while performing work with the front frame assembly removed.
- HINT:
- ·
Use the installation nuts and bolts specialized for the vehicle.
·Make sure to tighten the nuts by hand and do not use tools.
Install the SST (holding bar) to the vehicle with the bolt and nut A.
- Torque:
- 30 N*m (306 kgf*cm, 22 ft.*lbf)
17900
24.REMOVE INTERCOOLER WITH SENSOR ASSEMBLY
25.DISCONNECT WIRE HARNESS
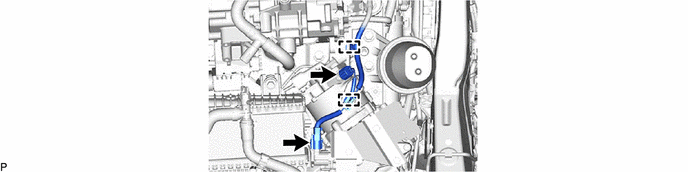
87209
26.DISCONNECT WATER HOSE SUB-ASSEMBLY
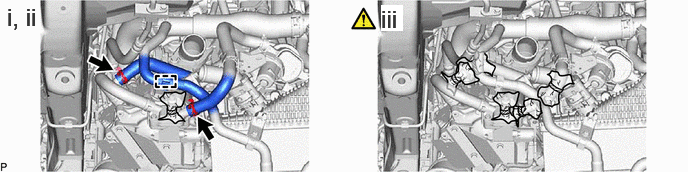
Detach the clamp.
Slide the 2 clips, disconnect the 2 water hose sub-assemblies.
Cover the connection of the water hose and hydrogen recirculation pump assembly with hydrogen recirculation separator assembly with plastic bags to prevent the foreign matter.
23B13
27.REMOVE NO. 3 HYDROGEN TUBE
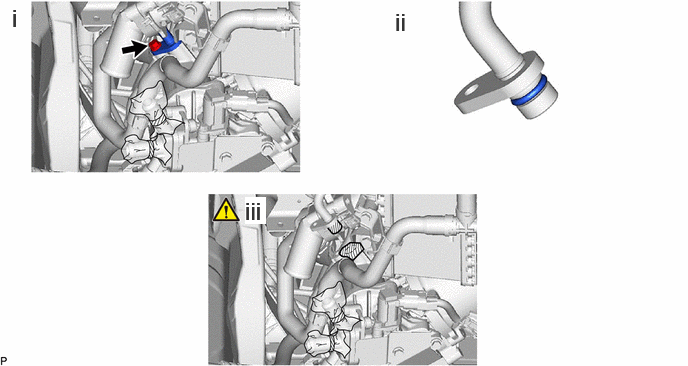
Remove the bolt and disconnect the No. 3 hydrogen tube.
Remove the O-ring from the No. 3 hydrogen tube.
Protect the openings of the No. 3 hydrogen tube and hydrogen recirculation separator assembly with protective tape (non-residue type) to prevent the entry of foreign matter or water.
23B12
28.REMOVE NO. 2 HYDROGEN TUBE
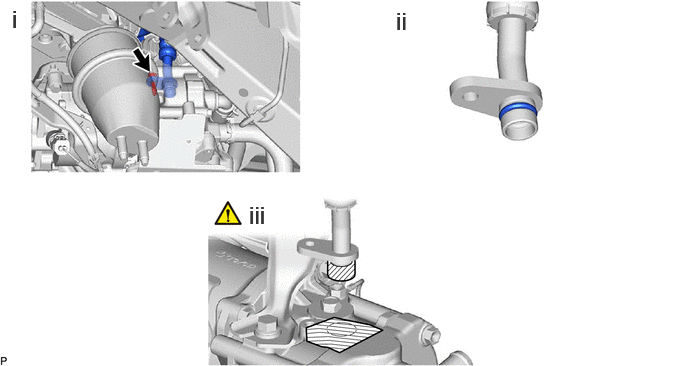
Remove the bolt and disconnect the No. 2 hydrogen tube.
Remove the O-ring from the No. 2 hydrogen tube.
Protect the openings of the No. 2 hydrogen tube and hydrogen recirculation pump assembly with protective tape (non-residue type) to prevent the entry of foreign matter or water.
29.REMOVE HYDROGEN RECIRCULATION PUMP ASSEMBLY WITH HYDROGEN RECIRCULATION SEPARATOR ASSEMBLY
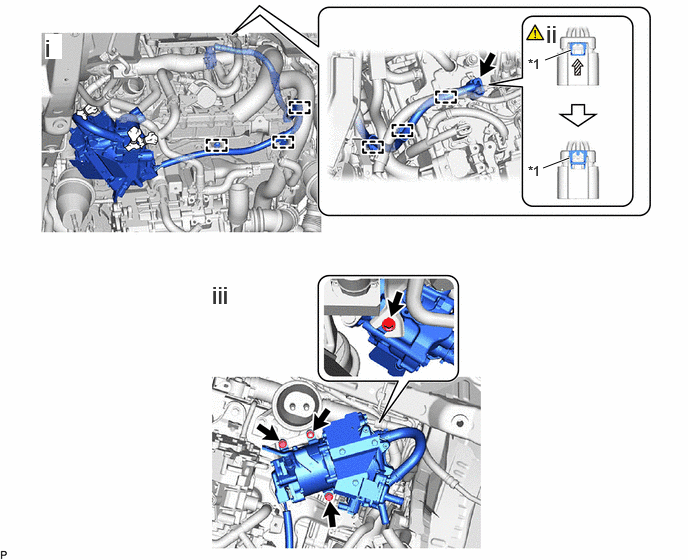
| *1 | Green-colored Lock | - | - |
Detach the 6 clamps.
As shown in the illustration, pull out the green-colored lock of the connector and disconnect the connector.
Remove the 3 bolt, nut and hydrogen recirculation pump assembly with hydrogen recirculation separator assembly.
30.REMOVE WIRE HARNESS CLAMP BRACKET

23C21
31.REMOVE HYDROGEN PUMP COOLING INLET HOSE
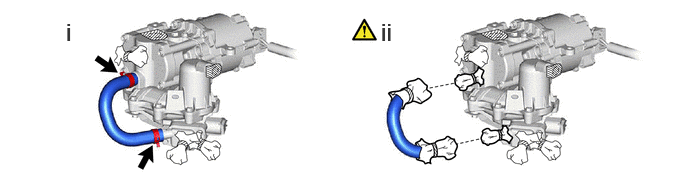
Slide the 2 clips, remove the hydrogen pump cooling inlet hose.
Cover the connection of the hydrogen pump cooling inlet hose and hydrogen recirculation pump assembly with hydrogen recirculation separator assembly with plastic bags to prevent the foreign matter.
23C77
32.REMOVE HYDROGEN RECIRCULATION SEPARATOR COVER

23C10
33.REMOVE HYDROGEN RECIRCULATION PUMP ASSEMBLY
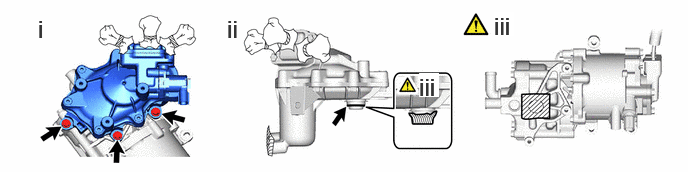
Remove the 3 bolts and hydrogen recirculation pump assembly from the hydrogen recirculation separator assembly.
Remove the O-ring from the hydrogen recirculation separator assembly.
Protect the openings of the hydrogen recirculation separator assembly and hydrogen recirculation pump assembly with protective tape (non-residue type) to prevent the entry of foreign matter or water.