P410 HYBRID TRANSMISSION / TRANSAXLE HYBRID VEHICLE TRANSAXLE INSTALLATION
PROCEDURE

 G1143
1.INSTALL MOTOR CABLE BRACKET
Install the motor cable bracket to the hybrid vehicle transaxle assembly with the bolt.
- Torque:
- 23 N*m (235 kgf*cm, 17 ft.*lbf)
2.INSTALL WIRE HARNESS CLAMP BRACKET
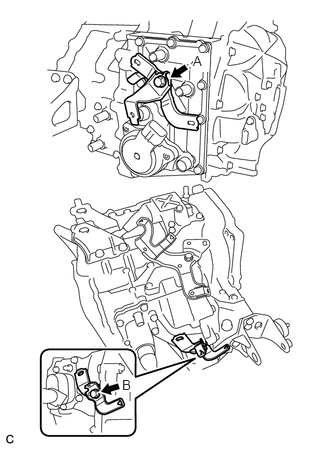
Install the 2 wire harness clamp brackets to the hybrid vehicle transaxle assembly with the 2 bolts.
- Torque:
- Bolt A : 29 N*m (296 kgf*cm, 21 ft.*lbf)
- Bolt B : 23 N*m (235 kgf*cm, 17 ft.*lbf)
12321A
3.INSTALL REAR ENGINE MOUNTING BRACKET
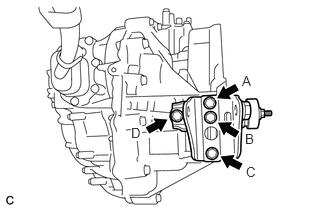
Install the rear engine mounting bracket with the 4 bolts in several steps.
- Torque:
- 45 N*m (459 kgf*cm, 33 ft.*lbf)
- NOTICE:
-
Temporarily tighten bolt A, and then fully tighten the 4 bolts in the order of C, B, D and A.
12311A
4.INSTALL FRONT ENGINE MOUNTING BRACKET
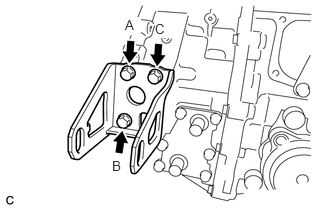
Install the front engine mounting bracket with the 3 bolts in several steps.
- Torque:
- 64 N*m (653 kgf*cm, 47 ft.*lbf)
- NOTICE:
-
Temporarily tighten bolt A, and then fully tighten the 3 bolts in the order of B, C and A.
30900
5.SUPPORT HYBRID VEHICLE TRANSAXLE ASSEMBLY
Support the hybrid vehicle transaxle assembly with a transmission jack.
30900
6.INSTALL HYBRID VEHICLE TRANSAXLE ASSEMBLY
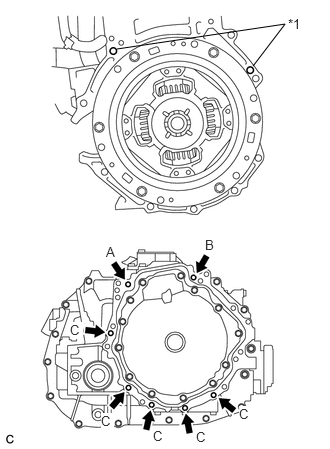
Make sure that the knock pins are installed to the engine.
| *1 | Knock Pin |
Using an transmission jack, align the engine assembly and hybrid vehicle transaxle assembly, fit the knock pins into the knock pin holes, and tighten the 7 bolts shown in the illustration.
- Torque:
- 33 N*m (337 kgf*cm, 24 ft.*lbf)
- NOTICE:
- ·
Make sure to align the hybrid vehicle transaxle assembly so that the input shaft of the hybrid vehicle transaxle assembly will be inserted straight into the inner splines of the transmission input damper.
·When inserting the input shaft of the hybrid vehicle transaxle assembly into the inner splines of the transmission input damper, do not shake the hybrid vehicle transaxle excessively.
·When mounting the hybrid vehicle transaxle assembly to the engine, make sure to securely fit the knock pins into the knock holes.
·Push in the hybrid vehicle transaxle assembly so that the contact surfaces of the engine and the hybrid vehicle transaxle assembly are aligned evenly.
·While mounting the hybrid vehicle transaxle assembly to the engine, temporarily tighten the bolt (A), fully tighten the bolt (B), fully tighten the bolt (A), and then fully tighten the bolts (C).
·Do not hang the hybrid vehicle transaxle assembly off of the engine if the contact surfaces of the engine and the hybrid vehicle transaxle assembly are not in full contact. The knock holes of the hybrid vehicle transaxle case may be deformed due to the excessive weight of the engine and hybrid vehicle transaxle assembly, resulting in misalignment between the engine and hybrid vehicle transaxle assembly.
12325A
7.INSTALL ENGINE MOUNTING BRACKET LH
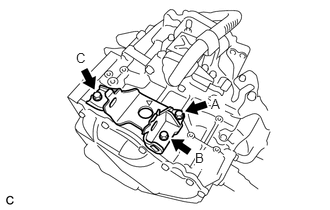
Install the engine mounting bracket LH with 3 new bolts in several steps.
- Torque:
- 64 N*m (653 kgf*cm, 47 ft.*lbf)
- NOTICE:
-
Temporarily tighten bolt A, and then fully tighten the 3 bolts in the order of B, C and A.
Install the engine mounting insulator LH with the through bolt and nut.
- Torque:
- 56 N*m (571 kgf*cm, 41 ft.*lbf)
- NOTICE:
-
When installing the engine mounting insulator, tighten the nut while holding the bolt.
12371A
8.INSTALL REAR ENGINE MOUNTING INSULATOR
51201
9.INSTALL FRONT SUSPENSION CROSSMEMBER SUB-ASSEMBLY
12361A
10.INSTALL FRONT ENGINE MOUNTING INSULATOR
57104E
11.INSTALL FRONT CROSSMEMBER SUB-ASSEMBLY
Install the front crossmember to the body with the 4 bolts.
- Torque:
- 96 N*m (979 kgf*cm, 71 ft.*lbf)
Install the front engine mounting insulator to the front crossmember with the 2 bolts.
- Torque:
- 95 N*m (969 kgf*cm, 70 ft.*lbf)
Tighten the front engine mounting insulator with the bolt and nut.
- Torque:
- 145 N*m (1479 kgf*cm, 107 ft.*lbf)
52258A
12.INSTALL FRONT SUSPENSION MEMBER REAR BRACE LH
52257
13.INSTALL FRONT SUSPENSION MEMBER REAR BRACE RH
- HINT:
-
Perform the same procedure as for the LH side.
51108A
14.INSTALL REAR SIDE RAIL REINFORCEMENT SUB-ASSEMBLY LH
51107A
15.INSTALL REAR SIDE RAIL REINFORCEMENT SUB-ASSEMBLY RH
- HINT:
-
Perform the same procedure as for the LH side.
51425A
16.INSTALL FRONT ENGINE MOUNTING BRACKET LOWER REINFORCEMENT
11363A
17.INSTALL FLYWHEEL HOUSING SIDE COVER
Install the flywheel housing side cover.
28193
18.INSTALL STARTER HOLE INSULATOR
Install the starter hole insulator with the 2 bolts.
- Torque:
- 37 N*m (377 kgf*cm, 27 ft.*lbf)
19.REMOVE ENGINE HANGERS
Remove the 2 bolts and 2 engine hangers.
43040B
20.INSTALL FRONT DRIVE SHAFT HOLE SNAP RING LH
43030B
21.INSTALL FRONT DRIVE SHAFT HOLE SNAP RING RH
- HINT:
-
Perform the same procedure as for the LH side.
43420
22.INSTALL FRONT DRIVE SHAFT ASSEMBLY LH
43410
23.INSTALL FRONT DRIVE SHAFT ASSEMBLY RH
- HINT:
-
Perform the same procedure as for the LH side.
48069
24.CONNECT FRONT LOWER NO. 1 SUSPENSION ARM SUB-ASSEMBLY LH
48068
25.CONNECT FRONT LOWER NO. 1 SUSPENSION ARM SUB-ASSEMBLY RH
- HINT:
-
Perform the same procedure as for the LH side.
48810
26.INSTALL FRONT STABILIZER LINK ASSEMBLY LH
48820B
27.INSTALL FRONT STABILIZER LINK ASSEMBLY RH
- HINT:
-
Perform the same procedure as for the LH side.
45047
28.CONNECT TIE ROD END SUB-ASSEMBLY LH
45046
29.CONNECT TIE ROD END SUB-ASSEMBLY RH
- HINT:
-
Perform the same procedure as for the LH side.
89543
30.INSTALL FRONT SPEED SENSOR LH
89542
31.INSTALL FRONT SPEED SENSOR RH
- HINT:
-
Perform the same procedure as for the LH side.
43502H
32.INSTALL FRONT AXLE SHAFT NUT LH
43501H
33.INSTALL FRONT AXLE SHAFT NUT RH
- HINT:
-
Perform the same procedure as for the LH side.
17410
34.INSTALL FRONT EXHAUST PIPE ASSEMBLY (w/ Exhaust Heat Recirculation System)
17410
35.INSTALL FRONT EXHAUST PIPE ASSEMBLY (w/o Exhaust Heat Recirculation System)
57533B
36.INSTALL FRONT CENTER FLOOR BRACE
51442A
37.INSTALL FRONT NO. 3 ENGINE UNDER COVER
45025D
38.CONNECT NO. 1 STEERING COLUMN HOLE COVER SUB-ASSEMBLY
45260
39.CONNECT NO. 2 STEERING INTERMEDIATE SHAFT ASSEMBLY (for LHD)
45260
40.CONNECT NO. 2 STEERING INTERMEDIATE SHAFT ASSEMBLY (for RHD)
41. ALIGN FRONT WHEELS FACING STRAIGHT AHEAD
45259A
42.INSTALL COLUMN HOLE COVER SILENCER SHEET (for LHD)
45259A
43.INSTALL COLUMN HOLE COVER SILENCER SHEET (for RHD)
44.INSTALL WIRE HARNESS
Connect the 12 wire harness clamps and 6 connectors and install the 2 bolts.
- Torque:
- 8.4 N*m (85 kgf*cm, 74 in.*lbf)
Connect the wire harness with the clamp.
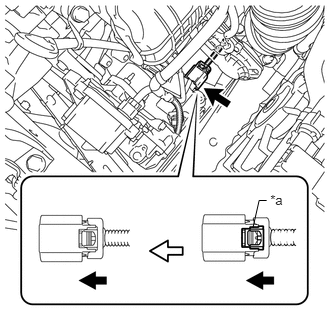
Connect the connector and lock the green-colored lock as shown in the illustration.
- CAUTION:
-
Wear insulated gloves when performing the procedure.
| *a | Green-colored Lock |
Install the earth wire with the bolt.
- Torque:
- 8.4 N*m (85 kgf*cm, 74 in.*lbf)
Connect the wire harness 2 clamps to the engine room junction block.
Connect the 2 connectors to the engine room junction block.
Connect the connector to the ECM with the lock lever.
Connect the 2 clamps.
G9228B
45.INSTALL WATER HOSE
Install the water hose to the hybrid vehicle transaxle assembly with the 2 clamps.
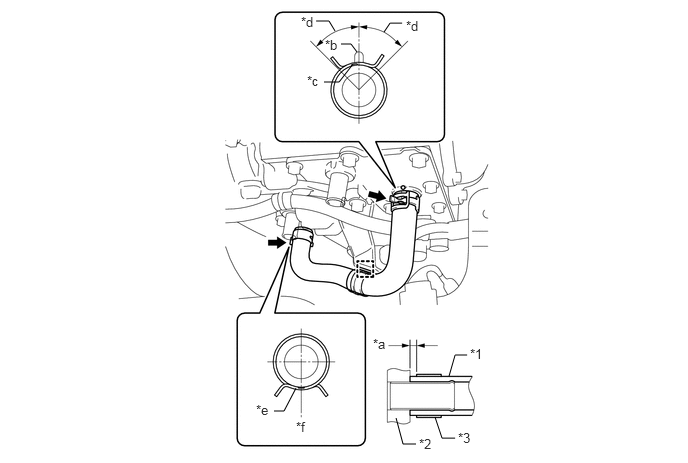
| *1 | Water Hose |
| *2 | No. 2 Motor Water Jacket Cover Assembly |
| *3 | Clamp |
| *a | 2 to 7 mm (0.0787 to 0.276 in.) |
| *b | Alignment Mark |
| *c | Yellow Mark |
| *d | Within 45° of the center of the clamp claw |
| *e | Green Mark |
| *f | Downward |
- NOTICE:
- ·
Align the yellow mark of the water hose and the alignment mark of the No. 2 motor water jacket cover assembly.
·Install the water hose upper clamp so that the center of the clamp claws is within 45° of the center of the matchmark of the No. 2 motor water jacket cover assembly as shown in the illustration.
·Install the water hose so that the green mark of the water hose is within 15° of facing downward.
Connect the clamp to the wire harness clamp bracket.
G9229A
46.CONNECT NO. 5 INVERTER COOLING HOSE
G9227A
47.CONNECT NO. 3 INVERTER COOLING HOSE
16577C
48.INSTALL RADIATOR PIPE
16281
49.CONNECT NO. 4 WATER BY-PASS HOSE
16571C
50.CONNECT NO. 1 RADIATOR HOSE
G9219A
51.INSTALL INVERTER TRAY BRACKET
G92A0A
52.INSTALL INVERTER RESERVE TANK ASSEMBLY
G9200
53.INSTALL INVERTER WITH CONVERTER ASSEMBLY
54.CONNECT WATER HOSE
82112
55.CONNECT NO. 2 ENGINE ROOM WIRE
G9221
56.REMOVE INVERTER COVER
82122
57.CONNECT NO. 2 ENGINE WIRE
G1148
58.CONNECT MOTOR CABLE
G2148
59.CONNECT GENERATOR CABLE
82164
60.CONNECT FRAME WIRE
61.CHECK HIGH VOLTAGE CABLE CONNECTION
G9221
62.INSTALL INVERTER COVER
82111
63.INSTALL ENGINE ROOM MAIN WIRE
G9214
64.INSTALL NO. 1 INVERTER BRACKET
65.INSTALL AIR CLEANER HOSE ASSEMBLY
66.INSTALL AIR CLEANER CASE
17750A
67.INSTALL INLET AIR CLEANER ASSEMBLY
17705
68.INSTALL AIR CLEANER CAP SUB-ASSEMBLY
G3834
69.INSTALL SERVICE PLUG GRIP
55701J
70.INSTALL OUTER COWL TOP PANEL SUB-ASSEMBLY (for LHD)
55701J
71.INSTALL OUTER COWL TOP PANEL SUB-ASSEMBLY (for RHD)
55736D
72.INSTALL COWL BODY MOUNTING REINFORCEMENT LH (for LHD)
55735C
73.INSTALL COWL BODY MOUNTING REINFORCEMENT RH (for RHD)
74.INSTALL WINDSHIELD WIPER MOTOR AND LINK ASSEMBLY
75.ADD HYBRID TRANSAXLE FLUID
76.ADD COOLANT (for Inverter)
77.ADD COOLANT (for Engine)
78.INSPECT HYBRID TRANSAXLE FLUID
79.INSPECT FOR HYBRID TRANSAXLE FLUID LEAK
80.INSPECT FOR COOLANT LEAK (for Inverter)
81.INSPECT FOR COOLANT LEAK (for Engine)
82.INSPECT FOR EXHAUST GAS LEAK
51441
83.INSTALL NO. 1 ENGINE UNDER COVER
52618A
84.INSTALL FRONT LOWER BUMPER ABSORBER
51444A
85.INSTALL REAR ENGINE UNDER COVER LH
51443C
86.INSTALL REAR ENGINE UNDER COVER RH
87.INSTALL FRONT WHEELS
53301
88.INSTALL HOOD SUB-ASSEMBLY
Install the hood sub-assembly to the hood hinge assembly RH and hood hinge assembly LH with the 4 bolts.
- Torque:
- 13 N*m (133 kgf*cm, 10 ft.*lbf)
Connect the clamp and washer hose.
53301
89.INSPECT HOOD SUB-ASSEMBLY
53301
90.ADJUST HOOD SUB-ASSEMBLY
53289A
91.INSTALL RADIATOR SUPPORT OPENING COVER
11212
92.INSTALL NO. 2 CYLINDER HEAD COVER
93.INSPECT AND ADJUST FRONT WHEEL ALIGNMENT
94.CHECK ABS SPEED SENSOR SIGNAL