AXLE AND DIFFERENTIAL REAR AXLE CARRIER INSTALLATION
CAUTION / NOTICE / HINT
- NOTICE:
- ·
When removing or installing the rear disc brake caliper assembly, pushing back the disc brake piston may cause a large clearance between the brake pads and brake disc. When the brake pedal is depressed with a large clearance between the brake pads and the brake disc, DTC C1214 related to abnormal brake fluid pressure may be stored. Make sure to clear any DTCs after performing this step.
·While the auxiliary battery is connected, even if the power switch is off, the brake control system activates when the brake pedal is depressed or any door courtesy switch turns on. Therefore, when servicing the brake system components, do not operate the brake pedal or open/close the doors while the auxiliary battery is connected.
- HINT:
- ·
Use the same procedure for the RH side and LH side.
·The following procedure is for the LH side.
PROCEDURE

 42305
1.TEMPORARILY INSTALL REAR AXLE CARRIER SUB-ASSEMBLY
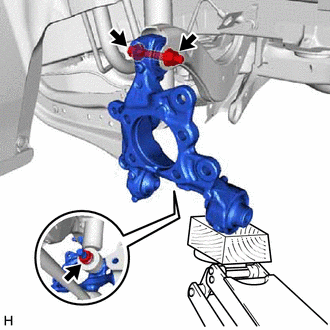
Temporarily install the rear axle carrier sub-assembly to the rear upper control arm assembly with the bolt and nut.
- NOTICE:
- ·
Insert the bolt with the threaded end facing the rear of the vehicle.
·Because the nut has its own stopper, do not turn the nut. Tighten the bolt with the nut secured.
Temporarily install the rear shock absorber assembly to the rear axle carrier sub-assembly with the nut.
- NOTICE:
-
Hold the rear axle carrier pin while rotating the nut.
Install the rear trailing arm assembly to the rear axle carrier sub-assembly with the 2 bolts.
- Torque:
- 135 N*m (1377 kgf*cm, 100 ft.*lbf)
2.INSTALL FLEXIBLE HOSE BRACKET
Install the flexible hose bracket to the rear axle carrier sub-assembly with the bolt.
- Torque:
- 29 N*m (296 kgf*cm, 21 ft.*lbf)
48720A
3.TEMPORARILY INSTALL REAR NO. 1 SUSPENSION ARM ASSEMBLY
48258C
4.INSTALL REAR LOWER COIL SPRING INSULATOR
48231B
5.INSTALL REAR COIL SPRING
6.STABILIZE SUSPENSION
48790
7.INSTALL REAR UPPER CONTROL ARM ASSEMBLY
Install the rear upper control arm assembly to the rear axle carrier sub-assembly with the bolt.
- Torque:
- 73 N*m (744 kgf*cm, 54 ft.*lbf)
- NOTICE:
-
Because the nut has its own stopper, do not turn the nut. Tighten the bolt with the nut secured.
48720A
8.INSTALL REAR NO. 1 SUSPENSION ARM ASSEMBLY
48740F
9.INSTALL REAR NO. 2 SUSPENSION ARM ASSEMBLY
Install the rear No. 2 suspension arm assembly (rear axle carrier sub-assembly side) with the bolt.
Click hereSuspension>REAR SUSPENSION>REAR LOWER ARM>INSTALLATION
48540
10.INSTALL REAR SHOCK ABSORBER ASSEMBLY
48840A
11.INSTALL REAR STABILIZER LINK ASSEMBLY
42450B
12.INSTALL REAR AXLE HUB AND BEARING ASSEMBLY
89516D
13.CONNECT SKID CONTROL SENSOR WIRE
42431
14.INSTALL REAR DISC
15.INSTALL REAR DISC BRAKE CALIPER ASSEMBLY
46430
16.CONNECT NO. 3 PARKING BRAKE CABLE ASSEMBLY
47658B
17.INSTALL PARKING BRAKE LEVER PROTECTOR
18.ADJUST PARKING BRAKE
89408C
19.INSTALL REAR HEIGHT CONTROL SENSOR SUB-ASSEMBLY LH (for LH Side)
57628C
20.INSTALL REAR FLOOR SIDE MEMBER COVER LH (for LH Side)
w/ Canister Pump Module: Click hereEngine / Hybrid System>2ZR-FXE FUEL>FUEL TANK(w/ Canister Pump Module)>INSTALLATION
w/o Canister Pump Module: Click hereEngine / Hybrid System>2ZR-FXE FUEL>FUEL TANK(w/o Canister Pump Module)>INSTALLATION
58390
21.INSTALL NO. 1 FLOOR UNDER COVER ASSEMBLY (for RH Side)
w/ Canister Pump Module: Click hereEngine / Hybrid System>2ZR-FXE FUEL>FUEL TANK(w/ Canister Pump Module)>INSTALLATION
w/o Canister Pump Module: Click hereEngine / Hybrid System>2ZR-FXE FUEL>FUEL TANK(w/o Canister Pump Module)>INSTALLATION
22.INSTALL REAR WHEEL
48740F
23.INSTALL REAR NO. 2 SUSPENSION ARM ASSEMBLY
Install the rear No. 2 suspension arm assembly (rear suspension member sub-assembly side) with the nut.
Click hereSuspension>REAR SUSPENSION>REAR LOWER ARM>INSTALLATION
24.CONNECT CABLE TO NEGATIVE AUXILIARY BATTERY TERMINAL
Connect the reservoir level switch connector.
Connect the cable to the negative (-) auxiliary battery terminal.
Click herePower Source / Network>2ZR-FXE BATTERY / CHARGING>AUXILIARY BATTERY>INSTALLATION
Turn the power switch on (READY).
Depress the brake pedal and release it.
Clear the DTCs.
25.INSPECT AND ADJUST REAR WHEEL ALIGNMENT
26.CHECK FOR SPEED SENSOR SIGNAL
27.PERFORM INITIALIZATION
| Intelligent clearance sonar system
Simple intelligent parking assist system |
( ) |
| Parking assist monitor system | ()
|
| Automatic headlight beam level control system | ()
|