ALIGNMENT / HANDLING DIAGNOSIS REAR WHEEL ALIGNMENT ADJUSTMENT
CAUTION / NOTICE / HINT
- NOTICE:
-
Before inspecting the wheel alignment, adjust the vehicle height to the specified value.
- HINT:
-
When adjusting the camber, the toe is also always changed. The camber must therefore be adjusted first.
PROCEDURE

 1.INSPECT TIRES
2. PREPARATION FOR INSPECTION AND ADJUSTMENT
3.INSPECT CAMBER
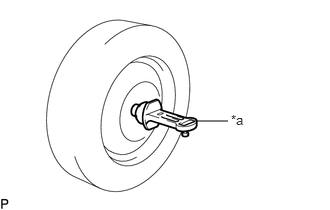
| *a | Camber-caster-kingpin Gauge |
Install a camber-caster-kingpin gauge.
Inspect the camber.
- Camber:
Equipment Camber Inclination Right-left Difference w/o AVS -1°50' +/- 0°25' (-1.83° +/- 0.42°) 0°30' (0.50°) or less w/ AVS -2°00' +/- 0°25' (-2.00° +/- 0.42°)
4.ADJUST CAMBER
- HINT:
-
When adjusting the camber, the toe is also always changed. The camber must therefore be adjusted first.
Remove the rear suspension arm cover.
Click hereSuspension>REAR SUSPENSION>REAR SHOCK ABSORBER>REMOVAL
Remove the stoneguard.
Click hereSuspension>REAR SUSPENSION>REAR LOWER ARM (for No. 2 Arm)>REMOVAL
Remove the rear coil spring.
Click hereSuspension>REAR SUSPENSION>REAR COIL SPRING>REMOVAL
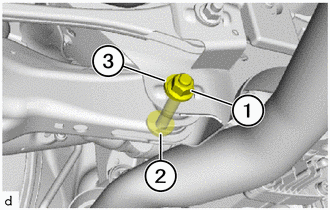
Loosen the nut (1) of the rear No. 2 suspension arm (on the rear suspension member side).
- NOTICE:
-
Hold the 18 mm camber adjust bolt (2) while rotating the nut (1).
Replace the nut (1), camber adjust bolt (2) and camber adjust washer (3).
- CAUTION:
-
Do not pull out the camber adjustment bolt (2) before removing the rear coil spring.
- NOTICE:
-
During installation, position camber adjust bolt (2) and camber adjust washer (3) in such a way that the eccentric points upward vertically.
Install the rear coil spring.
Click hereSuspension>REAR SUSPENSION>REAR COIL SPRING>INSTALLATION
Rotate the 18 mm camber adjust bolt (2) to adjust the camber.
Tighten the nut (1) of the rear No. 2 suspension arm (on the rear suspension member side).
- Torque:
- 175 N*m (1785 kgf*cm, 129 ft.*lbf)
- NOTICE:
-
Hold the 18 mm camber adjust bolt (2) while rotating the nut (1).
Install the stoneguard.
Click hereSuspension>REAR SUSPENSION>REAR LOWER ARM (for No. 2 Arm)>INSTALLATION
Install the rear suspension arm cover.
Click hereSuspension>REAR SUSPENSION>REAR SHOCK ABSORBER>INSTALLATION
5.INSPECT TOE-IN
Bounce the vehicle up and down at the corners to stabilize the suspension.
Release the parking brake and move the shift position to N.
Push the vehicle straight ahead approximately 5 m (16.4 ft.). (Step C)
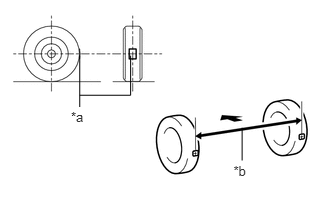
| *a | Tread Center Mark |
| *b | Dimension B |

|
Front of the Vehicle |
Put tread center marks on the rearmost points of the rear wheels and measure the distance between the marks (dimension B).
Slowly push the vehicle straight ahead to cause the rear wheels to rotate 180°. Use the rear tire valve as a reference point.
- HINT:
-
Do not allow the wheels to rotate more than 180°. If the wheels rotate more than 180°, perform the procedure from step C again.
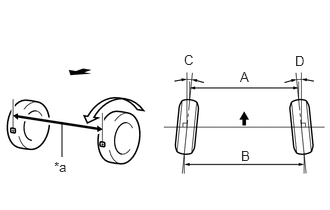
| *a | Dimension A |
|
|
Front of the Vehicle |
Measure the distance between the tread center marks on the front of the rear wheels (dimension A).
- Toe-in:
Specified Condition C + D: 0°14' +/- 0°12' (0.23° +/- 0.20°) B - A: 2.7 +/- 2.4 mm (0.1063 +/- 0.0945 in.)
- HINT:
-
Measure "B - A" only when "C + D" cannot be measured.
6.ADJUST TOE-IN
- HINT:
-
When adjusting the camber, the toe is also always changed. The camber must therefore be adjusted first.
Remove the rear suspension arm cover.
Click hereSuspension>REAR SUSPENSION>REAR SHOCK ABSORBER>REMOVAL
Remove the stoneguard.
Click hereSuspension>REAR SUSPENSION>REAR LOWER ARM (for No. 2 Arm)>REMOVAL
Remove the rear wheel.
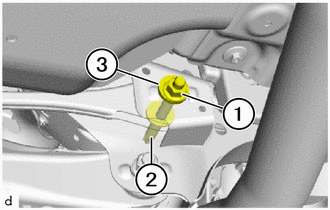
Loosen the 18 mm nut (1) of the toe control link (on the rear suspension member side).
- NOTICE:
-
Hold the E14 toe adjust bolt (2) while rotating the 18 mm nut (1).
Replace the nut (1), toe adjust bolt (2) and toe adjust washer (3).
- CAUTION:
-
Do not pull out the toe adjustment bolt (2) before removing the rear wheel.
- NOTICE:
-
During installation, position toe adjust bolt (2) and toe adjust washer (3) in such a way that the eccentric points upward vertically.
Install the rear wheel.
Rotate the E14 toe adjust bolt (2) to adjust the toe-in.
- Toe-in:
Specified Condition C + D: 0°14' +/- 0°04' (0.23° +/- 0.07°) B - A: 2.7 +/- 0.8 mm (0.1063 +/- 0.0315 in.)
Tighten the 18 mm nut (1) of the toe control link (on the rear suspension member side).
- Torque:
- 108 N*m (1101 kgf*cm, 80 ft.*lbf)
- NOTICE:
-
Hold the E14 toe adjust bolt (2) while rotating the 18 mm nut (1).
Install the stoneguard.
Click hereSuspension>REAR SUSPENSION>REAR LOWER ARM (for No. 2 Arm)>INSTALLATION
Install the rear suspension arm cover.
Click hereSuspension>REAR SUSPENSION>REAR SHOCK ABSORBER>INSTALLATION
7.ADJUST MILLIMETER WAVE RADAR SENSOR
Before starting adjustment:
Click hereEngine / Hybrid System>CRUISE CONTROL>MILLIMETER WAVE RADAR SENSOR>BEFORE STARTING ADJUSTMENT
Adjustment:
Click hereEngine / Hybrid System>CRUISE CONTROL>MILLIMETER WAVE RADAR SENSOR>ADJUSTMENT