1VD-FTV ENGINE MECHANICAL CYLINDER HEAD GASKET(w/o DPF) REMOVAL
CAUTION / NOTICE / HINT
- CAUTION:
-
When replacing an injector (including interchanging injectors between cylinders), common rail, cylinder head, or intake manifold, replace the corresponding injection pipes with a new one.
PROCEDURE

 1. PRECAUTION
- NOTICE:
-
After turning the ignition switch off, waiting time may be required before disconnecting the cable from the battery terminal. Therefore, make sure to read the disconnecting the cable from the battery terminal notice before proceeding with work (See page General>INTRODUCTION>REPAIR INSTRUCTION>PRECAUTION).
2.DISCONNECT CABLE FROM NEGATIVE BATTERY TERMINAL
- NOTICE:
-
When disconnecting the cable some systems need to be initialized after the cable is reconnected (See page General>INTRODUCTION>REPAIR INSTRUCTION>INITIALIZATION).
3.REMOVE ENGINE ASSEMBLY
Remove the engine assembly from the vehicle (See page Engine / Hybrid System>1VD-FTV (ENGINE MECHANICAL)>ENGINE ASSEMBLY>REMOVAL).
4.CHECK INJECTOR COMPENSATION CODE
17875
5.REMOVE NO. 1 INTAKE AIR CONNECTOR PIPE
27020
6.REMOVE GENERATOR ASSEMBLY
11452
7.REMOVE NO. 1 ENGINE OIL LEVEL DIPSTICK GUIDE
12262
8.DISCONNECT NO. 2 VENTILATION HOSE
16285
9.DISCONNECT NO. 2 TURBO WATER HOSE
10.DISCONNECT BREATHER PLUG RH
17167
11.REMOVE NO. 1 EXHAUST MANIFOLD HEAT INSULATOR
15474A
12.DISCONNECT NO. 1 OUTLET TURBO OIL HOSE
16027
13.REMOVE NO. 1 TURBO WATER PIPE SUB-ASSEMBLY
17293
14.REMOVE NO. 1 TURBOCHARGER STAY
12201
15.REMOVE NO. 1 VENTILATION TUBE SUB-ASSEMBLY
17201
16.REMOVE NO. 1 TURBOCHARGER SUB-ASSEMBLY WITH EXHAUST MANIFOLD RH
12263
17.DISCONNECT NO. 3 VENTILATION HOSE
18.DISCONNECT BREATHER PLUG LH
16285
19.DISCONNECT NO. 2 TURBO WATER HOSE
17168
20.REMOVE NO. 2 EXHAUST MANIFOLD HEAT INSULATOR
16029
21.REMOVE NO. 3 TURBO WATER PIPE SUB-ASSEMBLY
16355
22.REMOVE FRONT WATER BY-PASS JOINT
16028
23.REMOVE NO. 2 TURBO WATER PIPE SUB-ASSEMBLY
15492
24.DISCONNECT NO. 2 OUTLET TURBO OIL HOSE
17297
25.REMOVE NO. 2 TURBOCHARGER STAY
12202
26.REMOVE NO. 2 VENTILATION TUBE SUB-ASSEMBLY
17208
27.REMOVE NO. 2 TURBOCHARGER SUB-ASSEMBLY WITH EXHAUST MANIFOLD LH
17872
28.REMOVE NO. 1 INTAKE AIR CONNECTOR BRACKET
17368B
29.REMOVE AIR TUBE SUPPORT
16206
30.REMOVE NO. 1 WATER BY-PASS PIPE SUB-ASSEMBLY
25709E
31.REMOVE NO. 4 VACUUM TRANSMITTING PIPE SUB-ASSEMBLY (w/ Intercooler)
12315A
32.REMOVE ENGINE MOUNTING BRACKET RH
12581
33.REMOVE NO. 1 CYLINDER BLOCK INSULATOR
17873
34.REMOVE NO. 2 INTAKE AIR CONNECTOR BRACKET
1723A
35.REMOVE TURBOCHARGER WIRE
25708
36.REMOVE NO. 3 VACUUM TRANSMITTING PIPE SUB-ASSEMBLY
16207
37.REMOVE NO. 2 WATER BY-PASS PIPE SUB-ASSEMBLY
12325A
38.REMOVE ENGINE MOUNTING BRACKET LH
12582
39.REMOVE NO. 2 CYLINDER BLOCK INSULATOR
12502
40.REMOVE COMPRESSOR BRACKET
12158
41.REMOVE STIFFENER INSULATOR RH (w/ Intercooler)
15777
42.DISCONNECT NO. 1 OIL COOLER HOSE
15778
43.DISCONNECT NO. 2 OIL COOLER HOSE
13471
44.REMOVE CRANKSHAFT PULLEY
11348
45.REMOVE TIMING GEAR COVER SPACER (w/ Intercooler)
15650
46.REMOVE OIL FILTER ELEMENT
15609
47.REMOVE OIL FILTER BRACKET SUB-ASSEMBLY
89491
48.REMOVE ENGINE OIL LEVEL SENSOR
12102A
49.REMOVE NO. 2 OIL PAN SUB-ASSEMBLY
15104
50.REMOVE OIL STRAINER SUB-ASSEMBLY
12101
51.REMOVE NO. 1 OIL PAN SUB-ASSEMBLY
11301M
52.REMOVE CAMSHAFT POSITION SENSOR
11301K
53.REMOVE CRANKSHAFT POSITION SENSOR
87120G
54.REMOVE VISCOUS HEATER ASSEMBLY WITH MAGNET CLUTCH (w/ Viscous Heater)
55.REMOVE NO. 1 IDLER PULLEY BRACKET (w/ Viscous Heater)
16321
56.REMOVE WATER INLET
16331A
57.REMOVE THERMOSTAT
11336A
58.REMOVE TIMING GEAR COVER INSULATOR (w/ Intercooler)
16307A
59.REMOVE FAN BRACKET SUB-ASSEMBLY
16630H
60.REMOVE NO. 2 IDLER PULLEY (w/ Viscous Heater)
61.REMOVE NO. 2 IDLER PULLEY BRACKET (w/ Viscous Heater)
16620D
62.REMOVE V-RIBBED BELT TENSIONER ASSEMBLY
16262
63.DISCONNECT INLET WATER HOSE
28100
64.REMOVE STARTER ASSEMBLY
65.REMOVE STARTER HOSE BRACKET
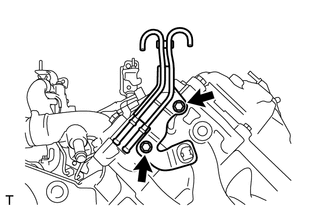
Remove the 2 bolts and starter hose bracket.
31484
66.REMOVE CLUTCH FLEXIBLE HOSE BRACKET (for Manual Transmission)
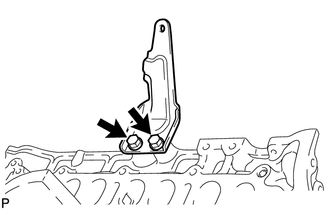
Remove the 2 bolts and clutch flexible hose bracket.
17946
67.REMOVE NO. 2 INTERCOOLER SUPPORT BRACKET
16331
68.REMOVE WATER OUTLET
69.REMOVE WATER OUTLET PIPE
19871
70.REMOVE NO. 1 GLOW PLUG CONNECTOR
19850
71.REMOVE GLOW PLUG ASSEMBLY
25860
72.REMOVE NO. 1 VACUUM SWITCHING VALVE ASSEMBLY (w/ Intercooler)
25706
73.REMOVE NO. 1 VACUUM TRANSMITTING PIPE SUB-ASSEMBLY
11224
74.REMOVE CYLINDER HEAD COVER SILENCER RH (w/ Intercooler)
11225
75.REMOVE CYLINDER HEAD COVER SILENCER LH (w/ Intercooler)
29300
76.REMOVE VACUUM PUMP ASSEMBLY (w/ Intercooler)
23681C
77.REMOVE NOZZLE HOLDER SEAL RH
11201
78.REMOVE CYLINDER HEAD COVER SUB-ASSEMBLY RH
11213
79.REMOVE NOZZLE HOLDER GASKET RH
12270
80.REMOVE OIL SEPARATOR ASSEMBLY
23681C
81.REMOVE NOZZLE HOLDER SEAL LH
11202
82.REMOVE CYLINDER HEAD COVER SUB-ASSEMBLY LH
11214
83.REMOVE NOZZLE HOLDER GASKET LH
23670
84.REMOVE FUEL INJECTOR RH
85.REMOVE FUEL INJECTOR LH
16100
86.REMOVE WATER PUMP ASSEMBLY
11302
87.REMOVE TIMING CHAIN COVER SUB-ASSEMBLY
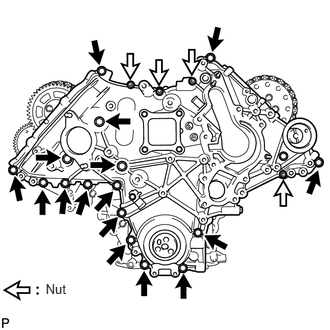
Remove the 4 nuts and 16 bolts.
Using a screwdriver, remove the timing chain cover by prying between the timing chain cover and cylinder head or cylinder block.
- HINT:
-
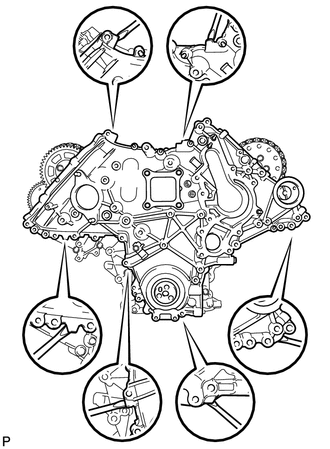
-
Tape the screwdriver tip before use.
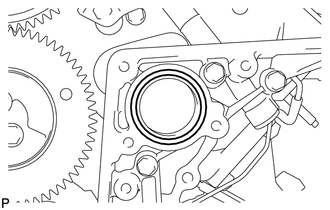
Remove the O-ring from the timing gear case.
88.REMOVE FRONT CRANKSHAFT OIL SEAL
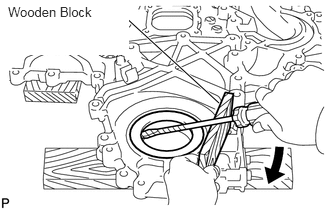
Place the timing chain cover on wooden blocks.
Using a screwdriver and wooden block, pry out the oil seal.
- NOTICE:
-
Do not damage the surface of the oil seal press fit hole.
- HINT:
-
Tape the screwdriver tip before use.
89.SET NO. 1 CYLINDER TO TDC/COMPRESSION
Temporarily install the 2 crankshaft pulley set bolts to the crankshaft.
Turn the crankshaft clockwise to set the No. 1 cylinder to TDC.
With the crankshaft key 45° counterclockwise from the top position, check that the timing marks of the RH and LH camshaft timing gears are aligned. If not as specified, turn the crankshaft 1 revolution (360°) and align the timing marks as shown below.
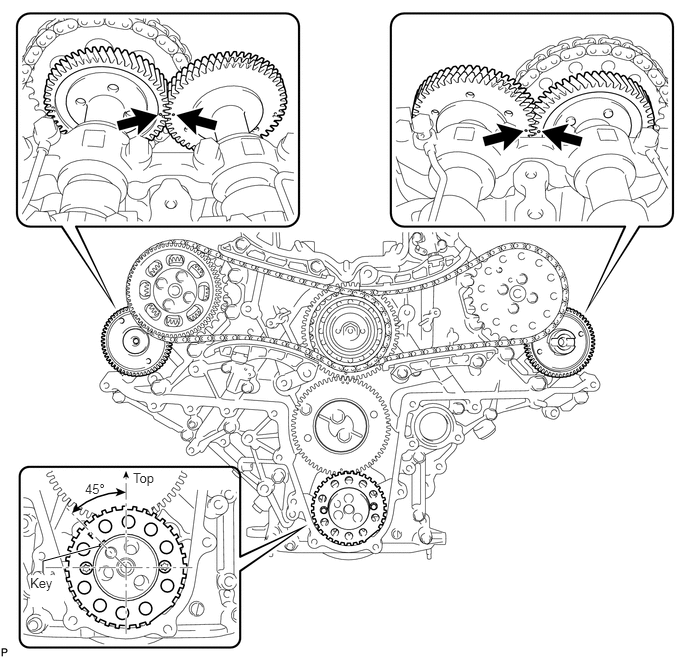
Remove the 2 crankshaft pulley set bolts.
19315
90.REMOVE NO. 1 CRANKSHAFT POSITION SENSOR PLATE
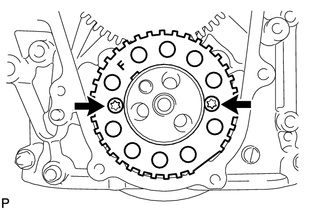
Using a T30 "TORX" wrench, remove the 2 screws and crankshaft position sensor plate.
13522
91.REMOVE PUMP DRIVE SHAFT GEAR
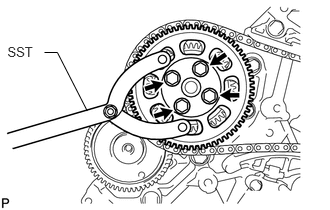
Using SST, hold the pump drive shaft gear.
- SST
- 09960-10010 (09962-01000, 09963-01000)
Remove the 4 bolts and pump drive shaft gear.
13540
92.REMOVE NO. 1 CHAIN TENSIONER ASSEMBLY
Push the tensioner slipper away from the tensioner, and move the stopper plate clockwise to release the lock as shown in A.
Push down the tensioner slipper and move the stopper plate counterclockwise to set the lock as shown in B.
Push the tensioner slipper away from the tensioner, and insert a hexagon wrench into the stopper plate hole as shown in C.
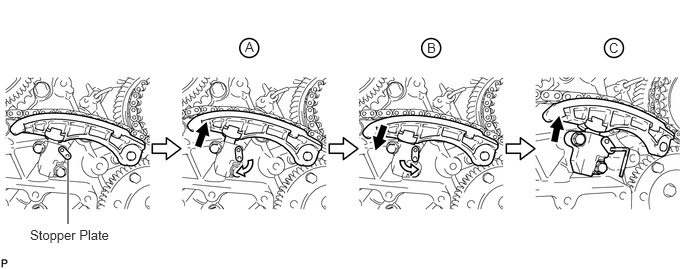
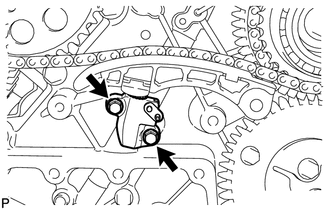
Remove the 2 bolts and No. 1 chain tensioner.
13559
93.REMOVE NO. 1 CHAIN TENSIONER SLIPPER
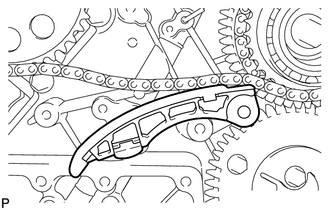
13561
94.REMOVE NO. 1 CHAIN VIBRATION DAMPER
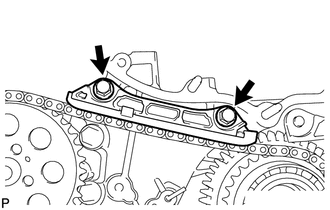
Remove the 2 bolts and No. 1 chain vibration damper.
13523
95.REMOVE NO. 1 CAMSHAFT TIMING SPROCKET AND NO. 1 TIMING CHAIN
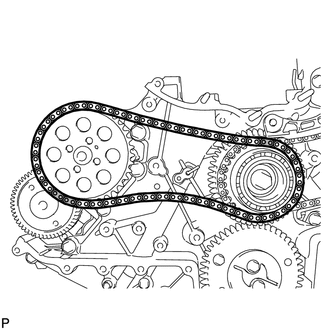
96.REMOVE NO. 2 CHAIN TENSIONER ASSEMBLY
Push the tensioner slipper away from the tensioner, and move the stopper plate clockwise to release the lock as shown in A.
Push up the tensioner slipper and move the stopper plate counterclockwise to set the lock as shown in B.
Push the tensioner slipper away from the tensioner, and insert a hexagon wrench into the stopper plate hole as shown in C.
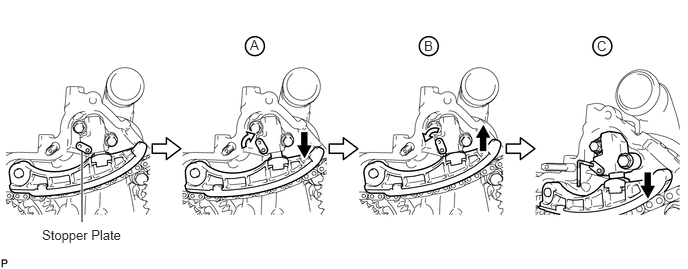
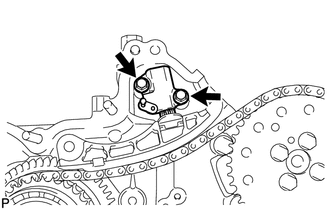
Remove the 2 bolts and No. 2 chain tensioner.
97.REMOVE NO. 2 CHAIN TENSIONER SLIPPER
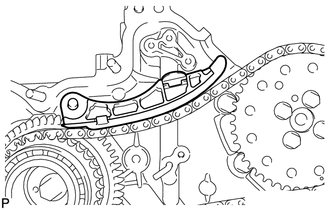
98.REMOVE NO. 2 CHAIN VIBRATION DAMPER
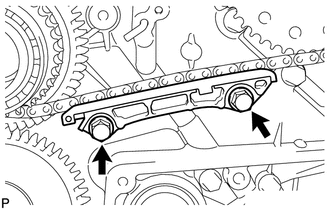
Remove the 2 bolts and No. 2 chain vibration damper.
13529G
99.REMOVE NO. 2 CAMSHAFT TIMING SPROCKET AND NO. 2 TIMING CHAIN
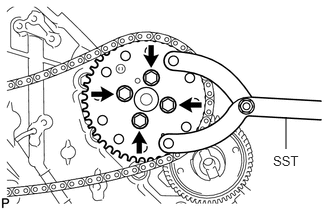
Using SST, hold the No. 2 camshaft timing sprocket.
- SST
- 09960-10010 (09962-01000, 09963-01000)
Remove the 4 bolts, No. 2 camshaft timing sprocket and No. 2 timing chain.
100.REMOVE FUEL SUPPLY PUMP DRIVE GEAR NUT
Using SST, hold the idle gear.
- SST
- 09960-10010 (09962-01000, 09963-00700)
Remove the nut.
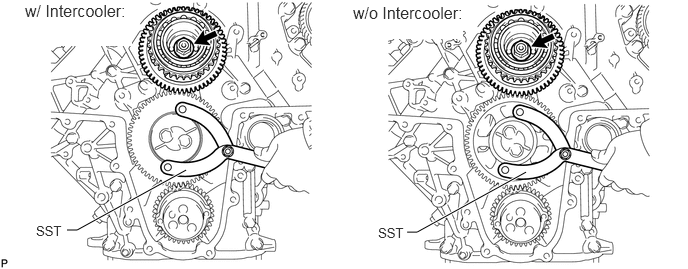
13520A
101.REMOVE IDLE GEAR ASSEMBLY
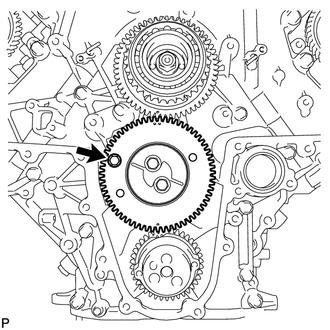
w/ Intercooler:
Using a 8 mm x 1.25 pitch service bolt with a length of 15 mm or more, fix the idle gear in place.
- Torque:
- 13 N*m (133 kgf*cm, 10 ft.*lbf)
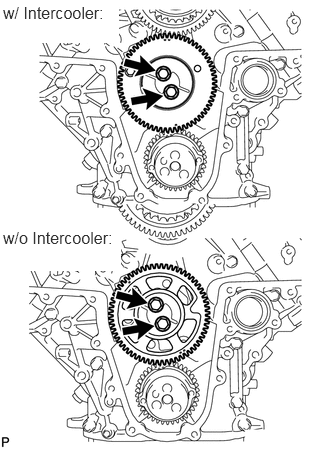
Remove the 2 bolts, idle gear thrust plate and idle gear.
13581
102.REMOVE NO. 1 IDLE GEAR SHAFT
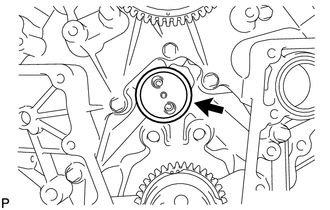
13613
103.REMOVE FUEL SUPPLY PUMP DRIVE GEAR
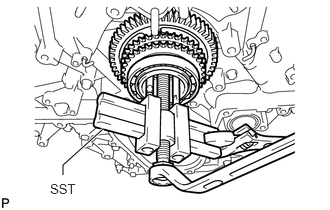
Using SST, remove the fuel supply pump drive gear.
- SST
- 09950-50013 (09951-05010, 09952-05010, 09953-05020, 09954-05031)
23243B
104.REMOVE FUEL PUMP MOTOR WIRE
22100
105.REMOVE FUEL SUPPLY PUMP ASSEMBLY
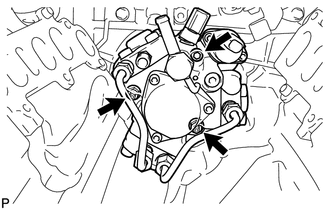
Using a 6 mm hexagon wrench, remove the hexagon bolt. Then remove the 2 nuts and fuel supply pump.
Remove the O-ring.
11248
106.REMOVE V-BANK SILENCER
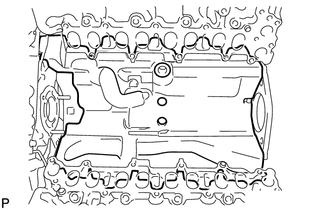
11301
107.REMOVE TIMING GEAR CASE SUB-ASSEMBLY
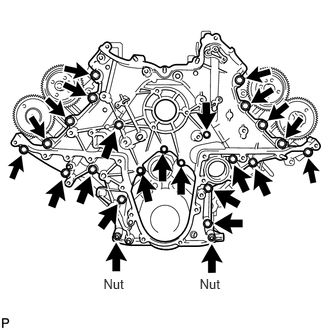
Remove the 22 bolts, 2 nuts and timing gear case shown in the illustration.
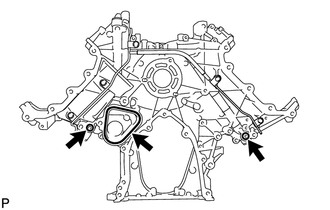
Remove the 2 O-rings and timing gear case gasket.
13511
108.REMOVE NO. 1 AND NO. 2 CAMSHAFTS
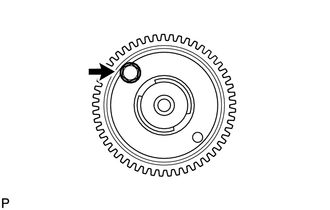
Using a 6 mm x 1.0 pitch service bolt with a length of 16 mm or more, fix the No. 1 camshaft in place.
- Torque:
- 8.0 N*m (82 kgf*cm, 71 in.*lbf)
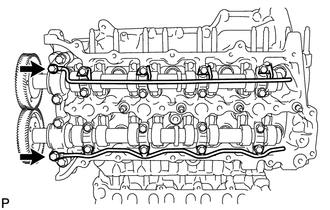
Loosen the 2 union bolts.
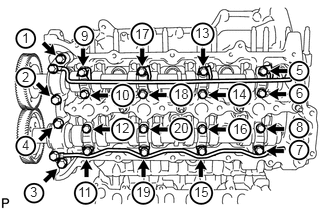
Uniformly loosen and remove the 20 bolts in the sequence shown in the illustration.
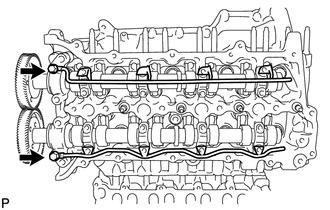
Remove the 2 union bolts and No. 1 and No. 2 oil feed pipes.
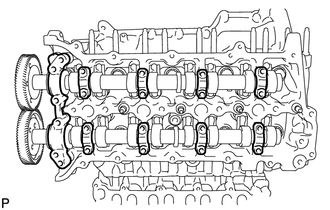
Remove the 8 No. 3 camshaft bearing caps and No. 1 camshaft bearing cap.
- HINT:
-
Be sure to arrange the removed parts for each installation position separately.
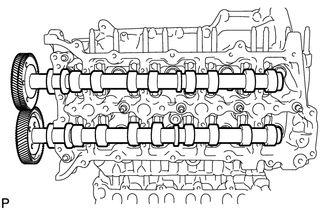
Remove the No. 1 and No. 2 camshafts.
13053
109.REMOVE NO. 3 AND NO. 4 CAMSHAFTS
Using an 6 mm x 1.0 pitch service bolt with a length of 16 mm or more, fix the No. 4 camshaft in place.
- Torque:
- 8.0 N*m (82 kgf*cm, 71 in.*lbf)
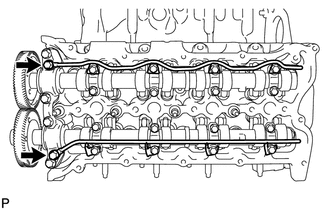
Loosen the 2 union bolts.
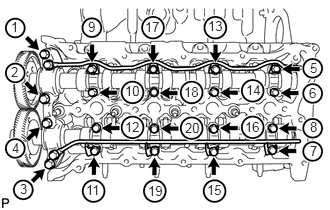
Uniformly loosen and remove the 20 bolts in the sequence shown in the illustration.
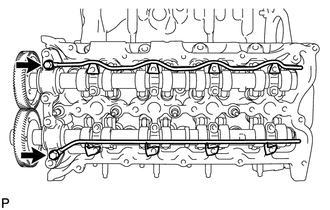
Remove the 2 union bolts, and No. 3 and No. 4 oil feed pipes.
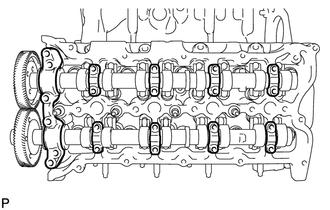
Remove the 8 No. 3 camshaft bearing caps and No. 4 camshaft bearing cap.
- HINT:
-
Be sure to arrange the removed parts for each installation position separately.
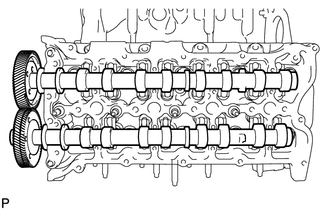
Remove the No. 3 and No. 4 camshafts.
110.REMOVE NO. 2 CAMSHAFT BEARING CAP
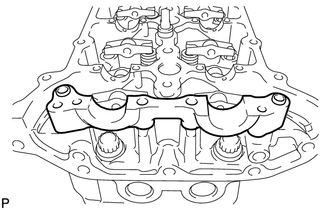
111.REMOVE NO. 5 CAMSHAFT BEARING CAP
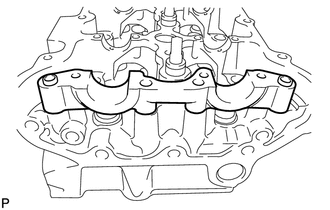
13801
112.REMOVE NO. 1 VALVE ROCKER ARM
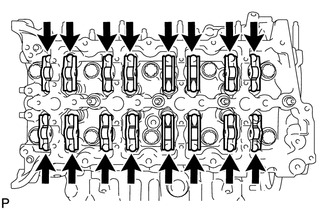
Remove the 16 No. 1 valve rocker arms.
- HINT:
-
Be sure to arrange the removed parts for each installation position separately.
113.REMOVE NO. 2 VALVE ROCKER ARM
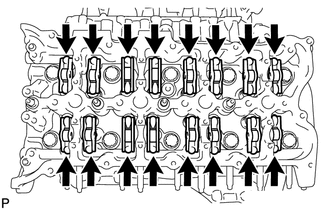
Remove the 16 No. 2 valve rocker arms.
- HINT:
-
Be sure to arrange the removed parts for each installation position separately.
13750
114.REMOVE NO. 1 VALVE LASH ADJUSTER ASSEMBLY
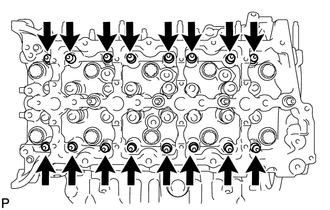
Remove the 16 No. 1 valve lash adjusters.
- HINT:
-
Be sure to arrange the removed parts for each installation position separately.
115.REMOVE NO. 2 VALVE LASH ADJUSTER ASSEMBLY
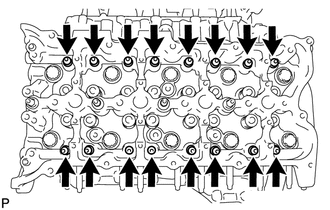
Remove the 16 No. 2 valve lash adjusters.
- HINT:
-
Be sure to arrange the removed parts for each installation position separately.
11101
116.REMOVE CYLINDER HEAD SUB-ASSEMBLY RH
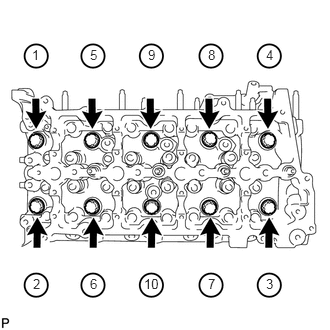
Uniformly loosen and remove the 10 bolts and 10 spacers in the sequence shown in the illustration. Then remove the cylinder head.
- NOTICE:
- ·
Be careful not to drop washers into the cylinder head.
·Head warpage or cracking could result from removing bolts in an incorrect order.
- HINT:
-
Be sure to arrange the removed parts for each installation position separately.
11102
117.REMOVE CYLINDER HEAD SUB-ASSEMBLY LH
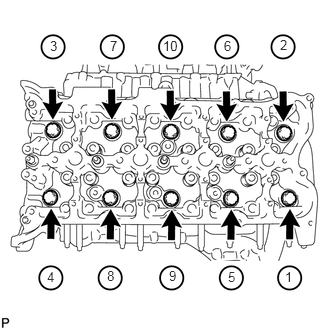
Uniformly loosen and remove the 10 bolts and 10 spacers in the sequence shown in the illustration. Then remove the cylinder head.
- NOTICE:
- ·
Be careful not to drop washers into the cylinder head.
·Head warpage or cracking could result from removing bolts in an incorrect order.
- HINT:
-
Be sure to arrange the removed parts for each installation position separately.
11115
118.REMOVE NO. 1 CYLINDER HEAD GASKET
11116
119.REMOVE NO. 2 CYLINDER HEAD GASKET