P510 HYBRID TRANSMISSION / TRANSAXLE HYBRID VEHICLE TRANSAXLE INSTALLATION
PROCEDURE

 30900H
1.INSTALL TRANSAXLE HSG AND CASE WITH HEAD STRAIGHT SCREW PLUG
Install a new gasket and the transaxle HSG and case with head straight screw plug to the hybrid vehicle transaxle assembly.
- Torque:
- 39 N*m (400 kgf*cm, 29 ft.*lbf)
2.INSTALL WIRE HARNESS CLAMP BRACKET
Install the wire harness clamp bracket to the hybrid vehicle transaxle assembly with the bolt.
- Torque:
- 13 N*m (130 kgf*cm, 9 ft.*lbf)
33829
3.INSTALL TRANSMISSION CONTROL CABLE SUPPORT
Install the 2 transmission control cable supports to the hybrid vehicle transaxle assembly with the 3 bolts.
- Torque:
- 12 N*m (122 kgf*cm, 9 ft.*lbf)
G1143
4.INSTALL MOTOR CABLE BRACKET
Install the motor cable bracket to the transmission control cable support with the bolt.
- Torque:
- 17 N*m (173 kgf*cm, 13 ft.*lbf)
35151J
5.INSTALL AUTOMATIC TRANSMISSION CASE COVER
- HINT:
-
Perform this procedure only when replacement of the automatic transmission case cover is necessary.
Install the automatic transmission case cover to the hybrid vehicle transaxle assembly with the 2 bolts.
- Torque:
- 13 N*m (132 kgf*cm, 10 ft.*lbf)
89451A
6.INSTALL SHIFT LEVER POSITION SENSOR
- HINT:
-
Perform this procedure only when replacement of the automatic transmission case cover is necessary.
Install the shift lever position sensor to the manual valve shaft.
- NOTICE:
- ·
Do not reuse the shift lever position sensor if it has been dropped or subjected to a severe impact.
·Do not allow moisture to adhere to the connector terminal.
Temporarily install the 2 bolts.
Install a new lock plate and tighten the nut.
- Torque:
- 6.9 N*m (70 kgf*cm, 61 in.*lbf)
Temporarily install the control shaft lever to the manual valve shaft.
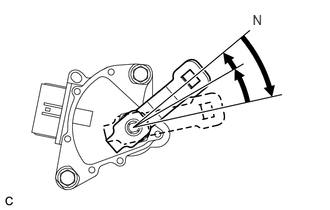
Turn the lever clockwise until it stops, then turn it counterclockwise 2 notches.
Remove the control shaft lever from the manual valve shaft.
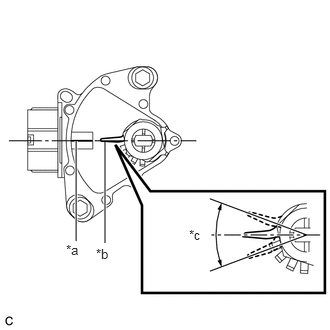
Align the protruding part with the neutral basic line.
| *a | Neutral Basic Line |
| *b | Protruding |
| *c | Range of Play |
- NOTICE:
-
There is play on the nut stopper side (protruding part). Align the center point of the range of the play with the neutral basic line.
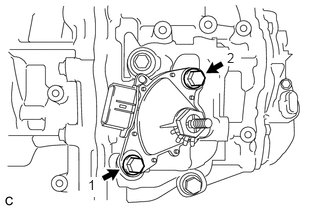
Tighten the 2 bolts in the order shown in the illustration.
- Torque:
- 13 N*m (133 kgf*cm, 10 ft.*lbf)
Using a screwdriver, secure the nut with the lock plate.
35572D
7.INSTALL TRANSMISSION CONTROL SHAFT LEVER
Install the transmission control shaft lever, washer, and nut to the manual valve shaft.
- Torque:
- 13 N*m (130 kgf*cm, 9 ft.*lbf)
33823
8.INSTALL NO. 1 TRANSMISSION CONTROL CABLE BRACKET
Install the No. 1 transmission control cable bracket to the hybrid vehicle transaxle assembly with the 2 bolts.
- Torque:
- 12 N*m (122 kgf*cm, 9 ft.*lbf)
G1148
9.INSTALL MOTOR CABLE
G1250
10.INSTALL MOTOR COOLING PIPE ASSEMBLY
Install a new O-ring and union to the hybrid vehicle transaxle assembly.
- Torque:
- 27 N*m (275 kgf*cm, 20 ft.*lbf)
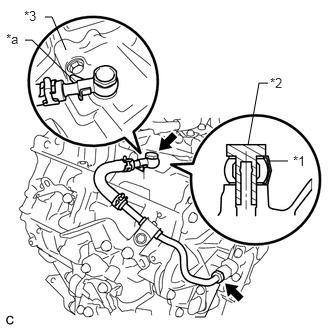
Temporarily tighten the motor cooling pipe assembly to the hybrid vehicle transaxle assembly with a new gasket and union bolt.
| *1 | Gasket |
| *2 | Union Bolt |
| *3 | Transaxle Case |
| *a | Stopper |
Install the oil cooler tube clamp and motor cooling pipe assembly to the No. 1 transmission control cable bracket with the bolt.
- Torque:
- 12 N*m (117 kgf*cm, 8 ft.*lbf)
Tighten the union bolt with the motor cooling pipe assembly stopper pressed against the transaxle case.
- Torque:
- 35 N*m (357 kgf*cm, 26 ft.*lbf)
Using a union nut wrench, connect the motor cooling pipe assembly to the union.
- Torque:
- 34 N*m (350 kgf*cm, 25 ft.*lbf)
- NOTICE:
-
Use the formula to calculate special torque values for situations where the union nut wrench is combined with a torque wrench (See page General>INTRODUCTION>REPAIR INSTRUCTION>PRECAUTION).
- HINT:
-
Turn the flare nut while holding the union.
30900
11.INSTALL HYBRID VEHICLE TRANSAXLE ASSEMBLY
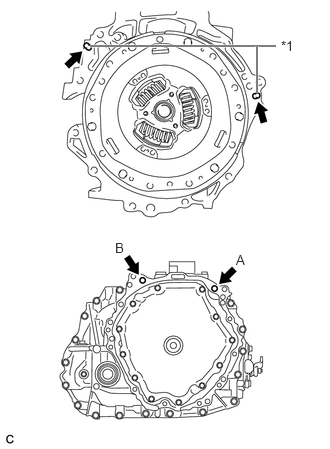
Make sure that the knock pins are installed to the engine.
| *1 | Knock Pin |
Temporarily install the hybrid vehicle transaxle assembly to the engine with the 2 bolts.
- HINT:
-
Temporarily tighten bolt B first.
Fully tighten the 2 bolts in the order of A and B.
- Torque:
- 64 N*m (653 kgf*cm, 47 ft.*lbf)
- NOTICE:
- ·
Make sure that the wire harness or similar items are not pinched between the contact surfaces.
·Do not forcibly pry on the hybrid vehicle transaxle.
·Make sure to align the hybrid vehicle transaxle so that the input shaft of the hybrid vehicle transaxle will be inserted straight into the inner splines of the transmission input damper.
·Do not apply grease either to the spline or to the input shaft.
·When inserting the input shaft of the hybrid vehicle transaxle into the inner splines of the transmission input damper, do not shake the hybrid vehicle transaxle excessively.
·When mounting the hybrid vehicle transaxle to the engine, make sure to securely fit the knock pins into the knock holes.
·When tightening the bolts, be sure that the mating surfaces of the engine and the hybrid vehicle transaxle assembly are in close contact with one another.
- Bolt Length:
45 mm (1.77 in.)
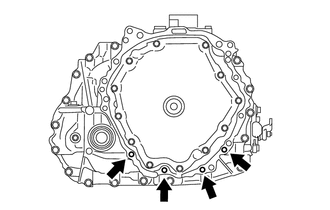
Install the 4 bolts.
- Torque:
- 30 N*m (301 kgf*cm, 22 ft.*lbf)
- Bolt Length:
45 mm (1.77 in.)
Engage the claw and install the flywheel housing side cover to the engine.
Install the starter hole heat insulator to the engine with the 2 bolts.
- Torque:
- 30 N*m (301 kgf*cm, 22 ft.*lbf)
- Bolt Length:
45 mm (1.77 in.)
Install the drive shaft heat insulator bracket to the engine with the 2 bolts.
- Torque:
- 30 N*m (301 kgf*cm, 22 ft.*lbf)
- Bolt Length:
45 mm (1.77 in.)
Connect the clamp to the drive shaft heat insulator bracket.
Install the drive shaft heat insulator sub-assembly to the engine and drive shaft heat insulator bracket with the bolt and nut.
- Torque:
- 18 N*m (179 kgf*cm, 13 ft.*lbf)
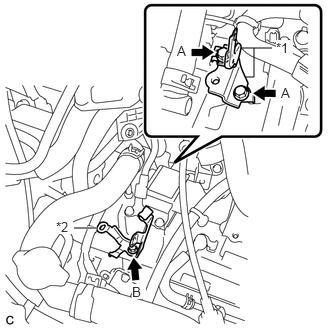
Install the 2 wire harness clamp brackets and transmission control cable clamp to the hybrid vehicle transaxle assembly with the 3 bolts.
| *1 | Wire Harness Clamp Bracket |
| *2 | Transmission Control Cable Clamp |
- Torque:
- Bolt A : 13 N*m (130 kgf*cm, 9 ft.*lbf)
- Bolt B : 12 N*m (122 kgf*cm, 9 ft.*lbf)
12325A
12.INSTALL ENGINE MOUNTING BRACKET LH
Clean and degrease the bolts and bolt holes.
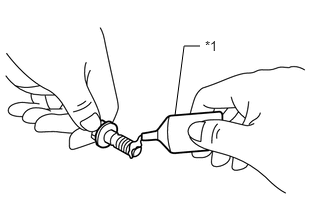
Apply adhesive to 4 bolts.
| *1 | Adhesive |
- NOTICE:
-
Apply adhesive to the bolts and tighten them within 3 minutes of application.
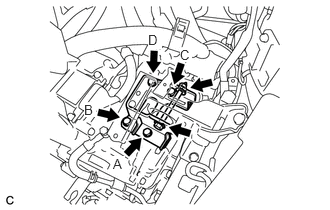
Temporarily install the engine mounting bracket LH to the hybrid vehicle transaxle assembly with the 4 bolts.
- HINT:
-
Temporarily tighten bolt D first.
Fully tighten the 4 bolts in the order of A, B, C and D.
- Torque:
- 64 N*m (653 kgf*cm, 47 ft.*lbf)
Install the engine mounting insulator LH to the engine mounting bracket LH with the through bolt and nut.
- Torque:
- 52 N*m (530 kgf*cm, 38 ft.*lbf)
- NOTICE:
-
Turn the through bolt while holding the nut.
12364A
13.INSTALL ENGINE LATERAL CONTROL ROD
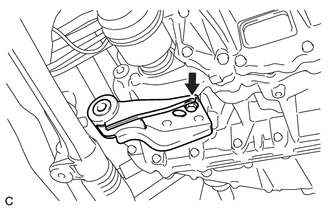
Temporarily tighten the engine lateral control rod to the hybrid vehicle transaxle assembly with the bolt.
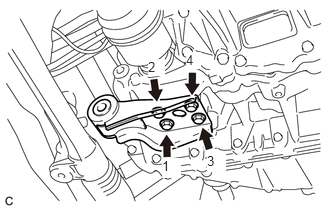
Tighten the 4 bolts in the order shown in the illustration.
- Torque:
- 45 N*m (459 kgf*cm, 33 ft.*lbf)
51201
14.INSTALL FRONT SUSPENSION CROSSMEMBER SUB-ASSEMBLY
12281A
15.REMOVE NO. 1 ENGINE HANGER
25620
16.INSTALL EGR VALVE ASSEMBLY
25612
17.INSTALL NO. 2 EGR PIPE
18.INSTALL FRONT DRIVE SHAFT ASSEMBLY
17410
19.INSTALL FRONT EXHAUST PIPE ASSEMBLY
45025D
20.INSTALL NO. 1 STEERING COLUMN HOLE COVER SUB-ASSEMBLY
45209
21.INSTALL STEERING SLIDING YOKE SUB-ASSEMBLY
45259A
22.INSTALL COLUMN HOLE COVER SILENCER SHEET
23.INSTALL WIRE HARNESS
Connect the 7 clamps, 4 connectors and install the wire harness to the hybrid vehicle transaxle assembly with the 3 bolts.
- Torque:
- 13 N*m (130 kgf*cm, 9 ft.*lbf)
Connect the 4 clamps and No. 2 engine wire.
33820B
24.INSTALL TRANSMISSION CONTROL CABLE ASSEMBLY
Connect the transmission control cable assembly to the transmission control cable clamp and transmission control cable support.
Connect the transmission control cable assembly to the No. 1 transmission control cable bracket with a new clip.
Install the transmission control cable assembly to the transmission control shaft lever with the nut.
- Torque:
- 12 N*m (122 kgf*cm, 9 ft.*lbf)
G9110
25.INSTALL INVERTER BRACKET ASSEMBLY
G9200
26.INSTALL INVERTER WITH CONVERTER ASSEMBLY
55701J
27.INSTALL OUTER COWL TOP PANEL SUB-ASSEMBLY (for LHD)
55701J
28.INSTALL OUTER COWL TOP PANEL SUB-ASSEMBLY (for RHD)
55815E
29.INSTALL FRONT NO. 1 VENTILATOR SEAL (for LHD)
55815E
30.INSTALL FRONT NO. 1 VENTILATOR SEAL (for RHD)
55735B
31.INSTALL FRONT AIR SHUTTER SEAL (for LHD)
55735B
32.INSTALL FRONT AIR SHUTTER SEAL (for RHD)
55722C
33.INSTALL INNER COWL TOP TO COWL BRACE (for LHD)
55722C
34.INSTALL INNER COWL TOP TO COWL BRACE (for RHD)
35.INSTALL WINDSHIELD WIPER MOTOR AND LINK ASSEMBLY
53301
36.INSTALL HOOD SUB-ASSEMBLY
Install the hood sub-assembly to the hood hinge assembly LH and hood hinge assembly RH with the 4 bolts.
- Torque:
- 13 N*m (133 kgf*cm, 10 ft.*lbf)
53301
37.INSPECT HOOD SUB-ASSEMBLY
53301
38.ADJUST HOOD SUB-ASSEMBLY
G3834
39.INSTALL SERVICE PLUG GRIP
40.ADD COOLANT (for Engine)
41.ADD COOLANT (for Inverter)
42.ADD HYBRID TRANSAXLE FLUID
43.INSPECT HYBRID TRANSAXLE FLUID
44.INSPECT FOR COOLANT LEAK (for Engine)
45.INSPECT FOR COOLANT LEAK (for Inverter)
46.INSPECT FOR HYBRID TRANSAXLE FLUID LEAK
47.INSPECT FOR EXHAUST GAS LEAK
48.INSTALL FRONT WHEELS
49.INSPECT SHIFT LEVER POSITION SENSOR POSITION
50.ADJUST SHIFT LEVER POSITION SENSOR POSITION
51.INSPECT SHIFT LEVER POSITION
52.ADJUST SHIFT LEVER POSITION
51441C
53.INSTALL ENGINE UNDER COVER RH
51442C
54.INSTALL ENGINE UNDER COVER LH
55.INSPECT AND ADJUST FRONT WHEEL ALIGNMENT
56.CHECK ABS SPEED SENSOR SIGNAL