N04C-VQ ENGINE CONTROL ECD SYSTEM Black Smoke Emitted
WIRING DIAGRAM
Refer to DTC P0087 for fuel pressure sensor circuit (Click hereEngine / Hybrid System>N04C-VQ (ENGINE CONTROL)>ECD SYSTEM>P0087).
Refer to DTC P0095 for intake air temperature sensor (after turbocharged) circuit (Click hereEngine / Hybrid System>N04C-VQ (ENGINE CONTROL)>ECD SYSTEM>P0095).
Refer to DTC P0107 for manifold absolute pressure sensor circuit (Click hereEngine / Hybrid System>N04C-VQ (ENGINE CONTROL)>ECD SYSTEM>P0107).
Refer to DTC P0112 for intake air temperature sensor circuit (Click hereEngine / Hybrid System>N04C-VQ (ENGINE CONTROL)>ECD SYSTEM>P0112).
Refer to DTC P0115 for engine coolant temperature sensor circuit (Click hereEngine / Hybrid System>N04C-VQ (ENGINE CONTROL)>ECD SYSTEM>P0115).
Refer to DTC P0201 for injector circuit (Click hereEngine / Hybrid System>N04C-VQ (ENGINE CONTROL)>ECD SYSTEM>P0201).
Refer to DTC P0335 for crankshaft position sensor circuit (Click hereEngine / Hybrid System>N04C-VQ (ENGINE CONTROL)>ECD SYSTEM>P0335).
Refer to DTC P2120 for accelerator pedal position sensor circuit (Click hereEngine / Hybrid System>N04C-VQ (ENGINE CONTROL)>ECD SYSTEM>P2120).
CAUTION / NOTICE / HINT
- NOTICE:
- ·
After replacing the ECM, the new ECM needs registration (Click hereEngine / Hybrid System>N04C-VQ (ENGINE CONTROL)>ECD SYSTEM>REGISTRATION)and initialization (Click hereEngine / Hybrid System>N04C-VQ (ENGINE CONTROL)>ECD SYSTEM>INITIALIZATION ).
·After replacing the injection or supply pump assembly, the ECM needs initialization (Click hereEngine / Hybrid System>N04C-VQ (ENGINE CONTROL)>ECD SYSTEM>INITIALIZATION).
·After replacing an injector assembly, the ECM needs registration (Click hereEngine / Hybrid System>N04C-VQ (ENGINE CONTROL)>ECD SYSTEM>REGISTRATION).
- HINT:
-
Specified values in the following troubleshooting flowchart are for reference only. Variations in the Data List values may occur depending on the measuring conditions or the vehicle's age. Do not assume the vehicle to be normal when the Data List outputs standard values. There may be concealed factors causing the malfunction.
PROCEDURE
Connect the GTS to the DLC3.
Turn the ignition switch to ON.
Turn the GTS on.
Enter the following menus: Powertrain / Engine and ECT / Trouble Codes.
Read the DTCs.
- Result:
Result Proceed to DTC is not output A DTCs related to the engine B
A
B
Connect the GTS to the DLC3.
Start the engine.
Turn the GTS on.
Enter the following menus: Powertrain / Engine and ECT / Data List.
Enter the following menus in order and read the values.
Injection Volume
Injection Feedback Val #1, #2, #3 and #4
- Standard:
GTS Display Condition* Reference Value Injection Volume Idling (No engine load) 5.0 to 15.0 mm3/st Injection Feedback Val #1 Idling (No engine load) -2.0 to 2.0 mm3/st Injection Feedback Val #2 Idling (No engine load) -2.0 to 2.0 mm3/st Injection Feedback Val #3 Idling (No engine load) -2.0 to 2.0 mm3/st Injection Feedback Val #4 Idling (No engine load) -2.0 to 2.0 mm3/st
- HINT:
-
*: If no idling conditions are specified, the shift lever should be in the neutral position, and the A/C switch and all accessory switches should be off.
- Result:
Proceed to OK NG
OK
NG
- HINT:
-
If the exhaust gas contains excessive black smoke, perform the following operations:
Accelerate the engine speed to the maximum speed with no load 20 times.
Check for black smoke in the exhaust gas.
- Result:
Result Proceed to Black smoke is not present A Black smoke remains in the exhaust gas B
- HINT:
-
Soot deposits in the exhaust system may cause excessive black smoke.
A
B
Inspect the engine condition (Click hereEngine / Hybrid System>N04C-VQ (EMISSION CONTROL)>EMISSION CONTROL SYSTEM>ON-VEHICLE INSPECTION).
- Result:
Proceed to OK NG
OK
NG
Inspect the exhaust retarder assembly.
- Result:
Proceed to OK NG
OK
NG
Inspect the EGR valve assembly (Click hereEngine / Hybrid System>N04C-VQ (EMISSION CONTROL)>EMISSION CONTROL SYSTEM>ON-VEHICLE INSPECTION).
- Result:
Proceed to OK NG
OK
NG
Check the turbocharger sub-assembly (Click hereEngine / Hybrid System>N04C-VQ (INTAKE)>INTAKE SYSTEM>ON-VEHICLE INSPECTION).
- Result:
Proceed to OK NG
OK
NG
Connect the GTS to the DLC3.
Start the engine.
Turn the GTS on.
Enter the following menus: Powertrain / Engine and ECT / Data List.
Enter the following menus in order and read the values.
Fuel Press
Injection Volume
Main Injection Period
Pilot 2 Injection Period
Injection Feedback Val #1, #2, #3 and #4
- Standard:
GTS Display Condition* Reference Value Fuel Press Idling 20000 to 30000 kPa Injection Volume Idling 5.0 to 15.0 mm3/st Main Injection Period Idling 450 to 800 μs Pilot 2 Injection Period Idling 500 to 600 μs Injection Feedback Val #1 Idling -2.0 to 2.0 mm3/st Injection Feedback Val #2 Idling -2.0 to 2.0 mm3/st Injection Feedback Val #3 Idling -2.0 to 2.0 mm3/st Injection Feedback Val #4 Idling -2.0 to 2.0 mm3/st
- HINT:
-
If no idling conditions are specified, the shift lever should be in the neutral position, and the A/C switch and all accessory switches should be off.
- Result:
Result Proceed to Within reference value A One of Injection Feedback Val #1 to #4 is not within reference value B Other result C
A
B
C
Check the cylinder compression pressure (Click hereEngine / Hybrid System>N04C-VQ (ENGINE MECHANICAL)>ENGINE>ON-VEHICLE INSPECTION).
- Result:
Proceed to OK NG
OK
NG
Check the wire harness between the injector assembly and injector driver assembly (IJ terminal).
Disconnect the injector assembly connectors.
Disconnect the injector driver assembly connector.
Measure the resistance according to the value(s) in the table below.
- Standard Resistance:
Tester Connection Condition Specified Condition i1-2 - B98-1 (IJ1+) Always Below 1 Ω i2-2 - B98-6 (IJ2+) Always Below 1 Ω i3-2 - B98-5 (IJ3+) Always Below 1 Ω i4-2 - B95-3 (IJ4+) Always Below 1 Ω i1-1 - B95-6 (IJ1-) Always Below 1 Ω i2-1 - B95-4 (IJ2-) Always Below 1 Ω i3-1 - B95-2 (IJ3-) Always Below 1 Ω i4-1 - B95-5 (IJ4-) Always Below 1 Ω i1-2 or B98-1 (IJ1+) - Body ground Always 10 kΩ or higher i2-2 or B98-6 (IJ2+) - Body ground Always 10 kΩ or higher i3-2 or B98-5 (IJ3+) - Body ground Always 10 kΩ or higher i4-2 or B95-3 (IJ4+) - Body ground Always 10 kΩ or higher i1-1 or B95-6 (IJ1-) - Body ground Always 10 kΩ or higher i2-1 or B95-4 (IJ2-) - Body ground Always 10 kΩ or higher i3-1 or B95-2 (IJ3-) - Body ground Always 10 kΩ or higher i4-1 or B95-5 (IJ4-) - Body ground Always 10 kΩ or higher
- Result:
Proceed to OK NG
OK
NG
Connect the GTS to the DLC3.
Start the engine.
Turn the GTS on.
Enter the following menus: Powertrain / Engine and ECT / Active Test / Control the Cylinder #1, #2, #3 and #4 Fuel Cut.
Check the four cylinders in sequence to identify any faulty cylinders by performing the power-balance inspection.
- Result:
Result Proceed to Engine Idling becomes unstable A Engine Idling does not change B
- HINT:
- ·
If the engine idle does not change when an injector is disabled, the cylinder being tested is malfunctioning.
·If the cylinder being tested is normal, there will be a significant change of idle speed when the fuel injection is stopped for that cylinder.
A
B
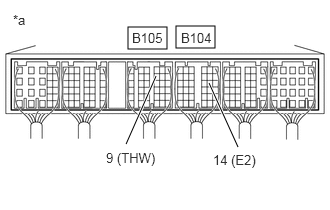
Start the engine.
Measure the voltage of the ECM connector.
- Standard Voltage:
Tester Connection Condition Specified Condition B105-9 (THW) - B104-14 (E2) Idling, engine coolant temperature between 60 and 120°C (140 and 248°F) 0.2 to 1.0 V
| *a | Component with harness connected
(ECM) |
- Result:
Proceed to OK NG
OK
NG
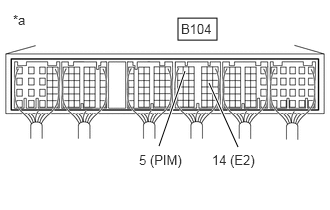
Turn the ignition switch to ON.
Measure the voltage according to the value(s) in the table below.
- Standard Voltage:
Tester Connection Condition Specified Condition B104-5 (PIM) - B104-14 (E2) Applied negative pressure of 93 kPa (700 mmHg, 27.5 in.Hg) 0.25 to 0.4 V B104-5 (PIM) - B104-14 (E2) Applied positive pressure of 150 kPa (1125 mmHg, 44 in.Hg) 1.0 to 1.4 V
| *a | Component with harness connected
(ECM) |
- Result:
Proceed to OK NG
OK
NG
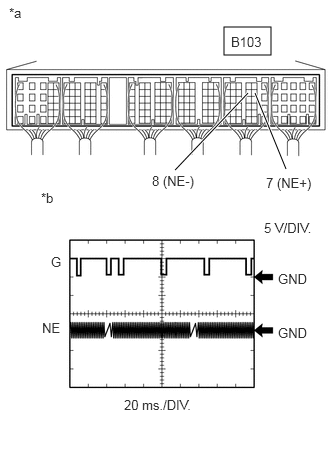
While idling the engine, check the waveform between the specified terminals of the ECM connector using an oscilloscope.
- Standard:
Tester Connection Specified Condition B103-7 (NE+) - B103-8 (NE-) Correct waveform appears as shown
Tool Setting 5 V/DIV., 20 ms./DIV. Condition Idling with warm engine
- HINT:
-
The waveform varies depending on the engine speed.
| *a | Component with harness connected
(ECM) |
| *b | G and NE Signal Waveform |
- Result:
Proceed to OK NG
OK
NG
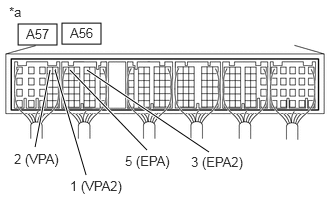
Turn the ignition switch to ON.
Measure the voltage according to the value(s) in the table below.
- Standard Voltage:
Tester Condition Accelerator Pedal Condition Specified Condition A57-2 (VPA) - A56-5 (EPA) Released 0.6 to 1.0 V Depressed 2.8 to 3.6 V A57-1 (VPA2) - A56-3 (EPA2) Released 1.4 to 1.8 V Depressed 3.6 to 4.4 V
| *a | Component with harness connected
(ECM) |
- Result:
Proceed to OK NG
OK
NG
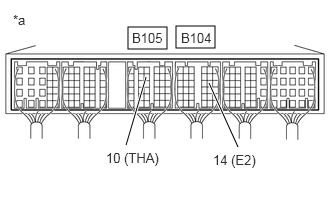
Start the engine.
Measure the voltage according to the value(s) in the table below.
- Standard Voltage:
Tester Connection Condition Specified Condition B105-10 (THA) - B104-14 (E2) Idling, intake air temperature at 0 to 80°C (32 to 176°F) 0.5 to 3.4 V
| *a | Component with harness connected
(ECM) |
- Result:
Proceed to OK NG
OK
NG
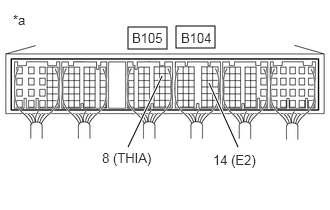
Start the engine.
Measure the voltage according to the value(s) in the table below.
- Standard Voltage:
Tester Connection Condition Specified Condition B105-8 (THIA) - B104-14 (E2) Idling, intake air temperature at 0 to 80°C (32 to 176°F) 1.0 to 4.4 V
| *a | Component with harness connected
(ECM) |
- Result:
Proceed to OK NG
OK
NG
Start the engine.
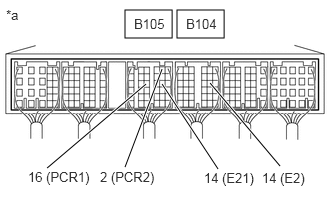
Measure the voltage according to the value(s) in the table below.
- Standard Voltage:
Tester Connection Condition Specified Condition B105-16 (PCR1) - B104-14 (E2) Idling 1.7 to 2.2 V B105-2 (PCR2) - B105-14 (E21) Idling 1.2 to 1.6 V
| *a | Component with harness connected
(ECM) |
- Result:
Proceed to OK NG
OK
NG
Inspect the common rail assembly (fuel pressure sensor) (Click hereEngine / Hybrid System>N04C-VQ (FUEL)>COMMON RAIL>INSPECTION).
- Result:
Proceed to OK NG
OK
NG
Disconnect the ECM connector.
Disconnect the fuel pressure sensor connector.
Measure the resistance according to the value(s) in the table below.
- Standard Resistance:
Tester Connection Condition Specified Condition B105-16 (PCR1) - B93-2 (PCR1) Always Below 1 Ω B104-13 (VC) - B93-1 (VC1) Always Below 1 Ω B104-14 (E2) - B93-3 (E1) Always Below 1 Ω B105-2 (PCR2) - B93-5 (PCR2) Always Below 1 Ω B105-13 (VC2) - B93-6 (VC2) Always Below 1 Ω B105-14 (E21) - B93-4 (E2) Always Below 1 Ω B105-16 (PCR1) or B93-2 (PCR1) - Body ground Always 10 kΩ or higher B104-13 (VC) or B93-1 (VC1) - Body ground Always 10 kΩ or higher B105-2 (PCR2) or B93-5 (PCR2) - Body ground Always 10 kΩ or higher B105-13 (VC2) or B93-6 (VC2) - Body ground Always 10 kΩ or higher B104-14 (E2) or B93-3 (E1) - Other terminals Always 10 kΩ or higher B105-14 (E21) or B93-4 (E2) - Other terminals Always 10 kΩ or higher
- Result:
Proceed to OK NG
OK
NG
Replace the ECM (Click hereEngine / Hybrid System>N04C-VQ (ENGINE CONTROL)>ECM>REMOVAL).
- NOTICE:
-
After replacing the ECM, the new ECM needs registration (Click hereEngine / Hybrid System>N04C-VQ (ENGINE CONTROL)>ECD SYSTEM>REGISTRATION) and initialization (Click hereEngine / Hybrid System>N04C-VQ (ENGINE CONTROL)>ECD SYSTEM>INITIALIZATION).
Check the volume of black smoke in the exhaust gas.
- OK:
Black smoke is not present.
- Result:
Proceed to OK NG
OK
NG
Inspect the intake air temperature sensor (Click hereEngine / Hybrid System>N04C-VQ (ENGINE CONTROL)>INTAKE AIR TEMPERATURE SENSOR>INSPECTION).
- Result:
Proceed to OK NG
OK
NG
Inspect the mass air flow meter sub-assembly (Click hereEngine / Hybrid System>N04C-VQ (ENGINE CONTROL)>MASS AIR FLOW METER>INSPECTION).
- Result:
Proceed to OK NG
OK
NG
Disconnect the accelerator pedal position sensor connector.
Disconnect the ECM connectors.
Measure the resistance according to the value(s) in the table below.
- Standard Resistance:
Tester Connection Condition Specified Condition F9-2 (EPA2) - A56-3 (EPA2) Always Below 1 Ω F9-1 (VPA2) - A57-1 (VPA2) Always Below 1 Ω F9-4 (VCPA) - A56-6 (VCPA) Always Below 1 Ω F9-3 (EPA) - A56-5 (EPA) Always Below 1 Ω F9-5 (VPA) - A57-2 (VPA) Always Below 1 Ω F9-2 (EPA2) or A56-3 (EPA2) - Body ground Always 10 kΩ or higher F9-1 (VPA2) or A57-1 (VPA2) - Body ground Always 10 kΩ or higher F9-4 (VCPA) or A56-6 (VCPA) - Body ground Always 10 kΩ or higher F9-3 (EPA) or A56-5 (EPA) - Body ground Always 10 kΩ or higher F9-5 (VPA) or A57-2 (VPA) - Body ground Always 10 kΩ or higher
- Result:
Proceed to OK NG
OK
NG
Inspect the crankshaft position sensor sensor (Click hereEngine / Hybrid System>N04C-VQ (ENGINE CONTROL)>CRANKSHAFT POSITION SENSOR>INSPECTION).
- Result:
Proceed to OK NG
OK
NG
Disconnect the manifold absolute pressure sensor connector.
Disconnect the ECM connector.
Measure the resistance according to the value(s) in the table below.
- Standard Resistance:
Tester Connection Condition Specified Condition B18-2 (PIM) - B104-5 (PIM) Always Below 1 Ω B18-3 (VC) - B104-13 (VC) Always Below 1 Ω B18-1 (E) - B104-14 (E2) Always Below 1 Ω B18-2 (PIM) or B104-5 (PIM) - Body ground Always 10 kΩ or higher B18-3 (VC) or B104-13 (VC) - Body ground Always 10 kΩ or higher B18-1 (E) or B104-14 (E2) - Other terminal Always 10 kΩ or higher
- Result:
Proceed to OK NG
OK
NG
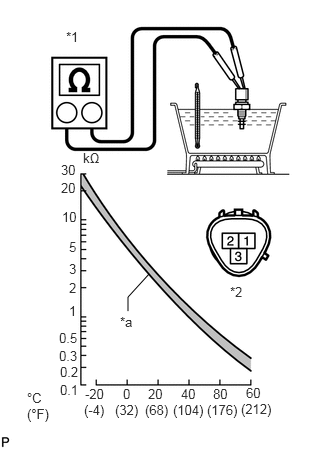
Remove the engine coolant temperature sensor.
Measure the resistance according to the value(s) in the table below.
- Standard Resistance:
Tester Connection Condition Specified Condition 1 - 2 20°C (68°F) 2.32 to 2.59 kΩ 1 - 2 80°C (176°F) 0.31 to 0.326 kΩ
| *1 | Ohmmeter |
| *2 | Engine Coolant Temperature Sensor |
| *a | Acceptable |
- NOTICE:
-
When checking the sensor in water, keep the terminals dry. After the check, wipe the sensor dry.
- HINT:
-
Alternative procedure: Connect an ohmmeter to the installed engine coolant temperature sensor and read the resistance. Use an infrared thermometer to measure the engine temperature in the immediate vicinity of the sensor. Compare these values against the resistance/ temperature graph. Change the engine temperature (warm up or cool down) and repeat the test.
- Result:
Proceed to OK NG
OK
NG