7GR-FKS ENGINE MECHANICAL ENGINE ASSEMBLY INSTALLATION
PROCEDURE

 12361E
1.INSTALL FRONT ENGINE MOUNTING INSULATOR
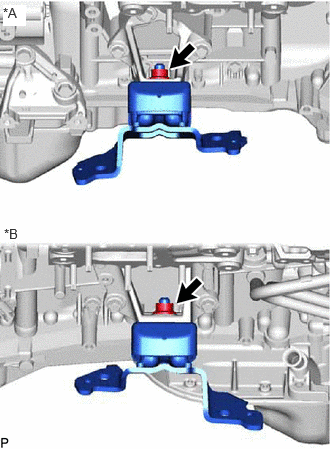
| *A | for LH Side |
| *B | for RH Side |
Install the 2 front engine mounting insulators to the front No. 1 engine mounting bracket RH and front No. 1 engine mounting bracket LH with the 2 nuts.
- Torque:
- 86 N*m (877 kgf*cm, 63 ft.*lbf)
12281A
2.INSTALL ENGINE HANGER
3.REMOVE ENGINE FROM ENGINE STAND
Attach an engine sling device and hang the engine with a chain block.
- NOTICE:
-
Pay attention to the angle of the sling device as the engine assembly or No. 1 engine hanger may be damaged or deformed if the angle is incorrect.
Lift the engine and remove it from the engine stand.
Place the engine onto a work bench.
51100H
4.CONNECT FRONT FRAME ASSEMBLY
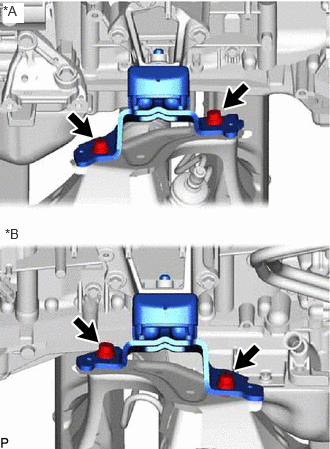
| *A | for LH Side |
| *B | for RH Side |
Install the front frame assembly to the engine assembly with the 4 bolts.
- Torque:
- 50 N*m (510 kgf*cm, 37 ft.*lbf)
32101
5.INSTALL DRIVE PLATE AND RING GEAR SUB-ASSEMBLY (for Automatic Transmission)
35000
6.INSTALL AUTOMATIC TRANSMISSION ASSEMBLY (for Automatic Transmission)
12380
7.INSTALL REAR ENGINE MOUNTING INSULATOR ASSEMBLY (for Automatic Transmission)
57209B
8.INSTALL REAR ENGINE MOUNTING MEMBER SUB-ASSEMBLY (for Automatic Transmission)
11361J
9.INSTALL FLYWHEEL HOUSING UNDER COVER (for Automatic Transmission)
10.INSTALL DRIVE PLATE AND TORQUE CONVERTER SETTING BOLT (for Automatic Transmission)
11.CONNECT ENGINE WIRE (for Automatic Transmission)
32921
12.INSTALL NO. 1 OIL COOLER INLET TUBE AND NO. 1 OIL COOLER OUTLET TUBE (for Automatic Transmission)
13.INSTALL ENGINE ASSEMBLY WITH AUTOMATIC TRANSMISSION ASSEMBLY (for Automatic Transmission)
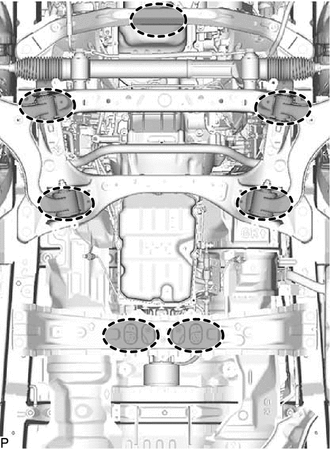

|
Place Wooden Block or Plate Attachments |
Set the engine on an engine lifter.
- NOTICE:
- ·
Place wooden blocks or plate lift attachments so that the engine is level.
·With the exception of installing the engine assembly to an engine stand or removing the engine assembly from an engine stand, do not perform any work on the engine while it is suspended, as doing so is dangerous.
·Never install attachments to the oil pan of the engine assembly or transmission as doing so may deform the oil pan.
Operate the engine lifter and install the engine assembly with automatic transmission assembly to the vehicle.
- NOTICE:
-
Make sure that the engine is clear of all wiring and hoses.
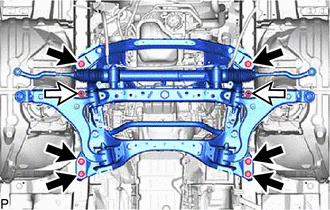

|
Bolt |

|
Nut |
Install the engine assembly with automatic transmission assembly to the vehicle with the 6 bolts and 2 nuts.
- Torque:
- 188 N*m (1917 kgf*cm, 139 ft.*lbf)
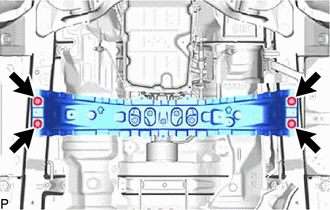
Install the rear engine mounting member with the 4 bolts.
- Torque:
- 80 N*m (816 kgf*cm, 59 ft.*lbf)
Remove the 4 bolts and 2 engine hangers.
88539C
14.CONNECT NO. 2 COOLER UNIT DRAIN HOSE (for Automatic Transmission)
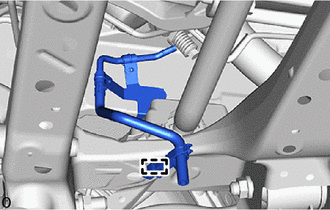
for LHD:
Attach the clamp and connect the No. 2 cooler unit drain hose.
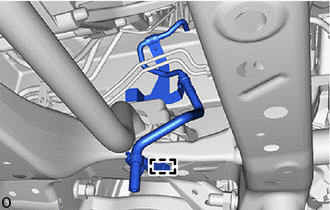
for RHD:
Attach the clamp and connect the No. 2 cooler unit drain hose.
82122A
15.CONNECT NO. 2 ENGINE WIRE (for Automatic Transmission)
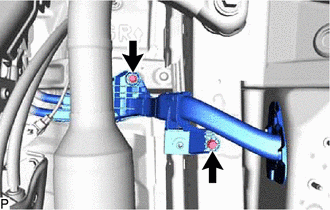
Connect the No. 2 engine wire to the vehicle body with the 2 bolts.
- Torque:
- 13 N*m (133 kgf*cm, 10 ft.*lbf)
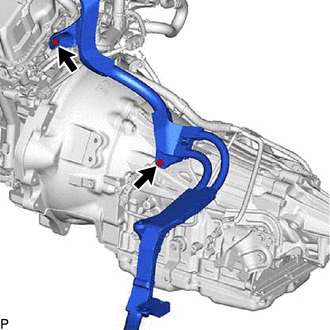
Connect the No. 2 engine wire to the automatic transmission assembly with the 2 bolts.
- Torque:
- 13 N*m (133 kgf*cm, 10 ft.*lbf)
58041C
16.INSTALL FRONT NO. 1 FLOOR HEAT INSULATOR SUB-ASSEMBLY (for Automatic Transmission)
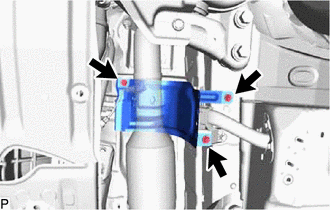
Install the front No. 1 floor heat insulator sub-assembly with the 3 bolts.
- Torque:
- 5.5 N*m (56 kgf*cm, 49 in.*lbf)
17.INSTALL ENGINE ASSEMBLY (for Manual Transmission)
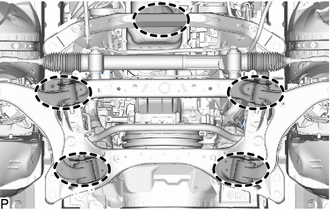
|
|
Place Wooden Block or Plate Attachments |
Set the engine on an engine lifter.
- NOTICE:
- ·
Place wooden blocks or plate lift attachments so that the engine is level.
·With the exception of installing the engine assembly to an engine stand or removing the engine assembly from an engine stand, do not perform any work on the engine while it is suspended, as doing so is dangerous.
·Never install attachments to the oil pan of the engine assembly or transmission as doing so may deform the oil pan.
Operate the engine lifter and install the engine assembly to the vehicle.
- NOTICE:
-
Make sure that the engine is clear of all wiring and hoses.
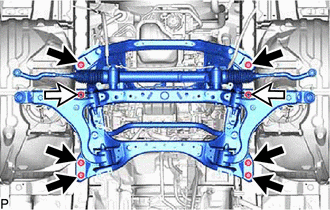
|
|
Bolt |
|
|
Nut |
Install the engine assembly to the vehicle with the 6 bolts and 2 nuts.
- Torque:
- 188 N*m (1917 kgf*cm, 139 ft.*lbf)
Remove the 4 bolts and 2 engine hangers.
88539C
18.CONNECT NO. 2 COOLER UNIT DRAIN HOSE (for Manual Transmission)
for LHD:
Attach the clamp and connect the No. 2 cooler unit drain hose.
for RHD:
Attach the clamp and connect the No. 2 cooler unit drain hose.
51107D
19.INSTALL REAR SIDE RAIL REINFORCEMENT SUB-ASSEMBLY RH
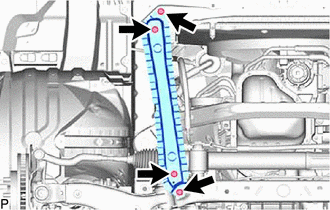
Install the rear side rail reinforcement sub-assembly RH with the 4 bolts.
- Torque:
- 35 N*m (357 kgf*cm, 26 ft.*lbf)
51108C
20.INSTALL REAR SIDE RAIL REINFORCEMENT SUB-ASSEMBLY LH
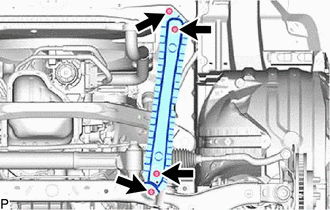
Install the rear side rail reinforcement sub-assembly LH with the 4 bolts.
- Torque:
- 35 N*m (357 kgf*cm, 26 ft.*lbf)
44402
21.CONNECT NO. 1 POWER STEERING OIL COOLER SUB-ASSEMBLY
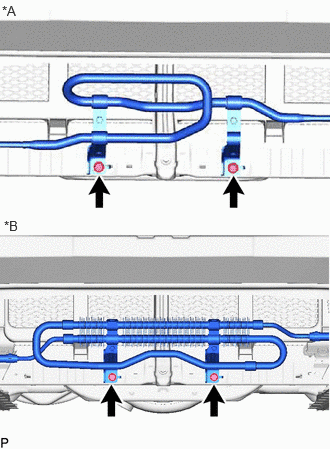
| *A | for Type A |
| *B | for Type B |
for LHD:
Connect the No. 1 power steering oil cooler sub-assembly with the 2 bolts.
- Torque:
- 28 N*m (286 kgf*cm, 21 ft.*lbf)
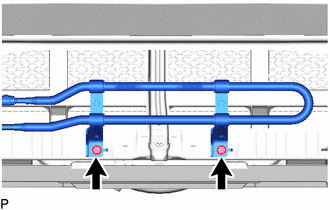
for RHD:
Connect the No. 1 power steering oil cooler sub-assembly with the 2 bolts.
- Torque:
- 28 N*m (286 kgf*cm, 21 ft.*lbf)
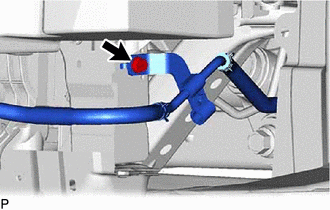
for LHD:
Connect the return tube sub-assembly to the vehicle body with the bolt.
- Torque:
- 28 N*m (286 kgf*cm, 21 ft.*lbf)
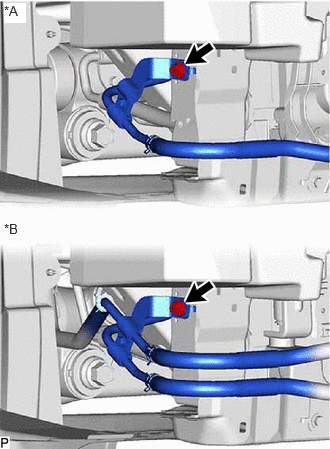
| *A | for LHD |
| *B | for RHD |
Connect the return tube sub-assembly to the vehicle body with the bolt.
- Torque:
- 28 N*m (286 kgf*cm, 21 ft.*lbf)
53287B
22.INSTALL RADIATOR SUPPORT EXTENSION RH
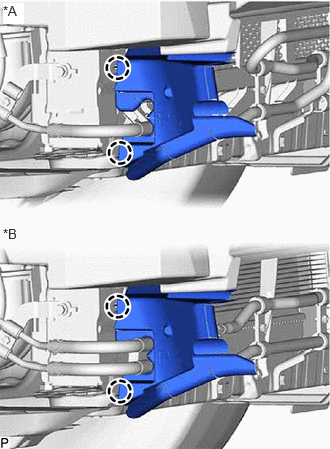
| *A | for LHD |
| *B | for RHD |
Attach the 2 claws and install the radiator support extension RH.
53288B
23.INSTALL RADIATOR SUPPORT EXTENSION LH (for LHD)
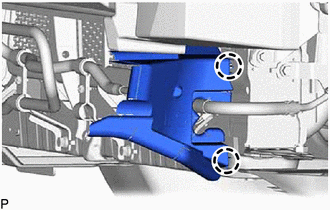
Attach the 2 claws and install the radiator support extension LH.
13405
24.INSTALL FLYWHEEL SUB-ASSEMBLY (for Manual Transmission)
31250
25.INSTALL CLUTCH DISC ASSEMBLY (for Manual Transmission)
31210
26.INSTALL CLUTCH COVER ASSEMBLY (for Manual Transmission)
31210
27.INSPECT AND ADJUST CLUTCH COVER ASSEMBLY (for Manual Transmission)
28.INSTALL MANUAL TRANSMISSION ASSEMBLY (for Manual Transmission)
29.CONNECT WIRE HARNESS (for Manual Transmission)
12380
30.INSTALL REAR ENGINE MOUNTING INSULATOR ASSEMBLY (for Manual Transmission)
57209B
31.INSTALL REAR ENGINE MOUNTING MEMBER SUB-ASSEMBLY (for Manual Transmission)
58041C
32.INSTALL FRONT NO. 1 FLOOR HEAT INSULATOR SUB-ASSEMBLY (for Manual Transmission)
51446B
33.INSTALL NO. 2 ENGINE UNDER COVER BRACKET (for Manual Transmission)
33820B
34.CONNECT TRANSMISSION CONTROL CABLE ASSEMBLY (for Manual Transmission)
33825
35.INSTALL TRANSMISSION CONTROL CABLE INSULATOR (for Manual Transmission)
31482
36.INSTALL CLUTCH RELEASE CYLINDER TO FLEXIBLE HOSE TUBE (for Manual Transmission)
31470
37.INSTALL CLUTCH RELEASE CYLINDER ASSEMBLY (for Manual Transmission)
31490
38.INSTALL CLUTCH ACCUMULATOR ASSEMBLY (for Manual Transmission)
31482D
39.INSTALL CLUTCH RELEASE CYLINDER TO ACCUMULATOR TUBE (for Manual Transmission)
31349
40.INSTALL CLUTCH CABLE HEAT INSULATOR (for Manual Transmission)
41.INSTALL CLUTCH ACCUMULATOR HEAT INSULATOR SUB-ASSEMBLY (for Manual Transmission)
42.INSTALL FRONT AXLE ASSEMBLY LH
43.INSTALL FRONT AXLE ASSEMBLY RH
- HINT:
-
Use the same procedure described for the LH side.
48810
44.INSTALL FRONT STABILIZER LINK ASSEMBLY LH
48820B
45.INSTALL FRONT STABILIZER LINK ASSEMBLY RH
- HINT:
-
Use the same procedure described for the LH side.
48069
46.INSTALL FRONT LOWER NO. 1 SUSPENSION ARM SUB-ASSEMBLY LH
48068
47.INSTALL FRONT LOWER NO. 1 SUSPENSION ARM SUB-ASSEMBLY RH
- HINT:
-
Use the same procedure described for the LH side.
43512
48.INSTALL FRONT DISC
49.CONNECT FRONT DISC BRAKE CALIPER ASSEMBLY LH
50.CONNECT FRONT DISC BRAKE CALIPER ASSEMBLY RH
- HINT:
-
Use the same procedure described for the LH side.
45047
51.CONNECT TIE ROD END SUB-ASSEMBLY LH
for LHD:
Click hereSteering>STEERING GEAR / LINKAGE>STEERING GEAR (for LHD)>INSTALLATION
for RHD:
Click hereSteering>STEERING GEAR / LINKAGE>STEERING GEAR (for RHD)>INSTALLATION
45046
52.CONNECT TIE ROD END SUB-ASSEMBLY RH
- HINT:
-
Use the same procedure described for the LH side.
89543
53.INSTALL FRONT SPEED SENSOR LH
89542
54.INSTALL FRONT SPEED SENSOR RH
- HINT:
-
Use the same procedure described for the LH side.
55.CONNECT INTERMEDIATE SHAFT ASSEMBLY
for LHD:
Click hereSteering>STEERING GEAR / LINKAGE>STEERING GEAR (for LHD)>INSTALLATION
for RHD:
Click hereSteering>STEERING GEAR / LINKAGE>STEERING GEAR (for RHD)>INSTALLATION
11363A
56.INSTALL FLYWHEEL HOUSING SIDE COVER
28100
57.INSTALL STARTER ASSEMBLY
28192
58.INSTALL STARTER COVER
37100
59.INSTALL PROPELLER SHAFT WITH CENTER BEARING ASSEMBLY
for Standard Roof:
Click hereDrivetrain>DRIVE SHAFT / PROPELLER SHAFT>PROPELLER SHAFT ASSEMBLY (for Standard Roof)>INSTALLATION
for High Roof:
Click hereDrivetrain>DRIVE SHAFT / PROPELLER SHAFT>PROPELLER SHAFT ASSEMBLY (for High Roof)>INSTALLATION
51569A
60.INSTALL PROPELLER SHAFT GUARD
for Standard Roof:
Click hereDrivetrain>DRIVE SHAFT / PROPELLER SHAFT>PROPELLER SHAFT ASSEMBLY (for Standard Roof)>INSTALLATION
for High Roof:
Click hereDrivetrain>DRIVE SHAFT / PROPELLER SHAFT>PROPELLER SHAFT ASSEMBLY (for High Roof)>INSTALLATION
17150
61.INSTALL EXHAUST MANIFOLD ASSEMBLY LH
17362
62.INSTALL NO. 2 AIR TUBE (w/ Secondary Air Injection System)
17119
63.INSTALL NO. 2 MANIFOLD STAY
17140
64.INSTALL EXHAUST MANIFOLD ASSEMBLY RH
17361N
65.INSTALL NO. 1 AIR TUBE (w/ Secondary Air Injection System)
11409
66.INSTALL ENGINE OIL LEVEL DIPSTICK GUIDE
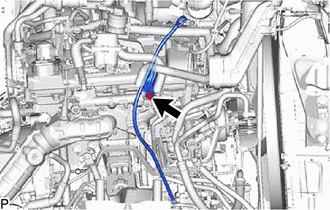
Install the O-ring to the engine oil level dipstick guide.
Install the engine oil level dipstick guide with the bolt.
- Torque:
- 21 N*m (214 kgf*cm, 15 ft.*lbf)
Install the engine oil level dipstick.
17118
67.INSTALL MANIFOLD STAY
17450B
68.INSTALL FRONT NO. 2 EXHAUST PIPE ASSEMBLY
17410
69.INSTALL FRONT EXHAUST PIPE ASSEMBLY
17403
70.INSTALL FRONT NO. 3 EXHAUST PIPE SUB-ASSEMBLY
17190
71.INSTALL INTAKE AIR SURGE TANK ASSEMBLY
22267A
72.INSTALL THROTTLE BODY BRACKET
17125
73.INSTALL NO. 1 SURGE TANK STAY
17126
74.INSTALL NO. 2 SURGE TANK STAY
17346
75.CONNECT NO. 6 AIR INJECTION SYSTEM HOSE (w/ Secondary Air Injection System)
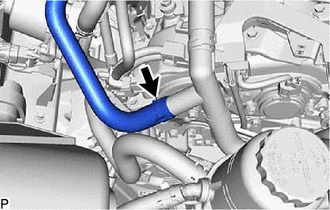
Connect the No. 6 air injection system hose to the air tube assembly, and slide the clip to secure it.
16631D
76.INSTALL NO. 1 IDLER PULLEY BRACKET (w/o Air Conditioning System)
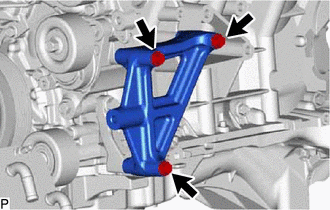
Install the No. 1 idler pulley bracket with the 3 bolts.
- Torque:
- 24.5 N*m (250 kgf*cm, 18 ft.*lbf)
16603K
77.INSTALL IDLER PULLEY SUB-ASSEMBLY (w/o Air Conditioning System)
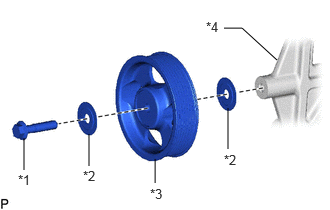
| *1 | Bolt |
| *2 | Plate Washer |
| *3 | Idler Pulley Sub-assembly |
| *4 | No. 1 Idler Pulley Bracket |
Install the 2 plate washers and idler pulley sub-assembly to the No. 1 idler pulley bracket with the bolt as shown in the illustration.
- Torque:
- 60 N*m (612 kgf*cm, 44 ft.*lbf)
88320
78.INSTALL COMPRESSOR ASSEMBLY WITH MAGNET CLUTCH (w/ Air Conditioning System)
88704
79.CONNECT SUCTION HOSE SUB-ASSEMBLY (w/ Air Conditioning System)
88703
80.CONNECT DISCHARGE HOSE SUB-ASSEMBLY (w/ Air Conditioning System)
27020
81.INSTALL GENERATOR ASSEMBLY
44310
82.CONNECT VANE PUMP ASSEMBLY
83.CONNECT VACUUM HOSE ASSEMBLY
23901
84.CONNECT FUEL TUBE SUB-ASSEMBLY
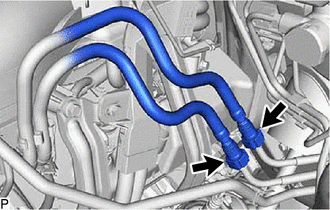
Connect the 2 fuel tube sub-assemblies.
Click hereEngine / Hybrid System>7GR-FKS (FUEL)>FUEL SYSTEM>PRECAUTION
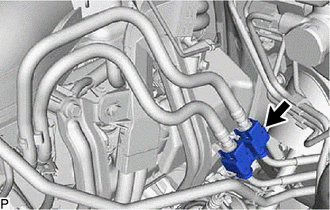
Install the No. 2 fuel pipe clamp.
87245A
85.CONNECT HEATER WATER HOSE ASSEMBLY
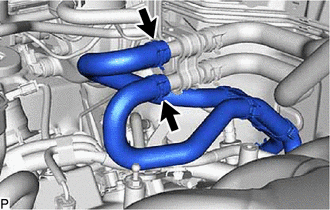
Connect the 2 heater water hose assemblies to the water pipe, and slide the 2 clamps to secure the hoses.
86.CONNECT WIRE HARNESS
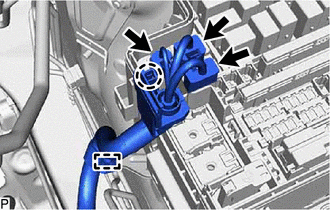
Attach the claw and 3 connectors from the No. 1 engine room relay block.
Attach the clamp and connect the wire harness to the bracket.
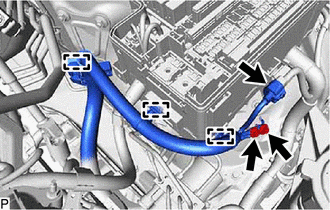
Connect the wire harness to the body with the 2 bolts.
- Torque:
- 14 N*m (143 kgf*cm, 10 ft.*lbf)
Connect the connector.
Attach the 3 clamps and connect the wire harness to the No. 1 engine room relay block and bracket.
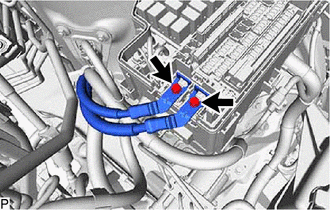
Connect the 2 wire harnesses to the No. 1 engine room relay assembly with the 2 bolts.
- Torque:
- 8.3 N*m (85 kgf*cm, 73 in.*lbf)
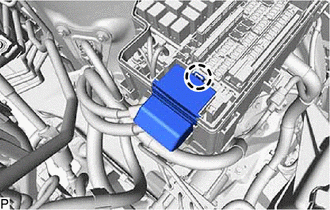
Attach the claw and install the relay block cover to the No. 1 engine room relay block.
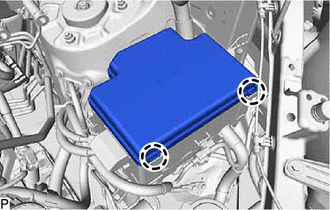
Attach the 2 claws and install the upper No. 1 relay block cover to the No. 1 engine room relay block.
82121
87.CONNECT ENGINE WIRE
Pass the engine wire into the cabin.
Attach the grommet to the body.
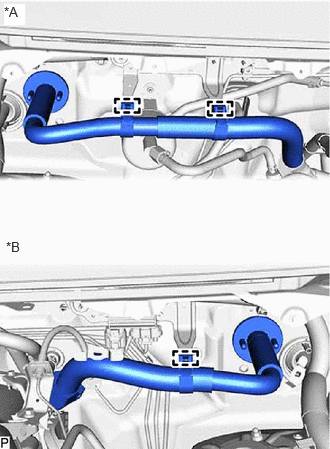
| *A | for LHD |
| *B | for RHD |
for LHD:
Attach the 2 clamps to connect the engine wire to the bracket.
for RHD:
Attach the clamp to connect the engine wire to the bracket.
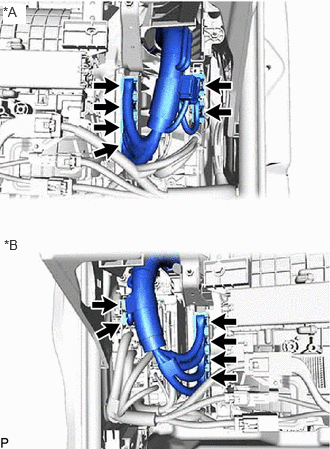
| *A | for LHD |
| *B | for RHD |
Connect the 2 connectors to the instrument panel wire.
Connect the 4 connectors to the ECM.
Click hereEngine / Hybrid System>7GR-FKS (ENGINE CONTROL)>ECM>INSTALLATION
16711
88.INSTALL FAN SHROUD
32941
89.INSTALL NO. 1 OIL COOLER INLET HOSE AND NO. 1 OIL COOLER OUTLET HOSE (for Automatic Transmission)
16572D
90.INSTALL NO. 2 RADIATOR HOSE
16571C
91.INSTALL NO. 1 RADIATOR HOSE
16470
92.INSTALL RADIATOR RESERVE TANK ASSEMBLY
44360
93.CONNECT VANE PUMP OIL RESERVOIR ASSEMBLY
94.INSTALL FRONT BUMPER
for Wagon:
Click hereVehicle Exterior>EXTERIOR PANELS / TRIM>FRONT BUMPER (for Wagon)>INSTALLATION
except Wagon:
Click hereVehicle Exterior>EXTERIOR PANELS / TRIM>FRONT BUMPER (except Wagon)>INSTALLATION
17881
95.INSTALL AIR CLEANER ASSEMBLY WITH AIR CLEANER HOSE
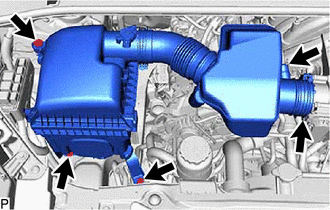
Install the air cleaner assembly with air cleaner hose with the 3 bolts.
- Torque:
- 5.0 N*m (51 kgf*cm, 44 in.*lbf)
Tighten the hose clamp.
- Torque:
- 4.0 N*m (41 kgf*cm, 35 in.*lbf)
Connect the No. 2 PCV hose to the No. 1 air cleaner hose, and slide the clamp to secure the hose.
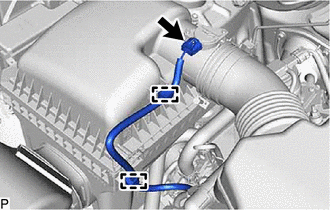
Attach the 2 wire harness clamps.
Connect the mass air flow meter sub-assembly connector.
17751
96.INSTALL NO. 1 AIR CLEANER INLET
11209
97.INSTALL V-BANK COVER SUB-ASSEMBLY (w/ Cover)
Attach the 3 clips to install the V-bank cover sub-assembly.
- NOTICE:
- ·
Securely attach the clips.
·If the clips are forcibly attached or struck with an object, they may be damaged.
55701J
98.INSTALL OUTER COWL TOP PANEL SUB-ASSEMBLY
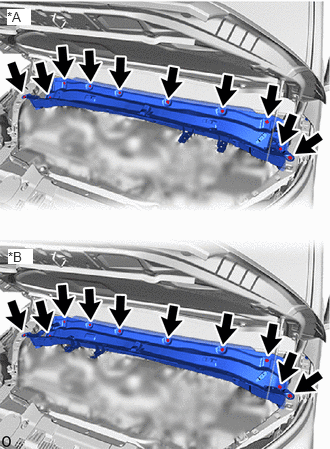
| *A | for LHD |
| *B | for RHD |
Install the outer cowl top panel sub-assembly with the 10 bolts.
- Torque:
- 12 N*m (122 kgf*cm, 9 ft.*lbf)
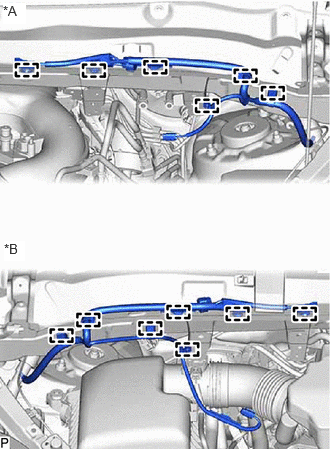
| *A | for LHD |
| *B | for RHD |
for LHD:
Attach the 6 clamps and connect the wire harness to the outer cowl top panel sub-assembly.
for RHD:
Attach the 7 clamps and connect the wire harness to the outer cowl top panel sub-assembly.
55738D
99.INSTALL NO. 2 HEATER AIR DUCT SPLASH SHIELD SEAL
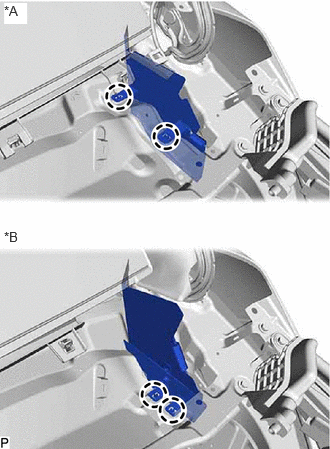
| *A | for LHD |
| *B | for RHD |
for LH Side:
Attach the 2 claws and install the No. 2 heater air duct splash shield seal to the outer cowl top panel sub-assembly.
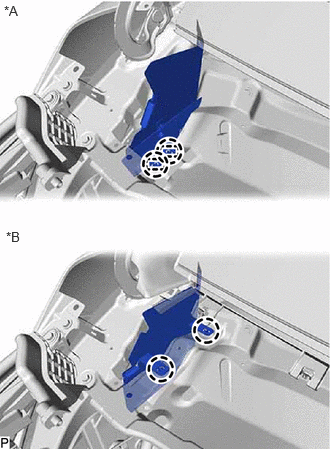
| *A | for LHD |
| *B | for RHD |
for RH Side:
Attach the 2 claws and install the No. 2 heater air duct splash shield seal to the outer cowl top panel sub-assembly.
47220D
100.CONNECT BRAKE MASTER CYLINDER RESERVOIR ASSEMBLY
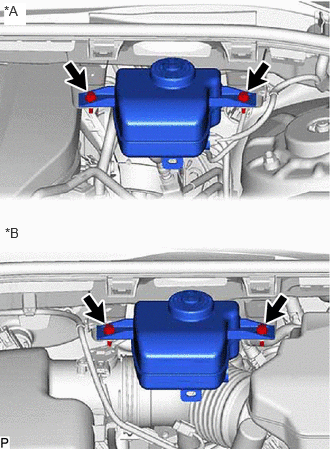
| *A | for LHD |
| *B | for RHD |
Connect the brake master cylinder reservoir assembly with the 2 bolts.
- Torque:
- 8.5 N*m (87 kgf*cm, 75 in.*lbf)
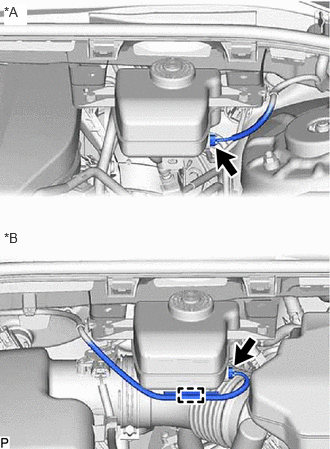
| *A | for LHD |
| *B | for RHD |
Disconnect the connector.
for RHD:
Attach the clamp and connect the wire harness to the brake master cylinder reservoir assembly.
85110
101.INSTALL WINDSHIELD WIPER MOTOR ASSEMBLY
102.CONNECT CABLE TO NEGATIVE BATTERY TERMINAL
103. INITIALIZATION AFTER RECONNECTING BATTERY TERMINAL
Click hereGeneral>SETUP>WHEN DISCONNECTING OR RECONNECTING BATTERY TERMINAL>WORK PROCEDURE
- HINT:
-
When disconnecting and reconnecting the battery, there is an automatic learning function that completes learning when the respective system is used.
-
Click hereGeneral>SETUP>WHEN DISCONNECTING OR RECONNECTING BATTERY TERMINAL>AUTOMATIC LEARNING CHART
104.BLEED CLUTCH PIPE LINE (for Manual Transmission)
Click hereDrivetrain>CLUTCH>CLUTCH SYSTEM>BLEEDING
105.INSPECT FOR BRAKE FLUID LEAK (for Manual Transmission)
106.CHECK FLUID LEVEL IN RESERVOIR (for Manual Transmission)
31301
107.INSPECT AND ADJUST CLUTCH PEDAL SUB-ASSEMBLY (for Manual Transmission)
108.CHARGE AIR CONDITIONING SYSTEM WITH REFRIGERANT (w/ Air Conditioning System)
109.ADD ENGINE OIL
110.ADD MANUAL TRANSMISSION OIL (for Manual Transmission)
111.INSPECT MANUAL TRANSMISSION OIL (for Manual Transmission)
112.ADD AUTOMATIC TRANSMISSION FLUID (for Automatic Transmission)
113.ADD ENGINE COOLANT
114.ADJUST AUTOMATIC TRANSMISSION FLUID (for Automatic Transmission)
115. WARM UP ENGINE (w/ Air Conditioning System)
116.INSPECT FOR REFRIGERANT GAS LEAK (w/ Air Conditioning System)
117.INSPECT FOR FUEL LEAK
118.INSPECT FOR COOLANT LEAK
119.INSPECT FOR ENGINE OIL LEAK
120.INSPECT FOR EXHAUST GAS LEAK
121.INSPECT ENGINE OIL LEVEL
122.INSPECT ENGINE COOLANT LEVEL IN RESERVOIR TANK
123.PERFORM RESET MEMORY (for Automatic Transmission)
124.INSTALL FRONT WHEELS
125. ALIGN FRONT WHEELS FACING STRAIGHT AHEAD
126.INSPECT AND ADJUST FRONT WHEEL ALIGNMENT
127.INSPECT IGNITION TIMING
128.INSPECT ENGINE IDLE SPEED
129.INSPECT CO/HC
51773E
130.INSTALL STEP PLATE COVER RH (w/ Cover)
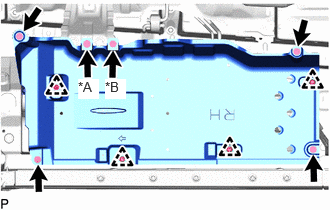
| *A | for Automatic Transmission |
| *B | for Manual Transmission |
Install the step plate cover RH with the 4 clips and 5 bolts.
- Torque:
- 5.5 N*m (56 kgf*cm, 49 in.*lbf)
51407A
131.INSTALL NO. 3 ENGINE UNDER COVER SUB-ASSEMBLY (w/ No. 3 Engine Under Cover Sub-assembly)
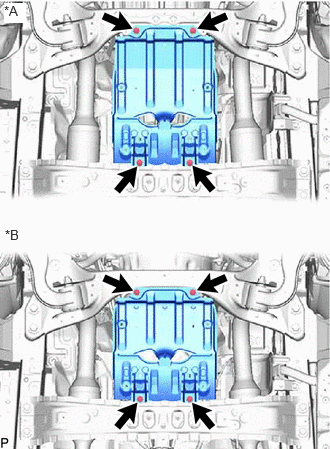
| *A | for Manual Transmission |
| *B | for Automatic Transmission |
Install the No. 3 engine under cover sub-assembly with the 4 bolts.
- Torque:
- 13 N*m (133 kgf*cm, 10 ft.*lbf)
51405A
132.INSTALL NO. 1 ENGINE UNDER COVER SUB-ASSEMBLY
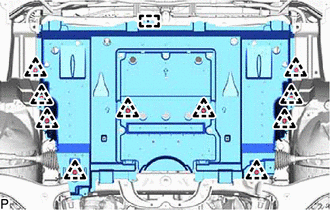
w/ No. 2 Engine Under Cover Sub-assembly:
Attach the guide and install the No. 1 engine under cover sub-assembly.
Install the 10 clips.
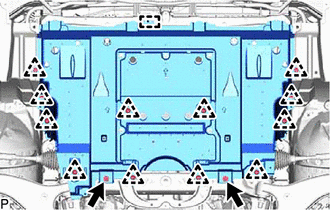
w/o No. 2 Engine Under Cover Sub-assembly:
Attach the guide and install the No. 1 engine under cover sub-assembly.
Install the 12 clips and 2 bolts.
- Torque:
- 5.5 N*m (56 kgf*cm, 49 in.*lbf)
52618
133.INSTALL LOWER FRONT BUMPER ABSORBER
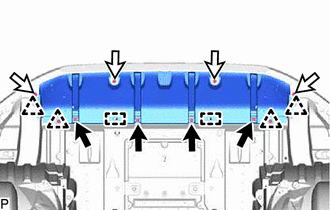
|
|
Bolt |
|
|
Screw |
Attach the 2 guides and install the lower front bumper absorber.
Install the 4 bolts, 4 screws and 4 clips.
- Torque:
- Bolt : 7.5 N*m (76 kgf*cm, 66 in.*lbf)
51406A
134.INSTALL NO. 2 ENGINE UNDER COVER SUB-ASSEMBLY (w/ No. 2 Engine Under Cover Sub-assembly)
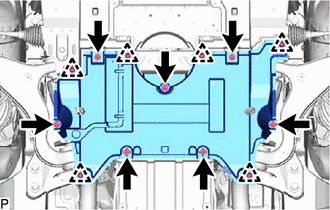
Install the No. 2 engine under cover sub-assembly with the 6 clips and 7 bolts.
- Torque:
- 5.5 N*m (56 kgf*cm, 49 in.*lbf)
53106B
135.INSTALL RADIATOR COVER SUB-ASSEMBLY
for Wagon:
Click hereVehicle Exterior>EXTERIOR PANELS / TRIM>RADIATOR GRILLE (for Wagon)>INSTALLATION
except Wagon:
Click hereVehicle Exterior>EXTERIOR PANELS / TRIM>RADIATOR GRILLE (except Wagon)>INSTALLATION