1VD-FTV ENGINE MECHANICAL CAMSHAFT(w/ DPF) INSTALLATION
CAUTION / NOTICE / HINT
- CAUTION:
-
When replacing an injector (including interchanging injectors between cylinders), common rail, cylinder head, or intake manifold, replace the corresponding injection pipes with a new one.
- NOTICE:
-
When fuel lines are disconnected, air may enter the fuel lines, leading to engine starting trouble. Therefore, perform forced regeneration and bleed the air from the fuel lines (See page Engine / Hybrid System>1VD-FTV (EMISSION CONTROL)>EMISSION CONTROL SYSTEM>ON-VEHICLE INSPECTION).
PROCEDURE

 1.CHECK INJECTOR COMPENSATION CODE
13053
2.INSTALL NO. 3 AND NO. 4 CAMSHAFTS
- NOTICE:
-
If replacing a camshaft with a new one, make a matchmark on the new camshaft in the same place as the old camshaft. Determine the matchmark placement by using the dot mark as a reference point and counting the number of gear teeth from the dot mark to the matchmark as shown in the illustration.
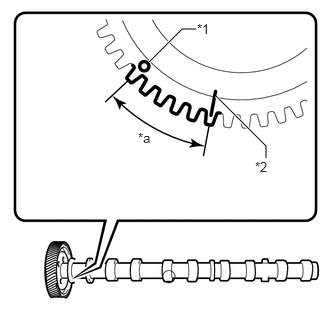
| *1 | Dot Mark |
| *2 | Matchmark |
| *a | Number of Gear Teeth |
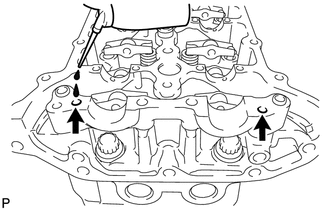
Add more than 19 cc (1.16 cu. in.) of engine oil into the cylinder head side oil holes.
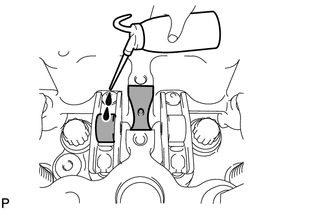
Apply engine oil to the rollers of the valve rocker arms and the camshaft housing of the cylinder head.
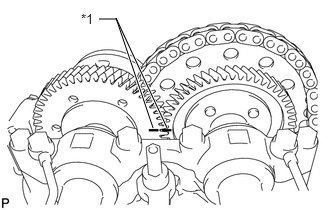
Install the No. 3 and No. 4 camshafts.
| *1 | Matchmark |
Apply engine oil to the camshaft journals, lobes, thrust portion and gears.
Align the matchmarks of the No. 3 and No. 4 camshaft timing gears as shown in the illustration.
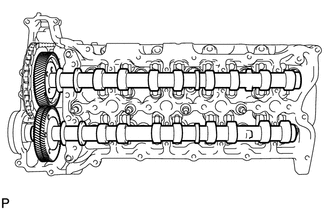
Place the camshafts into the cylinder head.
- NOTICE:
-
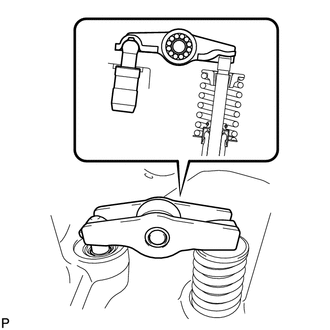
-
Before and after setting the camshafts, firmly set the rocker arms to the lash adjusters.
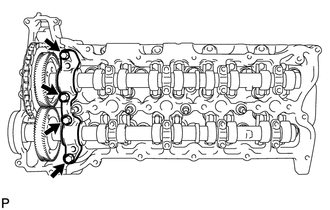
Install the No. 4 camshaft bearing cap.
Align the No. 4 camshaft bearing cap and the ring pins of the No. 5 camshaft bearing cap.
Temporarily install the 4 bolts by hand.
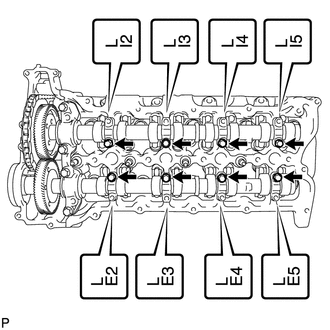
Install the No. 3 camshaft bearing caps.
Confirm the marks and numbers on the camshaft bearing caps and place them in their proper position and direction.
Temporarily install the 8 bolts, which are not installed with the oil feed pipe, by hand.
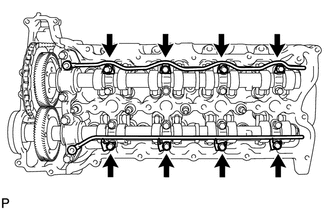
Temporarily install the No. 3 and No. 4 camshaft oil feed pipes with the 8 bolts by hand.
- NOTICE:
-
If even one of the pipe bolt holes does not match its camshaft bearing cap bolt hole, replace the camshaft oil feed pipe.
- HINT:
-
The pipe is bent on the intake side, and straight on the exhaust side.
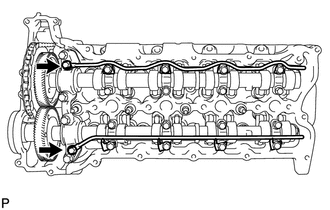
Temporarily install the 2 union bolts by hand.
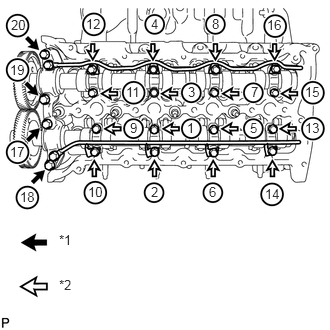
Uniformly tighten the 20 bolts in several steps in the order shown in the illustration.
- Torque:
- for 12 mm head bolt of No. 4 camshaft bearing cap : 21 N*m (214 kgf*cm, 15 ft.*lbf)
- for 10 mm head bolt of No. 3 camshaft bearing cap : 10 N*m (102 kgf*cm, 7 ft.*lbf)
| *1 | 12 mm Head Bolt |
| *2 | 10 mm Head Bolt |
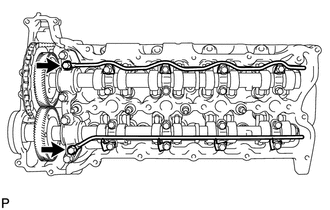
Tighten the 2 union bolts.
- Torque:
- 17 N*m (173 kgf*cm, 13 ft.*lbf)
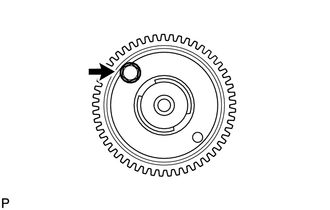
Remove the service bolt from the No. 4 camshaft timing gear.
- NOTICE:
-
Do not drop the bolt into the engine.
- HINT:
-
If the bolt is difficult to remove, rotate the camshaft and remove the bolt. Then realign the matchmarks of the No. 3 and No. 4 camshaft timing gears.
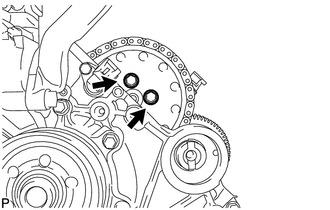
Temporarily install the No. 2 timing chain and No. 2 camshaft timing sprocket to the No. 3 camshaft with the 2 bolts.
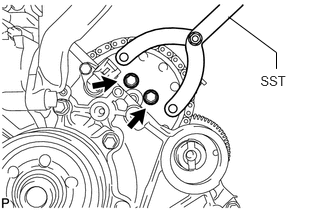
Using SST, hold the No. 2 camshaft timing sprocket. Tighten the 2 bolts.
- SST
- 09960-10010 (09962-01000, 09963-01000)
- Torque:
- 25 N*m (250 kgf*cm, 18 ft.*lbf)
Rotate the crankshaft pulley clockwise so that the 2 remaining pump drive shaft gear bolts can be installed.
Temporarily install the 2 bolts to the No. 3 camshaft.
Using SST, hold the No. 2 camshaft timing sprocket. Tighten the 2 bolts.
- SST
- 09960-10010 (09962-01000, 09963-01000)
- Torque:
- 25 N*m (250 kgf*cm, 18 ft.*lbf)
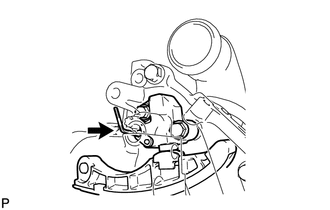
Remove the hexagon wrench from the No. 2 chain tensioner.
Remove the adhesive from the threads of the taper screw plug and the bolt hole of the timing gear case.
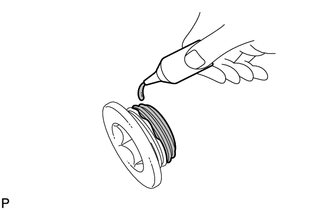
Apply adhesive to 3 or more threads of the taper screw plug.
- Adhesive:
Toyota Genuine Adhesive 1344, Three Bond 1344 or equivalent
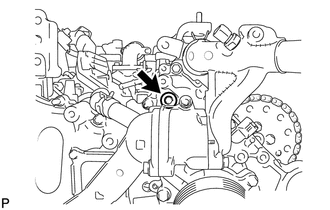
Using a 10 mm hexagon wrench, install the taper screw plug.
- Torque:
- 15 N*m (153 kgf*cm, 11 ft.*lbf)
13511
3.INSTALL NO. 1 AND NO. 2 CAMSHAFTS
- NOTICE:
-
If replacing a camshaft with a new one, make a matchmark on the new camshaft in the same place as the old camshaft. Determine the matchmark placement by using the dot mark as a reference point and counting the number of gear teeth from the dot mark to the matchmark as shown in the illustration.
| *1 | Dot Mark |
| *2 | Matchmark |
| *a | Number of Gear Teeth |
Add more than 19 cc (1.16 cu. in.) of engine oil into the cylinder head side oil holes.
Apply engine oil to the rollers of the valve rocker arms and the camshaft housing of the cylinder head.
Install the No. 1 and No. 2 camshafts.
Apply engine oil to the camshaft journals, lobes, thrust portion and gears.
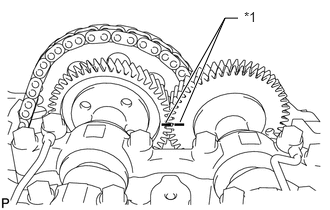
Align the matchmarks of the No. 1 and No. 2 camshaft timing gears as shown in the illustration.
| *1 | Matchmark |
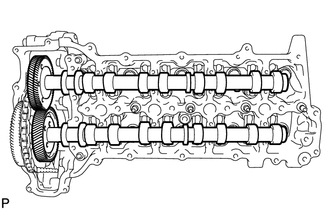
Place the 2 camshafts into the cylinder head.
- NOTICE:
-
-
Before and after setting the camshafts, firmly set the rocker arms to the lash adjusters.
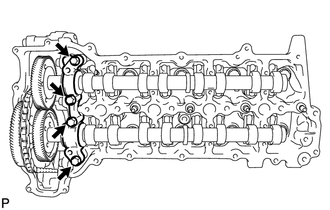
Install the No. 1 camshaft bearing cap.
Align the No. 1 camshaft bearing cap and the ring pins of the No. 2 camshaft bearing cap.
Temporarily install the 4 bolts by hand.
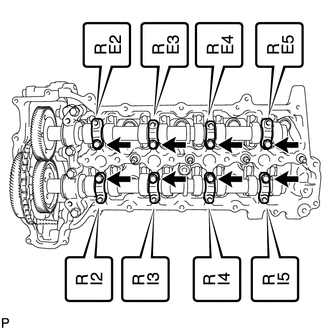
Install the No. 3 camshaft bearing caps.
Confirm the marks and numbers on the camshaft bearing caps and place them in their proper position and direction.
Temporarily install the 8 bolts, which are not installed with the oil feed pipe, by hand.
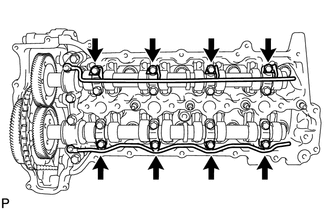
Temporarily install the No. 1 and No. 2 camshaft oil feed pipes with the 8 bolts by hand.
- NOTICE:
-
If even one of the pipe bolt holes does not match its camshaft bearing cap bolt hole, replace the camshaft oil feed pipe.
- HINT:
-
The pipe is bent on the intake side, and straight on the exhaust side.
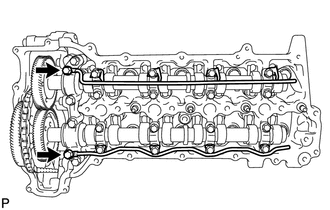
Temporarily install the 2 union bolts by hand.
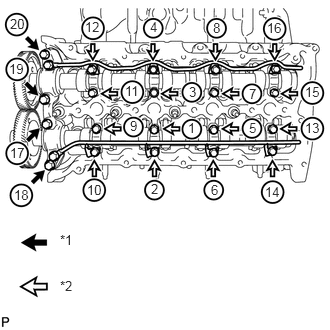
Uniformly tighten the 20 bolts in several steps in the order shown in the illustration.
- Torque:
- for 12 mm head bolt of No. 1 camshaft bearing cap : 21 N*m (214 kgf*cm, 15 ft.*lbf)
- for 10 mm head bolt of No. 3 camshaft bearing cap : 10 N*m (102 kgf*cm, 7 ft.*lbf)
| *1 | 12 mm Head Bolt |
| *2 | 10 mm Head Bolt |
Tighten the 2 union bolts.
- Torque:
- 17 N*m (173 kgf*cm, 13 ft.*lbf)
Remove the service bolt from the No. 1 camshaft timing gear.
- NOTICE:
-
Do not drop the bolt into the engine.
- HINT:
-
If the bolt is difficult to remove, rotate the camshaft and remove the bolt. Then realign the matchmarks of the No. 1 and No. 2 camshaft timing gears.
Temporarily install the No. 1 timing chain and No. 1 camshaft timing sprocket to the No. 2 camshaft.
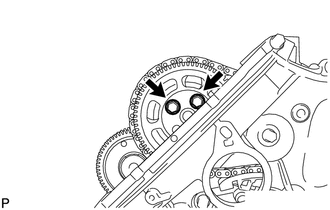
Temporarily install the pump drive shaft gear with the 2 bolts.
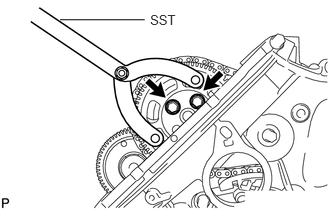
Using SST, hold the pump drive shaft gear. Tighten the 2 bolts.
- SST
- 09960-10010 (09962-01000, 09963-01000)
- Torque:
- 25 N*m (250 kgf*cm, 18 ft.*lbf)
Rotate the crankshaft clockwise so that the 2 remaining pump drive shaft gear bolts can be installed.
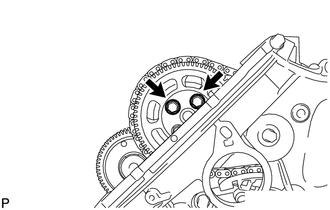
Temporarily install the 2 bolts to the pump drive shaft gear.
Using SST, hold the pump drive shaft gear. Tighten the 2 bolts.
- SST
- 09960-10010 (09962-01000, 09963-01000)
- Torque:
- 25 N*m (250 kgf*cm, 18 ft.*lbf)
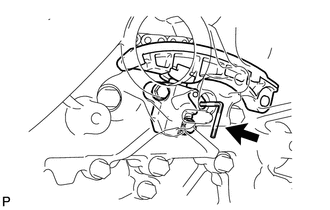
Remove the hexagon wrench.
Remove the adhesive from the threads of the taper screw plug and the bolt hole of the timing gear case.
Apply adhesive to 3 or more threads of the taper screw plug.
- Adhesive:
Toyota Genuine Adhesive 1344, Three Bond 1344 or equivalent
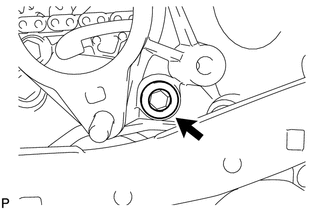
Using a 10 mm hexagon wrench, install the taper screw plug.
- Torque:
- 15 N*m (153 kgf*cm, 11 ft.*lbf)
4.CHECK NO. 1 CYLINDER TO TDC/COMPRESSION
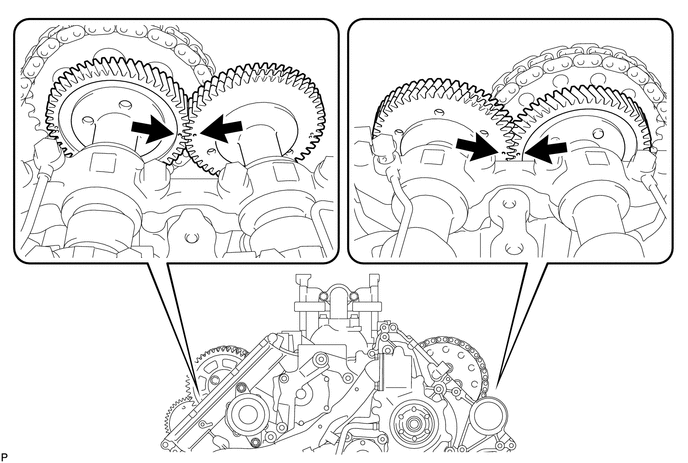
Rotate the crankshaft clockwise 3 times or more, and check that the timing marks of the camshafts (1 dot mark each) align. If the timing marks of the camshafts do not align, repeat the "Install No. 3 and No. 4 Camshafts" and "Install No. 1 and No. 2 Camshafts" procedures.
11202
5.INSTALL CYLINDER HEAD COVER SUB-ASSEMBLY LH
12270
6.INSTALL OIL SEPARATOR ASSEMBLY
11201
7.INSTALL CYLINDER HEAD COVER SUB-ASSEMBLY RH
23670
8.INSTALL FUEL INJECTOR RH
23670
9.INSTALL FUEL INJECTOR LH
11227
10.INSTALL CYLINDER HEAD COVER INSULATOR RH
11228A
11.INSTALL CYLINDER HEAD COVER INSULATOR LH
12.INSTALL NO. 2 FUEL PUMP BRACKET
23712
13.INSTALL NO. 2 FUEL INJECTOR PROTECTOR
14.INSTALL BREATHER PLUG LH
12263
15.INSTALL NO. 3 VENTILATION HOSE
23711
16.INSTALL NO. 1 FUEL INJECTOR PROTECTOR
12262
17.INSTALL NO. 2 VENTILATION HOSE
23763
18.INSTALL NO. 3 NOZZLE LEAKAGE PIPE
27148B
19.INSTALL CONNECTING WIRE
29300
20.INSTALL VACUUM PUMP ASSEMBLY
21.INSTALL NO. 2 IDLER PULLEY BRACKET (w/ Viscous Heater)
16630H
22.INSTALL NO. 2 IDLER PULLEY (w/ Viscous Heater)
23702
23.INSTALL INJECTION PIPE RH
11224
24.INSTALL CYLINDER HEAD COVER SILENCER RH
25.CONNECT NO. 2 ENGINE WIRE
23801L
26.INSTALL FUEL FILTER TO INJECTION PUMP FUEL PIPE SUB-ASSEMBLY
23820A
27.INSTALL COMMON RAIL ASSEMBLY LH
23765
28.INSTALL NO. 5 NOZZLE LEAKAGE PIPE
23812D
29.INSTALL NO. 2 FUEL PIPE
23701
30.INSTALL INJECTION PIPE LH
23764A
31.INSTALL NO. 4 NOZZLE LEAKAGE PIPE
11225
32.INSTALL CYLINDER HEAD COVER SILENCER LH
25706
33.INSTALL NO. 1 VACUUM TRANSMITTING PIPE SUB-ASSEMBLY
25860
34.INSTALL NO. 1 VACUUM SWITCHING VALVE ASSEMBLY
23706
35.INSTALL NO. 6 INJECTION PIPE SUB-ASSEMBLY
36.CONNECT ENGINE WIRE
RH side:
Install the engine wire harness protector with the 3 bolts.
Connect the 7 connectors.
Attach the wire harness clamp.
Install the wire harness bracket with the bolt.
Install the glow plug wire harness with the nut.
- Torque:
- 4.0 N*m (41 kgf*cm, 35 in.*lbf)
Attach the 5 wire harness clamps and connect the 4 connectors.
LH side:
Install the engine wire harness protector with the 2 bolts.
Connect the 8 connectors.
Attach the wire harness clamp.
Install the wire harness bracket with the bolt.
for RHD:
Connect the wire harness with the wire harness clamp holder.
Attach the 3 wire harness clamps and connect the 2 connectors.
Attach the 3 wire harness clamps and connect the 4 connectors.
Connect the wire harness with the wire harness clamp holder
Attach the ground wire clamp to the relay block side.
Install the ground wire to the body panel with the bolt.
- Torque:
- 8.4 N*m (87 kgf*cm, 74 in.*lbf)
Connect the 7 connectors to the injector driver.
Install the ground wire with the bolt.
- Torque:
- 8.4 N*m (86 kgf*cm, 74 in.*lbf)
Connect the wire harness holder to the relay block.
Connect the 2 connectors to the relay block.
Connect the wire harness with the wire harness clamp holder.
for RHD:
Install the wire harness clamp holder with the bolt.
Connect the wire harness with the wire harness clamp holder.
Connect the ECM connector to the ECM.
Connect the wire harness with the wire harness clamp holder.
Attach the wire harness tab to the relay block.
Connect the 4 connectors to the relay block.
for LHD:
Connect the wire harness with the wire harness clamp holder.
Connect the ECM connector to the ECM.
Attach the wire harness tab to the relay block.
Connect the 4 connectors to the relay block.
23274D
37.CONNECT FUEL HOSE
16288
38.INSTALL NO. 4 WATER BY-PASS PIPE
16268M
39.INSTALL NO. 3 WATER BY-PASS PIPE (w/o Viscous Heater)
17972
40.INSTALL AIR TUBE SUB-ASSEMBLY LH
17971
41.INSTALL AIR TUBE SUB-ASSEMBLY RH
42.INSTALL NO. 2 ENGINE OIL LEVEL DIPSTICK GUIDE
87209
43.CONNECT WATER HOSE SUB-ASSEMBLY
17806
44.INSTALL NO. 2 AIR CLEANER PIPE SUB-ASSEMBLY
17364
45.INSTALL NO. 4 AIR TUBE
17342D
46.INSTALL NO. 2 AIR HOSE
17885
47.INSTALL NO. 1 AIR CLEANER PIPE SUB-ASSEMBLY
17363K
48.INSTALL NO. 3 AIR TUBE
17341F
49.INSTALL NO. 1 AIR HOSE
50.INSTALL NO. 1 IDLER PULLEY BRACKET (w/ Viscous Heater)
87120G
51.INSTALL VISCOUS HEATER ASSEMBLY WITH MAGNET CLUTCH (w/ Viscous Heater)
87208
52.INSTALL HEATER WATER PIPE SUB-ASSEMBLY (w/ Viscous Heater)
17940D
53.INSTALL INTERCOOLER ASSEMBLY
16711
54.INSTALL FAN SHROUD WITH FAN
32942
55.INSTALL OIL COOLER TUBE
16361A
56.INSTALL V-RIBBED BELT
57.INSTALL NO. 3 IDLER PULLEY (w/ Viscous Heater)
58.INSTALL NO. 1 IDLER PULLEY (w/ Viscous Heater)
59.INSTALL V-RIBBED BELT (w/ Viscous Heater)
44310
60.INSTALL VANE PUMP ASSEMBLY
16470
61.INSTALL RADIATOR RESERVOIR ASSEMBLY
44369A
62.INSTALL NO. 1 OIL RESERVOIR BRACKET
44360
63.INSTALL VANE PUMP OIL RESERVOIR ASSEMBLY
17861
64.INSTALL INTAKE AIR CONNECTOR
17881
65.TEMPORARILY INSTALL NO. 1 AIR CLEANER HOSE
17705
66.INSTALL AIR CLEANER CAP SUB-ASSEMBLY
82113
67.INSTALL NO. 3 ENGINE ROOM WIRE
69.CONNECT CABLE TO NEGATIVE BATTERY TERMINAL
- NOTICE:
-
When disconnecting the cable, some systems need to be initialized after the cable is reconnected (See page General>INTRODUCTION>REPAIR INSTRUCTION>INITIALIZATION).
Connect the cables to negative (-) main battery and sub-battery battery terminals.
70.BLEED AIR FROM FUEL SYSTEM
71.ADD ENGINE COOLANT
72.INSPECT FOR FUEL LEAK
73.INSPECT FOR OIL LEAK
74.INSPECT FOR COOLANT LEAK
75.WARM UP ENGINE
- NOTICE:
-
In order to bleed air from the chain tensioner, drive the vehicle with the engine at 3000 rpm for 60 seconds or more.
76.INSPECT FOR EXHAUST GAS LEAK
51405A
77.INSTALL NO. 1 ENGINE UNDER COVER SUB-ASSEMBLY
53805
78.INSTALL FRONT FENDER SPLASH SHIELD SUB-ASSEMBLY RH
53806
79.INSTALL FRONT FENDER SPLASH SHIELD SUB-ASSEMBLY LH
53785B
80.INSTALL FRONT FENDER APRON SEAL REAR LH
53783
81.INSTALL FRONT FENDER APRON SEAL FRONT LH
53784
82.INSTALL FRONT FENDER APRON SEAL REAR RH
53782
83.INSTALL FRONT FENDER APRON SEAL FRONT RH
12601E
84.INSTALL NO. 1 ENGINE COVER SUB-ASSEMBLY
53292A
85.INSTALL UPPER RADIATOR SUPPORT SEAL
86.INSPECT ENGINE IDLE SPEED
87.INSPECT MAXIMUM ENGINE SPEED
88.CHECK ENGINE OIL LEVEL
89.INSPECT ENGINE COOLANT LEVEL IN RESERVOIR
55781E
90.INSTALL COWL TOP VENTILATOR LOUVER SUB-ASSEMBLY