1VD-FTV ENGINE MECHANICAL CYLINDER HEAD GASKET(w/ DPF) INSTALLATION
CAUTION / NOTICE / HINT
- NOTICE:
- ·
Before performing these installation procedures, sufficiently clean and remove any foreign matter from the cylinder block, cylinder head, camshaft and other parts.
·When replacing an injector (including interchanging injectors between cylinders), common rail, cylinder head, or intake manifold, replace the corresponding injection pipes with a new one.
·When fuel lines are disconnected, air may enter the fuel lines, leading to engine starting trouble. Therefore, perform forced regeneration and bleed the air from the fuel lines (See page Engine / Hybrid System>1VD-FTV (EMISSION CONTROL)>EMISSION CONTROL SYSTEM>ON-VEHICLE INSPECTION).
PROCEDURE

 1.CHECK INJECTOR COMPENSATION CODE
2.SELECT CYLINDER HEAD GASKET
Set the 2 crankshaft pulley set bolts to the crankshaft.
Clean the cylinder block with solvent.
Inspect the protrusion for each cylinder.
Set the piston of the cylinder to be measured to slightly before TDC.
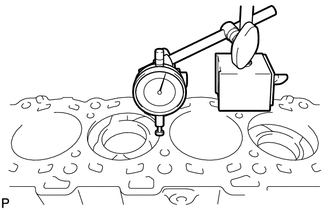
Place a dial indicator on the cylinder block, and set the measuring tip as shown in the illustration.
- NOTICE:
-
Make sure that the dial indicator is at a right angle to the cylinder block top surface.
Set the dial indicator at 0 mm (0 in.).
- HINT:
-
Make sure that the measuring tip is flat against the cylinder block surface and piston head when taking the measurements.
Find where the piston head protrudes most by slowly turning the crankshaft clockwise and counterclockwise.
Measure the piston protrusion value of each cylinder at 2 places as shown in the illustration below, making a total of 8 measurements.
- Standard piston protrusion:
0.520 to 0.780 mm (0.0205 to 0.0307 in.)
If the protrusion is not as specified, remove and reinstall the piston and connecting rod.
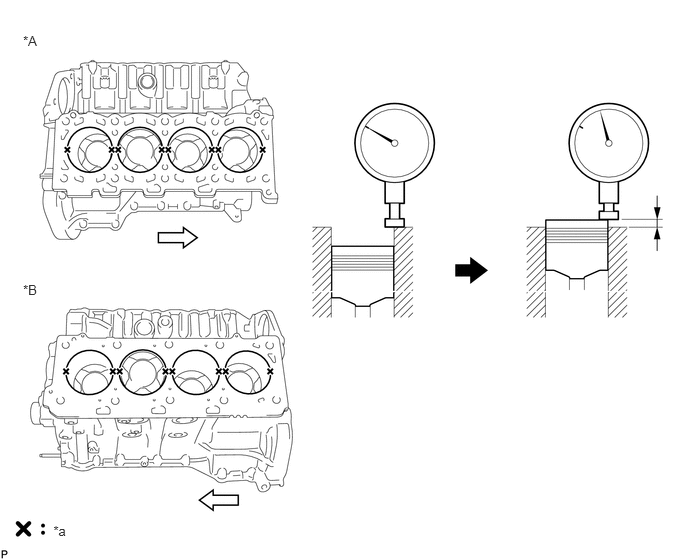
| *A | for Bank 1 | *B | for Bank 2 |
| *a | Measuring Point | - | - |

|
Front | - | - |
Select a new cylinder head gasket.
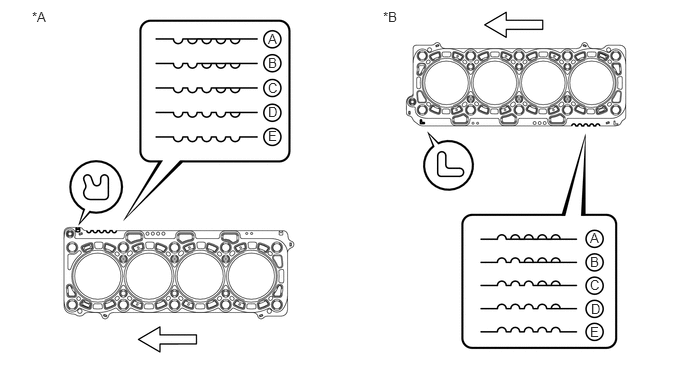
| *A | for Bank 1 | *B | for Bank 2 |
|
|
Front | - | - |
- HINT:
-
Cylinder head gaskets are marked A, B, C, D or E accordingly.
- New Installed Cylinder Head Gasket Thickness:
Item Cutout Specified Condition* A 1 1.20 to 1.30 mm (0.0472 to 0.0512 in.) B 2 1.25 to 1.35 mm (0.0492 to 0.0394 in.) C 3 1.30 to 1.40 mm (0.0512 to 0.0551 in.) D 4 1.35 to 1.45 mm (0.0531 to 0.0571 in.) E 5 1.40 to 1.50 mm (0.0551 to 0.0591 in.)
- HINT:
-
*: The specified condition indicates the thickness of the gasket after tightening the cylinder head.
Select the largest piston protrusion value from the measurements and then select a new appropriate gasket according to the table below.
- Standard Piston Protrusion:
Item Specified Condition A 0.520 to 0.575 mm (0.0205 to 0.0226 in.) B 0.575 to 0.625 mm (0.0226 to 0.0246 in.) C 0.625 to 0.675 mm (0.0246 to 0.0266 in.) D 0.675 to 0.725 mm (0.0266 to 0.0285 in.) E 0.725 to 0.780 mm (0.0285 to 0.0307 in.)
11116
3.INSTALL NO. 2 CYLINDER HEAD GASKET
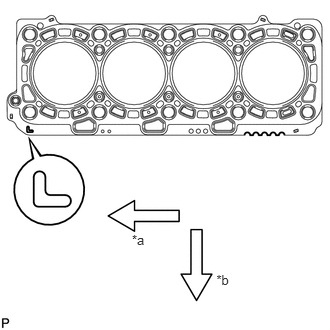
Remove any oil from the contact surface.
| *a | Front |
| *b | Exhaust Side |
Place the cylinder head gasket on the cylinder block surface with the front face of the indicated mark "L" upward and facing the exhaust side.
11115
4.INSTALL NO. 1 CYLINDER HEAD GASKET
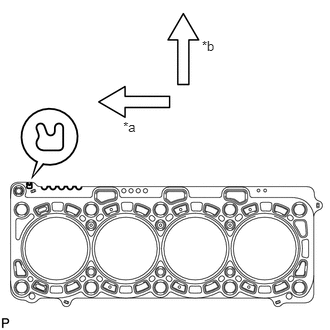
Remove any oil from the contact surface.
| *a | Front |
| *b | Exhaust Side |
Place the cylinder head gasket on the cylinder block surface with the front face of the indicated mark "R" upward and facing the exhaust side.
11102
5.INSTALL CYLINDER HEAD SUB-ASSEMBLY LH
11101
6.INSTALL CYLINDER HEAD SUB-ASSEMBLY RH
7.SET NO. 1 CYLINDER TO 45° BEFORE TDC
8.INSTALL NO. 2 VALVE LASH ADJUSTER ASSEMBLY
13750
9.INSTALL NO. 1 VALVE LASH ADJUSTER ASSEMBLY
10.INSTALL NO. 2 VALVE ROCKER ARM
13801
11.INSTALL NO. 1 VALVE ROCKER ARM
12.INSTALL NO. 5 CAMSHAFT BEARING CAP
13.INSTALL NO. 2 CAMSHAFT BEARING CAP
13053
14.INSTALL NO. 3 AND NO. 4 CAMSHAFTS
13511
15.INSTALL NO. 1 AND NO. 2 CAMSHAFT
11301
16.INSTALL TIMING GEAR CASE SUB-ASSEMBLY
11248
17.INSTALL V-BANK SILENCER
22100
18.INSTALL FUEL SUPPLY PUMP ASSEMBLY
23243C
19.INSTALL FUEL PUMP MOTOR WIRE
20.INSPECT RADIAL BALL BEARING
13613
21.TEMPORARILY INSTALL FUEL SUPPLY PUMP DRIVE GEAR
22.SET NO. 1 AND NO. 2 CAMSHAFTS TO TDC
13581
23.INSTALL NO. 1 IDLE GEAR SHAFT
13520A
24.INSTALL IDLE GEAR ASSEMBLY
25.TIGHTEN FUEL SUPPLY PUMP DRIVE GEAR NUT
26.CHECK NO. 1 CYLINDER TO TDC/COMPRESSION
13529G
27.INSTALL NO. 2 CAMSHAFT TIMING SPROCKET AND NO. 2 TIMING CHAIN
13523
28.INSTALL NO. 1 CAMSHAFT TIMING SPROCKET AND NO. 1 TIMING CHAIN
13522
29.INSTALL PUMP DRIVE SHAFT GEAR
30.INSTALL NO. 2 CHAIN VIBRATION DAMPER
31.INSTALL NO. 2 CHAIN TENSIONER SLIPPER
32.INSTALL NO. 2 CHAIN TENSIONER ASSEMBLY
13561
33.INSTALL NO. 1 CHAIN VIBRATION DAMPER
13559
34.INSTALL NO. 1 CHAIN TENSIONER SLIPPER
13540
35.INSTALL NO. 1 CHAIN TENSIONER ASSEMBLY
19315
36.INSTALL NO. 1 CRANKSHAFT POSITION SENSOR PLATE
37.CHECK NO. 1 CYLINDER TO TDC/COMPRESSION
38.INSTALL FRONT CRANKSHAFT OIL SEAL
11302
39.INSTALL TIMING CHAIN COVER SUB-ASSEMBLY
23255B
40.INSTALL FUEL INJECTOR SEAL
23710B
41.INSTALL EXHAUST FUEL ADDITION INJECTOR ASSEMBLY
42.TEMPORARILY INSTALL INTAKE MANIFOLD
11202
43.INSTALL CYLINDER HEAD COVER SUB-ASSEMBLY LH
11201
44.INSTALL CYLINDER HEAD COVER SUB-ASSEMBLY RH
45.INSTALL FUEL INJECTOR LH
23670
46.INSTALL FUEL INJECTOR RH
47.REMOVE INTAKE MANIFOLD
11228A
48.INSTALL CYLINDER HEAD COVER INSULATOR LH
11227
49.INSTALL CYLINDER HEAD COVER INSULATOR RH
50.INSTALL NO. 2 FUEL PUMP BRACKET
12270
51.INSTALL OIL SEPARATOR ASSEMBLY
29300
52.INSTALL VACUUM PUMP ASSEMBLY
19850
53.INSTALL GLOW PLUG ASSEMBLY
19871
54.INSTALL NO. 1 GLOW PLUG CONNECTOR
55.INSTALL WATER OUTLET PIPE
16331
56.INSTALL WATER OUTLET
17946
57.INSTALL NO. 2 INTERCOOLER SUPPORT BRACKET
58.INSTALL STARTER HOSE BRACKET
Install the starter hose bracket with the 2 bolts.
- Torque:
- 10 N*m (102 kgf*cm, 7 ft.*lbf)
28100
59.INSTALL STARTER ASSEMBLY
16100
60.INSTALL WATER PUMP ASSEMBLY
16262
61.CONNECT INLET WATER HOSE
62.INSTALL NO. 2 IDLER PULLEY BRACKET (w/ Viscous Heater)
16630H
63.INSTALL NO. 2 IDLER PULLEY (w/ Viscous Heater)
16307A
64.INSTALL FAN BRACKET SUB-ASSEMBLY
11336A
65.INSTALL TIMING GEAR COVER INSULATOR
16331A
66.INSTALL THERMOSTAT
16321
67.INSTALL WATER INLET
68.INSTALL NO. 1 IDLER PULLEY BRACKET (w/ Viscous Heater)
87120G
69.INSTALL VISCOUS HEATER ASSEMBLY WITH MAGNET CLUTCH (w/ Viscous Heater)
11301K
70.INSTALL CRANKSHAFT POSITION SENSOR
11301M
71.INSTALL CAMSHAFT POSITION SENSOR
12101
72.INSTALL NO. 1 OIL PAN SUB-ASSEMBLY
15104
73.INSTALL OIL STRAINER SUB-ASSEMBLY
12102A
74.INSTALL NO. 2 OIL PAN SUB-ASSEMBLY
89491
75.INSTALL ENGINE OIL LEVEL SENSOR
15609
76.INSTALL OIL FILTER BRACKET SUB-ASSEMBLY
15650
77.INSTALL OIL FILTER ELEMENT
11348
78.INSTALL TIMING GEAR COVER SPACER
13471
79.INSTALL CRANKSHAFT PULLEY
15778
80.CONNECT NO. 2 OIL COOLER HOSE
15777
81.CONNECT NO. 1 OIL COOLER HOSE
16620D
82.INSTALL V-RIBBED BELT TENSIONER ASSEMBLY
12158
83.INSTALL STIFFENER INSULATOR RH
12502
84.INSTALL COMPRESSOR BRACKET
12582
85.INSTALL NO. 2 CYLINDER BLOCK INSULATOR
12325A
86.INSTALL ENGINE MOUNTING BRACKET LH
16207
87.INSTALL NO. 2 WATER BY-PASS PIPE SUB-ASSEMBLY
25708
88.INSTALL NO. 3 VACUUM TRANSMITTING PIPE SUB-ASSEMBLY
1723A
89.INSTALL TURBOCHARGER WIRE
17873
90.INSTALL NO. 2 INTAKE AIR CONNECTOR BRACKET
12581
91.INSTALL NO. 1 CYLINDER BLOCK INSULATOR
12315A
92.INSTALL ENGINE MOUNTING BRACKET RH
25709E
93.INSTALL NO. 4 VACUUM TRANSMITTING PIPE SUB-ASSEMBLY
16206
94.INSTALL NO. 1 WATER BY-PASS PIPE SUB-ASSEMBLY
17368B
95.INSTALL AIR TUBE SUPPORT
17872
96.INSTALL NO. 1 INTAKE AIR CONNECTOR BRACKET
27020
97.INSTALL GENERATOR ASSEMBLY
98.INSTALL NO. 1 TURBOCHARGER SUB-ASSEMBLY WITH EXHAUST MANIFOLD RH AND NO. 2 TURBOCHARGER SUB-ASSEMBLY WITH EXHAUST MANIFOLD LH
99.CONNECT CABLE TO NEGATIVE BATTERY TERMINAL
- NOTICE:
-
When disconnecting the cable, some systems need to be initialized after the cable is reconnected (See page General>INTRODUCTION>REPAIR INSTRUCTION>INITIALIZATION).
Connect the cables to the negative (-) main battery and sub-battery terminals.