B48 ENGINE MECHANICAL PISTON REMOVAL
PROCEDURE

 1.REMOVE ENGINE ASSEMBLY
2.REMOVE SPARK PLUG
15620
3.REMOVE OIL FILTER CAP ASSEMBLY
12101A
4.REMOVE OIL PAN DRAIN PLUG
12101A
5.INSTALL OIL PAN DRAIN PLUG
15620
6.INSTALL OIL FILTER CAP ASSEMBLY
23801P
7.REMOVE NO. 1 FUEL PIPE SUB-ASSEMBLY
23100X
8.REMOVE FUEL (ENGINE ROOM SIDE) PUMP ASSEMBLY
23250
9.REMOVE FUEL INJECTOR ASSEMBLY
15370J
10.REMOVE CAM TIMING OIL CONTROL SOLENOID ASSEMBLY
23285A
11.REMOVE NO. 1 CHECK VALVE
17111
12.REMOVE INTAKE MANIFOLD
11201
13.REMOVE CYLINDER HEAD COVER SUB-ASSEMBLY
15474
14.REMOVE OUTLET TURBO OIL PIPE
15.SET NO. 1 CYLINDER TO TDC (COMPRESSION)
13540
16.REMOVE NO. 1 CHAIN TENSIONER ASSEMBLY
135A0
17.LOOSEN INTAKE CAMSHAFT TIMING GEAR BOLT ASSEMBLY
135A0A
18.LOOSEN EXHAUST CAMSHAFT TIMING GEAR BOLT ASSEMBLY
135A0
19.REMOVE INTAKE CAMSHAFT TIMING GEAR BOLT ASSEMBLY
135A0A
20.REMOVE EXHAUST CAMSHAFT TIMING GEAR BOLT ASSEMBLY
13050
21.REMOVE CAMSHAFT TIMING GEAR ASSEMBLY
13070A
22.REMOVE CAMSHAFT TIMING EXHAUST GEAR ASSEMBLY
23.REMOVE SST
11101
24.REMOVE CYLINDER HEAD SUB-ASSEMBLY
12101
25.REMOVE OIL PAN SUB-ASSEMBLY
15100
26.REMOVE OIL PUMP ASSEMBLY
12121
27.REMOVE NO. 1 OIL PAN BAFFLE PLATE
13201
28.REMOVE CONNECTING ROD SUB-ASSEMBLY
- NOTICE:
- ·
Damage on the cylinder wall and oil spray nozzles.
Major force can scratch the cylinder wall and bend the oil spray nozzles.
-Carefully move the piston and connecting rod in the engine block.
·Piston, piston pin, connecting rod and connecting rod bearings are matched to each other and balanced.
Always install the piston, piston pin, connecting rod and connecting rod bearing bearings in the cylinder from which they were removed.
·The connecting rods of the engine are balanced and are matched to each other.
A single connecting rod is not permitted to be replaced. Always replace all connecting rods.
- HINT:
-
The description is for one component only. The procedure is identical for all further components.
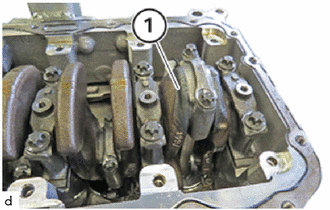
Turn the crankshaft until the connecting rod bearing journal (1) reaches a vertical position.
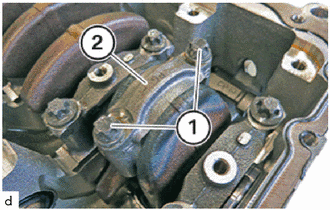
Loosen E12 bolts (1).
- NOTICE:
- ·
Engine damage caused by incorrectly installed connecting rod bearings and connecting rod bearing caps.
Engine damage may result from incorrectly installing connecting rod bearings and connecting rod bearing caps.
-Always install all bearing shells and bearing supports in the same position from which they were removed.
Remove the connecting rod bearing cap (2) and put to one side in the correct order.
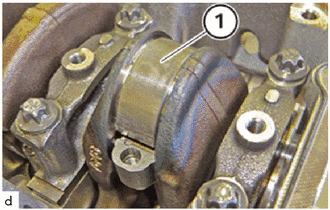
Remove connecting rod bearing (1).
- NOTICE:
- ·
Engine damage caused by incorrectly installed connecting rod bearings and connecting rod bearing caps.
Engine damage may result from incorrectly installing connecting rod bearings and connecting rod bearing caps.
-Always install all connecting rod bearings and connecting rod bearing caps in the same position from which they were removed.
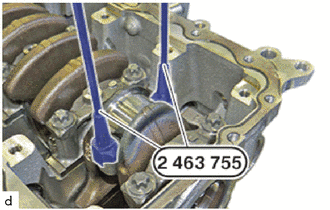
Screw special tool 2 463 755 in at large connecting rod eye.
- SST
- 09200-WA730
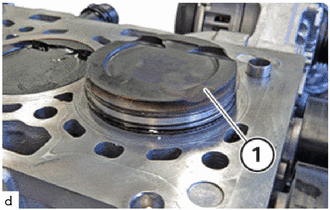
Push the piston (1) and the connecting rod upwards out of the crankcase.
29.INSPECT PISTON
- HINT:
-
The description is for one component only. The procedure is identical for all further components.
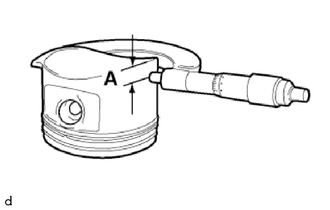
Position measuring bolt in area (A) and measure piston installation clearance transversely to gudgeon pin.
- Piston diameter:
Distance (A) to the lower end of the piston skirt Nominal dimension of piston diameter 14 mm (0.551 in.) 81.938 to 81.956 mm (3.226 to 3.227 in.) 26 mm (1.02 in.) 81.870 to 81.884 mm (3.223 to 3.224 in.) 49 mm (1.93 in.) 81.285 to 81.309 mm (3.200 to 3.201 in.)
- HINT:
-
If the piston diameter is not as specified, replace the piston.
30.REMOVE PISTON
- HINT:
- ·
Wear safety goggles.
·The description is for one component only. The procedure is identical for all further components.
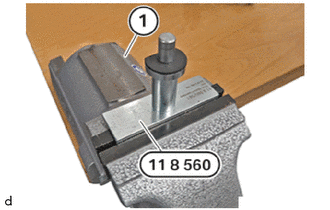
Clamp the special tool 0 495 743 (11 8 560) on the vice (1).
- SST
- 09200-WA740
Position the piston on the piston pin on the special tool 0 495 743 (11 8 560).
- SST
- 09200-WA740
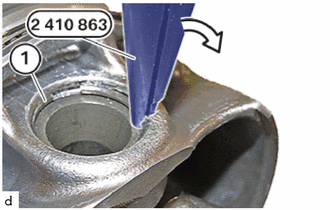
Grip piston pin hole snap ring (1) in piston groove with special tool 2 410 863.
- CAUTION:
- ·
Spring preload.
Danger of injury!
-The use of the specified special tool (tool) is mandatory.
-The described operation must be carried out properly.
- HINT:
-
Wear safety goggles.
Remove piston pin hole snap ring (1).
- HINT:
- ·
Piston and piston pin are matched to each other.
Always install piston and piston pin together and do not switch by mistake.
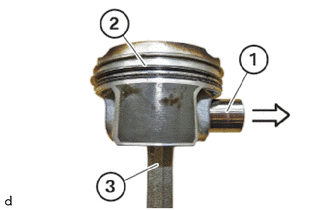
Check whether the piston pin (1) demonstrates tangible play in the piston.
Check whether the piston pin (1) can be removed without excessive force.
Removing the piston pin (1) is very difficult, or piston pin (1) has noticeable play.
Replace the piston (2) and the Piston pin (1).
31.REMOVE PISTON RING
- CAUTION:
- ·
Very wide spreading of the piston rings during installation / removal.
·Damage to the piston rings.
-Spread the piston rings only until the piston ring can just be slid over the piston.
-Use piston ring pliers to install and remove the piston rings.
·Wear safety goggles.
- NOTICE:
-
The description is for one component only. The procedure is identical for all further components.
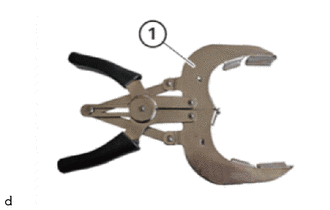
Keep the standard piston ring pliers (1) ready.
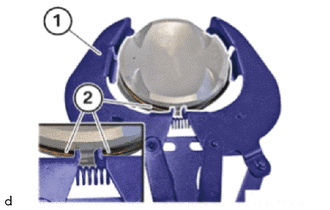
Position the piston ring pliers (1) on the top piston ring (2).
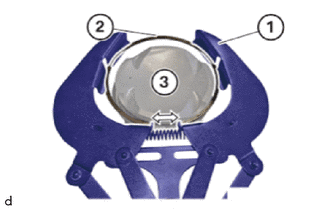
Tension the piston ring pliers (1) in the direction of arrow, feed out and remove the top piston ring (2).
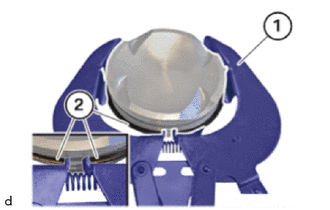
Position the piston ring pliers (1) on the middle piston ring (2).
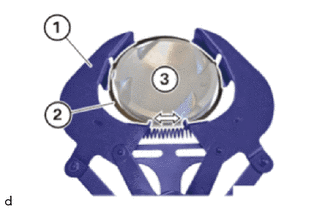
Tension the piston ring pliers (1) in the direction of arrow, feed out and remove the top piston ring (2).
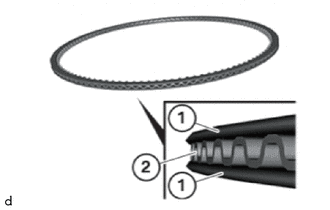
Remove the oil scraper ring (1) and the spring (2) by hand.
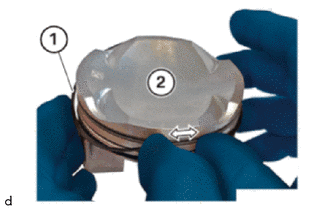
Feed out both oil scraper rings (1) in the direction of arrow on the piston (2) and remove.
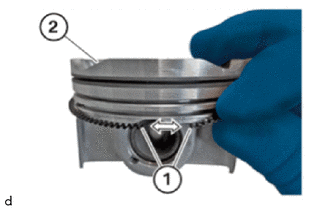
Feed out and remove the spring (1) in the direction of arrow on the piston (2).
32.INSPECT PISTON RING END GAP
- NOTICE:
-
Schematic diagram is for example purposes. Some parts may differ in certain details.
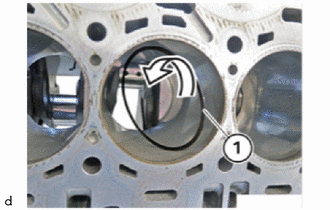
Place new piston rings (1) into the cylinder to be measured and turn through 90° in direction of the arrow.
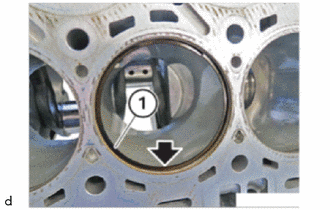
Position all new piston rings (1) in succession in the cylinder barrel below the top dead centre (arrow).
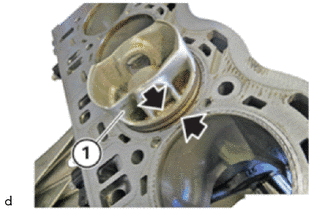
Press in all new piston rings in succession with the help of the piston (1) up to the last annular groove (arrows) in parallel.
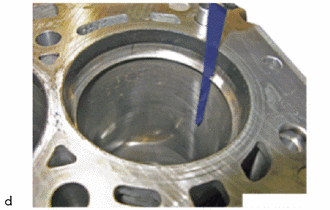
In succession, measure the end gap of all piston rings as shown with a feeler gauge.
- Standard End Gap:
End Gap, top (plain rectangular compression ring) End Gap, middle (taperfaced pistonring) 0.2 to 0.3 mm (0.0079 to 0.0118 in.) 0.4 to 0.6 mm (0.0157 to 0.0236 in.)
- HINT:
- ·
The end gap of the piston rings is outside of the tolerance.
-Check cylinder for wear; measure the cylinder if necessary.
33.INSPECT RING GROOVE CLEARANCE
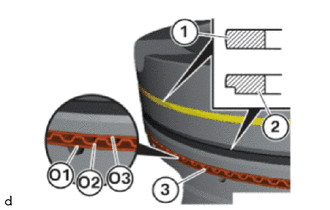
Observe the arrangement of the piston rings:
Upper piston ring (1): Plain rectangular compression ring (engraving must point upwards)
Centre piston ring (2): Taper faced piston ring (engraving must point upwards)
Oil scraper ring (3): Consisting of 2 piston rings (O1) and (O3) with a spring (O2) in the centre
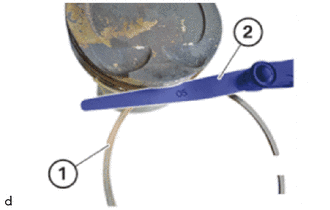
With a feeler gauge, measure the clearance of the new upper piston ring (plain rectangular compression ring).
- Standard Ring Groove Clearance:
Ring groove clearance of the piston ring, middle 0.02 to 0.07 mm (0.0008 to 0.0028 in.)
- HINT:
- ·
The clearance is outside of the tolerance.
-Renew the piston.
With a feeler gauge, measure the clearance of the newcentre piston ring (taper faced piston ring).
- Standard Ring Groove Clearance:
Ring groove clearance of the piston ring, middle 0.03 to 0.07 mm (0.0012 to 0.0028 in.)
- HINT:
- ·
The clearance is outside of the tolerance.
-Renew the piston.