B58 ENGINE MECHANICAL ENGINE ASSEMBLY REMOVAL
PROCEDURE

 1. RECOVER REFRIGERANT FROM REFRIGERATION SYSTEM
2.DISCONNECT CABLE FROM NEGATIVE BATTERY TERMINAL
Click hereGeneral>MAINTENANCE>B58 BATTERY>REMOVAL
12180E
3.REMOVE OIL FILLER CAP ASSEMBLY
12101A
4.REMOVE OIL PAN DRAIN PLUG
12101A
5.INSTALL OIL PAN DRAIN PLUG
53450A
6.REMOVE AND INSTALL HOOD SUPPORT ASSEMBLY
- CAUTION:
- ·
Shutting hood sub-assembly or tailgate.
Danger of injury!
-Support hood sub-assembly/tailgate in fully open position with the aid of a suitable device.
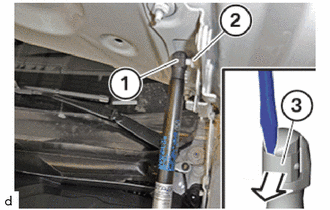
Lift clamp (3) slightly using a screwdriver, in the direction of the arrow.
Lift off ball socket (1) from ball pin (2).
Repeat the operation on the other side of vehicle.
- HINT:
-
Conduct the following operation with the assistance of a second person.
Remove the hood support assembly and open the hood sub-assembly further.
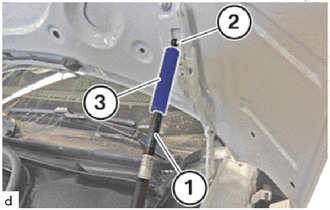
Push special tool 0 493 647 (51 2 170)(3) over gas pressure spring (1).
- SST
- 09800-WA030
Position the special tool 0 493 647 (51 2 170) (3) on the ball pin (2) and apply force to engage it.
- SST
- 09800-WA030
Repeat the operation on the other side of vehicle.
85010
7.REMOVE FRONT WIPER MOTOR AND LINK ASSEMBLY
53383
8.REMOVE HOOD TO COWL TOP SEAL
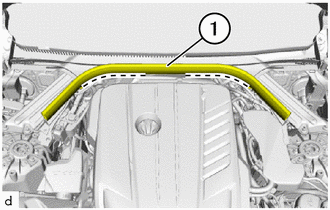
Feed the cable out from the brackets to the front in the marked area.
Remove the hood to cowl top seal (1) inward from the guide.
53681
9.REMOVE UPPER FRONT SUSPENSION CENTER BRACE
- NOTICE:
-
Driving without upper front suspension center brace is not permissible.
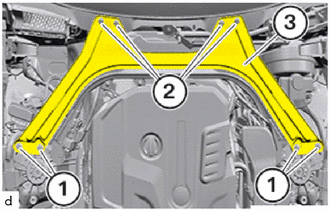
Remove E14 bolts (1) and bolts (2).
Remove the upper front suspension center brace (3).
55788A
10.REMOVE COWL TOP VENTILATOR LOUVER PROTECTOR
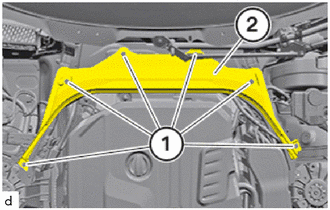
Loosen bolts (1).
Remove the cowl top ventilator louver protector (2).
55789B
11.REMOVE NO. 2 COWL TOP VENTILATOR LOUVER PROTECTOR
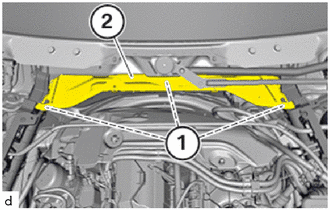
Loosen bolts and nut (1).
Remove the No. 2 cowl top ventilator louver protector (2).
12601B
12.REMOVE NO. 1 ENGINE COVER SUB-ASSEMBLY
- NOTICE:
- ·
Damage to the No. 1 engine cover sub-assembly.
Jerky movements during disassembly and excessive application of force during installation may result in breakage of the No. 1 engine cover sub-assembly.
-Disassemble or mount the No. 1 engine cover sub-assembly carefully.
-Disassemble or mount snap-lock couplings of the ball pivots one after the other.
-Disassemble or mount No. 1 engine cover sub-assembly only at temperatures >20 °C.
Vehicle information / Control unit list / DME / Call up control unit functions / Diagnostic request / Diagnostic request / 117 Ambient temperature
-Use only distilled water as an auxiliary material during installation, no lubricants.
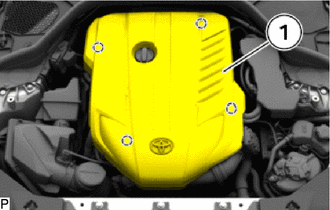
Release the No. 1 engine cover sub-assembly (1) towards the top from the grommets (marks) and remove.
12611
13.REMOVE NO. 1 ENGINE COVER
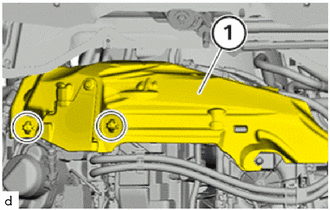
Unclip the No. 1 engine cover (1) at the grommets in the marked areas and remove it to the top.
14.REMOVE POSITIVE BATTERY CABLE
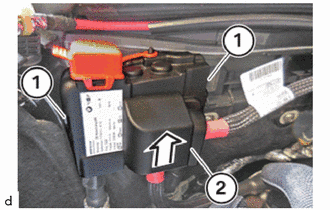
Unlock the locks (1).
Guide and remove cover (2) in direction of arrow.
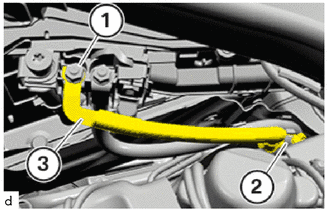
Loosen nut (1).
Loosen clamp (2).
Feed out generator wire (3) and put to one side.
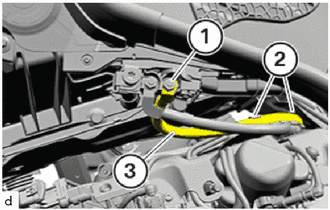
Loosen nut (1).
Loosen clamps (2).
Feed out starter wire (3) and put to one side.
15.REMOVE WIRE HARNESS CLAMP BRACKET
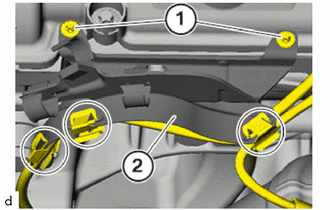
Unclip the lines in the marked areas.
Loosen E8 screws (1).
Remove wire harness clamp bracket (2) for the generator wire.
16.REMOVE NO. 1 INTEGRATION RELAY
17.REMOVE ENGINE ROOM ECM BOX
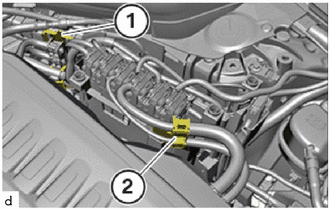
Unlock and loosen locks (1) and (2).
Release the wiring harnesses from the engine room ECM box and set it aside.
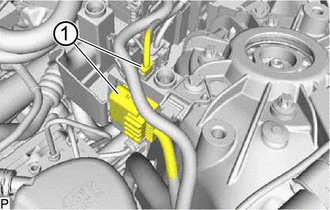
Unlock plug connection (1) and disconnect.
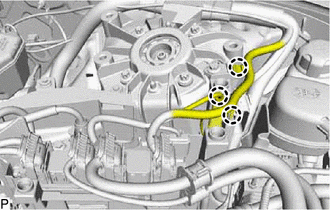
Unlock and loosen the 3 clamps (marks).
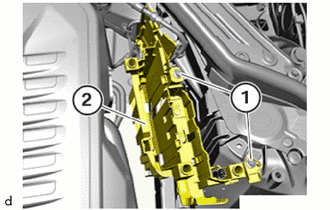
Loosen bolts (1).
Guide out and remove the engine room ECM box (2).
82161
18.REMOVE FLOOR WIRE
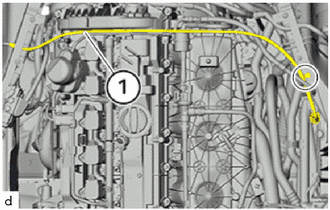
Unclip floor wire (1) for the voltage supply of the power distribution box in the marked area.
Set aside the floor wire (1) for the voltage supply of the power distribution box.
19.DISCONNECT CONNECTOR TO BRAKE BOOSTER TUBE
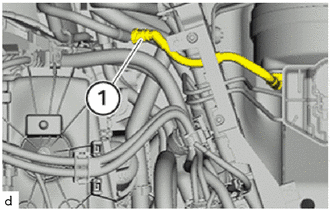
Unlock, disconnect and tie the connector to brake booster tube (1) to one side.
23827A
20.DISCONNECT NO. 2 FUEL VAPOR FEED HOSE
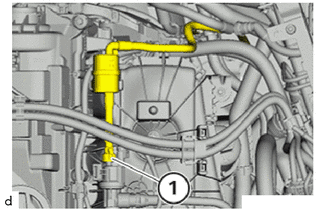
Disengage the clamp.
Unlock, disconnect and tie the No. 2 fuel vapor feed hose (1) to one side.
53826A
21.REMOVE FRONT UPPER FENDER PROTECTOR LH
53825A
22.REMOVE FRONT UPPER FENDER PROTECTOR RH
- HINT:
-
Use the same procedure described for the LH side.
16711
23.REMOVE FAN SHROUD
17700
24.REMOVE AIR CLEANER ASSEMBLY
17880
25.REMOVE AIR CLEANER HOSE ASSEMBLY
89467A
26.REMOVE WIDE RANGE AIR FUEL RATIO SENSOR
89465
27.REMOVE OXYGEN SENSOR
28.REMOVE IGNITION COIL ASSEMBLY
23802B
29.REMOVE NO. 2 FUEL PIPE SUB-ASSEMBLY
51219
30.REMOVE FRONT SUSPENSION MEMBER LOWER PROTECTOR
31.DRAIN ENGINE COOLANT (for High Pressure)
32.DRAIN ENGINE COOLANT (for Low Pressure)
16573B
33.DISCONNECT NO. 3 RADIATOR HOSE
- HINT:
-
Collect and dispose of emerging fluids. Observe country-specific waste disposal regulations.
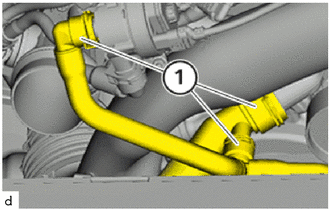
Unlock, disconnect and tie the No. 3 radiator hose (1) to one side.
16572D
34.REMOVE NO. 2 RADIATOR HOSE
28100
35.REMOVE STARTER ASSEMBLY
25051
36.REMOVE EXHAUST MANIFOLD CONVERTER SUB-ASSEMBLY
58166A
37.REMOVE FRONT FLOOR COVER LH
58165C
38.REMOVE FRONT FLOOR COVER RH
- HINT:
-
Use the same procedure as for the LH side.
58151
39.REMOVE FRONT NO. 1 FLOOR HEAT INSULATOR
58151A
40.REMOVE FLOOR HEAT INSULATOR
57255
41.REMOVE ENGINE REAR MOUNTING MEMBER
42.SEPARATE PROPELLER SHAFT ASSEMBLY
17119
43.REMOVE NO. 2 MANIFOLD STAY
35000
44.REMOVE AUTOMATIC TRANSMISSION ASSEMBLY
45.SEPARATE OIL COOLER TUBE
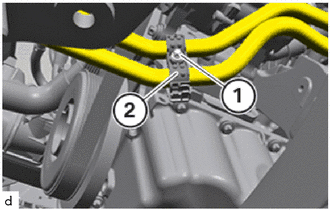
Loosen T25 bolt (1).
Loosen the No. 1 automatic transmission oil cooler tube clamp (2).
Tie the oil cooler tube to the side.
82261A
46.SEPARATE GENERATOR WIRE
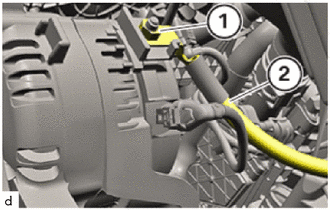
Unfasten nut (1).
Thread out generator wire (2) and set it aside.
88710
47.REMOVE AIR CONDITIONING TUBE ASSEMBLY
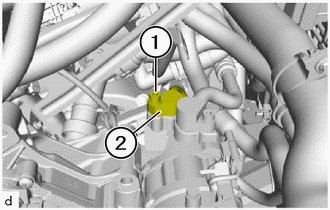
Loosen T45 bolts (1).
Remove air conditioning tube assembly (2) upwards.
88707
48.REMOVE SUCTION PIPE SUB-ASSEMBLY
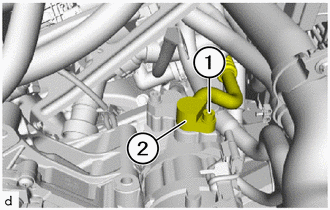
Loosen T45 bolts (1).
Remove suction pipe sub-assembly (2) upwards.
49.DISCONNECT WATER HOSE
- HINT:
-
Collect and dispose of emerging fluids. Observe country-specific waste disposal regulations.
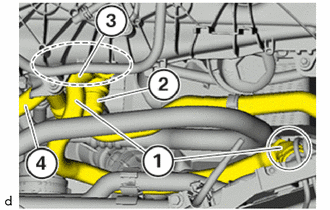
Unlock and disconnect No. 1 water by-pass hose (1), heater water hose (2), No. 7 water by-pass hose (3) and No. 5 water by-pass hose (4) in the marked areas.
Remove the No. 1 water by-pass hose (1).
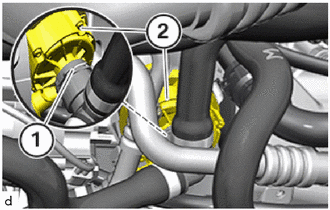
Unlock No. 7 water by-pass hose (1) and disconnect from the water pump sub-assembly (2).
Place the No. 7 water by-pass hose (1) aside.
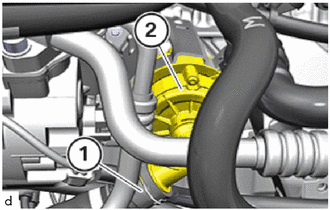
Unlock No. 6 radiator hose (1) and disconnect from the water pump sub-assembly (2).
Place the No. 6 radiator hose (1) aside.
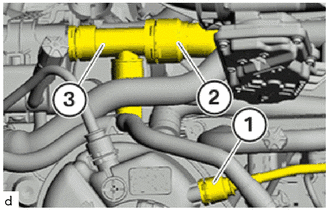
Unlock and disconnect the radiator reserve tank hose (1) and No. 7 water by-pass hose (2) and lay to one side.
Unlock and disconnect the No. 6 water by-pass hose (3) and set it aside.
50.REMOVE ENGINE ASSEMBLY
- CAUTION:
- ·
Components connected to the engine joint or cross member.
Danger of injury!
-Check lifting eyes and engine mounting brackets for damage, e.g. cracks.
-Attach the component to correctly mounted engine joints or cross members only.
-Exclusively lift the component, do not move it forwards, backwards or in transverse direction.
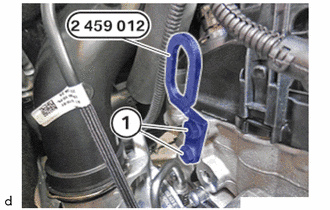
Guide in and position special tool 2 459 012 on cylinder head.
- SST
- 09200-WA610
Tighten the bolts (1) of special tool 2 459 012 .
- SST
- 09200-WA610
- Torque:
- 21.5 N*m (219 kgf*cm, 16 ft.*lbf)
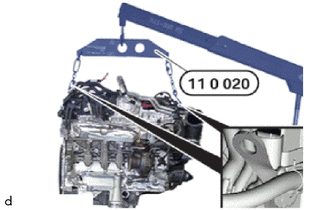
Connect both hooks of the special tool 0 490 567 (11 0 020) to the front and back of the engine with the engine hangers.
- SST
- 09200-WA860
- HINT:
-
The workshop crane, lifting gear and the engine hangers on the engine must all be connected to each other so that the engine hangs straight upon lifting.
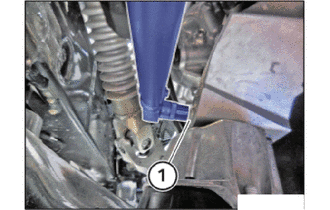
Release the E14 bolt (1) from the top.
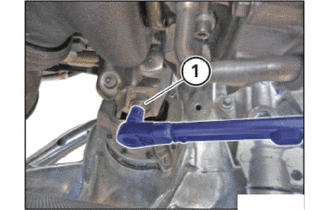
Release the E14 bolt (1) from the top.
Raise and remove the engine.
51.INSTALL ENGINE STAND
- CAUTION:
- ·
Heavy component.
Heavy components can lead to injury or damage.
-Remove and install heavy components with the aid of another person/other persons.
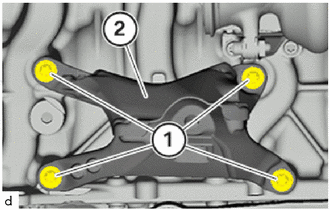
Loosen E12 bolts (1).
Remove the No. 1 front engine mounting bracket RH (2).
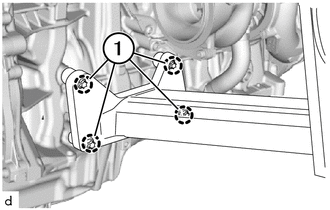
Position and secure engine stand attachment No. 2 on the engine.
Tighten the bolts (1).
- Torque:
- 38 N*m (387 kgf*cm, 28 ft.*lbf)
Lower engine slowly.
Release both hooks of the special tool 0 490 567 (11 0 020) at the front and back of the engine from the engine hangers.
- SST
- 09200-WA860