2NZ-FE ENGINE MECHANICAL CYLINDER HEAD GASKET INSTALLATION
PROCEDURE

 11101A
1.INSPECT CYLINDER HEAD SET BOLT
11115
2.INSTALL CYLINDER HEAD GASKET
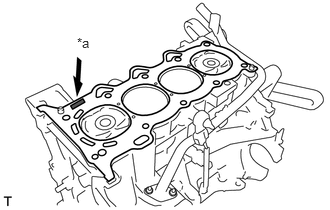
Place a new cylinder head gasket on the cylinder block with the Lot No. stamp facing upward.
| *a | Lot No. |
- NOTICE:
- ·
Remove any oil from the contact surfaces.
·Check the mounting orientation of the cylinder head gasket.
·Place the cylinder head on the cylinder head gently in order not to damage the gasket.
11101
3.INSTALL CYLINDER HEAD SUB-ASSEMBLY
- HINT:
-
The cylinder head bolts are tightened in 2 successive steps.
Apply a light coat of engine oil to the threads of the cylinder head bolts.
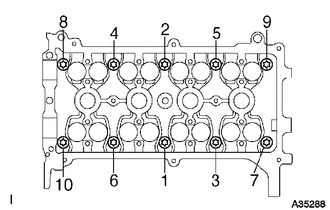
Using several steps, install and tighten the 10 cylinder head bolts and plate washers uniformly with an 8 mm bi-hexagon wrench, in the sequence shown in the illustration.
- Torque:
- 29 N*m (300 kgf*cm, 22 ft.*lbf)
Mark the front of the cylinder head bolt with paint.
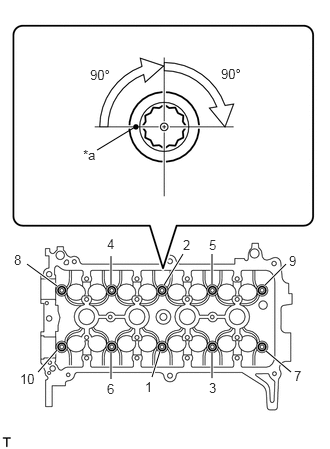
Retighten the cylinder head bolts 90° and then an additional by 90° as shown in the illustration.
| *a | Paint Mark |
Check that the paint mark is now at a 180° angle from the front.
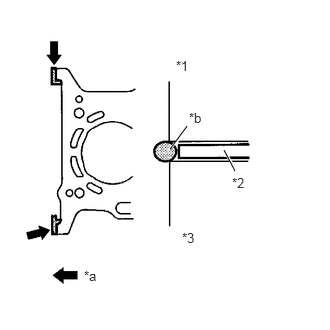
Apply a continuous bead of seal packing (Diameter 4.5 to 5.5 mm (0.177 to 0.217 in.)) as shown in the illustration.
- Seal Packing:
Toyota Genuine Seal Packing Black, Three Bond 1207B or Equivalent
| *1 | Cylinder Head |
| *2 | Cylinder Head Gasket |
| *3 | Cylinder Block |
| *a | Seal Packing |
| *b | Diameter: 4.5 to 5.5 mm |
- NOTICE:
- ·
Remove any oil from the contact surfaces.
·Install the oil pump assembly within 3 minutes and tighten the bolts within 15 minutes of applying the seal packing.
13511
4.INSTALL CAMSHAFT
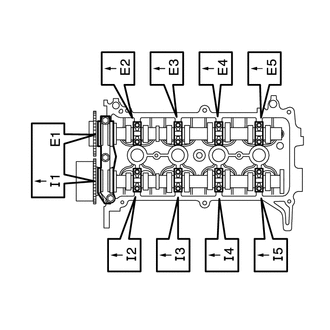
Examine the front marks and numbers and check that the sequence is as shown in the illustration. Then provisionally tighten the 19 bolts.
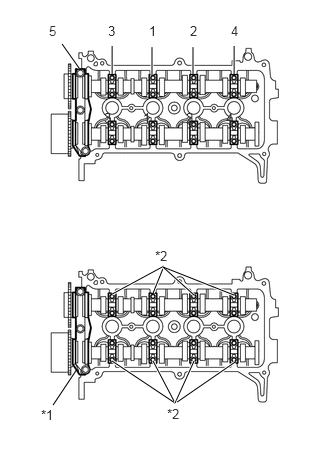
Uniformly tighten the bolts in several steps in the sequence shown in the illustration and install No. 1 camshaft bearing cap and No. 2 camshaft bearing cap.
| *1 | No. 1 Bearing Cap |
| *2 | No. 2 Bearing Cap |
- Torque:
- No. 1 Camshaft bearing cap : 23 N*m (235 kgf*cm, 17 ft.*lbf)
- No. 2 Camshaft bearing cap : 13 N*m (129 kgf*cm, 9 ft.*lbf)
- NOTICE:
-
Tighten each bolt uniformly while keeping the camshaft level.
13506
5.INSTALL CHAIN SUB-ASSEMBLY
13559
6.INSTALL CHAIN TENSIONER SLIPPER
13540
7.INSTALL NO. 1 CHAIN TENSIONER ASSEMBLY
15100C
8.INSTALL OIL PUMP SEAL
15100
9.INSTALL OIL PUMP ASSEMBLY
16100
10.INSTALL ENGINE WATER PUMP ASSEMBLY
12315A
11.INSTALL TRANSVERSE ENGINE ENGINE MOUNTING BRACKET
16173
12.INSTALL WATER PUMP PULLEY
11101J
13.INSTALL CAMSHAFT TIMING OIL CONTROL VALVE ASSEMBLY
15100Q
14.INSTALL CRANKSHAFT POSITION SENSOR
13407
15.INSTALL CRANKSHAFT DAMPER SUB-ASSEMBLY
12305
16.INSTALL ENGINE MOUNTING INSULATOR SUB-ASSEMBLY RH
11201
17.INSTALL CYLINDER HEAD COVER SUB-ASSEMBLY
19500D
18.INSTALL NO. 1 IGNITION COIL
23820
19.INSTALL FUEL VAPOR FEED HOSE ASSEMBLY
12261
20.INSTALL VENTILATION HOSE
27020
21.INSTALL GENERATOR ASSEMBLY
25591
22.INSTALL MANIFOLD SUPPORT BRACKET
Install the manifold support bracket with the 3 bolts.
- Torque:
- 44 N*m (449 kgf*cm, 33 ft.*lbf)
17451
23.INSTALL EXHAUST PIPE GASKET
17451A
24.INSTALL NO. 2 EXHAUST PIPE GASKET
17410
25.INSTALL FRONT EXHAUST PIPE ASSEMBLY
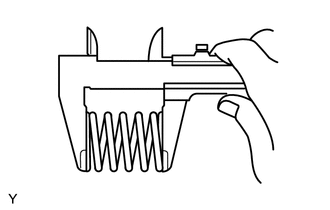
Using a vernier caliper, measure the free length of the compression spring.
- Minimum length:
40.5 mm (1.594 in.)
If the length is not as specified, replace the compression spring.
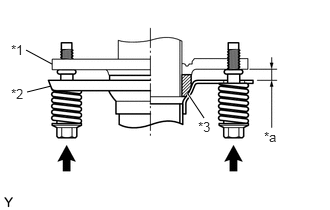
Install the front exhaust pipe assembly onto the exhaust manifold with the 2 compression springs and 2 bolts.
| *1 | Exhaust Manifold |
| *2 | Front Exhaust Pipe Assembly |
| *3 | Exhaust Pipe Gasket |
| *a | Space between flanges: 8.5 mm (0.335 in.) |
- Torque:
- 43 N*m (438 kgf*cm, 32 ft.*lbf)
- HINT:
-
After the installation, check that the gaps between the flanges of the exhaust manifold and front exhaust pipe assembly are consistent front-to-rear and left-to-right.
26.CONNECT WIRE HARNESS
Connect the wire harness with the 2 bolts.
- Torque:
- 13 N*m (133 kgf*cm, 10 ft.*lbf)
16261
27.CONNECT WATER BY-PASS HOSE
Connect the water by-pass hose.
87245A
28.CONNECT INLET HEATER WATER HOSE A
Connect inlet heater water hose A.
16268
29.INSTALL NO. 1 WATER BY-PASS PIPE
Install No. 1 water by-pass pipe with the bolt.
- Torque:
- 9.0 N*m (92 kgf*cm, 80 in.*lbf)
89465
30.CONNECT HEATED OXYGEN SENSOR CONNECTOR
Connect the heated oxygen sensor connector.
Install the sensor bracket with the bolt.
89422
31.CONNECT ENGINE COOLANT TEMPERATURE SENSOR CONNECTOR
Connect the engine coolant temperature sensor connector.
11101E
32.CONNECT CAMSHAFT POSITION SENSOR CONNECTOR
Connect the camshaft position sensor connector.
44763
33.CONNECT BOOSTER VACUUM TUBE
Connect the booster vacuum tube.
23901
34.CONNECT FUEL TUBE SUB-ASSEMBLY
11452
35.INSTALL OIL LEVEL DIPSTICK GUIDE
Apply engine oil to a new O-ring.
Install the O-ring onto the oil level dipstick guide.
Install the oil level dipstick guide with the bolt.
- Torque:
- 10 N*m (102 kgf*cm, 7 ft.*lbf)
Engage the clamp and connect the wire harness to the oil level dipstick guide.
17111
36.INSTALL INTAKE MANIFOLD
Install a new gasket onto the intake manifold.
Install the intake manifold with the 3 bolts and 2 nuts.
- Torque:
- 30 N*m (306 kgf*cm, 22 ft.*lbf)
Connect the 3 wire harness clamps shown in the illustration.
15301
37.INSTALL OIL LEVEL DIPSTICK SUB-ASSEMBLY
44774
38.CONNECT UNION TO CONNECTOR TUBE HOSE
Connect the union to connector tube hose.
12261
39.CONNECT VENTILATION HOSE
Connect the ventilation hose.
23820
40.INSTALL FUEL VAPOR FEED HOSE ASSEMBLY
Install the fuel vapor feed hose assembly.
22030
41.CONNECT THROTTLE WITH MOTOR BODY CONNECTOR
Install the throttle with motor body connector bracket with the nut.
- Torque:
- 9.0 N*m (92 kgf*cm, 80 in.*lbf)
Connect the throttle with motor body connector.
Connect the wire harness clamp.
16264
42.CONNECT NO. 2 WATER BY-PASS HOSE
Connect No. 2 water by-pass hose.
16502
43.INSTALL WATER FILLER SUB-ASSEMBLY
Install the water filler sub-assembly with the 2 nuts.
- Torque:
- 7.5 N*m (76 kgf*cm, 66 in.*lbf)
Connect No. 1 radiator hose to the cylinder head.
16711
44.CONNECT RESERVE TANK HOSE
Connect the reserve tank hose.
16573B
45.CONNECT NO. 3 RADIATOR HOSE
Connect No. 3 radiator hose.
19500D
46.INSTALL NO. 1 IGNITION COIL
17705
47.INSTALL AIR CLEANER CAP SUB-ASSEMBLY WITH NO. 1 AIR CLEANER HOSE
74431
48.INSTALL BATTERY TRAY
49.INSTALL BATTERY
55711
50.INSTALL OUTER COWL TOP PANEL (for LHD)
55711
51.INSTALL OUTER COWL TOP PANEL (for RHD)
55722C
52.INSTALL INNER COWL TOP TO COWL BRACE (for LHD)
55722C
53.INSTALL INNER COWL TOP TO COWL BRACE (for RHD)
55815E
54.INSTALL FRONT NO. 1 VENTILATOR SEAL (for LHD)
55815E
55.INSTALL FRONT NO. 1 VENTILATOR SEAL (for RHD)
55735D
56.INSTALL FRONT AIR SHUTTER SEAL RH (for LHD)
55735D
57.INSTALL FRONT AIR SHUTTER SEAL RH (for RHD)
58.INSTALL FRONT WIPER MOTOR AND LINK ASSEMBLY
59.INSTALL FRONT WHEEL RH
- Torque:
- 103 N*m (1050 kgf*cm, 76 ft.*lbf)
60.ADD ENGINE COOLANT
61.ADD ENGINE OIL
62.INSPECT FOR ENGINE COOLANT LEAK
63.INSPECT ENGINE OIL LEVEL
64.INSPECT FOR ENGINE OIL LEAK
65.INSPECT FOR FUEL LEAK
66.INSPECT FOR EXHAUST GAS LEAK
67.INSPECT IGNITION TIMING
68.INSPECT ENGINE IDLING SPEED
69.INSPECT COMPRESSION
11212
71.INSTALL NO. 2 CYLINDER HEAD COVER
51442C
72.INSTALL ENGINE UNDER COVER LH (for Plastic Type)
- Torque:
- 5.0 N*m (51 kgf*cm, 44 in.*lbf)
51441C
73.INSTALL ENGINE UNDER COVER RH (for Plastic Type)
- Torque:
- 5.0 N*m (51 kgf*cm, 44 in.*lbf)
51405A
74.INSTALL NO. 1 ENGINE UNDER COVER SUB-ASSEMBLY (for Metal Type)
- Torque:
- 18 N*m (184 kgf*cm, 13 ft.*lbf)