2GR-FE ENGINE MECHANICAL ENGINE ASSEMBLY INSTALLATION
PROCEDURE

 89422
1.INSTALL ENGINE COOLANT TEMPERATURE SENSOR
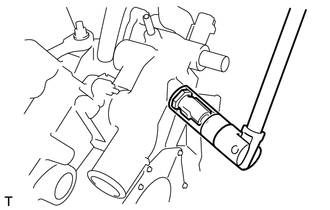
Using a 19 mm deep socket wrench, install the gasket and engine coolant temperature sensor.
89615
2.INSTALL KNOCK CONTROL SENSOR
83530
3.INSTALL ENGINE OIL PRESSURE SWITCH ASSEMBLY
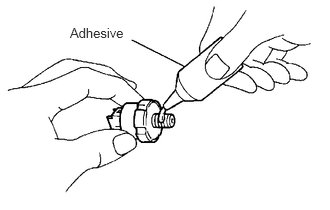
Remove the oil pressure gauge.
Apply adhesive to 2 or 3 threads of the oil pressure switch.
- Adhesive:
Toyota Genuine Adhesive 1344, Three Bond 1344 or equivalent
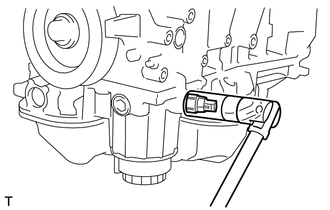
Using a 24 mm deep socket wrench, install the oil pressure switch.
- Torque:
- 15 N*m (153 kgf*cm, 11 ft.*lbf)
- NOTICE:
-
Do not start the engine within 1 hour after installation.
25860
4.INSTALL NO. 1 VACUUM SWITCHING VALVE ASSEMBLY
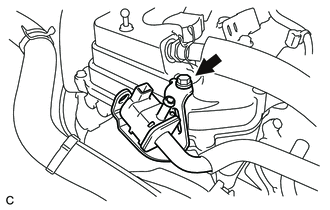
Install the No. 1 vacuum switching valve assembly with the bolt.
- Torque:
- 10 N*m (102 kgf*cm, 7 ft.*lbf)
86011A
5.INSTALL RADIO SETTING CONDENSER
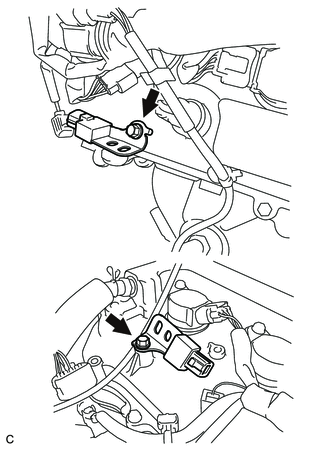
Install the radio setting condenser with the 2 bolts.
- Torque:
- 10 N*m (102 kgf*cm, 7 ft.*lbf)
12315
6.INSTALL FRONT NO. 1 ENGINE MOUNTING BRACKET LH
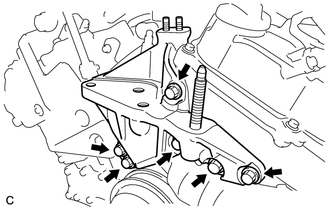
Install the front No. 1 engine mounting bracket LH with the 6 bolts.
- Torque:
- 54 N*m (551 kgf*cm, 40 ft.*lbf)
16173
7.INSTALL WATER PUMP PULLEY
16604
8.INSTALL NO. 2 IDLER PULLEY SUB-ASSEMBLY
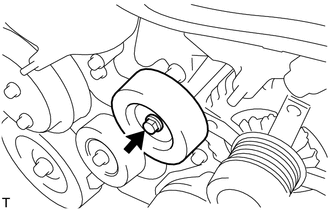
Install the No. 2 idler pulley sub-assembly and cover plate with the bolt.
- Torque:
- 43 N*m (439 kgf*cm, 32 ft.*lbf)
11322F
9.INSTALL NO. 2 TIMING GEAR COVER
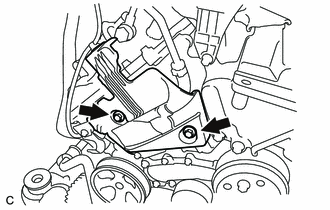
Install the No. 2 timing gear cover with the 2 bolts.
- Torque:
- 6.0 N*m (61 kgf*cm, 53 in.*lbf)
16620
10.INSTALL V-RIBBED BELT TENSIONER ASSEMBLY
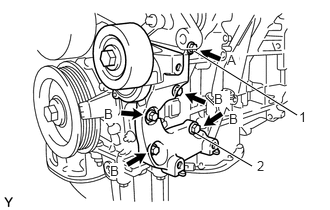
Temporarily install the V-ribbed belt tensioner with the 5 bolts.
- HINT:
-
Each bolt length is as follows:
-
A: 70 mm (2.76 in.)
-
B: 33 mm (1.30 in.)
Install the V-ribbed belt tensioner by tightening the bolt 1 and bolt 2 in the order shown in the illustration.
- Torque:
- 43 N*m (438 kgf*cm, 32 ft.*lbf)
Tighten the other bolts.
- Torque:
- 43 N*m (438 kgf*cm, 32 ft.*lbf)
43457
11.INSTALL DRIVE SHAFT BEARING BRACKET
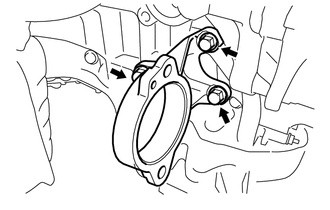
Install the drive shaft bearing bracket with the 3 bolts.
- Torque:
- 64 N*m (650 kgf*cm, 47 ft.*lbf)
17105
12.INSTALL EXHAUST MANIFOLD SUB-ASSEMBLY LH
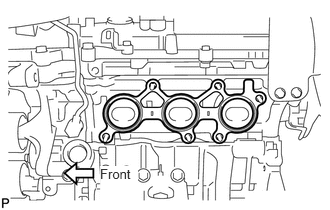
Install a new gasket as shown in the illustration.
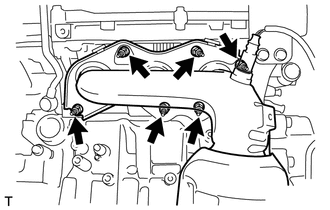
Install the exhaust manifold sub-assembly LH with the 6 nuts.
- Torque:
- 21 N*m (214 kgf*cm, 15 ft.*lbf)
17168
13.INSTALL NO. 2 EXHAUST MANIFOLD HEAT INSULATOR
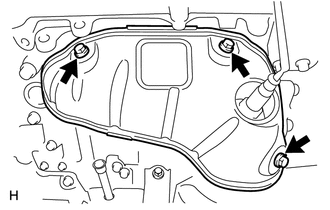
Install the No. 2 exhaust manifold heat insulator with the 3 bolts.
- Torque:
- 8.5 N*m (87 kgf*cm, 75 in.*lbf)
17119
14.INSTALL NO. 2 MANIFOLD STAY
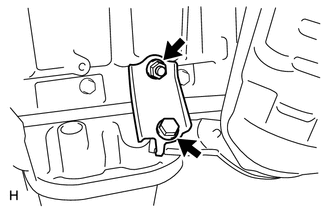
Install the No. 2 manifold stay with the bolt and nut.
- Torque:
- 34 N*m (347 kgf*cm, 25 ft.*lbf)
15.INSTALL ENGINE OIL LEVEL DIPSTICK
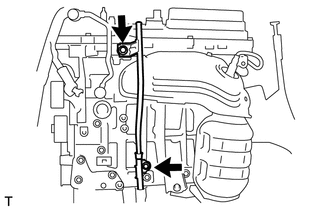
Install 2 new O-rings to the oil level dipstick guide.
Apply a light coat of engine oil to the O-rings.
Push in the oil level dipstick guide end into the guide hole.
Install the No. 1 oil level dipstick guide with the bolt.
- Torque:
- 21 N*m (214 kgf*cm, 15 ft.*lbf)
Install the No. 2 oil level dipstick guide with the bolt.
- Torque:
- 21 N*m (214 kgf*cm, 15 ft.*lbf)
Install the oil level dipstick.
17104
16.INSTALL EXHAUST MANIFOLD SUB-ASSEMBLY RH
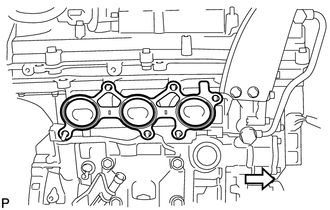
Install a new gasket as shown in the illustration.
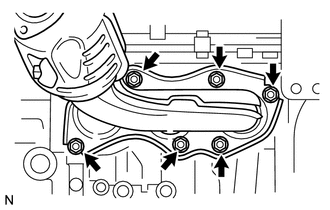
Install the exhaust manifold sub-assembly RH with the 6 nuts.
- Torque:
- 21 N*m (214 kgf*cm, 15 ft.*lbf)
17111
17.INSTALL INTAKE MANIFOLD
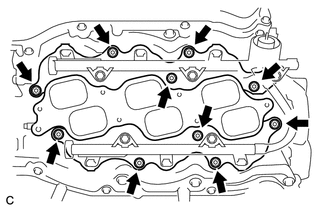
Set a new gasket on each cylinder head.
- NOTICE:
- ·
Align the port holes of the gasket and cylinder head.
·Make sure that the gasket is installed in the correct direction.
Set the intake manifold on the cylinder heads.
Install and tighten the 6 bolts and 4 nuts uniformly in several steps.
- Torque:
- 21 N*m (214 kgf*cm, 15 ft.*lbf)
12327A
18.INSTALL NO. 2 ENGINE MOUNTING STAY RH
Install the No. 2 engine mounting stay RH with the bolt.
- Torque:
- 21 N*m (214 kgf*cm, 15 ft.*lbf)
19500
19.INSTALL IGNITION COIL ASSEMBLY
Install the 6 ignition coil assemblies with the 6 bolts.
- Torque:
- 10 N*m (102 kgf*cm, 7 ft.*lbf)
17190
20.INSTALL INTAKE AIR SURGE TANK ASSEMBLY
- NOTICE:
- DO NOT apply oil to the bolts listed below ::
Tightening Parts Surge Tank and Intake Manifold No. 1 Surge Tank Stay and Cylinder Head Cover No. 1 Surge Tank Stay and Surge Tank Throttle Body Bracket and Cylinder Head Cover Throttle Body Bracket and Surge Tank
Install a new gasket to the intake air surge tank.
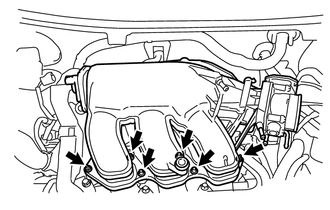
Using a 5 mm hexagon socket wrench, install the 4 bolts and 2 nuts.
- Torque:
- Bolt : 18 N*m (184 kgf*cm, 13 ft.*lbf)
- Nut : 16 N*m (163 kgf*cm, 12 ft.*lbf)
Install the throttle body bracket and No. 1 surge tank stay with the 4 bolts.
- Torque:
- 21 N*m (214 kgf*cm, 15 ft.*lbf)
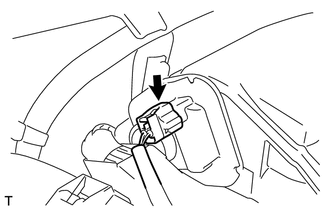
Connect the connector.
Connect the No. 1 ventilation hose.
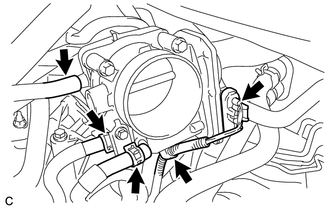
Install the clamp and connect the throttle with motor body assembly connector.
Connect the vapor feed hose.
Connect the 2 water by-pass hoses to the throttle with motor body assembly.
88320
21.INSTALL COMPRESSOR AND MAGNETIC CLUTCH
27415
22.INSTALL GENERATOR ASSEMBLY
16361A
23.INSTALL FAN & GENERATOR V BELT
24.SUSPEND ENGINE ASSEMBLY
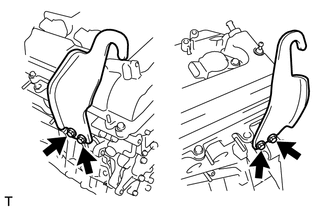
Install the No. 1 and No. 2 engine hangers with the bolts.
- Torque:
- 38 N*m (387 kgf*cm, 28 ft.*lbf)
| Item | Part No. |
|---|---|
| No. 1 engine hanger | 12281-31120 |
| No. 2 engine hanger | 12282-31100 |
| Bolt | 91671-10825 |
Attach the sling device to the engine hangers and chain block.
25.REMOVE ENGINE STAND
32101
26.INSTALL DRIVE PLATE
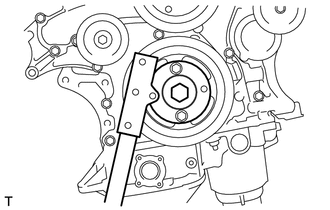
Using SST, hold the crankshaft.
- SST
- 09213-70011 (09213-70020)
09330-00021
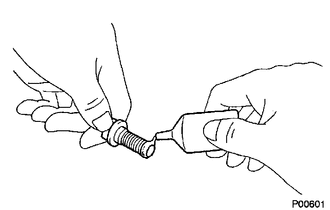
Apply adhesive to 2 or 3 threads of the mounting bolt end.
- Adhesive:
Toyota Genuine Adhesive 1324, Three Bond 1324 or equivalent
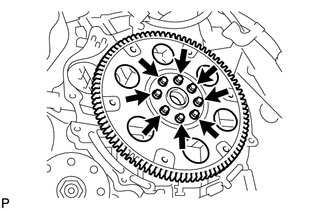
Install the front spacer, drive plate and rear spacer on the crankshaft.
Install and tighten the 8 mounting bolts uniformly in several steps.
- Torque:
- 83 N*m (850 kgf*cm, 61 ft.*lbf)
30500
27.INSTALL AUTOMATIC TRANSAXLE ASSEMBLY
Install the automatic transaxle (See page Drivetrain>U660E (AUTOMATIC TRANSMISSION / TRANSAXLE)>AUTOMATIC TRANSAXLE ASSEMBLY>INSTALLATION).
17571
28.INSTALL NO. 1 EXHAUST PIPE SUPPORT BRACKET
Install the No. 1 exhaust pipe support bracket with the 2 bolts.
- Torque:
- 21 N*m (214 kgf*cm, 15 ft.*lbf)
11361J
29.INSTALL FLYWHEEL HOUSING UNDER COVER
28100
30.INSTALL STARTER ASSEMBLY
12321A
31.INSTALL NO. 2 ENGINE MOUNTING BRACKET
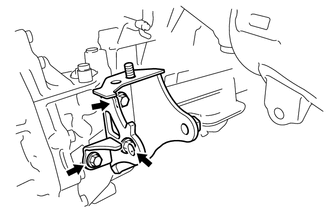
Install the No. 2 engine mounting bracket with the 3 bolts.
- Torque:
- 45 N*m (459 kgf*cm, 33 ft.*lbf)
12311A
32.INSTALL NO. 1 ENGINE MOUNTING BRACKET
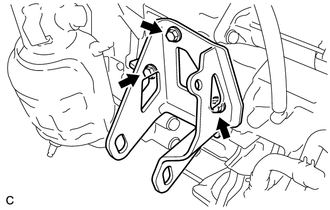
Install the No. 1 engine mounting bracket with the 3 bolts.
- Torque:
- 64 N*m (653 kgf*cm, 47 ft.*lbf)
17118
33.INSTALL MANIFOLD STAY
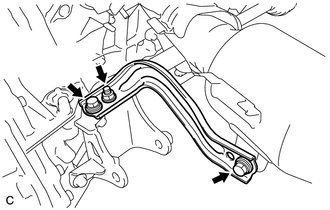
Install the manifold stay with the 2 bolts.
- Torque:
- 34 N*m (347 kgf*cm, 25 ft.*lbf)
43410
34.INSTALL FRONT DRIVE SHAFT
Install the front drive shaft (See page Drivetrain>DRIVE SHAFT>FRONT DRIVE SHAFT ASSEMBLY>INSTALLATION).
82121
35.INSTALL ENGINE WIRE
11000
36.INSTALL ENGINE ASSEMBLY
Set an engine lifter underneath the engine.
- HINT:
-
Set wooden blocks or an equivalent under the engine so that the engine is level.
Carefully install the engine to the vehicle.
- NOTICE:
-
While installing the engine to the vehicle, do not allow it to contact the vehicle.
12372A
37.INSTALL ENGINE MOUNTING INSULATOR LH
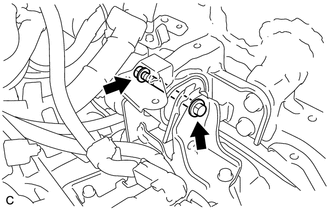
Install the through bolt and nut.
- Torque:
- 56 N*m (571 kgf*cm, 41 ft.*lbf)
- HINT:
-
Install the through bolt by tightening the nut.
12305
38.INSTALL ENGINE MOUNTING INSULATOR RH
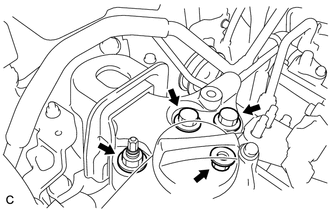
Install the insulator RH with the 2 nuts and 2 bolts.
Install the insulator RH with the 2 nuts and 2 bolts.
- Torque:
- 95 N*m (969 kgf*cm, 70 ft.*lbf)
for bolt
- 95 N*m (969 kgf*cm, 70 ft.*lbf)
for nut A
- 52 N*m (530 kgf*cm, 38 ft.*lbf)
for nut B
51201
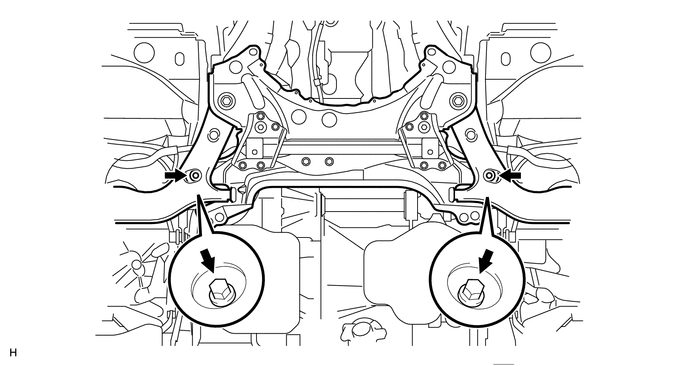
39.TEMPORARILY TIGHTEN FRONT SUSPENSION CROSSMEMBER SUB-ASSEMBLY
Temporarily install the suspension crossmember with the 2 bolts.
51403B
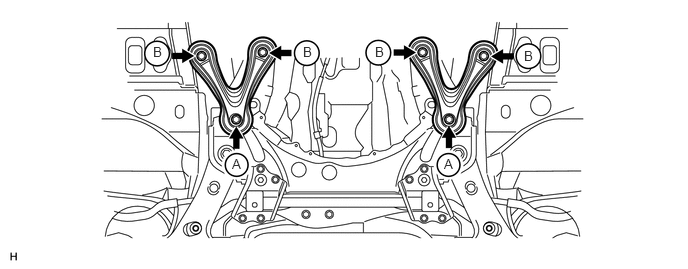
40.TEMPORARILY TIGHTEN FRONT SUSPENSION MEMBER BRACE SUB-ASSEMBLY
Temporarily install the suspension member brace with the 2 bolts (A) and 4 bolts (B).
51201
41.TIGHTEN FRONT SUSPENSION CROSSMEMBER SUB-ASSEMBLY
Alternately insert SST into the standard holes on the front suspension crossmember RH and LH, and properly align the crossmember. Tighten the bolts.
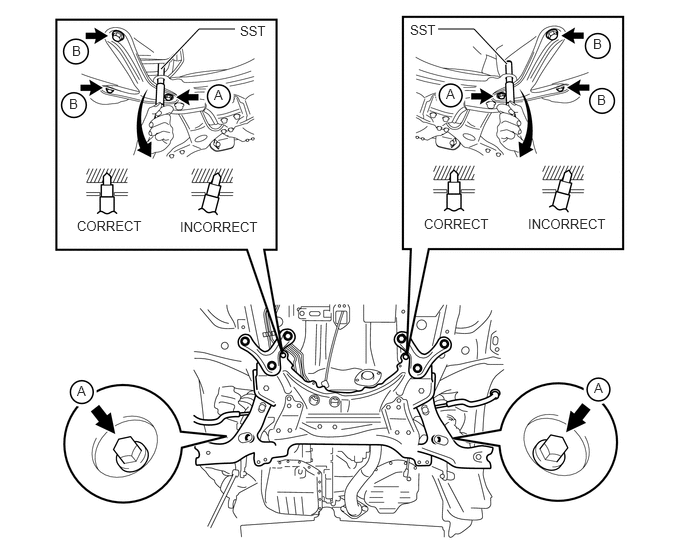
- SST
- 09670-00010
- Torque:
- Bolt A : 137 N*m (1397 kgf*cm, 101 ft.*lbf)
- Bolt B : 93 N*m (948 kgf*cm, 69 ft.*lbf)
- NOTICE:
- ·
SST must be inserted perpendicularly into the standard holes.
·If SST cannot be perpendicularly inserted, loosen the 8 bolts and try again.
57104E
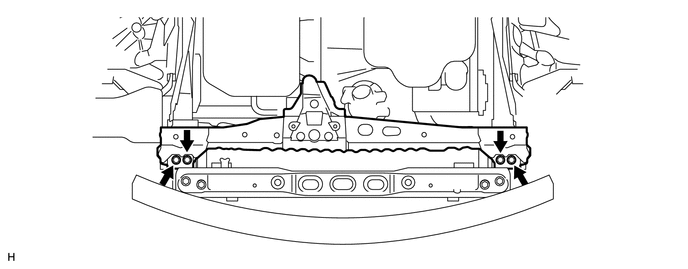
42.INSTALL FRONT CROSSMEMBER SUB-ASSEMBLY
Install the crossmember with the 4 bolts.
- Torque:
- 96 N*m (979 kgf*cm, 71 ft.*lbf)
51217A
43.INSTALL FRONT SUSPENSION MEMBER REINFORCEMENT RH
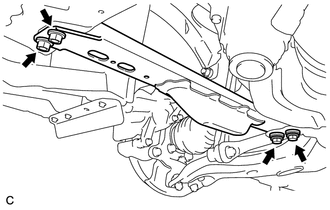
Install the reinforcement RH with the 4 bolts.
- Torque:
- 96 N*m (979 kgf*cm, 71 ft.*lbf)
51218A
44.INSTALL FRONT SUSPENSION MEMBER REINFORCEMENT LH
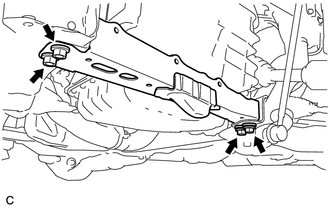
Install the reinforcement LH with the 4 bolts.
- Torque:
- 96 N*m (979 kgf*cm, 71 ft.*lbf)
12371A
45.INSTALL REAR ENGINE MOUNTING INSULATOR
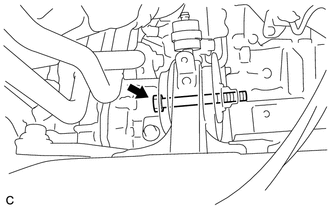
Install the through bolt which is used to secure the rear engine mounting insulator into the rear engine mounting bracket.
- Torque:
- 95 N*m (969 kgf*cm, 70 ft.*lbf)
12361A
46.INSTALL FRONT ENGINE MOUNTING INSULATOR
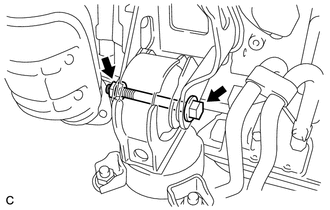
Install the through bolt and nut which is used to secure the front engine mounting bracket.
T = 145 N*m{ 1,479 kgf*cm 107 ft.*lbf }
12281A
47.REMOVE ENGINE HANGER
Remove the chain block, sling device and No. 1 and No. 2 engine hangers.
48.CONNECT FRONT AXLE ASSEMBLY LH
48069
49.CONNECT FRONT NO. 1 SUSPENSION ARM SUB-ASSEMBLY LOWER
50.CONNECT TIE ROD END SUB-ASSEMBLY
48810
51.CONNECT FRONT STABILIZER LINK ASSEMBLY
89542
52.CONNECT FRONT SPEED SENSOR
45025D
53.CONNECT NO. 1 STEERING COLUMN HOLE COVER SUB-ASSEMBLY
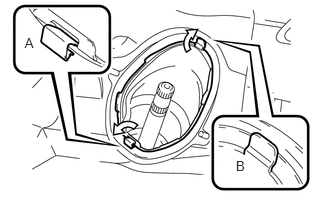
Insert clip B, set clip A on the upper surface of the panel and connect the steering column hole cover to the floor panel.
45221
54.INSTALL STEERING INTERMEDIATE SHAFT
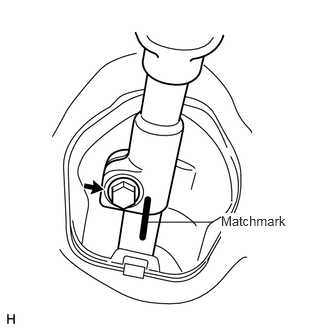
Align the matchmark on the steering intermediate shaft and steering gear with the bolt.
- Torque:
- 35 N*m (357 kgf*cm, 26 ft.*lbf)
45259A
55.INSTALL COLUMN HOLE COVER SILENCER SHEET
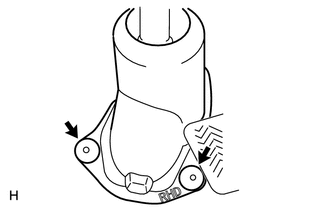
Install the column hole cover silencer sheet with the 2 clips.
17410
56.INSTALL FRONT EXHAUST PIPE ASSEMBLY
17420
57.INSTALL CENTER EXHAUST PIPE ASSEMBLY
77251B
58.CONNECT FUEL MAIN TUBE
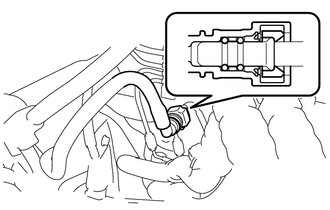
Push in the fuel tube connector to the fuel pipe until the connector makes a "click" sound.
- NOTICE:
- ·
Check for damage or contamination on the connected part of the pipe.
·Check if the pipe and the connector are securely connected by trying to pull them apart.
Install the No. 1 fuel pipe clamp.
88712
59.CONNECT NO. 1 COOLER REFRIGERANT SUCTION HOSE
88703
60.CONNECT DISCHARGE HOSE SUB-ASSEMBLY
12327A
61.INSTALL NO. 2 ENGINE MOUNTING STAY RH
16611
62.INSTALL RADIATOR RESERVOIR BRACKET
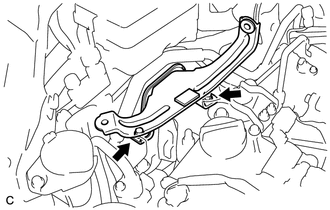
Install the radiator reservoir bracket with the 2 bolts.
- Torque:
- 5.5 N*m (56 kgf*cm, 49 in.*lbf)
16470
63.INSTALL RADIATOR RESERVOIR ASSEMBLY
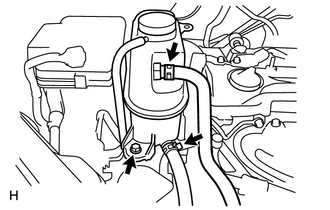
Install the reservoir with the bolt.
- Torque:
- 5.5 N*m (56 kgf*cm, 49 in.*lbf)
Connect the No. 1 and No. 2 water by-pass hoses.
82121
64.CONNECT ENGINE WIRE
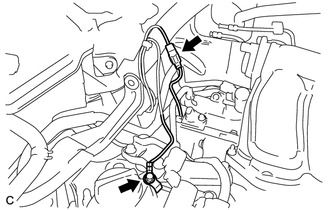
Install the ground cable with the bolt and connect the connector.
- Torque:
- 8.4 N*m (86 kgf*cm, 74 in.*lbf)
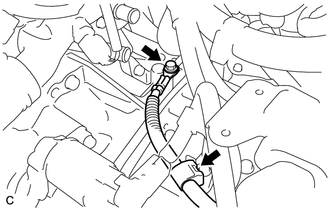
Install the ground cable with the bolt and clamp, connect the connector.
- Torque:
- 19 N*m (194 kgf*cm, 14 ft.*lbf)
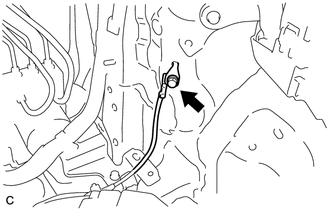
Install the ground cable with the bolt.
- Torque:
- 8.4 N*m (86 kgf*cm, 74 in.*lbf)
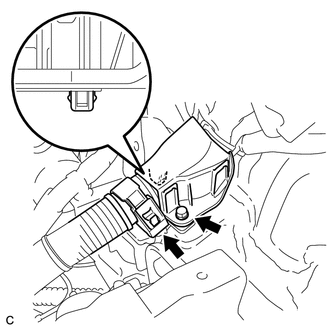
Install the wire harness protector to the bracket with the bolt and 2 clamps.
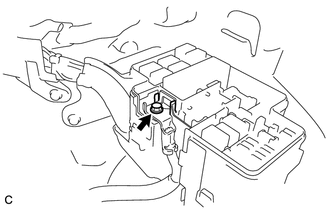
Connect the engine wire to the engine room relay block.
Lock the 2 claws and install the bolt.
- Torque:
- 5.4 N*m (55 kgf*cm, 48 in.*lbf)
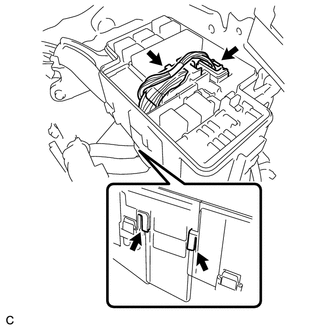
Connect the 2 connectors and 2 claws to the engine room relay block.
89661
65.INSTALL ECM
66.CONNECT TRANSAXLE CONTROL CABLE ASSEMBLY
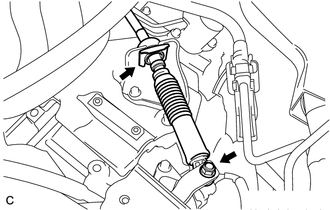
Connect the cable to the transaxle with the clip and nut.
- Torque:
- 12 N*m (122 kgf*cm, 9 ft.*lbf)
44774
67.CONNECT UNION TO CONNECTOR TUBE HOSE
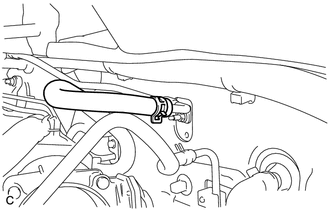
Connect the 2 union to connector tube hoses.
23826
68.CONNECT NO. 1 FUEL VAPOR FEED HOSE
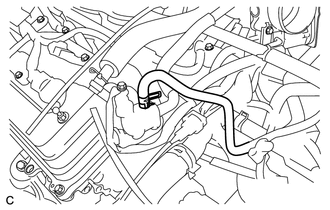
Connect the No. 1 fuel vapor feed hose.
87246B
69.CONNECT HEATER WATER OUTLET HOSE
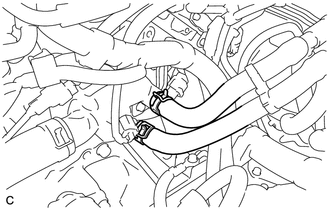
Connect the outlet hose to the pipe of the heater unit and water by-pass pipe.
87245A
70.CONNECT HEATER WATER INLET HOSE
Connect the inlet hose to the heater unit's pipe and water by-pass pipe.
16571C
71.CONNECT NO. 1 RADIATOR HOSE
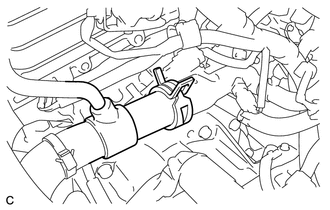
Connect the No. 1 radiator hose.
16572D
72.CONNECT NO. 2 RADIATOR HOSE
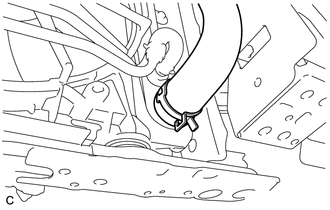
Connect the No. 2 radiator hose.
32941
73.CONNECT OIL COOLER INLET HOSE
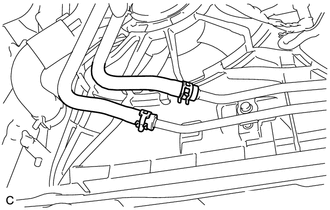
Connect the oil cooler inlet hose.
32942
74.CONNECT OIL COOLER OUTLET HOSE
Connect the oil cooler outlet hose.
74414D
75.INSTALL BATTERY CARRIER SUPPORT
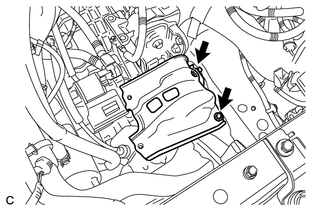
Install the battery carrier support with the 2 bolts.
- Torque:
- 20 N*m (204 kgf*cm, 15 ft.*lbf)
74411
76.INSTALL BATTERY CARRIER
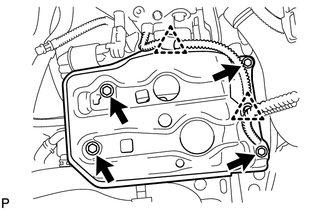
Install the battery carrier with the 4 bolts.
- Torque:
- 20 N*m (204 kgf*cm, 15 ft.*lbf)
Connect the battery ground cable's connector.
17752
77.INSTALL NO. 2 AIR CLEANER INLET
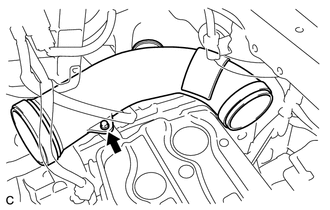
Install the No. 2 air cleaner inlet with the bolt.
- Torque:
- 5.0 N*m (51 kgf*cm, 44 in.*lbf)
for nut
17751
78.INSTALL NO. 1 AIR CLEANER INLET
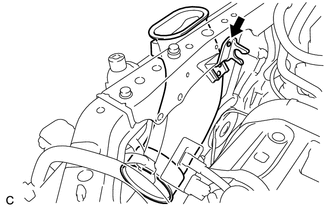
Install the No. 1 air cleaner inlet with the clip.
17700
79.INSTALL AIR CLEANER CASE SUB-ASSEMBLY
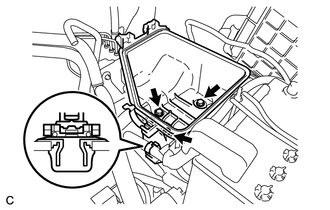
Install the air cleaner case sub-assembly with the 3 bolts.
- Torque:
- 7.0 N*m (71 kgf*cm, 62 in.*lbf)
for nut
17705
80.INSTALL AIR CLEANER CAP SUB-ASSEMBLY
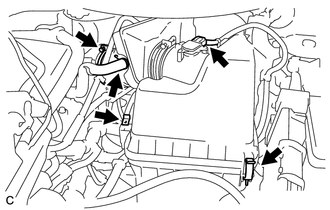
Install the air cleaner filter element.
Install the air cleaner cap and tighten the hose band.
Connect the ventilation hose.
Connect the mass air flow meter connector.
74431
81.INSTALL BATTERY TRAY
28800
82.INSTALL BATTERY
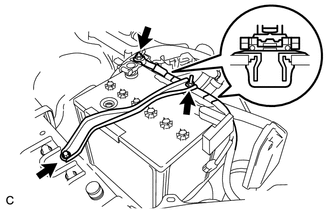
Install the battery clamp with the bolt and nut.
- Torque:
- 46 N*m (469 kgf*cm, 34 ft.*lbf)
for bolt
- 5.0 N*m (51 kgf*cm, 44 in.*lbf)
for nut
Connect the positive (+) cable to the battery positive (+) terminal.
- Torque:
- 13 N*m (133 kgf*cm, 9.6 ft.*lbf)
83.INSTALL FRONT COWL TOP OUTSIDE PANEL WITH WINDSHIELD WIPER MOTOR AND LINK
84.INSTALL BRAKE MASTER CYLINDER RESERVOIR WITH BRACKET
55781F
85.REMOVE COWL TOP VENTILATOR LOUVER
86.REMOVE FRONT WIPER ARM
87.ADD AUTOMATIC TRANSAXLE FLUID
88.ADD ENGINE COOLANT
89.ADD ENGINE OIL
90.CONNECT CABLE TO NEGATIVE BATTERY TERMINAL
Connect the negative (-) cable to the battery negative (-) terminal.
- Torque:
- 5.4 N*m (55 kgf*cm, 48 in.*lbf)
91.INSPECT FOR ENGINE COOLANT
92.INSPECT FOR AUTOMATIC TRANSAXLE FLUID LEVEL
93.CHARGE WITH REFRIGERANT
Charge with refrigerant (See page Vehicle Interior>AIR CONDITIONING>REFRIGERANT>REPLACEMENT).
53292A
94.INSTALL UPPER RADIATOR SUPPORT SEAL
53701
95.INSTALL FRONT FENDER APRON RH
53702
96.INSTALL FRONT FENDER APRON LH
51442
97.INSTALL NO. 2 ENGINE UNDER COVER
51441
98.INSTALL NO. 1 ENGINE UNDER COVER
99.INSTALL FRONT WHEEL
53301
100.INSTALL HOOD SUB-ASSEMBLY
Install the hood with the 4 bolts.
- Torque:
- 13 N*m (133 kgf*cm, 10 ft.*lbf)
53301
101.ADJUST HOOD SUB-ASSEMBLY
102.ADJUST SHIFT LEVER POSITION
103.INSPECT AND ADJUST FRONT WHEEL ALIGNMENT
Inspect and adjust front wheel alignment (See page Suspension>SUSPENSION>FRONT WHEEL ALIGNMENT>ADJUSTMENT).
104.PERFORM INITIALIZATION
Perform initialization (See page General>INTRODUCTION>REPAIR INSTRUCTION>INITIALIZATION).
- NOTICE:
-
Certain systems need to be initialized after disconnecting and reconnecting the cable from the negative (-) battery terminal.
11209
105.INSTALL V-BANK COVER ASSEMBLY
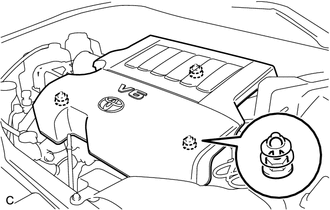
Fit the 3 retainers and install the V-bank cover assembly.
106.CHECK ABS SPEED SENSOR SIGNAL