HEATING / AIR CONDITIONING FRONT AIR CONDITIONING UNIT(for RHD) REMOVAL
CAUTION / NOTICE / HINT
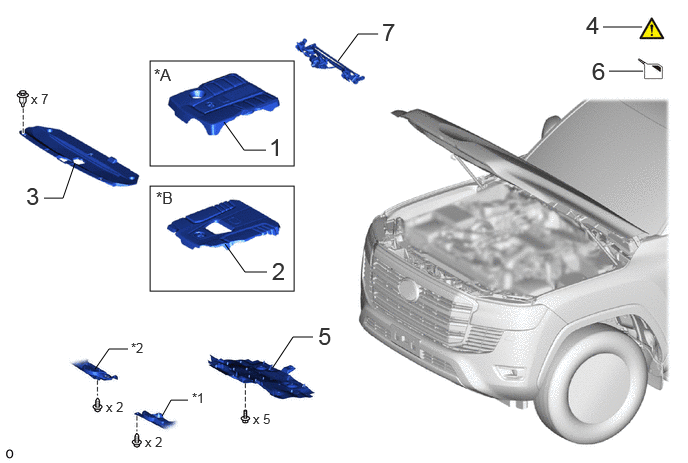
| Procedure | Part Name Code |

|

|

|
|
|---|---|---|---|---|---|
| 1 | V-BANK COVER SUB-ASSEMBLY | 11209 | - | - | - |
| 2 | NO. 1 ENGINE COVER SUB-ASSEMBLY | 12601B | |||
| 3 | UPPER RADIATOR SUPPORT SEAL | 53292A | - | - | - |
| 4 | RECOVER REFRIGERANT FROM REFRIGERATION SYSTEM | - | ( ) |
- | - |
| 5 | NO. 1 ENGINE UNDER COVER ASSEMBLY | 51410 | - | - | - |
| 6 | DRAIN ENGINE COOLANT | - | - | () |
- |
| 7 | FRONT WIPER MOTOR AND LINK | - | - | - | - |
| *A | for V35A-FTS | *B | for F33A-FTV |
| *1 | ENGINE SIDE COVER SUB-ASSEMBLY LH | *2 | ENGINE SIDE COVER SUB-ASSEMBLY RH |
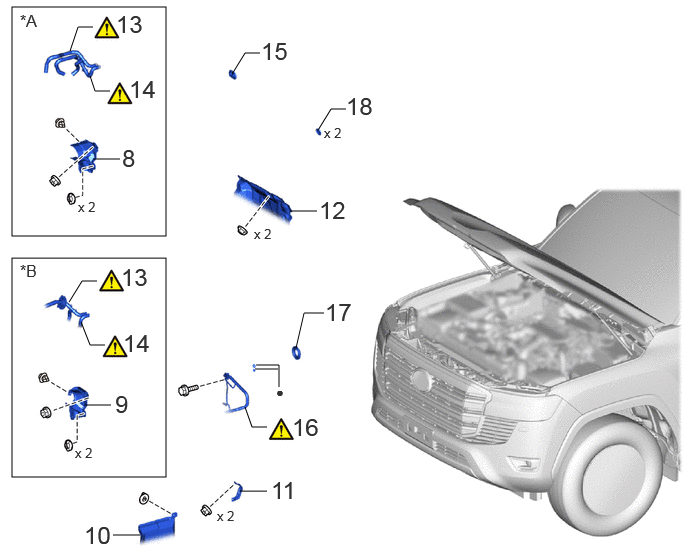
| Procedure | Part Name Code |
|
|
|
|
|---|---|---|---|---|---|
| 8 | HEATER PIPING COVER | 87237 | - | - | - |
| 9 | NO. 1 HEATER COVER | 87114E | - | - | - |
| 10 | REAR ENGINE SIDE UNDER COVER ASSEMBLY LH | 51470C | - | - | - |
| 11 | WIRING HARNESS CLAMP BRACKET | - | - | - | - |
| 12 | OUTER DASH PANEL INSULATOR | 55223A | - | - | - |
| 13 | OUTLET HEATER WATER HOSE A | 87246A | () |
- | - |
| 14 | INLET HEATER WATER HOSE A | 87245A | () |
- | - |
| 15 | HEATER GROMMET | 87128 | - | - | - |
| 16 | NO. 3 AIR CONDITIONING TUBE AND ACCESSORY ASSEMBLY | 88710K | () |
- | - |
| 17 | COOLER PIPE GROMMET | 88879K | - | - | - |
| 18 | HOLE PLUG | - | - | - | - |
| *A | for V35A-FTS | *B | for F33A-FTV |
| ● | Non-reusable part | - | - |
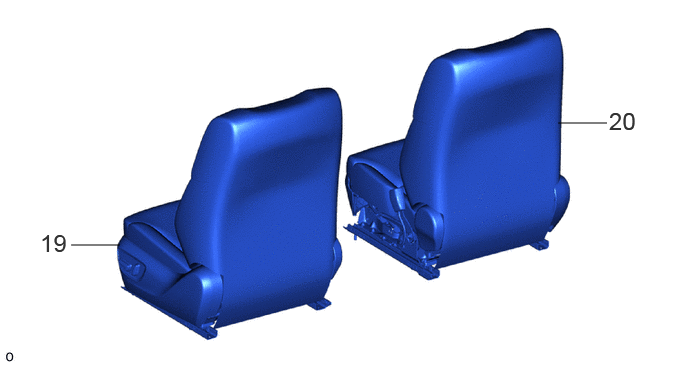
| Procedure | Part Name Code |
|
|
|
|
|---|---|---|---|---|---|
| 19 | FRONT SEAT ASSEMBLY LH | - | - | - | - |
| 20 | FRONT SEAT ASSEMBLY RH | - | - | - | - |
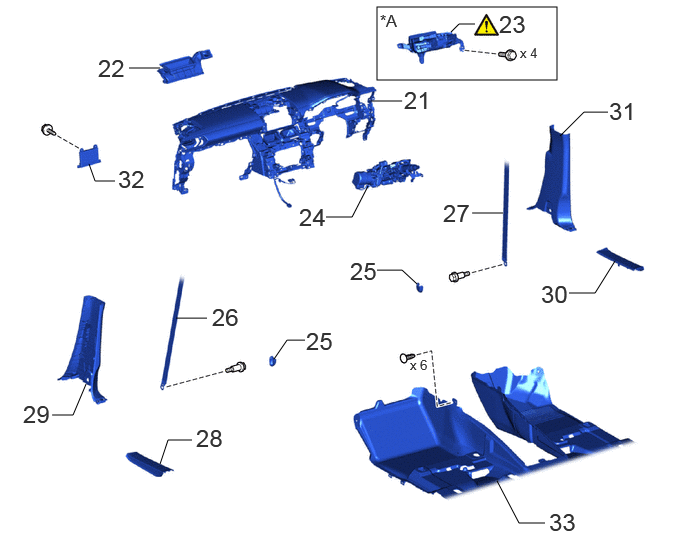
| Procedure | Part Name Code |
|
|
|
|
|---|---|---|---|---|---|
| 21 | INSTRUMENT PANEL SAFETY PAD | - | - | - | - |
| 22 | LOWER DEFROSTER NOZZLE ASSEMBLY | 55990B | - | - | - |
| 23 | METER MIRROR SUB-ASSEMBLY | 83108 | () |
- | - |
| 24 | STEERING COLUMN ASSEMBLY | 45250 | - | - | - |
| 25 | OUTER LAP BELT ANCHOR COVER | 73233 | - | - | - |
| 26 | FRONT SEAT OUTER BELT ASSEMBLY LH (FLOOR ANCHOR) | 73220 | - | - | - |
| 27 | FRONT SEAT OUTER BELT ASSEMBLY RH (FLOOR ANCHOR) | 73210 | - | - | - |
| 28 | REAR DOOR SCUFF PLATE LH | 67918D | - | - | - |
| 29 | CENTER PILLAR LOWER GARNISH LH | 62414A | - | - | - |
| 30 | REAR DOOR SCUFF PLATE RH | 67917C | - | - | - |
| 31 | CENTER PILLAR LOWER GARNISH RH | 62413A | - | - | - |
| 32 | AIR CONDITIONING AMPLIFIER ASSEMBLY | 88650N | - | - | - |
| 33 | FRONT FLOOR CARPET ASSEMBLY | 58510D | - | - | - |
| *A | w/ Headup Display | - | - |
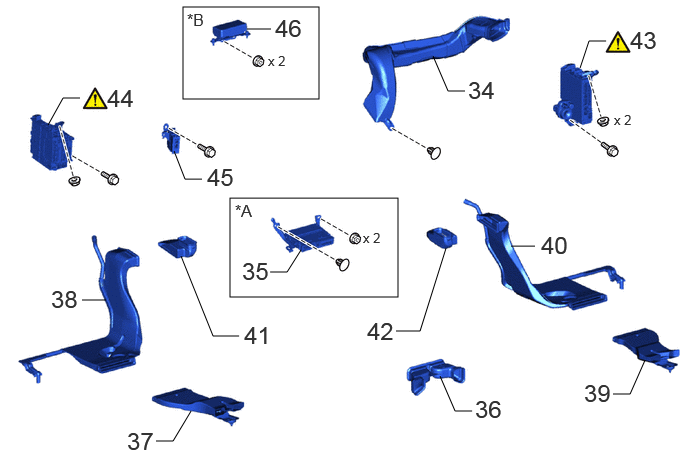
| Procedure | Part Name Code |
|
|
|
|
|---|---|---|---|---|---|
| 34 | NO. 1 HEATER TO REGISTER DUCT SUB-ASSEMBLY | 55084E | - | - | - |
| 35 | TELEPHONE TRANSCEIVER ASSEMBLY WITH BRACKET | - | - | - | - |
| 36 | NO. 1 COOLER AIR DUCT | 88576C | - | - | - |
| 37 | REAR NO. 6 AIR DUCT | 87212K | - | - | - |
| 38 | REAR NO. 4 AIR DUCT | 87212H | - | - | - |
| 39 | REAR NO. 5 AIR DUCT | 87212J | - | - | - |
| 40 | REAR NO. 3 AIR DUCT | 87212G | - | - | - |
| 41 | REAR NO. 2 AIR DUCT | 87212F | - | - | - |
| 42 | REAR NO. 1 AIR DUCT | 87212 | - | - | - |
| 43 | POWER DISTRIBUTION BOX ASSEMBLY | 82730G | () |
- | - |
| 44 | ECU INTEGRATION BOX LH | 82878 | () |
- | - |
| 45 | WINDSHIELD WIPER RELAY ASSEMBLY | 85940 | - | - | - |
| 46 | DOOR CONTROL BATTERY | 8598A | - | - | - |
| *A | w/ Telematics Transceiver | *B | w/ Door Control Battery |
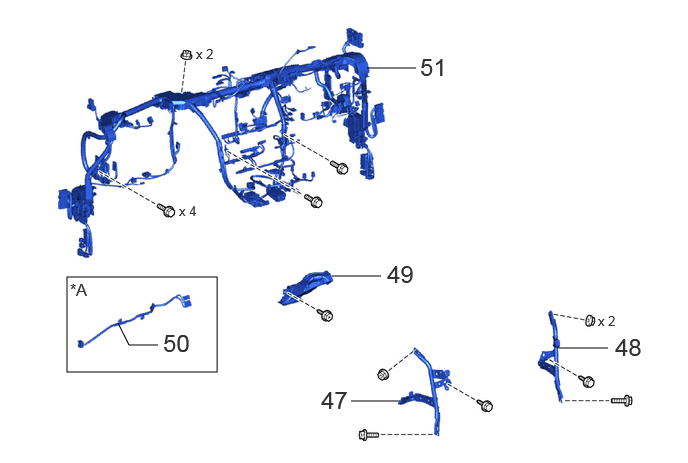
| Procedure | Part Name Code |
|
|
|
|
|---|---|---|---|---|---|
| 47 | NO. 2 INSTRUMENT PANEL BRACE SUB-ASSEMBLY | 55307C | - | - | - |
| 48 | NO. 1 INSTRUMENT PANEL BRACE SUB-ASSEMBLY | 55306A | - | - | - |
| 49 | NO. 1 AIR DUCT SUB-ASSEMBLY | 87201 | - | - | - |
| 50 | HEATER BLOWER WIRE | 82213E | - | - | - |
| 51 | INSTRUMENT PANEL WIRE | 82141 | - | - | - |
| *A | w/ PTC Heater | - | - |
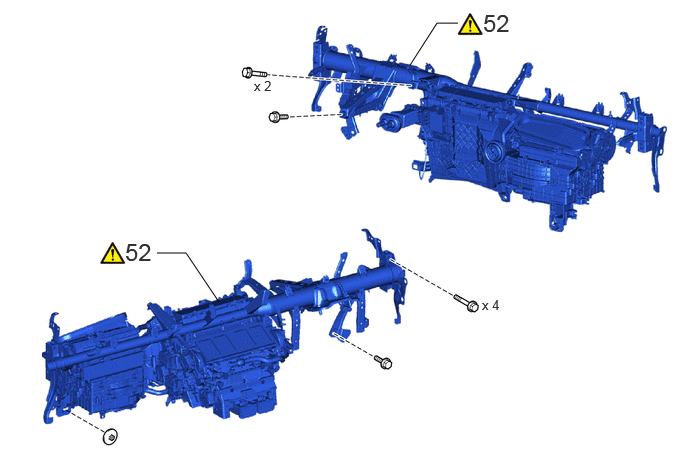
| Procedure | Part Name Code |
|
|
|
|
|---|---|---|---|---|---|
| 52 | INSTRUMENT PANEL REINFORCEMENT ASSEMBLY WITH AIR CONDITIONING UNIT ASSEMBLY | - | () |
- | - |
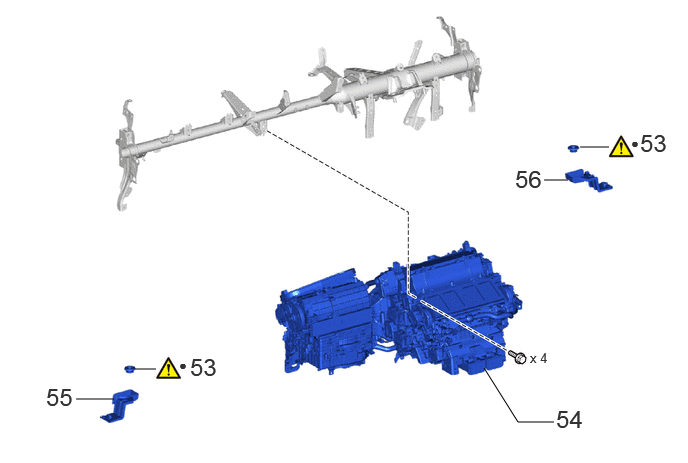
| Procedure | Part Name Code |
|
|
|
|
|---|---|---|---|---|---|
| 53 | COOLER UNIT DRAIN HOSE GROMMET | 88539G | () |
- | - |
| 54 | AIR CONDITIONER UNIT ASSEMBLY | - | - | - | - |
| 55 | NO. 1 COOLING UNIT BRACKET | 88536 | - | - | - |
| 56 | NO. 2 COOLING UNIT BRACKET | 88536A | - | - | - |
| ● | Non-reusable part | - | - |
CAUTION / NOTICE / HINT
The necessary procedures (adjustment, calibration, initialization or registration) that must be performed after parts are removed, installed or replaced during the air conditioner unit assembly removal/installation are shown below.
| Replaced Part or Performed Procedure | Necessary procedures | Effect/Inoperative Function When Necessary Procedures are not Performed | Link |
|---|---|---|---|
| Disconnect cable from negative (-) battery terminal | Memorize steering angle neutral point | Parking assist monitor system | () |
| Multi-terrain monitor system | () |
||
| Panoramic view monitor system | () |
||
| Steering sensor (Including removal and installation) | Steering angle neutral point | Panoramic view monitor system | () |
| Parking assist monitor system | () |
||
| Steering angle setting | Panoramic view monitor system | () |
|
| Parking assist monitor system | () |
||
|
·
No. 1 air conditioner radiator damper servo sub-assembly
·
No. 2 air conditioner radiator damper servo sub-assembly
·
No. 3 air conditioner radiator damper servo sub-assembly
·
No. 4 air conditioner radiator damper servo sub-assembly
·
No. 5 air conditioner radiator damper servo sub-assembly
·
No. 6 air conditioner radiator damper servo sub-assembly |
Initialization servo motor | DTCs are output | () |
- HINT:
-
·
When the cable is disconnected/reconnected to the battery terminal, systems temporarily stop operating. However, each system has a function that completes learning the first time the system is used.
-Learning completes when vehicle is driven
Effect/Inoperative Function When Necessary Procedures are not Performed Necessary Procedures Link Stop and start system Drive the vehicle until stop and start control is permitted (approximately 5 to 60 minutes) ( )Lighting system (EXT) Cornering lights Drive the vehicle straight ahead at 35 km/h (22 mph) or more for 5 seconds or more. ( )Pre-collision system Lane tracing assist system Lane departure alert system Adaptive high beam system
-Learning completes when vehicle is operated normally
Effect/Inoperative Function When Necessary Procedures are not Performed Necessary Procedures Link Power back door system Fully close the back door by hand.
- HINT:
-
Initialization is not necessary if the above procedures are performed while the back door is closed.
( )Air conditioning system After the ignition switch is turned to ON, the servo motor and expansion valve standard position is recognized. -
·When removing the air conditioning radiator damper servo sub-assembly, reinstallation is easier to perform if the following conditions are set before disconnecting the negative (-) battery terminal.
Item Condition Air vent damper position Face Set temperature Max cool
PROCEDURE

 11209 1.REMOVE V-BANK COVER SUB-ASSEMBLY (for V35A-FTS)
12601B 2.REMOVE NO. 1 ENGINE COVER SUB-ASSEMBLY (for F33A-FTV)
53292A 3.REMOVE UPPER RADIATOR SUPPORT SEAL
for Standard:
Click hereVehicle Exterior>EXTERIOR PANELS / TRIM>FRONT BUMPER (for Standard)>REMOVAL
for Aero Type:
Click hereVehicle Exterior>EXTERIOR PANELS / TRIM>FRONT BUMPER (for Aero Type)>REMOVAL
4. RECOVER REFRIGERANT FROM REFRIGERATION SYSTEM
51410 5.REMOVE NO. 1 ENGINE UNDER COVER ASSEMBLY
for V35A-FTS:
Click hereEngine / Hybrid System>V35A-FTS (LUBRICATION)>OIL PAN AND OIL LEVEL SENSOR>REMOVAL
for F33A-FTV:
Click hereEngine / Hybrid System>F33A-FTV (LUBRICATION)>OIL PAN AND OIL LEVEL SENSOR>REMOVAL
6.DRAIN ENGINE COOLANT
for V35A-FTS:
for F33A-FTV:
7.REMOVE FRONT WIPER MOTOR AND LINK
87237 8.REMOVE HEATER PIPING COVER (for V35A-FTS)
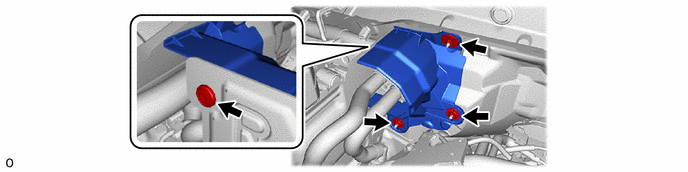
87114E 9.REMOVE NO. 1 HEATER COVER (for F33A-FTV)
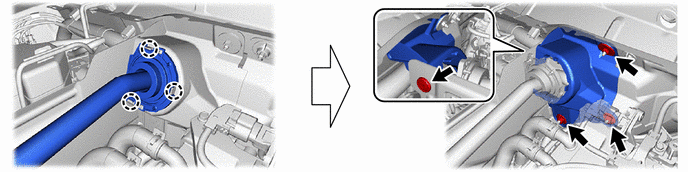
51470C 10.DISCONNECT REAR ENGINE SIDE UNDER COVER ASSEMBLY LH
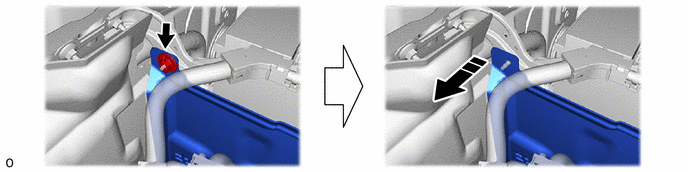

|
Disconnect in this Direction | - | - |
11.REMOVE WIRING HARNESS CLAMP BRACKET
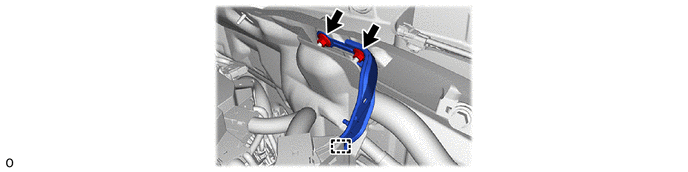
55223A 12.DISCONNECT OUTER DASH PANEL INSULATOR
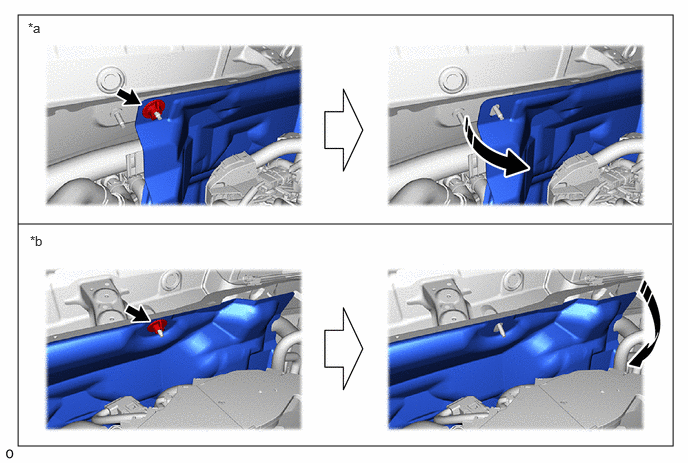
| *a | LH Side | *b | RH Side |
|
|
Disconnect in this Direction | - | - |
87246A 13.DISCONNECT OUTLET HEATER WATER HOSE A
for V35A-FTS:
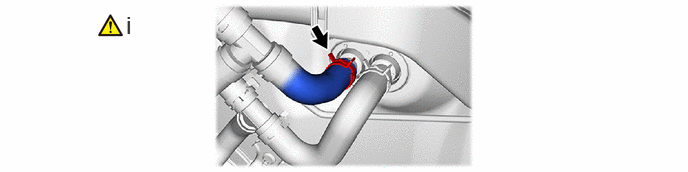
Using pliers, grip the claws of the clip and slide the clip to disconnect the outlet heater water hose A.
- NOTICE:
-
·
Do not apply excessive force to the outlet heater water hose A.
·Prepare a drain pan or cloth in case the coolant leaks.
for F33A-FTV:
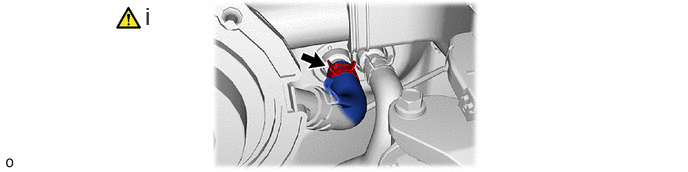
Using pliers, grip the claws of the clip and slide the clip to disconnect the outlet heater water hose A.
- NOTICE:
-
·
Do not apply excessive force to the outlet heater water hose A.
·Prepare a drain pan or cloth in case the coolant leaks.
87245A 14.DISCONNECT INLET HEATER WATER HOSE A
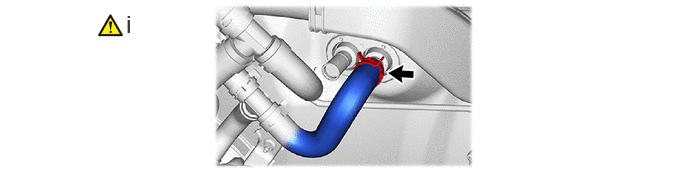
Using pliers, grip the claws of the clip and slide the clip to disconnect the inlet heater water hose A.
- NOTICE:
-
·
Do not apply excessive force to the inlet heater water hose A.
·Prepare a drain pan or cloth in case the coolant leaks.
for F33A-FTV:
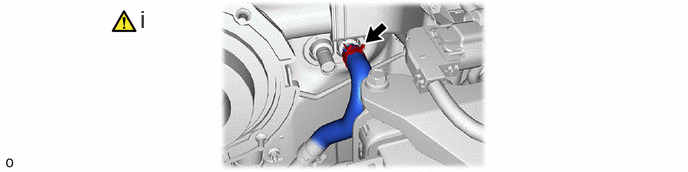
Using pliers, grip the claws of the clip and slide the clip to disconnect the inlet heater water hose A.
- NOTICE:
-
·
Do not apply excessive force to the inlet heater water hose A.
·Prepare a drain pan or cloth in case the coolant leaks.
87128 15.REMOVE HEATER GROMMET
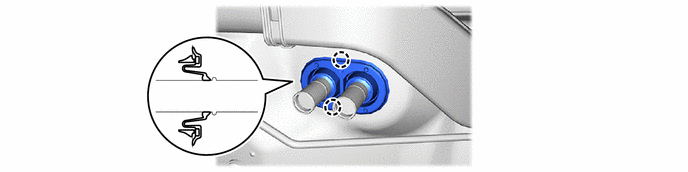
88710K 16.DISCONNECT NO. 3 AIR CONDITIONING TUBE AND ACCESSORY ASSEMBLY
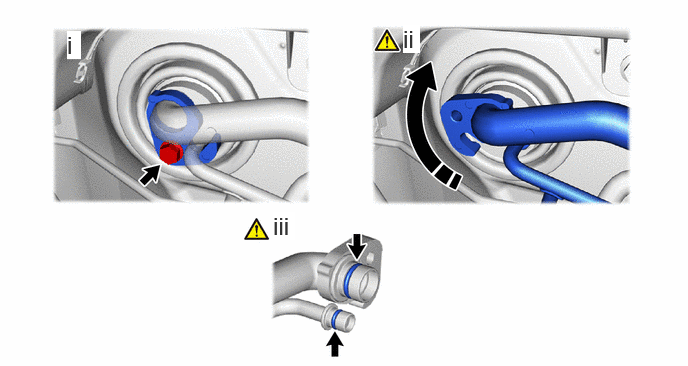
|
|
Rotate in this Direction | - | - |
Remove the bolt.
Rotate the 1-point tightening plate and disconnect the No. 3 air conditioning tube and accessory assembly.
Remove the 2 O-rings from the No. 3 air conditioning tube and accessory assembly.
- NOTICE:
-
Seal the openings of the disconnected parts using vinyl tape to prevent entry of moisture and foreign matter.
88897K 17.REMOVE COOLER PIPE GROMMET
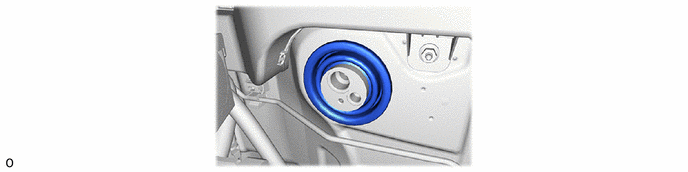
18.REMOVE HOLE PLUG
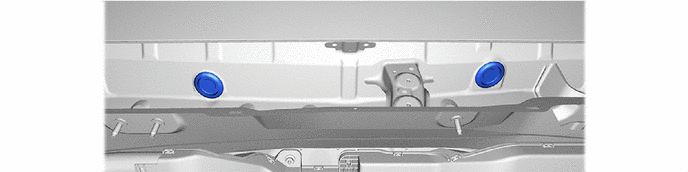
19.REMOVE FRONT SEAT ASSEMBLY LH
for Manual Seat:
Click hereVehicle Interior>SEAT>FRONT SEAT ASSEMBLY (for Manual Seat)>REMOVAL
for Power Seat:
Click hereVehicle Interior>SEAT>FRONT SEAT ASSEMBLY (for Power Seat)>REMOVAL
20.REMOVE FRONT SEAT ASSEMBLY RH
Use the same procedure described for the LH side.
21.REMOVE INSTRUMENT PANEL SAFETY PAD
55990B 22.REMOVE LOWER DEFROSTER NOZZLE ASSEMBLY
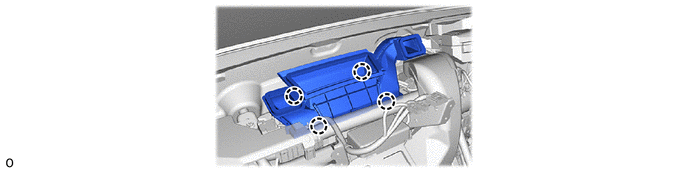
83108 23.REMOVE METER MIRROR SUB-ASSEMBLY (w/ Headup Display)
|
|
Click here() |
45250 24.REMOVE STEERING COLUMN ASSEMBLY
for Manual Tilt and Manual Telescopic Steering Column:
for Power Tilt and Power Telescopic Steering Column:
73233 25.REMOVE OUTER LAP BELT ANCHOR COVER
73220 26.REMOVE FRONT SEAT OUTER BELT ASSEMBLY LH (FLOOR ANCHOR)
73210 27.REMOVE FRONT SEAT OUTER BELT ASSEMBLY RH (FLOOR ANCHOR)
Use the same procedure described for the LH side.
67918D 28.REMOVE REAR DOOR SCUFF PLATE LH
62414A 29.REMOVE CENTER PILLAR LOWER GARNISH LH
67917C 30.REMOVE REAR DOOR SCUFF PLATE RH
Use the same procedure described for the LH side.
62413A 31.REMOVE CENTER PILLAR LOWER GARNISH RH
Use the same procedure described for the LH side.
88650N 32.REMOVE AIR CONDITIONING AMPLIFIER ASSEMBLY
58510D 33.REMOVE FRONT FLOOR CARPET ASSEMBLY
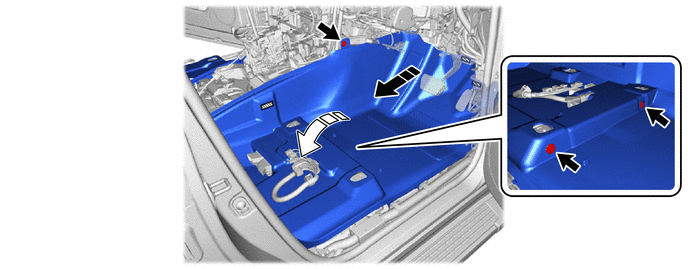
|
|
Pull Out |

|
Fold Up |

|
Fastener | - | - |
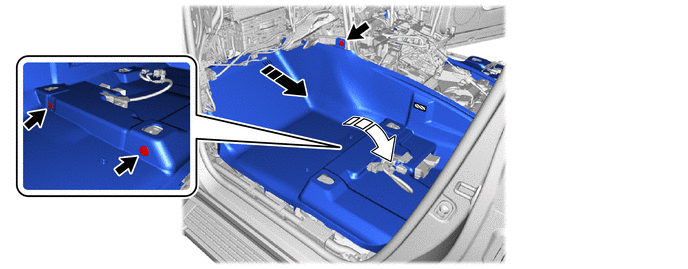
|
|
Pull Out |
|
Fold Up |
|
|
Fastener | - | - |
55084E 34.REMOVE NO. 1 HEATER TO REGISTER DUCT SUB-ASSEMBLY
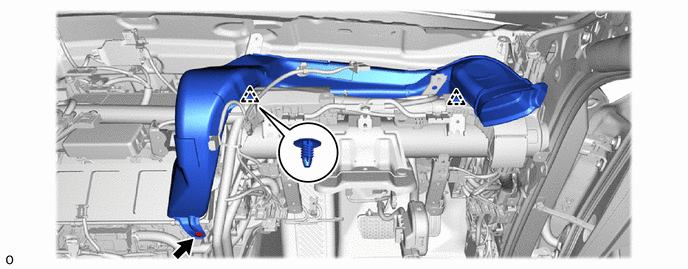
35.REMOVE TELEPHONE TRANSCEIVER ASSEMBLY WITH BRACKET (w/ Telematics Transceiver)
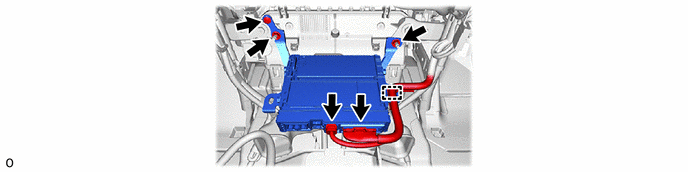
88576C 36.REMOVE NO. 1 COOLER AIR DUCT
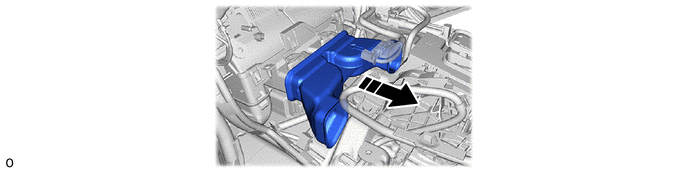
|
|
Remove in this Direction | - | - |
87212K 37.REMOVE REAR NO. 6 AIR DUCT
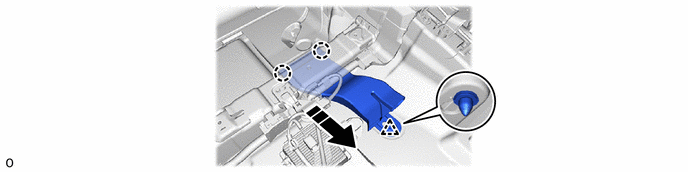
|
|
Remove in this Direction | - | - |
87212H 38.REMOVE REAR NO. 4 AIR DUCT
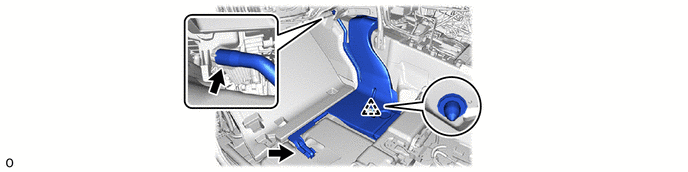
87212J 39.REMOVE REAR NO. 5 AIR DUCT
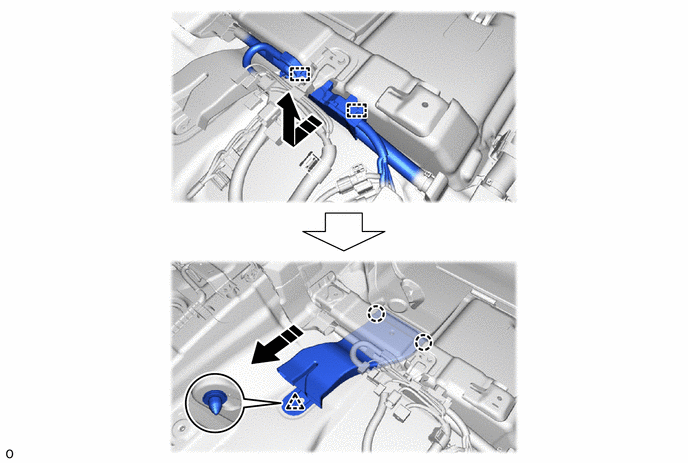
|
|
Remove in this Direction | - | - |
87212G 40.REMOVE REAR NO. 3 AIR DUCT
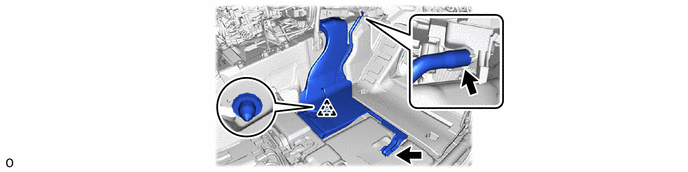
87212F 41.REMOVE REAR NO. 2 AIR DUCT
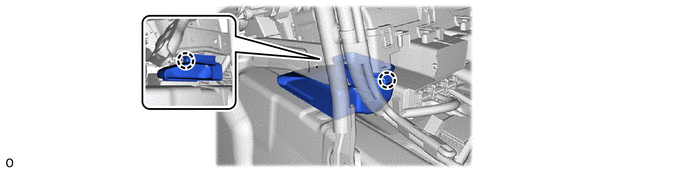
87212 42.REMOVE REAR NO. 1 AIR DUCT
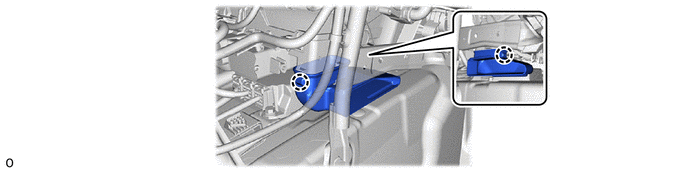
82730G 43.REMOVE POWER DISTRIBUTION BOX ASSEMBLY
|
|
Click here() |
82878 44.REMOVE ECU INTEGRATION BOX LH
|
|
Click here() |
85940 45.REMOVE WINDSHIELD WIPER RELAY ASSEMBLY
8598A 46.REMOVE DOOR CONTROL BATTERY (w/ Door Control Battery)
55307C 47.REMOVE NO. 2 INSTRUMENT PANEL BRACE SUB-ASSEMBLY
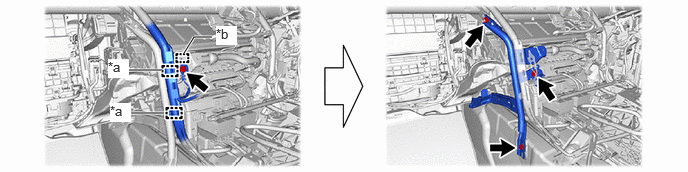
| *a | Clamp | *b | Guide |
55306A 48.REMOVE NO. 1 INSTRUMENT PANEL BRACE SUB-ASSEMBLY
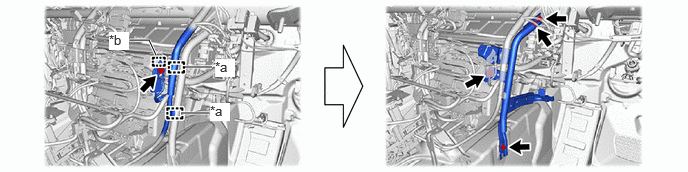
| *a | Clamp | *b | Guide |
87201 49.REMOVE NO. 1 AIR DUCT SUB-ASSEMBLY
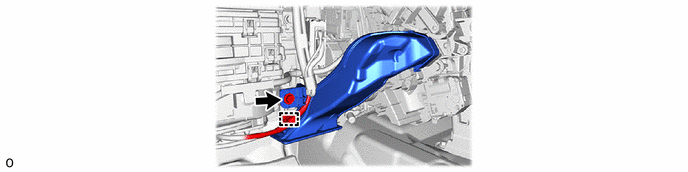
82213E 50.REMOVE HEATER BLOWER WIRE (w/ PTC Heater)
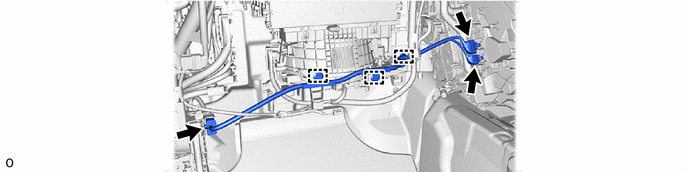
82141 51.DISCONNECT INSTRUMENT PANEL WIRE
- HINT:
-
The illustration is an example, so the details may differ.
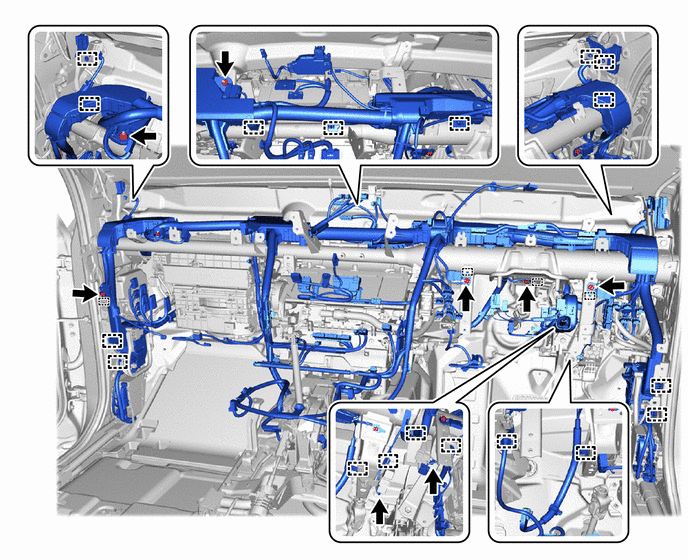
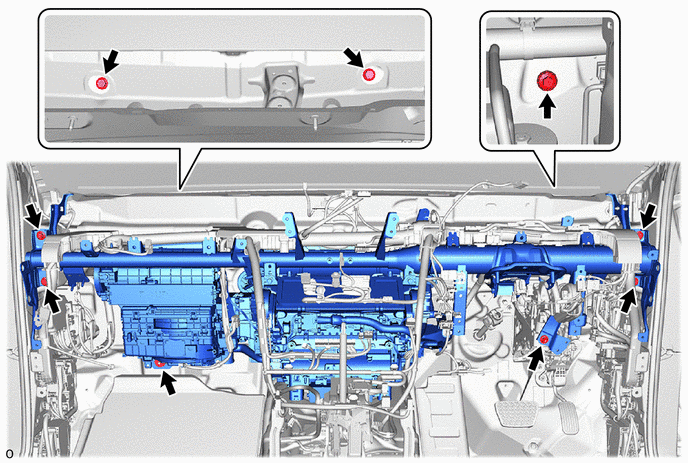
52.REMOVE INSTRUMENT PANEL REINFORCEMENT ASSEMBLY WITH AIR CONDITIONING UNIT ASSEMBLY
|
|
|
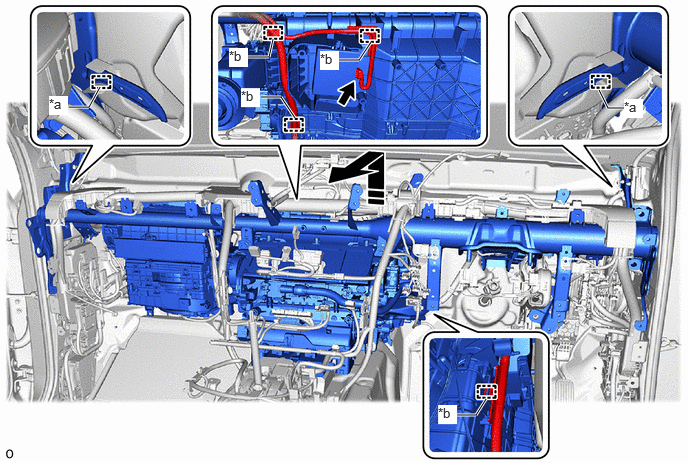
| *a | Guide | *b | Clamp |
|
|
Remove in this Direction | - | - |
88539G 53.REMOVE COOLER UNIT DRAIN HOSE GROMMET
|
|
|
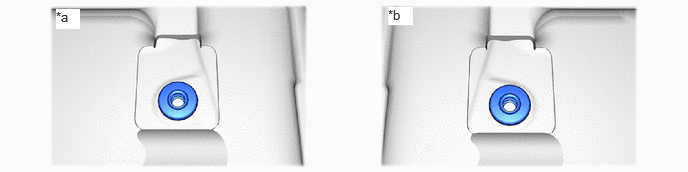
| *a | Driver Side | *b | Passenger Side |
54.REMOVE AIR CONDITIONER UNIT ASSEMBLY
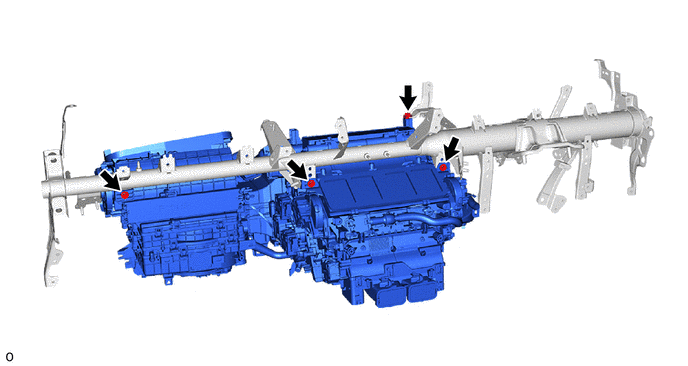
88536 55.REMOVE NO. 1 COOLING UNIT BRACKET
- HINT:
-
Perform this procedure only when replacement of the No. 1 cooling unit bracket is necessary.
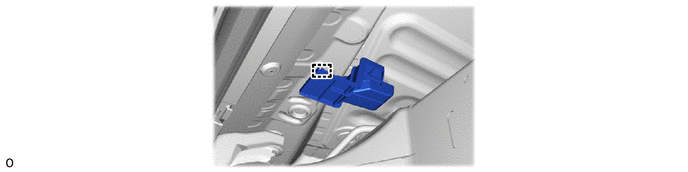
88536A 56.REMOVE NO. 2 COOLING UNIT BRACKET
- HINT:
-
Perform this procedure only when replacement of the No. 2 cooling unit bracket is necessary.
Use the same procedure described for the No. 1 cooling unit bracket.