FA20 ENGINE MECHANICAL ENGINE ASSEMBLY INSTALLATION
PROCEDURE

 12311
1.INSTALL FRONT ENGINE MOUNTING BRACKET
Install the 2 front engine mounting brackets with the 4 bolts.
- Torque:
- 35 N*m (357 kgf*cm, 26 ft.*lbf)
2.REMOVE ENGINE STAND
Attach an engine sling device and hang the engine with a chain block.
- NOTICE:
-
With the exception of installing the engine assembly to an engine stand or removing the engine assembly from an engine stand, do not perform any work on the engine while it is suspended, as doing so is dangerous.
Remove the engine stand from the engine.
19315
3.INSTALL NO. 1 CRANKSHAFT POSITION SENSOR PLATE
13405
4.INSTALL FLYWHEEL SUB-ASSEMBLY (for Manual Transmission)
31250
5.INSTALL CLUTCH DISC ASSEMBLY (for Manual Transmission)
31210
6.INSTALL CLUTCH COVER ASSEMBLY (for Manual Transmission)
32101
7.INSTALL DRIVE PLATE AND RING GEAR SUB-ASSEMBLY (for Automatic Transmission)
12000
8.INSTALL ENGINE ASSEMBLY
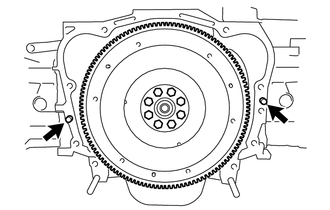
Confirm that 2 knock pins are on the transmission contact surface of the engine block before transmission installation.
Keeping the engine assembly and the transmission assembly in a horizontal position, align the knock pins with each hole on the transmission assembly and install the bolt.
- Torque:
- 50 N*m (510 kgf*cm, 37 ft.*lbf)
9.REMOVE ENGINE HANGER
10.CONNECT FUEL HOSE
for Clamp Type:
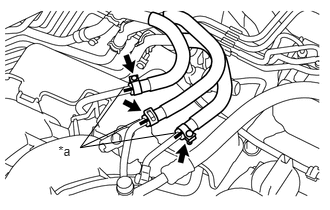
Connect the fuel tube and No. 2 fuel tube and fuel tube to the fuel pipe.
- Torque:
- 1.3 N*m (13 kgf*cm, 12 in.*lbf)
| *a | Matchmark |
- NOTICE:
-
Align the matchmarks on the fuel hoses and fuel pipes.
for Metal Type:
Connect the fuel tube and No. 2 fuel tube to the fuel pipe (See page Engine / Hybrid System>FA20 FUEL>FUEL SYSTEM>PRECAUTION).
Connect the No. 2 fuel vapor feed hose to the fuel pipe.
32101C
11.INSTALL DRIVE PLATE SETTING HEXAGON BOLT (for Automatic Transmission)
11361J
12.INSTALL FLYWHEEL HOUSING UNDER COVER
57104A
13.INSTALL FRONT CROSS MEMBER SUB-ASSEMBLY
Install the front suspension crossmember sub-assembly with 2 new nuts.
- Torque:
- 60 N*m (612 kgf*cm, 44 ft.*lbf)
30300
14.INSTALL MANUAL TRANSMISSION ASSEMBLY (for Manual Transmission)
Install the 3 bolts and 2nuts.
- Torque:
- 50 N*m (510 kgf*cm, 37 ft.*lbf)
35000
15.INSTALL AUTOMATIC TRANSMISSION ASSEMBLY (for Automatic Transmission)
Install the 3 bolts and 2nuts.
- Torque:
- 50 N*m (510 kgf*cm, 37 ft.*lbf)
48811
16.INSTALL FRONT STABILIZER BAR (for Automatic Transmission)
51444A
17.INSTALL ENGINE UNDER COVER REAR LH (w/ Floor Under Cover)
Install the rear engine under cover LH with the 3 bolts and 8 clips.
- Torque:
- 7.5 N*m (76 kgf*cm, 66 in.*lbf)
18.INSTALL EARTH CABLE
Install the 2 grounded cables with the 2 bolts.
- Torque:
- 7.5 N*m (76 kgf*cm, 66 in.*lbf)
16572
19.CONNECT RADIATOR OUTLET HOSE
Install the clamp and connect the radiator outlet hose.
32943C
20.CONNECT NO. 3 TRANSMISSION OIL COOLER HOSE (for Automatic Transmission)
Connect the No. 3 transmission oil cooler hose.
28100
21.INSTALL STARTER ASSEMBLY (for Automatic Transmission)
28100
22.INSTALL STARTER ASSEMBLY (for Manual Transmission)
88711
23.CONNECT NO. 1 COOLER REFRIGERANT DISCHARGE HOSE (w/ Air Conditioning System)
88704
24.INSTALL SUCTION HOSE SUB-ASSEMBLY (w/ Air Conditioning System)
Remove the attached vinyl tape from the hose.
Apply sufficient compressor oil to a new O-ring and the fitting surface of the compressor assembly with pulley.
- Compressor oil:
- for HFC-134a (R134a):
ND-OIL 8 or equivalent
- for HFC-1234yf (R1234fyf):
ND-OIL 12 or equivalent
Install the O-ring onto the suction hose sub-assembly.
Install the suction hose sub-assembly onto the compressor assembly with pulley with the bolt.
- Torque:
- 10 N*m (102 kgf*cm, 7 ft.*lbf)
Remove the vinyl tape from the pipe.
Sufficiently apply compressor oil to a new O-ring and the fitting surface of the suction pipe sub-assembly.
- Compressor oil:
- for HFC-134a (R134a):
ND-OIL 8 or equivalent
- for HFC-1234yf (R1234fyf):
ND-OIL 12 or equivalent
Connect the O-ring to the suction pipe sub-assembly.
Connect the suction pipe sub-assembly.
Rotate the hook connector in the direction indicated by the arrow in the illustration.
for LHD:
Install the suction hose sub-assembly with the nut.
- Torque:
- 7.5 N*m (76 kgf*cm, 66 in.*lbf)
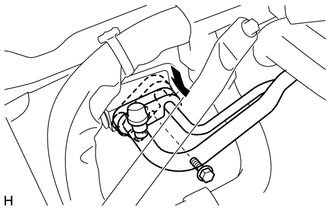
Insert the pipe joint into the cooler expansion valve securely and tighten the bolt.
- Torque:
- 7.5 N*m (76 kgf*cm, 66 in.*lbf)
for RHD:
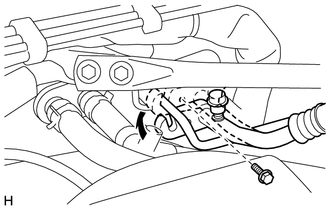
Insert the pipe joint into the cooler expansion valve securely and tighten the bolt.
- Torque:
- 7.5 N*m (76 kgf*cm, 66 in.*lbf)
32943
25.INSTALL NO. 1 TRANSMISSION OIL COOLER HOSE (for Automatic Transmission)
Connect the No. 1 transmission oil cooler hose.
87245A
26.CONNECT HEATER WATER HOSE
Install the 2 hose clamps and connect 2 heater water hoses.
17141
27.INSTALL EXHAUST MANIFOLD
44771
28.CONNECT VACUUM TUBE CONNECTOR HOSE (for Manual Transmission)
Connect the vacuum tube connector hose with the bolt.
- Torque:
- 18 N*m (184 kgf*cm, 13 ft.*lbf)
Connect the vacuum tube connector hose.
44771
29.CONNECT VACUUM TUBE CONNECTOR HOSE (for Automatic Transmission)
Connect the vacuum tube connector hose with the 2 bolts.
- Torque:
- 18 N*m (184 kgf*cm, 13 ft.*lbf)
Connect the vacuum tube connector hose.
12601B
30.INSTALL NO. 1 ENGINE COVER SUB-ASSEMBLY (w/ Air Conditioning System)
31.CONNECT ENGINE WIRE (for RHD)
Connect the generator connector and connect the clamp.
Connect the generator wire with the nut.
- Torque:
- 16 N*m (163 kgf*cm, 12 ft.*lbf)
Install the terminal cap.
Connect the 5 wire harness clamps.
Install the 2 wire harness clamp brackets with the 2 bolts.
- Torque:
- 11 N*m (112 kgf*cm, 8 ft.*lbf)
Connect the 2 wire harness clamps to the 2 wire harness clamp brackets.
Connect the wire harness clamp to the No. 2 engine hanger.
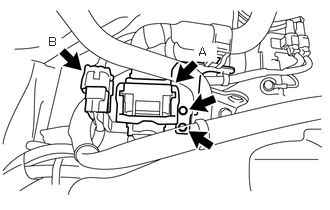
Connect the connector (B).
Connect the wire harness connector (A) and securely lock the connector.
Install the wire harness clamp bracket to the No. 2 engine hanger with the 2 bolts.
- Torque:
- 10 N*m (102 kgf*cm, 7 ft.*lbf)
for Automatic Transmission:
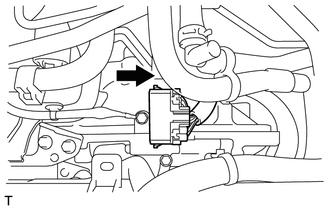
Slide the connector in the direction shown in the diagram, and connect the wire harness.
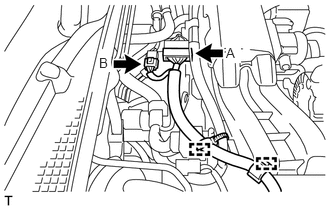
Connect the 2 wire harness clamps.
Connect the wire harness connector (A) and securely lock the connector.
Connect the connector (B).
32.CONNECT ENGINE WIRE (for LHD)
Connect the generator connector and connect the clamp.
Connect the generator wire with the nut.
- Torque:
- 16 N*m (163 kgf*cm, 12 ft.*lbf)
Install the terminal cap.
Connect the 5 wire harness clamps.
Install the 2 wire harness clamp brackets with the 2 bolts.
- Torque:
- 11 N*m (112 kgf*cm, 8 ft.*lbf)
Connect the 2 wire harness clamps to the 2 wire harness clamp brackets.
Connect the wire harness clamp to the No. 2 engine hanger.
Connect the connector (B).
Connect the wire harness connector (A) and securely lock the connector.
Install the wire harness clamp bracket to the No. 2 engine hanger with the 2 bolts.
- Torque:
- 10 N*m (102 kgf*cm, 7 ft.*lbf)
for Automatic Transmission:
Slide the connector in the direction shown in the diagram, and connect the wire harness.
Connect the 2 wire harness clamps.
Connect the wire harness connector (A) and securely lock the connector.
Connect the connector (B).
89871
33.INSTALL INJECTOR DRIVER
16502
34.INSTALL WATER FILLER SUB-ASSEMBLY
Install the 2 clamps and connect the water filler sub-assembly.
Install the water filler sub-assembly with 2 bolts.
- Torque:
- 7.5 N*m (76 kgf*cm, 66 in.*lbf)
16470
35.INSTALL RADIATOR RESERVE TANK ASSEMBLY
36.INSTALL AIR CLEANER ASSEMBLY WITH HOSE
Install the stay with bolt to the body.
- Torque:
- 35 N*m (357 kgf*cm, 26 ft.*lbf)
Install the air cleaner assembly with hose with the 3 bolts.
- Torque:
- 6.0 N*m (61 kgf*cm, 53 in.*lbf)
Install the hose clamp.
- Torque:
- 2.0 N*m (20 kgf*cm, 18 in.*lbf)
Connect the clamp and wire harness to the air cleaner cap.
Connect the mass air flow meter connector.
Connect the No. 2 ventilation hose.
Install the 2 bolts and the chamber duct with chamber.
- Torque:
- 6.0 N*m (61 kgf*cm, 53 in.*lbf)
Connect the hose.
53608
37.INSTALL FRONT SUSPENSION UPPER TO COWL BRACE SUB-ASSEMBLY LH
53607
38.INSTALL FRONT SUSPENSION UPPER TO COWL BRACE SUB-ASSEMBLY RH
39.ADD ENGINE OIL
40.CONNECT CABLE TO NEGATIVE BATTERY TERMINAL
41.ADD ENGINE COOLANT
42.CHARGE WITH REFRIGERANT (w/ Air Conditioning System)
for HFC-134a (R134a):
(See page Vehicle Interior>HEATING / AIR CONDITIONING>REFRIGERANT(for HFC-134a(R134a))>REPLACEMENT)
for HFO-1234fy (R1234fy):
(See page Vehicle Interior>HEATING / AIR CONDITIONING>REFRIGERANT(for HFO-1234yf(R1234yf))>REPLACEMENT)
43.CHECK FOR ENGINE COOLANT LEAK
44.CHECK FOR ENGINE OIL LEAK
45.CHECK FOR FUEL LEAK
46.CHECK FOR EXHAUST GAS LEAK
47.INSPECT FOR REFRIGERANT LEAK
for HFC-134a (R134a):
(See page Vehicle Interior>HEATING / AIR CONDITIONING>REFRIGERANT(for HFC-134a(R134a))>REPLACEMENT)
for HFO-1234fy (R1234fy):
(See page Vehicle Interior>HEATING / AIR CONDITIONING>REFRIGERANT(for HFO-1234yf(R1234yf))>REPLACEMENT)
22030
48.INSPECT THROTTLE WITH MOTOR BODY ASSEMBLY
49.INSPECT IGNITION TIMING
50.INSPECT ENGINE IDLE SPEED
52.INSPECT ENGINE COOLANT LEVEL
53.INSPECT ENGINE OIL LEVEL
53301
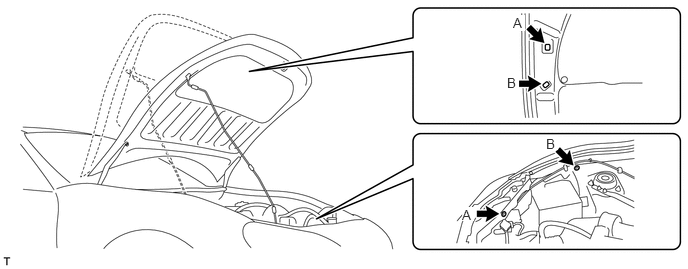
54.SET HOOD SUB-ASSEMBLY
Change the front hood stay position from B to A, and store the front hood stay.