1VD-FTV ENGINE MECHANICAL CYLINDER HEAD GASKET(w/o DPF) INSTALLATION
CAUTION / NOTICE / HINT
- NOTICE:
- ·
Before performing these installation procedures, sufficiently clean and remove any foreign matter from the cylinder block, cylinder head, camshaft and other parts.
·When replacing an injector (including interchanging injectors between cylinders), common rail, cylinder head, or intake manifold, replace the corresponding injection pipes with a new one.
PROCEDURE

 1.CHECK INJECTOR COMPENSATION CODE
2.SELECT CYLINDER HEAD GASKET
Set the 2 crankshaft pulley set bolts to the crankshaft.
Clean the cylinder block with solvent.
Inspect the protrusion for each cylinder.
Set the piston of the cylinder to be measured to slightly before TDC.
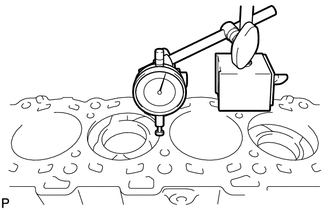
Place a dial indicator on the cylinder block, and set the measuring tip as shown in the illustration.
- NOTICE:
-
Make sure that the dial indicator is at a right angle to the cylinder block top surface.
Set the dial indicator at 0 mm (0 in.).
- HINT:
-
Make sure that the measuring tip is flat against the cylinder block surface and piston head when taking the measurements.
Find where the piston head protrudes most by slowly turning the crankshaft clockwise and counterclockwise.
Measure the piston protrusion value of each cylinder at 2 places as shown in the illustration below, making a total of 8 measurements.
- Standard piston protrusion:
0.520 to 0.780 mm (0.0205 to 0.0307 in.)
If the protrusion is not as specified, remove and reinstall the piston and connecting rod.
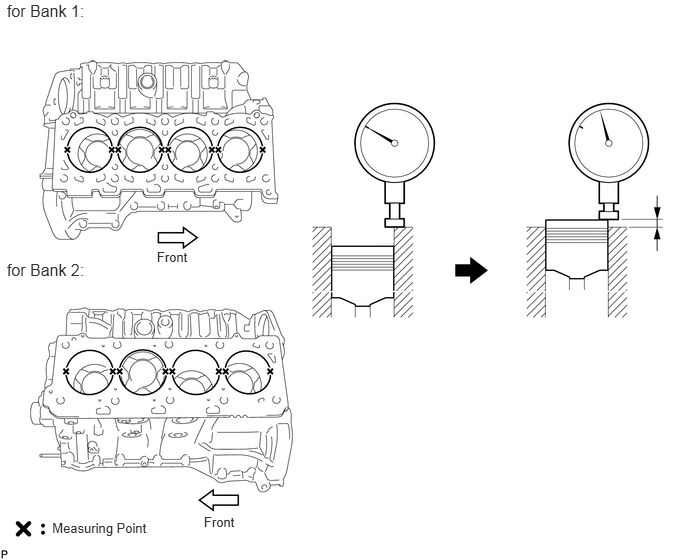
Select a new cylinder head gasket.
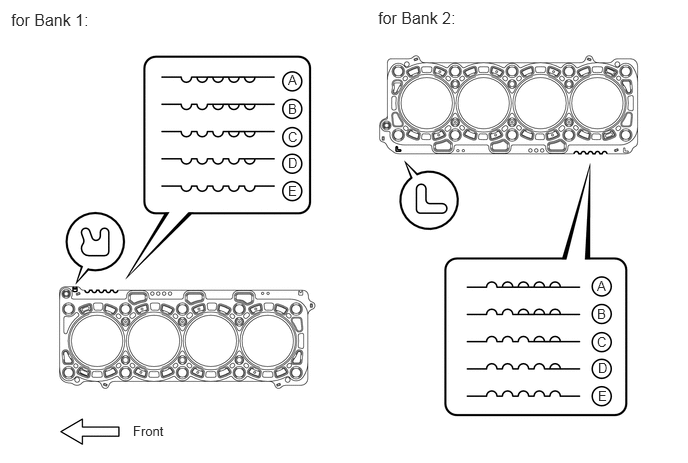
- HINT:
-
Cylinder head gaskets are marked A, B, C, D or E accordingly.
- New Installed Cylinder Head Gasket Thickness:
Item Cutout Specified Condition* A 1 1.20 to 1.30 mm (0.0472 to 0.0512 in.) B 2 1.25 to 1.35 mm (0.0492 to 0.0394 in.) C 3 1.30 to 1.40 mm (0.0512 to 0.0551 in.) D 4 1.35 to 1.45 mm (0.0531 to 0.0571 in.) E 5 1.40 to 1.50 mm (0.0551 to 0.0591 in.)
- HINT:
-
*: The specified condition indicates the thickness of the gasket after tightening the cylinder head.
Select the largest piston protrusion value from the measurements and then select a new appropriate gasket according to the table below.
- Standard Piston Protrusion:
Item Specified Condition A 0.520 to 0.575 mm (0.0205 to 0.0226 in.) B 0.575 to 0.625 mm (0.0226 to 0.0246 in.) C 0.625 to 0.675 mm (0.0246 to 0.0266 in.) D 0.675 to 0.725 mm (0.0266 to 0.0285 in.) E 0.725 to 0.780 mm (0.0285 to 0.0307 in.)
11116
3.INSTALL NO. 2 CYLINDER HEAD GASKET
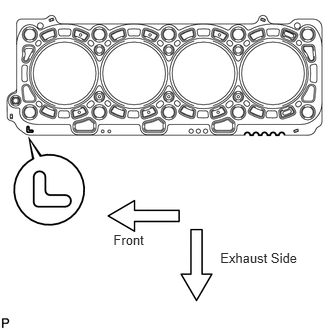
Remove any oil from the contact surface.
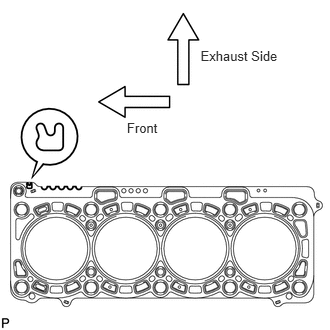
Place the cylinder head gasket on the cylinder block surface with the front face of the indicated mark "L" upward and facing the exhaust side.
11115
4.INSTALL NO. 1 CYLINDER HEAD GASKET
Remove any oil from the contact surface.
Place the cylinder head gasket on the cylinder block surface with the front face of the indicated mark "R" upward and facing the exhaust side.
11102
5.INSTALL CYLINDER HEAD SUB-ASSEMBLY LH
Place the cylinder head on the cylinder head gasket.
- NOTICE:
-
Ensure that no oil is on the mounting surface of the cylinder head.
Inspect the cylinder head bolts (See page Engine / Hybrid System>1VD-FTV (ENGINE MECHANICAL)>ENGINE UNIT>INSPECTION).
Apply a light coat of engine oil to the threads and under the heads of the cylinder head bolts.
Step 1:
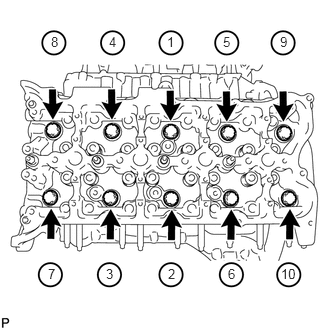
Install and uniformly tighten the 10 cylinder head bolts with the spacers in several steps, in the sequence shown in the illustration.
- Torque:
- 80 N*m (816 kgf*cm, 59 ft.*lbf)
- HINT:
- ·
The cylinder head bolts are tightened in 4 progressive steps.
·If a cylinder head bolt is broken or deformed, replace it.
Step 2:
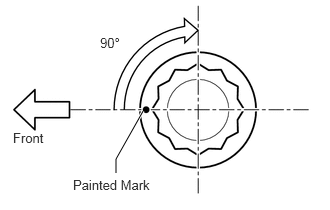
Mark the cylinder head bolt heads with paint as shown in the illustration.
Tighten the cylinder head bolts 90° in the sequence shown in step 1.
Step 3:
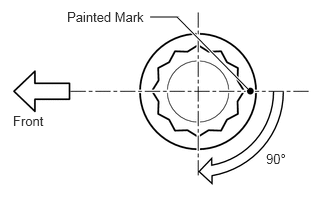
Tighten the cylinder head bolts another 90° in the sequence shown in step 1.
Step 4:
Tighten the cylinder head bolts by an additional 90° in the sequence shown in step 1.
Check that the painted marks are now facing the exhaust port side.
11101
6.INSTALL CYLINDER HEAD SUB-ASSEMBLY RH
Place the cylinder head on the cylinder head gasket.
- NOTICE:
-
Ensure that no oil is on the mounting surface of the cylinder head.
Inspect the cylinder head bolts (See page Engine / Hybrid System>1VD-FTV (ENGINE MECHANICAL)>ENGINE UNIT>INSPECTION).
Apply a light coat of engine oil to the threads and under the heads of the cylinder head bolts.
Step 1:
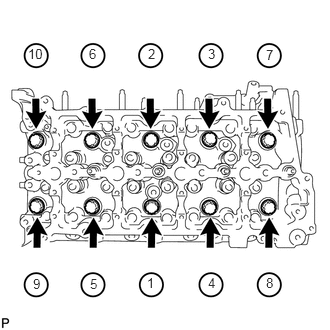
Install and uniformly tighten the 10 cylinder head bolts with the spacers in several steps, in the sequence shown in the illustration.
- Torque:
- 80 N*m (816 kgf*cm, 59 ft.*lbf)
- HINT:
- ·
The cylinder head bolts are tightened in 4 progressive steps.
·If a cylinder head bolt is broken or deformed, replace it.
Step 2:
Mark the cylinder head bolt heads with paint as shown in the illustration.
Tighten the cylinder head bolts 90° in the sequence shown in step 1.
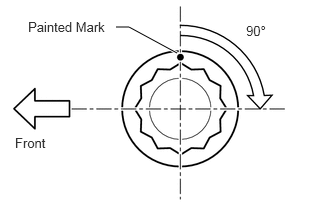
Step 3:
Tighten the cylinder head bolts another 90° in the sequence shown in step 1.
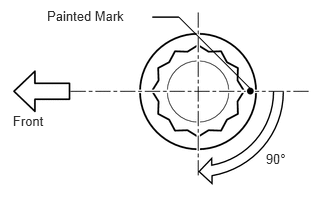
Step 4:
Tighten the cylinder head bolts by an additional 90° in the sequence shown in step 1.
Check that the painted marks are now facing the intake port side.
7.SET NO. 1 CYLINDER TO 45° BEFORE TDC
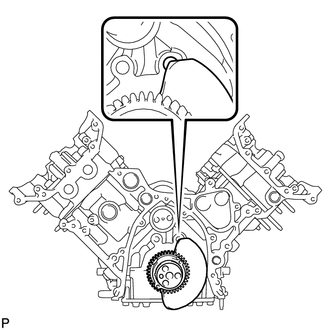
Using a bar, turn the crankshaft counterclockwise until the No. 1 cylinder is at a position 45° before TDC.
- NOTICE:
-
Do not turn the crankshaft again until after the timing gear is installed.
- HINT:
-
The No. 1 cylinder is at a position 45° before TDC if the crankshaft counterweight is overlapping the cylinder block hole as shown in the illustration.
Remove the 2 crankshaft pulley set bolts.
8.INSTALL NO. 2 VALVE LASH ADJUSTER ASSEMBLY
- NOTICE:
-
Be sure to inspect the valve lash adjuster before installing it (See page Engine / Hybrid System>1VD-FTV (ENGINE MECHANICAL)>ENGINE UNIT>INSPECTION).
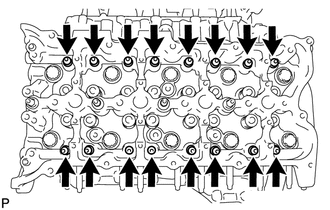
Install the 16 No. 2 valve lash adjusters to the cylinder head.
- HINT:
-
Install the lash adjuster at the same place it was removed from.
13750
9.INSTALL NO. 1 VALVE LASH ADJUSTER ASSEMBLY
- NOTICE:
-
Be sure to inspect the valve lash adjuster before installing it (See page Engine / Hybrid System>1VD-FTV (ENGINE MECHANICAL)>ENGINE UNIT>INSPECTION).
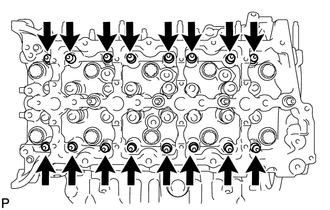
Install the 16 No. 1 valve lash adjusters to the cylinder head.
- HINT:
-
Install the lash adjuster at the same place it was removed from.
10.INSTALL NO. 2 VALVE ROCKER ARM
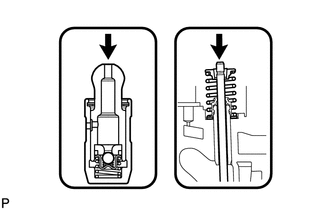
Apply engine oil to the lash adjuster tips and valve stem ends.
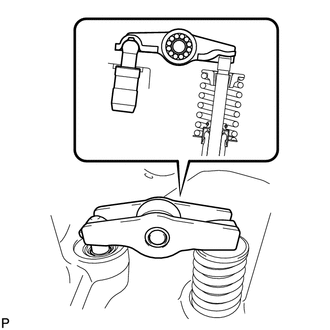
Install the 16 No. 2 valve rocker arms as shown in the illustration.
- HINT:
-
Install the valve rocker arm at the same place it was removed from.
13801
11.INSTALL NO. 1 VALVE ROCKER ARM
Apply engine oil to the lash adjuster tips and valve stem ends.
Install the 16 No. 1 valve rocker arms as shown in the illustration.
- HINT:
-
-
Install the valve rocker arm at the same place it was removed from.
12.INSTALL NO. 5 CAMSHAFT BEARING CAP
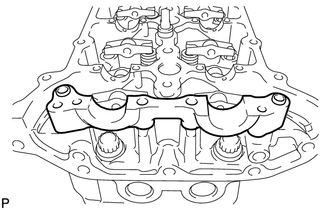
Align the camshaft bearing cap and the ring pins of the cylinder head, and install the cap.
13.INSTALL NO. 2 CAMSHAFT BEARING CAP
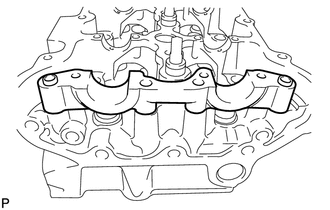
Align the camshaft bearing cap and the ring pins of the cylinder head, and install the cap.
13053
14.INSTALL NO. 3 AND NO. 4 CAMSHAFTS
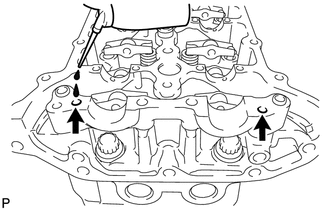
Add more than 19 cc (1.16 cu. in.) of engine oil into the cylinder head side oil holes.
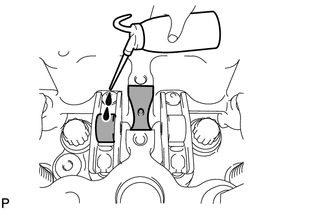
Apply engine oil to the rollers of the valve rocker arms and the camshaft housing of the cylinder head.
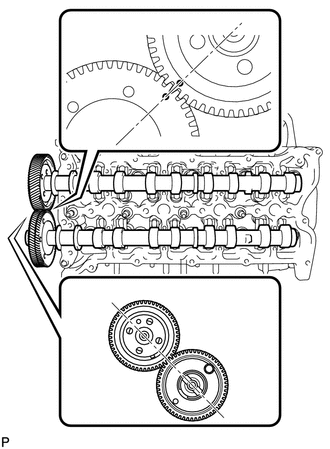
Install the camshafts.
Apply engine oil to the camshaft journals, lobes, thrust portion and gears.
Align the timing marks (1 dot mark) on the back side of the No. 3 and No. 4 camshaft timing gears as shown in the illustration.
Place the camshafts into the cylinder head.
- NOTICE:
-
-
Before and after setting the camshafts, firmly set the rocker arms to the lash adjusters.
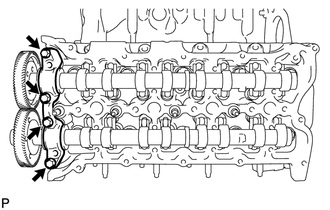
Install the No. 4 camshaft bearing cap.
Align the No. 4 camshaft bearing cap and the ring pins of the No. 5 camshaft bearing cap.
Temporarily install the 4 bolts by hand.
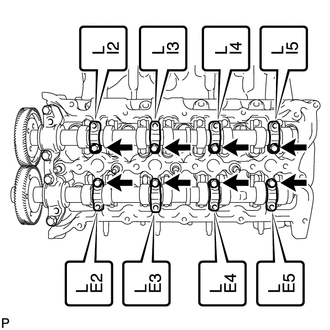
Install the No. 3 camshaft bearing caps.
Confirm the marks and numbers on the camshaft bearing caps and place them in their proper position and direction.
Temporarily install the 8 bolts, which are not installed with the oil feed pipe, by hand.
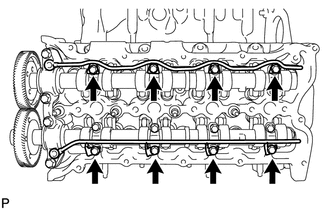
Temporarily install the No. 3 and No. 4 camshaft oil feed pipes with the 8 bolts by hand.
- NOTICE:
-
If even one of the pipe bolt holes does not match its camshaft bearing cap bolt hole, replace the camshaft oil feed pipe.
- HINT:
-
The pipe is bent on the intake side, and straight on the exhaust side.
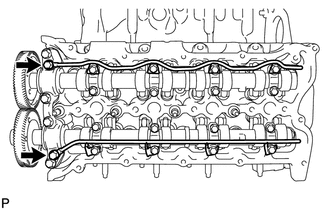
Temporarily install the 2 union bolts by hand.
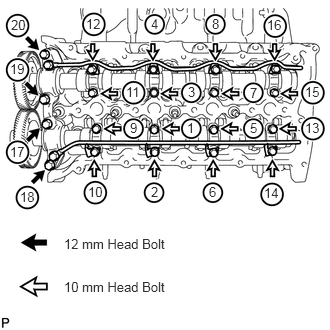
Uniformly tighten the 20 bolts in several steps in the order shown in the illustration.
- Torque:
- for 12 mm head bolt of No. 4 camshaft bearing cap : 21 N*m (214 kgf*cm, 15 ft.*lbf)
- for 10 mm head bolt of No. 3 camshaft bearing cap : 10 N*m (102 kgf*cm, 7 ft.*lbf)
Tighten the 2 union bolts.
- Torque:
- 17 N*m (173 kgf*cm, 13 ft.*lbf)
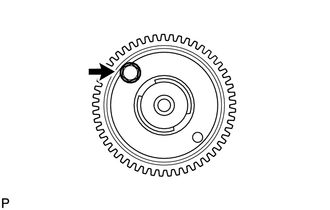
Remove the bolt from the No. 4 camshaft timing gear.
- NOTICE:
-
Do not drop the bolt into the engine.
13511
15.INSTALL NO. 1 AND NO. 2 CAMSHAFT
Add more than 19 cc (1.16 cu. in.) of engine oil into the cylinder head side oil holes.
Apply engine oil to the rollers of the valve rocker arms and the camshaft housing of the cylinder head.
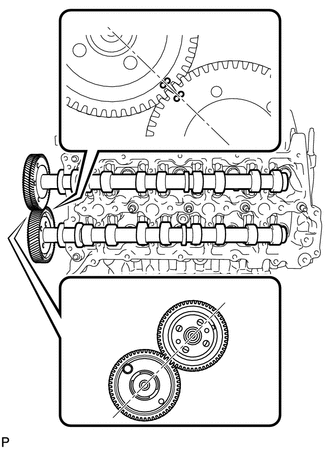
Install the camshafts.
Apply engine oil to the camshaft journals, lobes, thrust portion and gears.
Align the timing marks (2 dot marks) on the back side of the No. 1 and No. 2 camshaft timing gears as shown in the illustration.
Place the camshafts into the cylinder head.
- NOTICE:
-
-
Before and after setting the camshafts, firmly set the rocker arms to the lash adjusters.
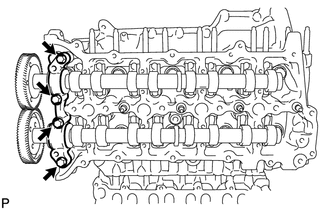
Install the No. 1 camshaft bearing cap.
Align the No. 1 camshaft bearing cap and the ring pins of the No. 2 camshaft bearing cap.
Temporarily install the 4 bolts by hand.
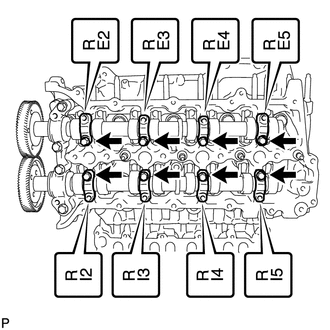
Install the No. 3 camshaft bearing caps.
Confirm the marks and numbers on the camshaft bearing caps and place them in their proper position and direction.
Temporarily install the 8 bolts, which are not installed with the oil feed pipe, by hand.
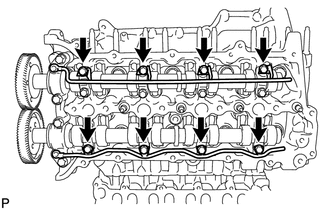
Temporarily install the No. 1 and No. 2 camshaft oil feed pipes with the 8 bolts by hand.
- NOTICE:
-
If even one of the pipe bolt holes does not match its camshaft bearing cap bolt hole, replace the camshaft oil feed pipe.
- HINT:
-
The pipe is bent on the intake side, and straight on the exhaust side.
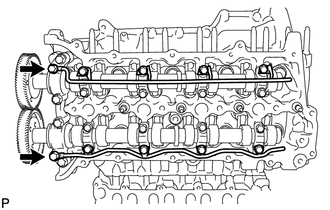
Temporarily install the 2 union bolts by hand.
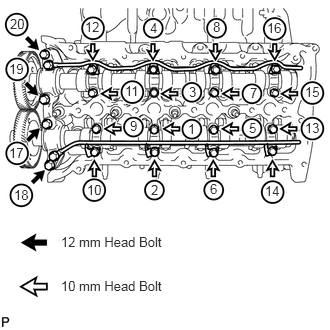
Uniformly tighten the 20 bolts in several steps in the order shown in the illustration.
- Torque:
- for 12 mm head bolt of No. 1 camshaft bearing cap : 21 N*m (214 kgf*cm, 15 ft.*lbf)
- for 10 mm head bolt of No. 3 camshaft bearing cap : 10 N*m (102 kgf*cm, 7 ft.*lbf)
Tighten the 2 union bolts.
- Torque:
- 17 N*m (173 kgf*cm, 13 ft.*lbf)
Remove the bolt from the No. 1 camshaft timing gear.
- NOTICE:
-
Do not drop the bolt into the engine.
11301
16.INSTALL TIMING GEAR CASE SUB-ASSEMBLY
- NOTICE:
-
When the contact surfaces shown below are wet, wipe them with an oil-free cloth before applying seal packing.
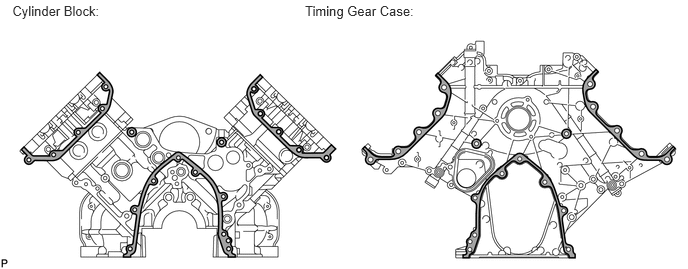 0.129,0.029 1.108,0.196 0.979,0.167 10 Cylinder Block: 3.177,0.029 4.380,0.215 1.204,0.187 10 Timing Gear Case:
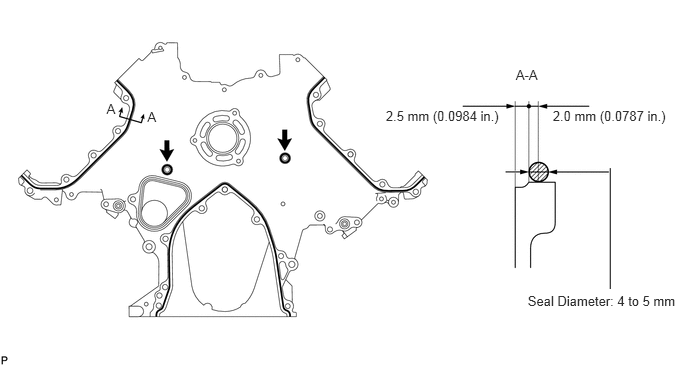
Apply seal packing to the timing gear case as shown in the following illustration.
- Standard seal diameter:
4 to 5 mm (0.157 to 0.197 in.)
- Seal packing:
Toyota Genuine Seal Packing Black, Three Bond 1207B or equivalent
- NOTICE:
- ·
After applying seal packing, align the timing gear case with the engine within 3 minutes and tighten the bolts and nuts within 15 minutes.
·Apply the seal packing in a continuous line.
- HINT:
- ·
The FIPG line is shown below.
·Apply packing to the 5 seal surface areas.
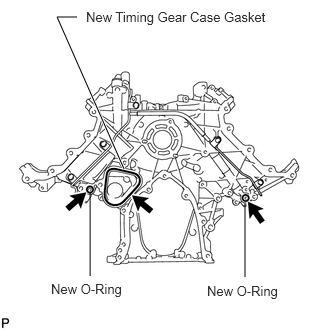
Install a new timing gear case gasket.
Apply engine oil to 2 new O-rings and install them to the timing gear case.
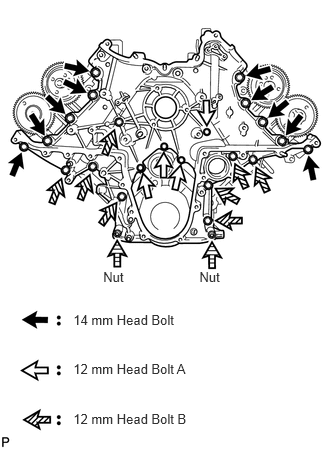
Install the timing gear case with the 22 bolts and 2 nuts.
- Torque:
- for 14 mm head bolt (case is dry) : 46 N*m (469 kgf*cm, 34 ft.*lbf)
- for 14 mm head bolt (case is wet) : 42 N*m (428 kgf*cm, 31 ft.*lbf)
- for 12 mm head bolt A and B : 29 N*m (296 kgf*cm, 21 ft.*lbf)
- for nut : 29 N*m (296 kgf*cm, 21 ft.*lbf)
- NOTICE:
- ·
The case is "dry" when there is absolutely no engine oil on the 14 mm head bolts and cylinder head bolt holes.
·The case is "wet" when there is engine oil on the 14 mm head bolts and cylinder head bolt holes.
| Item | Quantity | Length |
|---|---|---|
| A | 4 | 20 mm (0.787 in.) |
| B | 8 | 45 mm (1.77 in.) |
11248
17.INSTALL V-BANK SILENCER
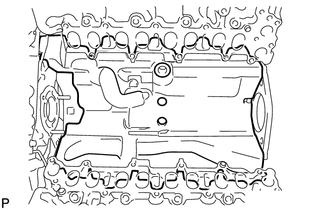
Align the alignment areas of the V-bank silencer and cylinder block, and install the V-bank silencer.
- NOTICE:
-
Verify that the V-bank silencer is below the top surface of the intake port of the cylinder head RH and LH.
22100
18.INSTALL FUEL SUPPLY PUMP ASSEMBLY
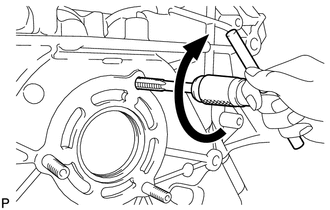
Using an 8 mm x 1.25 pitch tap, remove the adhesive from the timing gear case side bolt hole.
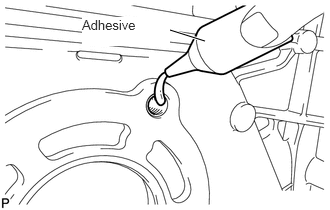
Apply adhesive to 2 or more threads of the timing gear case bolt hole.
- Adhesive:
Toyota Genuine Adhesive 1344, Three Bond 1344 or equivalent
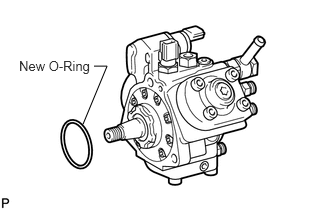
Apply engine oil to a new O-ring and install it to the supply pump.
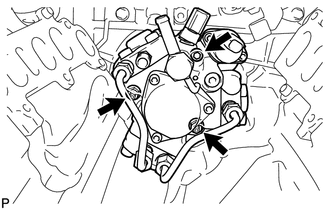
Install the supply pump to the timing gear case.
- NOTICE:
-
When installing the supply pump, do not hold the fuel pipe to prevent fuel leaks.
Temporarily install the 2 nuts.
Using a 6 mm hexagon wrench, install the hexagon bolt, and then tighten the 2 nuts.
- Torque:
- 21 N*m (214 kgf*cm, 15 ft.*lbf)
19.INSPECT RADIAL BALL BEARING
13613
20.TEMPORARILY INSTALL FUEL SUPPLY PUMP DRIVE GEAR
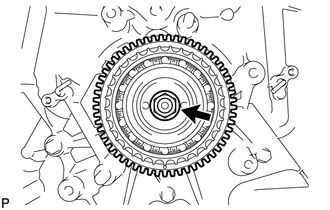
Align the cutout of the supply pump drive gear and key of the supply pump, and temporarily install the nut.
21.SET NO. 1 AND NO. 2 CAMSHAFTS TO TDC
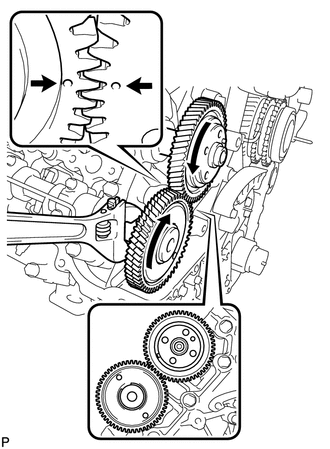
Using a wrench, turn the No. 1 camshaft and align the timing marks (1 dot mark) on the back side of the timing gears as shown in the illustration.
13581
22.INSTALL NO. 1 IDLE GEAR SHAFT
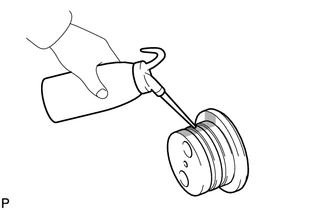
Apply engine oil to the contact surface of the idle gear shaft and the back side of the protrusion.
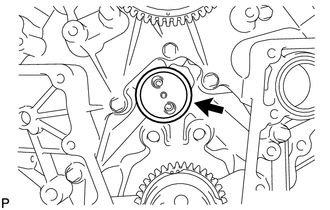
Install the idle gear shaft to the cylinder block.
13520A
23.INSTALL IDLE GEAR ASSEMBLY
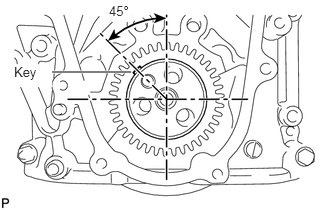
Temporarily install the 2 crankshaft pulley set bolts to the crankshaft.
Using a bar, turn the crankshaft clockwise to the No. 1 cylinder TDC position.
Align the timing marks of the supply pump drive gear and idle gear, and the timing marks of the crankshaft timing gear and idle gear as shown in the illustration.
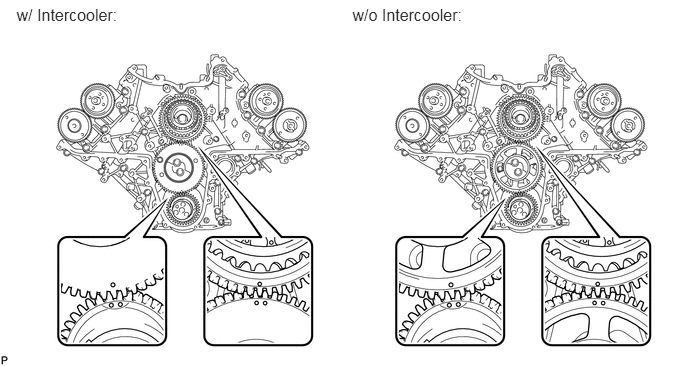
Apply engine oil to the idle gear thrust plate and gears.
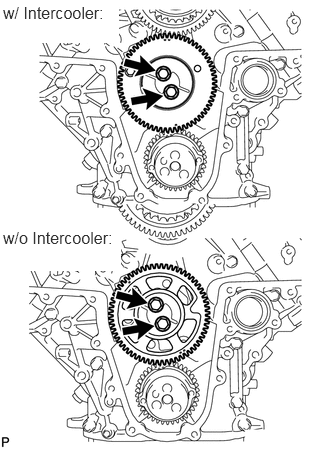
Install the idle gear thrust plate with the 2 bolts.
- Torque:
- 47 N*m (479 kgf*cm, 35 ft.*lbf)
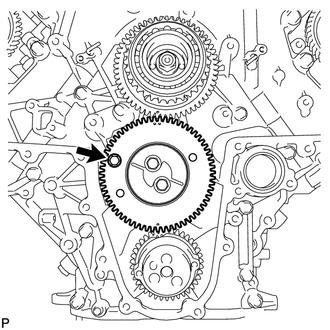
w/ Intercooler:
Remove the service bolt.
24.TIGHTEN FUEL SUPPLY PUMP DRIVE GEAR NUT
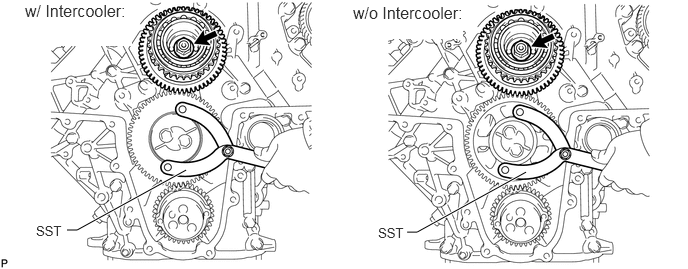
Using SST, hold the idle gear and tighten the nut.
- SST
- 09960-10010 (09962-01000, 09963-00700)
- Torque:
- 68 N*m (693 kgf*cm, 50 ft.*lbf)
25.CHECK NO. 1 CYLINDER TO TDC/COMPRESSION
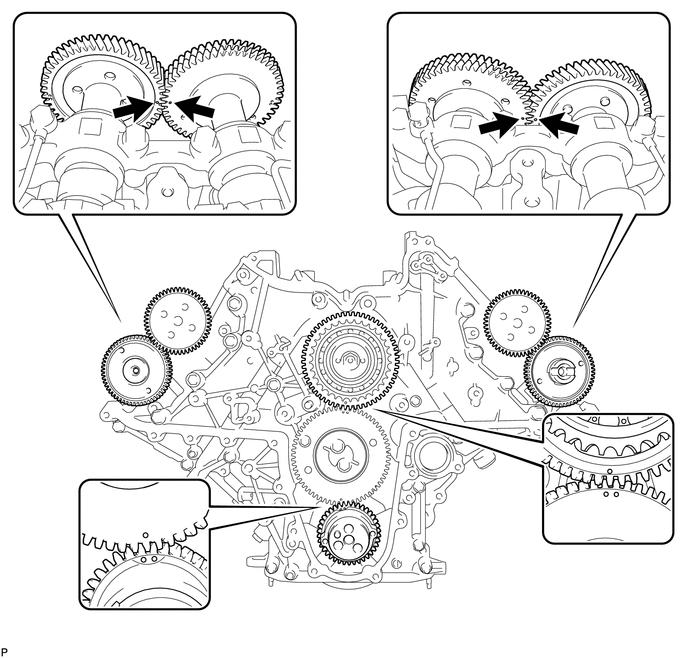
Check that the timing marks of the following pairs of parts are aligned: 1) supply pump drive gear and idle gear: 2) crankshaft timing gear and idle gear: 3) RH and LH camshaft timing gears.
13529G
26.INSTALL NO. 2 CAMSHAFT TIMING SPROCKET AND NO. 2 TIMING CHAIN
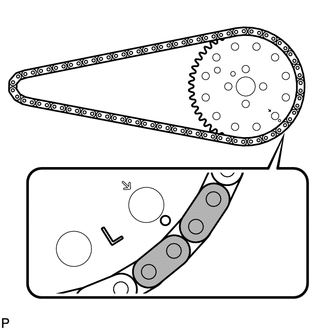
Align the 2 mark plates (yellow) on the No. 2 timing chain with the timing mark (1 dot mark) of the No. 2 camshaft timing sprocket as shown in the illustration.
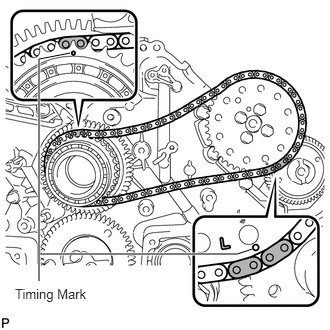
Align the No. 2 timing chain mark plate (yellow) with the supply pump drive gear timing mark, and temporarily install the No. 2 camshaft timing sprocket with the 4 bolts.
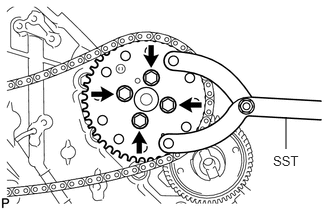
Using SST, hold the No. 2 camshaft timing sprocket, and tighten the 4 bolts.
- SST
- 09960-10010 (09962-01000, 09963-01000)
- Torque:
- 25 N*m (250 kgf*cm, 18 ft.*lbf)
13523
27.INSTALL NO. 1 CAMSHAFT TIMING SPROCKET AND NO. 1 TIMING CHAIN
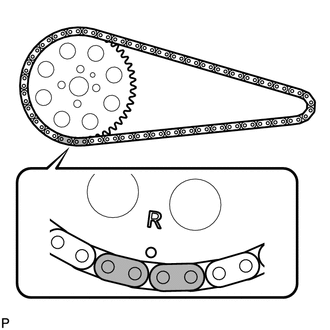
Align the 2 mark plates (yellow) on the No. 1 timing chain with the timing mark (1 dot mark) of the No. 1 camshaft timing sprocket as shown in the illustration.
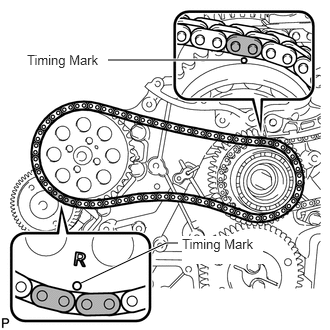
Align the No. 1 timing chain mark plate (yellow) with the supply pump drive gear timing mark, and temporarily install the No. 1 camshaft timing sprocket.
13522
28.INSTALL PUMP DRIVE SHAFT GEAR
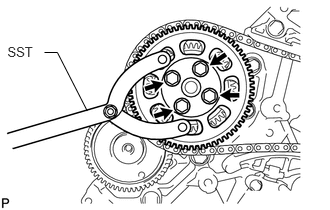
Temporarily install the pump drive shaft gear with the 4 bolts.
Using SST, hold the pump drive shaft gear and tighten the 4 bolts.
- SST
- 09960-10010 (09962-01000, 09963-01000)
- Torque:
- 25 N*m (250 kgf*cm, 18 ft.*lbf)
29.INSTALL NO. 2 CHAIN VIBRATION DAMPER
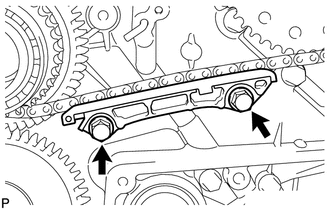
Install the No. 2 chain vibration damper with the 2 bolts.
- Torque:
- 21 N*m (214 kgf*cm, 15 ft.*lbf)
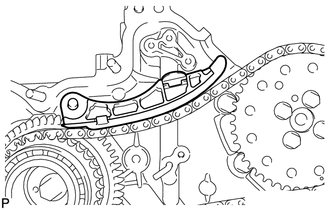
30.INSTALL NO. 2 CHAIN TENSIONER SLIPPER
31.INSTALL NO. 2 CHAIN TENSIONER ASSEMBLY
Move the stopper plate clockwise to release the lock, and push the plunger into the tensioner.
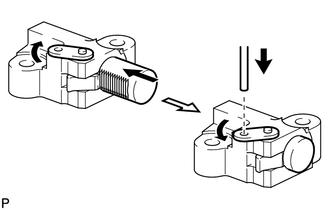
Move the stopper plate counterclockwise to set the lock, and insert a hexagon wrench into the stopper plate hole.
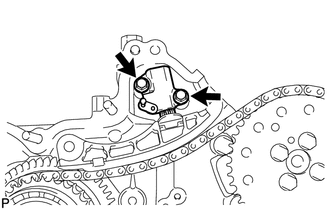
Install the No. 2 chain tensioner with the 2 bolts.
- Torque:
- 10 N*m (102 kgf*cm, 7 ft.*lbf)
Remove the hexagon wrench.
13561
32.INSTALL NO. 1 CHAIN VIBRATION DAMPER
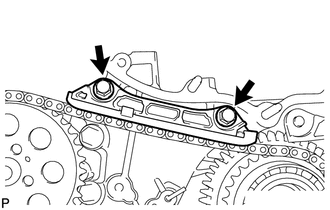
Install the No. 1 chain vibration damper with the 2 bolts.
- Torque:
- 21 N*m (214 kgf*cm, 15 ft.*lbf)
13559
33.INSTALL NO. 1 CHAIN TENSIONER SLIPPER
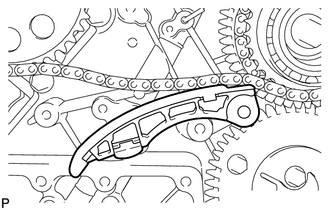
13540
34.INSTALL NO. 1 CHAIN TENSIONER ASSEMBLY
Move the stopper plate clockwise to release the lock, and push the plunger into the tensioner.
Move the stopper plate counterclockwise to set the lock, and insert a hexagon wrench into the stopper plate hole.
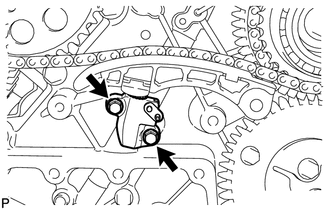
Install the No. 1 chain tensioner with the 2 bolts.
- Torque:
- 10 N*m (102 kgf*cm, 7 ft.*lbf)
Remove the hexagon wrench.
19315
35.INSTALL NO. 1 CRANKSHAFT POSITION SENSOR PLATE
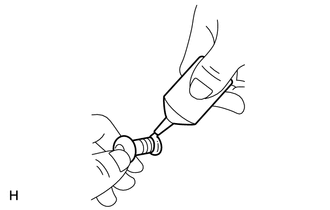
Remove the adhesive from the threads of the screws and the bolt holes of the crankshaft.
Apply adhesive to 2 or 3 threads of the 2 screws.
- Adhesive:
Toyota Genuine Adhesive 1344, Three Bond 1344 or equivalent
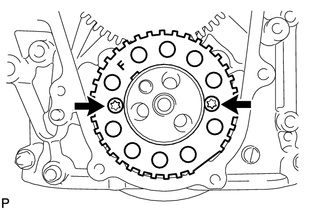
Using a T30 "TORX" wrench, install the No. 1 crankshaft position sensor plate with the 2 screws.
- Torque:
- 10 N*m (102 kgf*cm, 7 ft.*lbf)
- NOTICE:
-
Make sure the "F" mark on the plate is facing towards the front side of the engine.
36.CHECK NO. 1 CYLINDER TO TDC/COMPRESSION
Temporarily install the 2 crankshaft pulley set bolts to the crankshaft.
Rotate the crankshaft 2 revolutions or more so that the crankshaft key is 45° counterclockwise from the top. Check that the timing marks (1 dot mark each) of the RH and LH camshaft timing gears align. If not as specified, turn the crankshaft 1 revolution (360°) and align the timing marks. If the timing marks are deviated, reinstall the chain and camshaft.
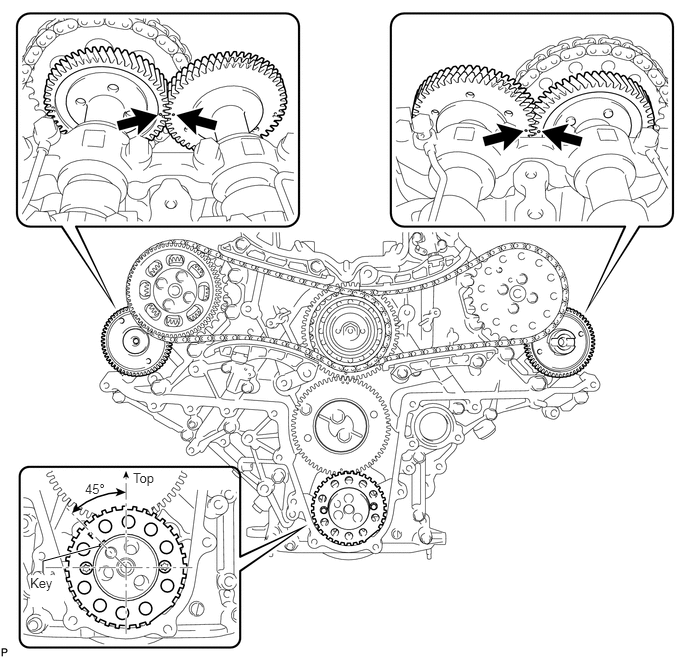
Remove the 2 crankshaft pulley set bolts.
37.INSTALL FRONT CRANKSHAFT OIL SEAL
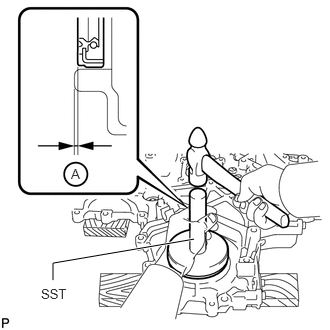
Place the timing chain cover on wooden blocks.
Using SST and a hammer, tap in a new oil seal as shown in the illustration.
- SST
- 09316-12010
09950-70010 (09951-07100)
09950-60020 (09951-00890)
- Standard depth A:
0.6 to 1.4 mm (0.0236 to 0.0551 in.)
11302
38.INSTALL TIMING CHAIN COVER SUB-ASSEMBLY
- NOTICE:
-
When the contact surfaces shown below are wet, wipe them with an oil-free cloth before applying seal packing.
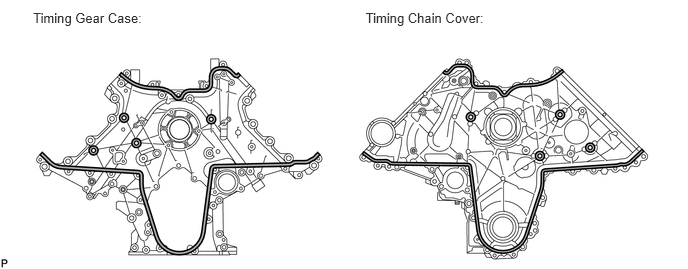 0.344,0.107 1.545,0.277 1.201,0.170 10 Timing Gear Case: 3.808,0.104 5.115,0.274 1.306,0.170 10 Timing Chain Cover:
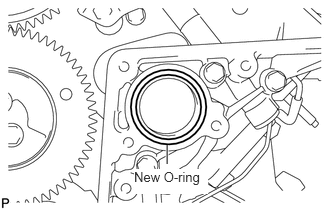
Install a new O-ring to the timing gear case.
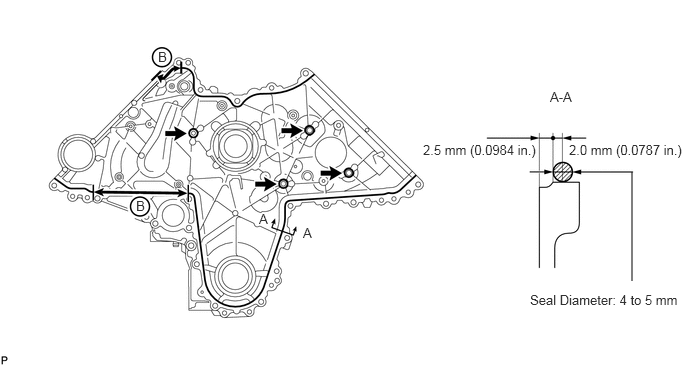
Apply seal packing to the timing chain cover as shown in the following illustration.
- Standard seal diameter:
4 to 5 mm (0.157 to 0.197 in.)
- Seal packing:
Toyota Genuine Seal Packing Black, Three Bond 1207B or equivalent
- NOTICE:
- ·
After applying seal packing, align the timing chain cover with the timing gear case within 3 minutes and tighten the bolts and nuts within 15 minutes.
·Apply the seal packing in a continuous line.
·Make sure the seal packing does not become thinner than 4 mm (0.157 in.) at the areas labeled "B" in the illustration below.
- HINT:
- ·
The FIPG line is shown below.
·Apply packing to the 6 seal surface areas.
 6.583,1.792 6.583,2.927 false 4.406,1.479 5.635,1.646 1.229,0.167 10 false 2.5 mm (0.0984 in.) 5.927,1.479 7.156,1.656 1.229,0.177 10 false 2.0 mm (0.0787 in.) 5.521,3.042 7.146,3.229 1.625,0.188 10 false Seal Diameter: 4 to 5 mm 5.729,0.927 6,1.083 0.271,0.156 10 false A-A 3.156,2.344 3.292,2.51 0.135,0.167 10 false A 2.698,2.198 2.833,2.365 0.135,0.167 10 false A 1.646,0.51 1.802,0.677 0.156,0.167 10 false B 1.417,2.063 1.573,2.229 0.156,0.167 10 false B
Apply engine oil to the lip of the oil seal.
Align and install the timing chain cover to the timing gear case knock pin and supply pump bearing.
- NOTICE:
-
Make sure that the lip of the oil seal is properly installed.
- Torque:
- 25 N*m (250 kgf*cm, 18 ft.*lbf)
- HINT:
-
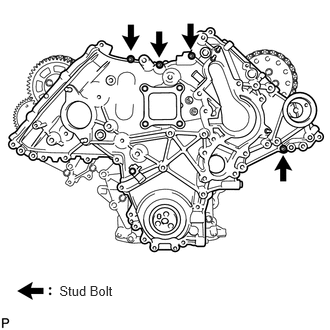 0.618,2.951 1.218,3.093 0.599,0.142 10 Stud Bolt
-
If the stud bolts are loose, tighten them before performing this procedure.
Using an E7 "TORX" wrench, tighten the stud bolts.
- Torque:
- 6.0 N*m (61 kgf*cm, 53 in.*lbf)
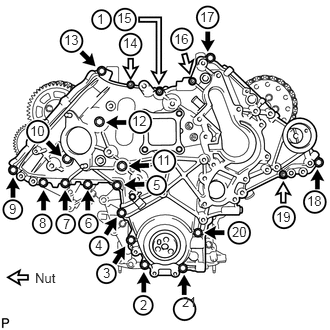
Install and uniformly tighten the 16 bolts and 4 nuts in the order shown in the illustration.
39.TEMPORARILY INSTALL INTAKE MANIFOLD
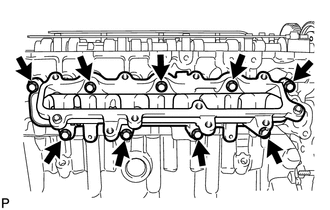
Install the gasket and temporarily install the No. 2 intake manifold with the 9 bolts.
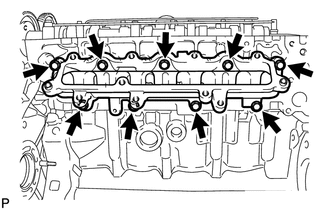
Install the gasket and temporarily install the No. 1 intake manifold with the 9 bolts.
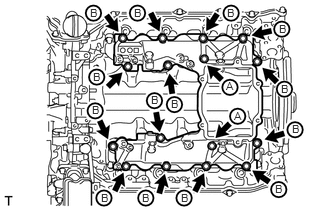
Install the 2 gaskets and temporarily install the No. 3 intake manifold with the 16 bolts.
| Item | Length |
|---|---|
| Bolt A | 70 mm (2.76 in.) |
| Bolt B | 25 mm (0.984 in.) |
23810A
40.TEMPORARILY INSTALL COMMON RAIL ASSEMBLY RH
23820A
41.TEMPORARILY INSTALL COMMON RAIL ASSEMBLY LH
23670
42.INSTALL FUEL INJECTOR RH
43.INSTALL FUEL INJECTOR LH
23810A
44.REMOVE COMMON RAIL ASSEMBLY RH
23820A
45.REMOVE COMMON RAIL ASSEMBLY LH
46.REMOVE INTAKE MANIFOLD
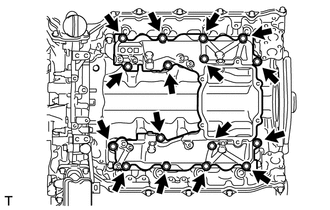
Remove the 16 bolts, 2 gaskets and intake manifold.
Remove the 9 bolts, No. 1 intake manifold and gasket.
Remove the 9 bolts, No. 2 intake manifold and gasket.
11214
47.INSTALL NOZZLE HOLDER GASKET LH
11202
48.INSTALL CYLINDER HEAD COVER SUB-ASSEMBLY LH
23681C
49.INSTALL NOZZLE HOLDER SEAL LH
12270
50.INSTALL OIL SEPARATOR ASSEMBLY
11213
51.INSTALL NOZZLE HOLDER GASKET RH
11201
52.INSTALL CYLINDER HEAD COVER SUB-ASSEMBLY RH
23681C
53.INSTALL NOZZLE HOLDER SEAL RH
11225
54.INSTALL CYLINDER HEAD COVER SILENCER LH (w/ Intercooler)
11224
55.INSTALL CYLINDER HEAD COVER SILENCER RH (w/ Intercooler)
29300
56.INSTALL VACUUM PUMP ASSEMBLY (w/ Intercooler)
25706
57.INSTALL NO. 1 VACUUM TRANSMITTING PIPE SUB-ASSEMBLY
25860
58.INSTALL NO. 1 VACUUM SWITCHING VALVE ASSEMBLY (w/ Intercooler)
19850
59.INSTALL GLOW PLUG ASSEMBLY
19871
60.INSTALL NO. 1 GLOW PLUG CONNECTOR
61.INSTALL WATER OUTLET PIPE
16331
62.INSTALL WATER OUTLET
17946
63.INSTALL NO. 2 INTERCOOLER SUPPORT BRACKET
31484
64.INSTALL CLUTCH FLEXIBLE HOSE BRACKET (for Manual Transmission)
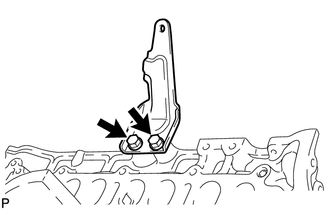
Install the clutch flexible hose bracket with the 2 bolts.
- Torque:
- 20 N*m (204 kgf*cm, 15 ft.*lbf)
65.INSTALL STARTER HOSE BRACKET
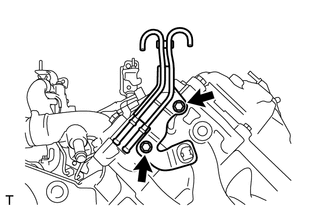
Install the starter hose bracket with the 2 bolts.
- Torque:
- 10 N*m (102 kgf*cm, 7 ft.*lbf)
28100
66.INSTALL STARTER ASSEMBLY
16100
67.INSTALL WATER PUMP ASSEMBLY
16262
68.CONNECT INLET WATER HOSE
69.INSTALL NO. 2 IDLER PULLEY BRACKET (w/ Viscous Heater)
16630H
70.INSTALL NO. 2 IDLER PULLEY (w/ Viscous Heater)
16307A
71.INSTALL FAN BRACKET SUB-ASSEMBLY
11336A
72.INSTALL TIMING GEAR COVER INSULATOR (w/ Intercooler)
16331A
73.INSTALL THERMOSTAT
16321
74.INSTALL WATER INLET
75.INSTALL NO. 1 IDLER PULLEY BRACKET (w/ Viscous Heater)
87120G
76.INSTALL VISCOUS HEATER ASSEMBLY WITH MAGNET CLUTCH (w/ Viscous Heater)
11301K
77.INSTALL CRANKSHAFT POSITION SENSOR
11301M
78.INSTALL CAMSHAFT POSITION SENSOR
12101
79.INSTALL NO. 1 OIL PAN SUB-ASSEMBLY
15104
80.INSTALL OIL STRAINER SUB-ASSEMBLY
12102A
81.INSTALL NO. 2 OIL PAN SUB-ASSEMBLY
89491
82.INSTALL ENGINE OIL LEVEL SENSOR
15609
83.INSTALL OIL FILTER BRACKET SUB-ASSEMBLY
15650
84.INSTALL OIL FILTER ELEMENT
11348
85.INSTALL TIMING GEAR COVER SPACER (w/ Intercooler)
13471
86.INSTALL CRANKSHAFT PULLEY
15778
87.CONNECT NO. 2 OIL COOLER HOSE
15777
88.CONNECT NO. 1 OIL COOLER HOSE
16620D
89.INSTALL V-RIBBED BELT TENSIONER ASSEMBLY
12158
90.INSTALL STIFFENER INSULATOR RH (w/ Intercooler)
12502
91.INSTALL COMPRESSOR BRACKET
12582
92.INSTALL NO. 2 CYLINDER BLOCK INSULATOR
12325A
93.INSTALL ENGINE MOUNTING BRACKET LH
16207
94.INSTALL NO. 2 WATER BY-PASS PIPE SUB-ASSEMBLY
25708
95.INSTALL NO. 3 VACUUM TRANSMITTING PIPE SUB-ASSEMBLY
1723A
96.INSTALL TURBOCHARGER WIRE
17873
97.INSTALL NO. 2 INTAKE AIR CONNECTOR BRACKET
12581
98.INSTALL NO. 1 CYLINDER BLOCK INSULATOR
12315A
99.INSTALL ENGINE MOUNTING BRACKET RH
25709E
100.INSTALL NO. 4 VACUUM TRANSMITTING PIPE SUB-ASSEMBLY (w/ Intercooler)
16206
101.INSTALL NO. 1 WATER BY-PASS PIPE SUB-ASSEMBLY
17368B
102.INSTALL AIR TUBE SUPPORT
17872
103.INSTALL NO. 1 INTAKE AIR CONNECTOR BRACKET
17208
104.INSTALL NO. 2 TURBOCHARGER SUB-ASSEMBLY WITH EXHAUST MANIFOLD LH
12202
105.INSTALL NO. 2 VENTILATION TUBE SUB-ASSEMBLY
17297
106.INSTALL NO. 2 TURBOCHARGER STAY
15492
107.CONNECT NO. 2 OUTLET TURBO OIL HOSE
16028
108.INSTALL NO. 2 TURBO WATER PIPE SUB-ASSEMBLY
16355
109.INSTALL FRONT WATER BY-PASS JOINT
16029
110.INSTALL NO. 3 TURBO WATER PIPE SUB-ASSEMBLY
17168
111.INSTALL NO. 2 EXHAUST MANIFOLD HEAT INSULATOR
16285
112.CONNECT NO. 2 TURBO WATER HOSE
113.CONNECT BREATHER PLUG LH
12263
114.CONNECT NO. 3 VENTILATION HOSE
17201
115.INSTALL NO. 1 TURBOCHARGER SUB-ASSEMBLY WITH EXHAUST MANIFOLD RH
12201
116.INSTALL NO. 1 VENTILATION TUBE SUB-ASSEMBLY
17293
117.INSTALL NO. 1 TURBOCHARGER STAY
16027
118.INSTALL NO. 1 TURBO WATER PIPE SUB-ASSEMBLY
15474A
119.CONNECT NO. 1 OUTLET TURBO OIL HOSE
17167
120.INSTALL NO. 1 EXHAUST MANIFOLD HEAT INSULATOR
16285
121.CONNECT NO. 2 TURBO WATER HOSE
122.CONNECT BREATHER PLUG RH
12262
123.CONNECT NO. 2 VENTILATION HOSE
27020
124.INSTALL GENERATOR ASSEMBLY
17875
125.INSTALL NO. 1 INTAKE AIR CONNECTOR PIPE
11452
126.INSTALL NO. 1 ENGINE OIL LEVEL DIPSTICK GUIDE
127.INSTALL ENGINE ASSEMBLY
Install the engine assembly to the vehicle (See page Engine / Hybrid System>1VD-FTV (ENGINE MECHANICAL)>ENGINE ASSEMBLY>INSTALLATION).
128.CONNECT CABLE TO NEGATIVE BATTERY TERMINAL
- NOTICE:
-
When disconnecting the cable, some systems need to be initialized after the cable is reconnected (See page General>INTRODUCTION>REPAIR INSTRUCTION>INITIALIZATION).
Connect the cables to the negative (-) main battery and sub-battery terminals.