HEATING / AIR CONDITIONING FRONT AIR CONDITIONING UNIT INSTALLATION
PROCEDURE

 1.INSTALL FRONT AIR CONDITIONING UNIT
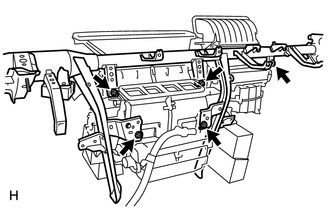
Temporarily tighten the air conditioning unit with the 3 bolts and 2 screws.
55330B
2.INSTALL INSTRUMENT PANEL REINFORCEMENT ASSEMBLY
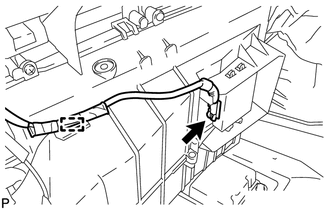
Connect the connector and clamp and install the wire harness.
Install the instrument panel reinforcement.
for Passenger Side:
Using a 12 mm hexagon wrench, install the 2 collars.
- Torque:
- 18 N*m (184 kgf*cm, 13 ft.*lbf)
for Passenger Side:
Using a T40 "TORX" socket, install the 2 "TORX" bolts.
- Torque:
- 18 N*m (184 kgf*cm, 13 ft.*lbf)
for Driver Side:
Install the 3 bolts and 2 caps.
Install the instrument panel reinforcement with the 3 bolts and nut.
for Nut
- Torque:
- 5.4 N*m (55 kgf*cm, 48 in.*lbf)
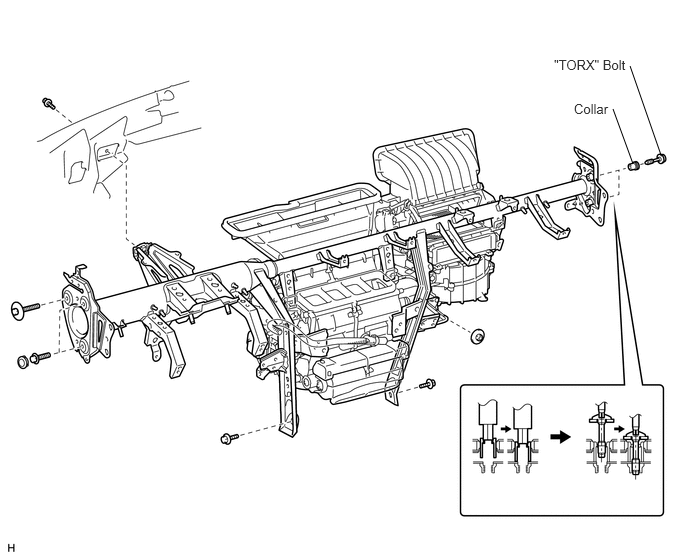
Tighten the air conditioning unit with the 3 bolts and 2 screws.
for Bolt
- Torque:
- 9.8 N*m (100 kgf*cm, 87 in.*lbf)
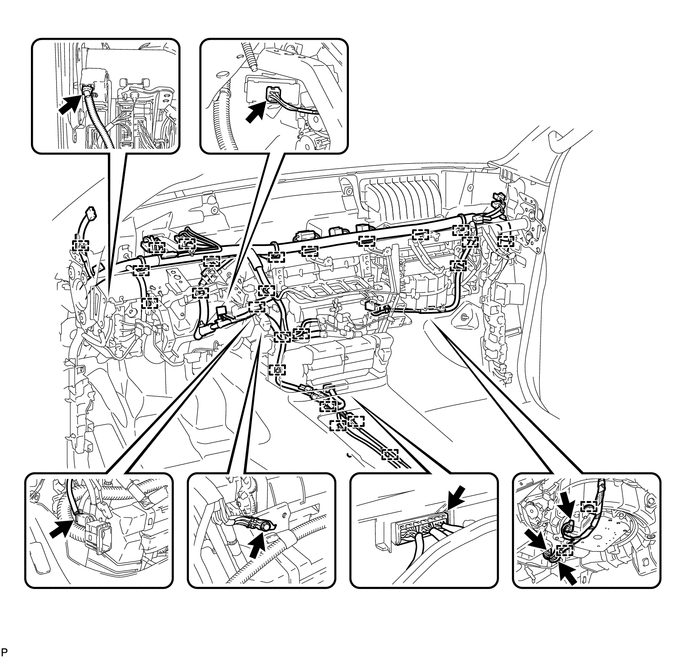
Connect the connectors and clamps and install the wire harness.
Install the ground wire with the bolt.
- Torque:
- 8.4 N*m (86 kgf*cm, 74 in.*lbf)
82861
3.INSTALL NO. 1 ECU INTEGRATION BRACKET
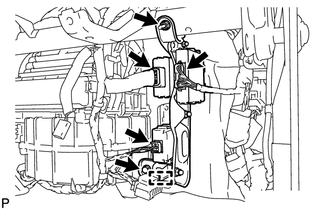
Install the ECU integration bracket with the bolt and nut.
Connect the connectors and clamp.
81980
4.INSTALL TURN SIGNAL FLASHER ASSEMBLY
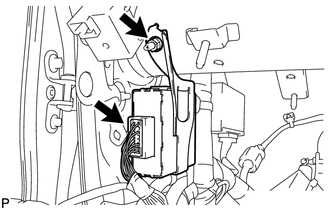
Install the turn signal flasher with the nut.
Connect the connector.
82733A
5.INSTALL MAIN BODY ECU
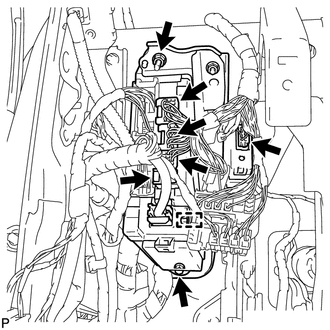
Install the main body ECU with the bolt and nut.
Connect the connectors and clamp.
87212F
6.INSTALL REAR NO. 2 AIR DUCT
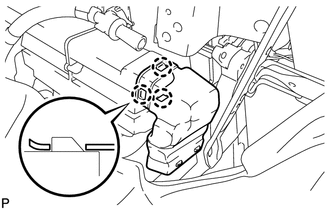
Attach the 3 claws and install the air duct.
87212
7.INSTALL REAR NO. 1 AIR DUCT
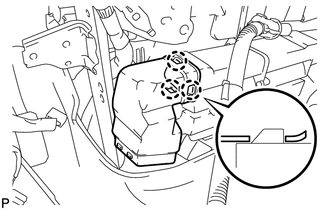
Attach the 3 claws and install the air duct.
33550
8.INSTALL TRANSMISSION FLOOR SHIFT ASSEMBLY
33820B
9.CONNECT TRANSMISSION CONTROL CABLE ASSEMBLY
55301
10.INSTALL INSTRUMENT PANEL SUB-ASSEMBLY (for 8 Speakers)
55301
11.INSTALL INSTRUMENT PANEL SUB-ASSEMBLY (for 14 Speakers)
45250
12.INSTALL STEERING COLUMN ASSEMBLY (for Manual Tilt and Manual Telescopic Steering Column)
45250
13.INSTALL STEERING COLUMN ASSEMBLY (for Power Tilt and Power Telescopic Steering Column)
45220
14.INSTALL STEERING INTERMEDIATE SHAFT ASSEMBLY
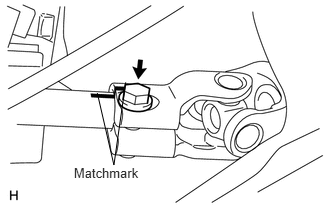
Align the matchmarks on the steering column and install the steering intermediate shaft.
Install the bolt.
- Torque:
- 35 N*m (357 kgf*cm, 26 ft.*lbf)
87201F
15.INSTALL NO. 3 AIR DUCT SUB-ASSEMBLY
87212H
16.INSTALL REAR NO. 4 AIR DUCT
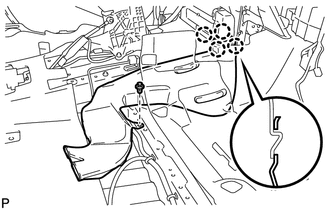
Attach the 4 claws and install the air duct.
Install the clip.
87212G
17.INSTALL REAR NO. 3 AIR DUCT
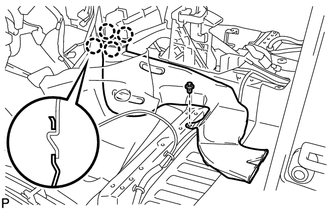
Attach the 4 claws and install the air duct.
Install the clip.
86280
18.INSTALL STEREO COMPONENT AMPLIFIER ASSEMBLY (for 14 Speakers)
86183D
19.INSTALL AUDIO AMPLIFIER COVER (for 14 Speakers)
71100S
20.INSTALL FRONT RH SEAT ASSEMBLY (for RH Side)
72137G
21.INSTALL SEAT TRACK OUTER COVER RH (for RH Side)
72137C
22.INSTALL SEAT TRACK INNER COVER RH (for RH Side)
71910A
23.INSTALL FRONT SEAT HEADREST ASSEMBLY (for RH Side)
71200S
24.INSTALL FRONT LH SEAT ASSEMBLY (for LH Side)
72138D
25.INSTALL SEAT TRACK OUTER COVER LH (for LH Side)
72138E
26.INSTALL SEAT TRACK INNER COVER LH (for LH Side)
71910A
27.INSTALL FRONT SEAT HEADREST ASSEMBLY (for LH Side)
86160L
28.INSTALL FRONT NO. 4 SPEAKER ASSEMBLY (for 14 Speakers)
55474E
29.INSTALL NO. 3 INSTRUMENT PANEL SPEAKER PANEL SUB-ASSEMBLY
86160P
30.INSTALL FRONT NO. 2 SPEAKER ASSEMBLY RH
55409F
31.INSTALL NO. 2 INSTRUMENT PANEL SPEAKER PANEL SUB-ASSEMBLY
86160P
32.INSTALL FRONT NO. 2 SPEAKER ASSEMBLY LH
55409A
33.INSTALL INSTRUMENT PANEL SPEAKER PANEL SUB-ASSEMBLY
55042B
34.INSTALL NO. 2 INSTRUMENT PANEL BOX DOOR SUB-ASSEMBLY
55045A
35.INSTALL LOWER INSTRUMENT PANEL FINISH PANEL SUB-ASSEMBLY RH
73990
36.INSTALL LOWER NO. 2 INSTRUMENT PANEL AIRBAG ASSEMBLY
55312
37.INSTALL LOWER INSTRUMENT PANEL
55607
38.INSTALL NO. 2 INSTRUMENT PANEL UNDER COVER SUB-ASSEMBLY
62211
39.INSTALL FRONT PILLAR GARNISH RH
62311B
40.INSTALL FRONT DOOR OPENING TRIM WEATHERSTRIP RH
62111C
41.INSTALL COWL SIDE TRIM BOARD RH
67913
42.INSTALL FRONT DOOR SCUFF PLATE RH
55317A
43.INSTALL INSTRUMENT SIDE PANEL RH
44.INSTALL NAVIGATION RECEIVER ASSEMBLY (w/ Navigation System)
86120
45.INSTALL RADIO AND DISPLAY RECEIVER ASSEMBLY (w/o Navigation System)
84010D
46.INSTALL INTEGRATION CONTROL AND PANEL ASSEMBLY
55434B
47.INSTALL CENTER LOWER INSTRUMENT PANEL FINISH PANEL
83100
48.INSTALL COMBINATION METER ASSEMBLY
55410C
49.INSTALL INSTRUMENT CLUSTER FINISH PANEL ASSEMBLY
58811A
50.INSTALL FRONT CONSOLE BOX
58910C
51.INSTALL REAR CONSOLE BOX ASSEMBLY
58815A
52.INSTALL CONSOLE BOX CARPET
58925A
53.INSTALL REAR CONSOLE BOX POCKET
58805C
54.INSTALL REAR UPPER CONSOLE PANEL SUB-ASSEMBLY
58804A
55.INSTALL UPPER CONSOLE PANEL SUB-ASSEMBLY
33504F
56.INSTALL SHIFT LEVER KNOB SUB-ASSEMBLY
55046A
57.INSTALL LOWER INSTRUMENT PANEL FINISH PANEL SUB-ASSEMBLY LH
53601
58.INSTALL HOOD LOCK CONTROL LEVER SUB-ASSEMBLY
55318C
59.INSTALL INSTRUMENT SIDE PANEL LH
62212
60.INSTALL FRONT PILLAR GARNISH LH
62312B
61.INSTALL FRONT DOOR OPENING TRIM WEATHERSTRIP LH
62112
62.INSTALL COWL SIDE TRIM BOARD LH
67914
63.INSTALL FRONT DOOR SCUFF PLATE LH
84140
64.INSTALL TURN SIGNAL SWITCH ASSEMBLY WITH SPIRAL CABLE SUB-ASSEMBLY
45286B
65.INSTALL UPPER STEERING COLUMN COVER
45287
66.INSTALL LOWER STEERING COLUMN COVER
45100
67.INSTALL STEERING WHEEL ASSEMBLY
45130
68.INSTALL STEERING PAD
45187
69.INSTALL LOWER NO. 3 STEERING WHEEL COVER
45186
70.INSTALL LOWER NO. 2 STEERING WHEEL COVER
71.INSTALL FRONT WIPER MOTOR AND LINK ASSEMBLY
55781E
72.INSTALL COWL TOP VENTILATOR LOUVER SUB-ASSEMBLY
53867H
73.INSTALL FRONT FENDER TO COWL SIDE SEAL LH
53866J
74.INSTALL FRONT FENDER TO COWL SIDE SEAL RH
85221B
75.INSTALL FRONT WIPER ARM AND BLADE ASSEMBLY LH
85211B
76.INSTALL FRONT WIPER ARM AND BLADE ASSEMBLY RH
87246A
77.CONNECT HEATER WATER OUTLET HOSE A
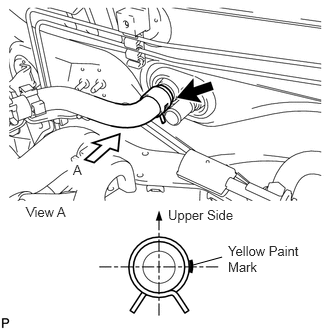
Connect the water hose onto the air conditioning unit.
- NOTICE:
-
Perform the installation with the hose clip and mark at the correct angle.
87245A
78.CONNECT HEATER WATER INLET HOSE A
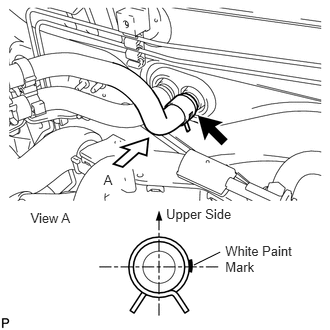
Connect the water hose onto the air conditioning unit.
- NOTICE:
-
Perform the installation with the hose clip and mark at the correct angle.
88716B
79.CONNECT COOLER REFRIGERANT LIQUID PIPE B
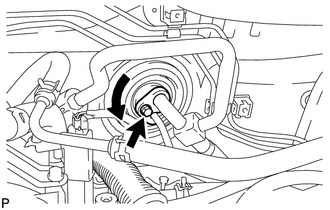
Remove the attached vinyl tape from the pipe.
Sufficiently apply compressor oil to a new O-ring and the fitting surface of the suction pipe.
- Compressor oil:
ND-OIL 8 or equivalent
Install the 2 O-rings on the suction pipe and liquid pipe.
Move the hook connector in the direction indicated by the arrow in the illustration.
Insert the pipe joint into the fitting hole securely and tighten the bolt.
- Torque:
- 9.8 N*m (100 kgf*cm, 87 in.*lbf)
80.INSPECT SHIFT LEVER POSITION
81.ADJUST SHIFT LEVER POSITION
82.CONNECT CABLE TO NEGATIVE BATTERY TERMINAL
- NOTICE:
-
When disconnecting the cable some systems need to be initialized after the cable is reconnected (See page General>INTRODUCTION>REPAIR INSTRUCTION>INITIALIZATION).
- Torque:
- 5.4 N*m (55 kgf*cm, 48 in.*lbf)
83.ADD ENGINE COOLANT (for 3UR-FE)
84.ADD ENGINE COOLANT (for 3UR-FBE)
85.INSPECT FOR COOLANT LEAK (for 3UR-FE)
86.INSPECT FOR COOLANT LEAK (for 3UR-FBE)
87. CHARGE REFRIGERANT
88. WARM UP ENGINE
89.INSPECT FOR REFRIGERANT LEAK
51441
90.INSTALL NO. 1 ENGINE UNDER COVER
91.CHECK SRS WARNING LIGHT
Check the SRS warning light (See page Vehicle Interior>SUPPLEMENTAL RESTRAINT SYSTEMS>AIRBAG SYSTEM>DIAGNOSIS SYSTEM).