1NZ-FE ENGINE MECHANICAL ENGINE ASSEMBLY(for Manual Transaxle) INSTALLATION
PROCEDURE

 12372A
1.INSTALL ENGINE MOUNTING INSULATOR LH
- HINT:
-
Only perform this procedure when replacement of the engine mounting insulator LH is necessary.
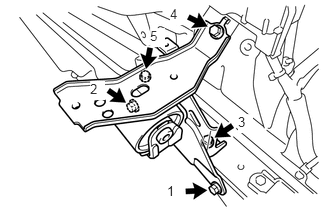
Temporarily tighten the engine mounting insulator LH to the vehicle with the 5 bolts.
Fully tighten the 5 bolts, in the sequence shown in the illustration.
- Torque:
- 52 N*m (530 kgf*cm, 38 ft.*lbf)
12305
2.INSTALL ENGINE MOUNTING INSULATOR SUB-ASSEMBLY RH
- HINT:
-
Only perform this procedure when replacement of the engine mounting insulator sub-assembly RH is necessary.
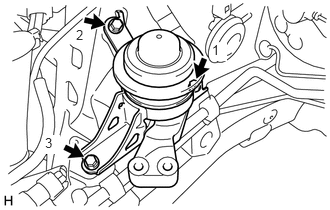
Temporarily tighten the engine mounting insulator sub-assembly RH to the vehicle with the 3 bolts.
Fully tighten the 3 bolts, in the sequence shown in the illustration.
- Torque:
- 52 N*m (530 kgf*cm, 38 ft.*lbf)
19500D
3.INSTALL NO. 1 IGNITION COIL
17141
4.INSTALL EXHAUST MANIFOLD
25591
5.INSTALL MANIFOLD SUPPORT BRACKET
17167
6.INSTALL NO. 1 EXHAUST MANIFOLD HEAT INSULATOR
17111
7.INSTALL INTAKE MANIFOLD WITH THROTTLE BODY WITH MOTOR ASSEMBLY
Install a new intake manifold to head gasket to the intake manifold.
Temporarily tighten the intake manifold with throttle body with motor assembly to the cylinder head sub-assembly with the 3 bolts and 2 nuts.
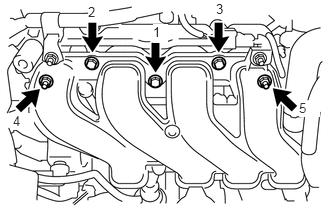
Tighten the 3 bolts and 2 nuts in the sequence shown in the illustration.
- Torque:
- 30 N*m (306 kgf*cm, 22 ft.*lbf)
Connect the No. 2 water by-pass hose to the No. 1 water by-pass pipe with the hose clip.
Connect the water by-pass hose to the cylinder head sub-assembly with the hose clip.
Connect the union to connector tube hose to the booster vacuum tube with the hose clip.
15301
8.INSTALL OIL LEVEL DIPSTICK SUB-ASSEMBLY
16502
9.INSTALL WATER FILLER SUB-ASSEMBLY
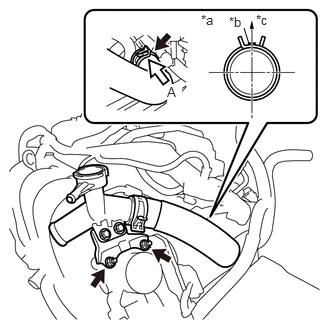
| *a | View A |
| *b | Paint Mark |
| *c | Top of Vehicle |
Install the water filler sub-assembly to the throttle body with motor assembly with the 2 nuts.
- Torque:
- 7.5 N*m (76 kgf*cm, 66 in.*lbf)
Connect the No. 1 radiator hose to the cylinder head sub-assembly with the hose clip as shown in the illustration.
12261
10.INSTALL VENTILATION HOSE
Install the ventilation hose to the cylinder head cover sub-assembly and intake manifold with the 2 hose clips.
82121
11.INSTALL ENGINE WIRE
Connect the engine wire to the cylinder head sub-assembly with the 2 bolts.
- Torque:
- 8.4 N*m (86 kgf*cm, 74 in.*lbf)
Connect all the engine wire and connectors.
12.REMOVE ENGINE STAND
Using a chain block and a sling device, secure the engine assembly.
- NOTICE:
-
Make sure that the sling angle is correct to prevent the engine assembly and engine hangers from being damaged or deformed.
Remove the engine stand from the engine assembly.
13405
13.INSTALL FLYWHEEL SUB-ASSEMBLY
Using height adjustment attachments or plate lift attachments, place the engine assembly on a flat, level surface.
- NOTICE:
- ·
Using height adjustment attachments or plate lift attachments, place the engine assembly horizontally.
·To prevent the No. 2 oil pan sub-assembly from deforming, do not place any attachments under the No. 2 oil pan sub-assembly of the engine assembly.
·Using an engine sling device and engine lifter, secure the engine assembly before servicing.
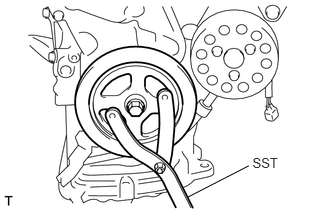
Using SST, hold the crankshaft damper sub-assembly.
- SST
- 09960-10010 (09962-01000, 09963-01000)
Install the flywheel sub-assembly to the crankshaft.
Clean the 6 bolts and their holes.
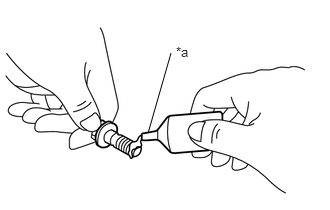
| *a | Adhesive |
Apply adhesive to 2 or 3 threads at the end of each of the 6 bolts.
- Adhesive:
Toyota Genuine Adhesive 1324, Three Bond 1324 or equivalent
- NOTICE:
-
To prevent contamination by foreign matter, install immediately after applying adhesive.
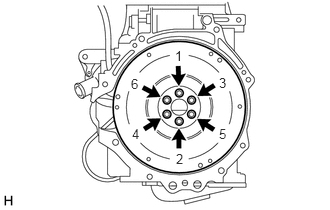
Install and uniformly tighten the 6 bolts in several steps, in the sequence shown in the illustration.
- Torque:
- 49 N*m (500 kgf*cm, 36 ft.*lbf)
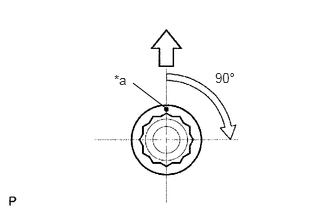
| *a | Paint Mark |

|
Engine Upper Side |
Mark paint marks on the bolt heads on the engine upper side.
Tighten the bolts 90° in the sequence shown in the illustration.
- NOTICE:
-
Do not start the engine for at least 1 hour after installing the flywheel sub-assembly.
31250B
14.INSTALL CLUTCH DISC ASSEMBLY
31210
15.INSTALL CLUTCH COVER ASSEMBLY
31210
16.INSPECT AND ADJUST CLUTCH COVER ASSEMBLY
17.INSTALL ENGINE ASSEMBLY
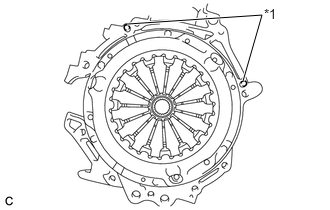
| *1 | Knock Pin |
Confirm that the 2 knock pins are installed on the engine assembly and are not damaged.
Align the input shaft with the clutch disc assembly and install the engine assembly to the manual transaxle assembly.
- NOTICE:
- ·
When mounting the manual transaxle assembly to the engine assembly, make sure to securely fit the knock pins into the holes.
·When tightening the bolts, be sure that the mating surfaces of the engine assembly and manual transaxle assembly are in close contact with one another.
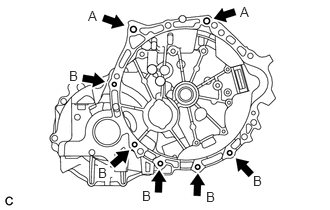
Install the 7 bolts.
- Torque:
- 33 N*m (337 kgf*cm, 24 ft.*lbf)
- HINT:
- ·
Bolt A: Install from manual transaxle assembly side
·Bolt B: Install from engine assembly side
12321B
18.INSTALL DRIVE SHAFT HEAT INSULATOR SUB-ASSEMBLY
33524B
19.INSTALL CONTROL CABLE BRACKET
Install the control cable bracket to the manual transaxle assembly with the 2 bolts.
- Torque:
- 24.5 N*m (250 kgf*cm, 18 ft.*lbf)
28100
20.INSTALL STARTER ASSEMBLY
11363A
21.INSTALL FLYWHEEL HOUSING SIDE COVER
51201
22.TEMPORARILY TIGHTEN FRONT SUSPENSION CROSSMEMBER SUB-ASSEMBLY
Temporarily tighten the front suspension crossmember sub-assembly to the engine moving control rod bracket with the through bolt.
12281A
23.REMOVE NO. 1 ENGINE HANGER
Remove the 2 bolts and 2 No. 1 engine hangers from the cylinder head sub-assembly.
Install the wire harness clamp bracket to the cylinder head sub-assembly with the bolt.
- Torque:
- 39 N*m (398 kgf*cm, 29 ft.*lbf)
Connect the air fuel ratio sensor wire to the wire harness clamp bracket.
24.INSTALL ENGINE ASSEMBLY WITH MANUAL TRANSAXLE ASSEMBLY
Place height adjustment attachments or plate lift attachments, and then set the engine assembly with manual transaxle assembly.
- NOTICE:
- ·
Place the height adjustment attachments or plate lift attachments so that the engine assembly with manual transaxle assembly is level.
·As the engine assembly with manual transaxle assembly is very heavy, be sure to support it securely.
·To prevent deformation of the No. 2 oil pan sub-assembly, never set any attachments against the No. 2 oil pan sub-assembly of the engine assembly.
Operate the engine lifter and lift the engine assembly with manual transaxle assembly and front suspension crossmember sub-assembly to the position where the engine mounting insulator sub-assembly RH and engine mounting insulator LH can be installed.
- CAUTION:
-
Do not raise the engine more than necessary. If the engine is raised excessively, the vehicle may also be lifted up.
- NOTICE:
-
Make sure that the engine is clear of all wiring and hoses.
Connect the engine mounting insulator LH to the engine mounting bracket LH with the through bolt and nut.
- Torque:
- 52 N*m (530 kgf*cm, 38 ft.*lbf)
- HINT:
-
Tighten by holding the nut and turning the through bolt.
Connect the engine mounting insulator sub-assembly RH to the engine mounting bracket RH with the bolt and 2 nuts.
- Torque:
- 52 N*m (530 kgf*cm, 38 ft.*lbf)
By inserting SST into the datum holes in the front suspension crossmember sub-assembly RH and LH alternately, tighten the bolts A, B and C on both sides to the specified torque, in several steps.
- SST
- 09670-00010
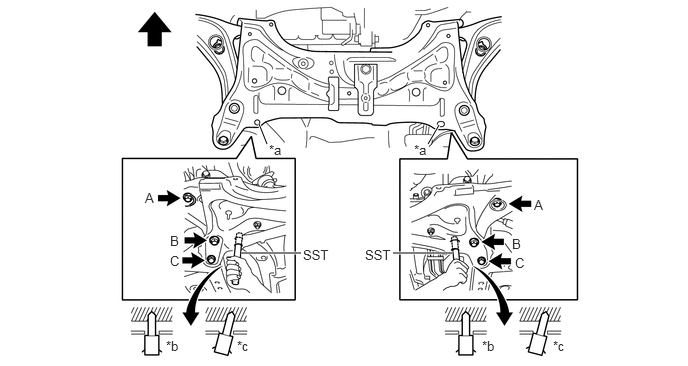
| *a | Datum Hole | *b | Correct |
| *c | Incorrect | - | - |

|
Front of the Vehicle | - | - |
- Torque:
- Bolt A : 70 N*m (714 kgf*cm, 52 ft.*lbf)
- Bolt B : 165 N*m (1683 kgf*cm, 122 ft.*lbf)
- Bolt C : 95 N*m (969 kgf*cm, 70 ft.*lbf)
- NOTICE:
- ·
Insert SST into the datum hole vertically.
·If impossible to insert SST vertically, loosen all bolts and then insert SST again.
Tighten the engine moving control rod bolt.
- Torque:
- 120 N*m (1224 kgf*cm, 89 ft.*lbf)
45025D
25.INSTALL NO. 1 STEERING COLUMN HOLE COVER SUB-ASSEMBLY
45209
26.CONNECT STEERING SLIDING YOKE SUB-ASSEMBLY
45259A
27.INSTALL COLUMN HOLE COVER SILENCER SHEET
43420
28.INSTALL FRONT DRIVE SHAFT ASSEMBLY
33820B
29.CONNECT TRANSMISSION CONTROL CABLE ASSEMBLY
33820B
30.ADJUST TRANSMISSION CONTROL CABLE ASSEMBLY
17410
31.INSTALL FRONT EXHAUST PIPE ASSEMBLY
57533B
32.INSTALL FRONT FLOOR CENTER BRACE
58910C
33.INSTALL REAR CONSOLE BOX ASSEMBLY
82121
34.CONNECT ENGINE WIRE
Connect the engine wire to the manual transaxle assembly with the bolt.
- Torque:
- 25.5 N*m (260 kgf*cm, 19 ft.*lbf)
Engage the 2 clamps to connect the engine wire to the engine mounting bracket LH.
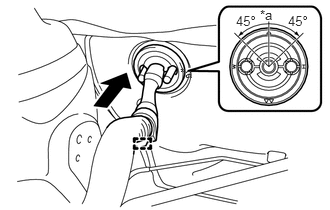
| *a | Top of the Vehicle |
Pass the engine wire through the hole to the outside of the engine room and engage the grommet to the vehicle as shown in the illustration.
Engage the clamp to connect the engine wire to the wire harness clamp bracket.
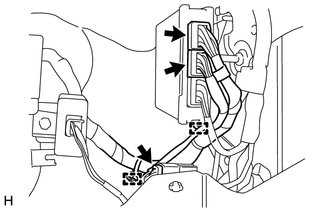
Engage the 2 clamps to connect the engine wire to the wire harness clamp bracket and vehicle.
Connect the 3 connectors as shown in the illustration.
Engage the 2 claws to connect the engine wire to the engine room relay block.
Install the nut to the engine room relay block.
- Torque:
- 8.4 N*m (86 kgf*cm, 74 in.*lbf)
Connect the connector to the engine room relay block.
Engage the clamp to connect the engine wire to the vehicle.
Install the relay block cover to the engine room relay block.
55550
35.INSTALL GLOVE COMPARTMENT DOOR ASSEMBLY
88320
36.INSTALL COOLER COMPRESSOR ASSEMBLY (w/o Fan Shroud Ventilation Duct)
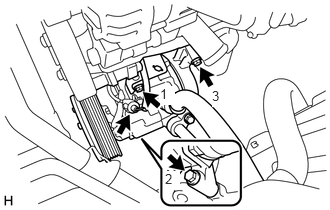
Install the cooler compressor assembly to the oil pan sub-assembly with the 3 bolts, in the sequence shown in the illustration.
- Torque:
- 25 N*m (255 kgf*cm, 18 ft.*lbf)
Connect the cooler compressor assembly connector.
88320
37.INSTALL COOLER COMPRESSOR ASSEMBLY (w/ Fan Shroud Ventilation Duct)
88712
38.CONNECT NO. 1 COOLER REFRIGERANT SUCTION HOSE (w/ Fan Shroud Ventilation Duct)
88711
39.CONNECT NO. 1 COOLER REFRIGERANT DISCHARGE HOSE (w/ Fan Shroud Ventilation Duct)
31470
40.INSTALL CLUTCH RELEASE CYLINDER ASSEMBLY
16361A
41.INSTALL FAN AND GENERATOR V BELT
16361A
42.ADJUST FAN AND GENERATOR V BELT
44772
43.CONNECT CHECK VALVE TO CONNECTOR TUBE HOSE
Connect the check valve to connector tube hose to the booster vacuum tube with the hose clip.
23901
44.CONNECT FUEL TUBE SUB-ASSEMBLY
23842A
45.INSTALL EFI FUEL PIPE CLAMP
87246
46.CONNECT OUTLET HEATER WATER HOSE
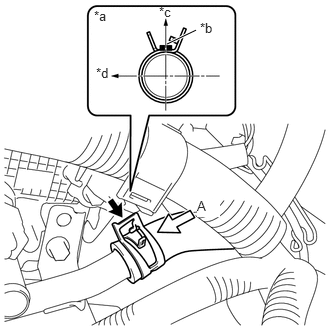
| *a | View A |
| *b | Paint Mark |
| *c | Top of Vehicle |
| *d | Front of Vehicle |
Connect the outlet heater water hose to the No. 1 water by-pass pipe with the hose clip as shown in the illustration.
87245
47.CONNECT INLET HEATER WATER HOSE
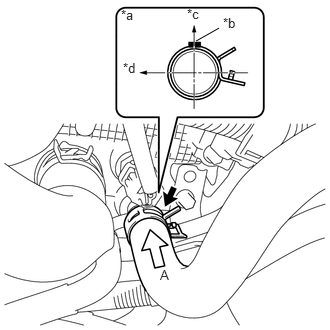
| *a | View A |
| *b | Paint Mark |
| *c | Top of Vehicle |
| *d | Front of Vehicle |
Connect the inlet heater water hose to the cylinder head sub-assembly with the hose clip as shown in the illustration.
16572D
48.CONNECT NO. 2 RADIATOR HOSE
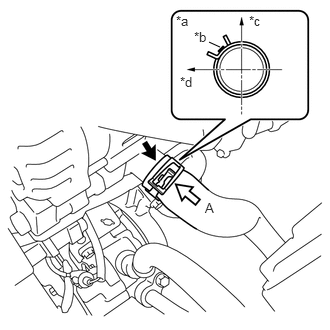
| *a | View A |
| *b | Paint Mark |
| *c | Top of Vehicle |
| *d | Right Side of Vehicle |
Connect the No. 2 radiator hose to the water inlet with the hose clip as shown in the illustration.
16573B
49.CONNECT NO. 3 RADIATOR HOSE
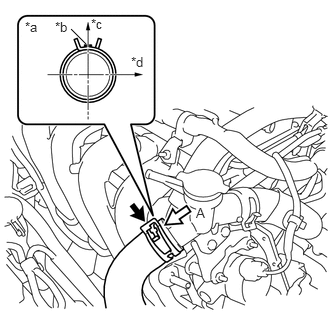
| *a | View A |
| *b | Paint Mark |
| *c | Top of Vehicle |
| *d | Right Side of Vehicle |
Connect the No. 3 radiator hose to the water filler sub-assembly with the hose clip as shown in the illustration.
50.CONNECT RADIATOR RESERVOIR TANK HOSE
74410
51.INSTALL BATTERY CARRIER ASSEMBLY
Install the battery carrier assembly to the engine mounting insulator LH and vehicle with the 5 bolts.
- Torque:
- 17.2 N*m (175 kgf*cm, 13 ft.*lbf)
Engage the 6 clamps to connect the engine wire to the battery carrier assembly.
74431
52.INSTALL BATTERY TRAY
Install the battery tray to the battery carrier assembly.
28800
53.INSTALL BATTERY
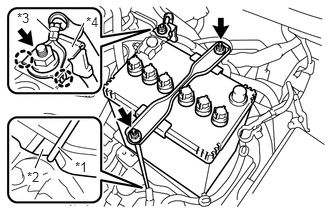
| *1 | Battery Clamp Bolt |
| *2 | Battery Carrier |
| *3 | Engine Room Main Wire |
| *4 | Engine Wire |
Install the battery to the battery tray.
Install the battery clamp sub-assembly to the battery carrier assembly with the 2 nuts and battery clamp bolt.
- HINT:
-
Engage the hook of the battery clamp bolt to the notch of the battery carrier assembly.
- Torque:
- 3.5 N*m (36 kgf*cm, 31 in.*lbf)
Engage the 2 claws to connect the engine room main wire to the engine wire.
Connect the engine room main wire with engine wire to the positive (+) battery terminal with the nut.
- Torque:
- 7.6 N*m (77 kgf*cm, 67 in.*lbf)
Install the terminal cover to the positive (+) battery terminal.
23820
54.INSTALL FUEL VAPOR FEED HOSE ASSEMBLY
Install the fuel vapor feed hose assembly to the cylinder head cover sub-assembly and fuel tube with the 2 hose clips.
55.INSTALL AIR CLEANER CASE SUB-ASSEMBLY
Install the air cleaner case sub-assembly to the air cleaner bracket with the 3 bolts.
- Torque:
- 7.8 N*m (80 kgf*cm, 69 in.*lbf)
Engage the clamp to connect the engine wire to the air cleaner case sub-assembly.
17801
56.INSTALL AIR CLEANER FILTER ELEMENT SUB-ASSEMBLY
Install the air cleaner filter element sub-assembly to the air cleaner case sub-assembly.
17735
57.INSTALL AIR CLEANER CAP WITH NO. 1 AIR CLEANER HOSE
23827A
58.CONNECT NO. 2 FUEL VAPOR FEED HOSE
23820
59.CONNECT FUEL VAPOR FEED HOSE ASSEMBLY
60.INSTALL FRONT WHEELS
- Torque:
- 103 N*m (1050 kgf*cm, 76 ft.*lbf)
16361A
61.INSPECT FAN AND GENERATOR V BELT
62.CONNECT CABLE TO NEGATIVE BATTERY TERMINAL
- Torque:
- 5.4 N*m (55 kgf*cm, 48 in.*lbf)
63.ADD ENGINE COOLANT
64.INSPECT ENGINE OIL LEVEL
65.ADD MANUAL TRANSAXLE OIL
66.CHARGE AIR CONDITIONING SYSTEM WITH REFRIGERANT (w/ Fan Shroud Ventilation Duct)
67.WARM UP ENGINE (w/ Fan Shroud Ventilation Duct)
68.INSPECT FOR REFRIGERANT LEAK (w/ Fan Shroud Ventilation Duct)
69.INSPECT MANUAL TRANSAXLE OIL
70.INSPECT FOR COOLANT LEAK
71.INSPECT FOR ENGINE OIL LEAK
72.INSPECT FOR MANUAL TRANSAXLE OIL LEAK
73.INSPECT FOR FUEL LEAK
74.INSPECT FOR EXHAUST GAS LEAK
75.INSPECT IGNITION TIMING
76.INSPECT ENGINE IDLING SPEED
77.INSPECT CO/HC
78.INSPECT AND ADJUST FRONT WHEEL ALIGNMENT
51441C
79.INSTALL ENGINE UNDER COVER RH (w/o Metal Type Under Cover)
Install the engine under cover RH to the vehicle with the 2 bolts and 2 screws.
- Torque:
- Bolt : 5.0 N*m (51 kgf*cm, 44 in.*lbf)
51442C
80.INSTALL ENGINE UNDER COVER LH (w/o Metal Type Under Cover)
Install the engine under cover LH to the vehicle with the 3 bolts and 5 screws.
- Torque:
- Bolt : 5.0 N*m (51 kgf*cm, 44 in.*lbf)
51405A
81.INSTALL NO. 1 ENGINE UNDER COVER SUB-ASSEMBLY (w/ Metal Type Under Cover)
Install the No. 1 engine under cover sub-assembly to the vehicle with the 11 bolts.
- Torque:
- 18 N*m (184 kgf*cm, 13 ft.*lbf)
51451A
82.INSTALL CENTER ENGINE UNDER COVER (w/ Metal Type Under Cover)
Install the center engine under cover to the vehicle with the 4 screws and 5 clips.
11212
83.INSTALL NO. 2 CYLINDER HEAD COVER
84.INSPECT SPEED SENSOR SIGNAL