2AZ-FE ENGINE MECHANICAL ENGINE ASSEMBLY REMOVAL
PROCEDURE

 1.DISCHARGE FUEL SYSTEM PRESSURE
28800J
2.DISCONNECT CABLE FROM NEGATIVE BATTERY TERMINAL
- NOTICE:
-
When disconnecting the cable, some systems need to be initialized after the cable is reconnected (See page General>INTRODUCTION>REPAIR INSTRUCTION>INITIALIZATION).
3.REMOVE FRONT WHEEL
51441
4.REMOVE NO. 1 ENGINE UNDER COVER
51442
5.REMOVE NO. 2 ENGINE UNDER COVER
53702
6.REMOVE FRONT FENDER APRON LH
53701
7.REMOVE FRONT FENDER APRON RH
8.DRAIN ENGINE OIL
53301
9.REMOVE HOOD SUB-ASSEMBLY
Remove the 4 bolts and hood sub-assembly.
53292A
10.REMOVE UPPER RADIATOR SUPPORT SEAL
11.DRAIN ENGINE COOLANT
12.DRAIN AUTOMATIC TRANSAXLE FLUID (for Automatic Transaxle)
13.DRAIN CONTINUOUSLY VARIABLE TRANSAXLE FLUID (for CVT)
51218A
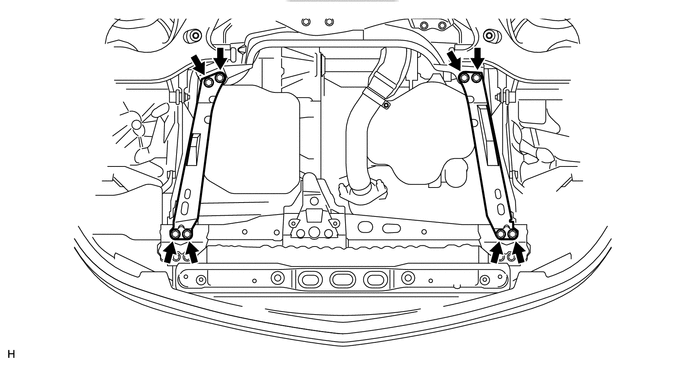
14.REMOVE FRONT SUSPENSION MEMBER REINFORCEMENT LH
Remove the 4 bolts and front suspension member reinforcement LH.
51217A
15.REMOVE FRONT SUSPENSION MEMBER REINFORCEMENT RH
Remove the 4 bolts and front suspension member reinforcement RH.
17410
16.REMOVE FRONT EXHAUST PIPE ASSEMBLY
16571C
17.DISCONNECT NO. 1 RADIATOR HOSE
Disconnect the No. 1 radiator hose.
16572D
18.DISCONNECT NO. 2 RADIATOR HOSE
Disconnect the No. 2 radiator hose.
16283H
19.DISCONNECT NO. 6 WATER BY-PASS HOSE (for CVT)
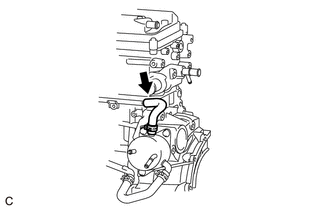
w/ Air Cooled Transmission Oil Cooler:
Disconnect the No. 6 water by-pass hose from the No. 4 water by-pass pipe.
32942C
20.DISCONNECT OUTLET NO. 1 OIL COOLER HOSE (for CVT)
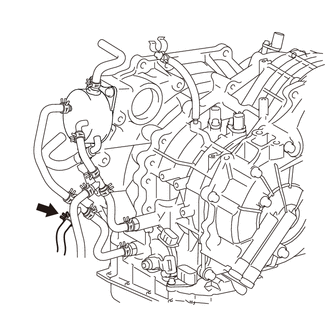
w/ Air Cooled Transmission Oil Cooler:
Disconnect the outlet No. 1 oil cooler hose from the oil cooler outlet tube.
32941D
21.DISCONNECT INLET OIL COOLER HOSE (for CVT)
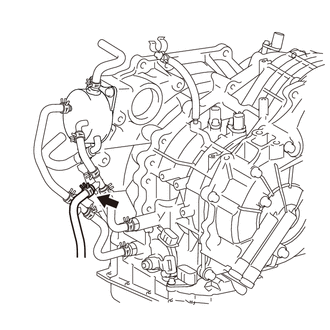
w/ Air Cooled Transmission Oil Cooler:
Disconnect the inlet oil cooler hose from the oil cooler outlet tube.
22.DISCONNECT OIL COOLER HOSE (for Automatic Transaxle)
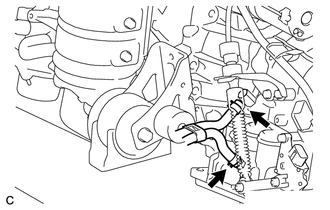
Disconnect the 2 oil cooler hoses from the automatic transaxle assembly.
23.REMOVE COWL TOP OUTER PANEL WITH WINDSHIELD WIPER MOTOR AND LINK
28800
24.REMOVE BATTERY
74431
25.REMOVE BATTERY TRAY
17705
26.REMOVE AIR CLEANER CAP SUB-ASSEMBLY
17700
27.REMOVE AIR CLEANER CASE SUB-ASSEMBLY
17752
28.REMOVE NO. 2 AIR CLEANER INLET
74411
29.REMOVE BATTERY CARRIER
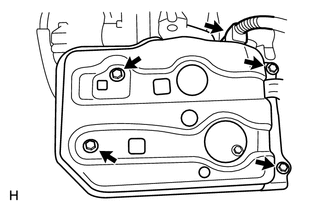
Disconnect the wire harness clamp.
Remove the 4 bolts and battery carrier.
74414D
30.REMOVE BATTERY CARRIER SUPPORT
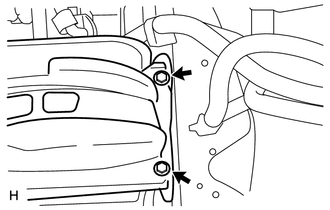
Remove the 2 bolts and battery carrier support.
77251B
31.DISCONNECT FUEL MAIN TUBE
35104V
32.DISCONNECT BREATHER PLUG HOSE
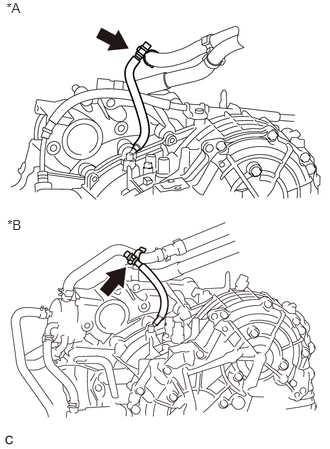
Disconnect the breather plug hose from the clamp.
| *A | for Automatic Transaxle
for CVT (w/ Air Cooled Transmission Oil Cooler) |
| *B | for CVT (w/o Air Cooled Transmission Oil Cooler) |
87245A
33.DISCONNECT HEATER WATER INLET HOSE
Disconnect the water by-pass hoses (for Automatic Transaxle or CVT (w/ Air Cooled Transmission Oil Cooler)).
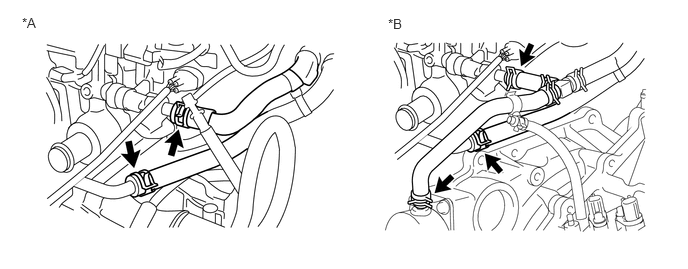
Disconnect the water by-pass hoses (for CVT (w/o Air Cooled Transmission Oil Cooler)).
| *A | for Automatic Transaxle
for CVT (w/ Air Cooled Transmission Oil Cooler) |
| *B | for CVT (w/o Air Cooled Transmission Oil Cooler) |
87246B
34.DISCONNECT HEATER WATER OUTLET HOSE
Disconnect the heater water outlet hose.
25860
35.DISCONNECT PURGE LINE HOSE
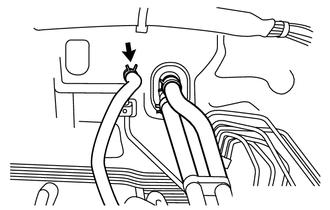
Disconnect the purge line hose.
44774
36.DISCONNECT UNION TO CONNECTOR TUBE HOSE
Disconnect the 2 union to connector tube hoses from the booster vacuum tube.
28100
37.REMOVE STARTER ASSEMBLY
16470
38.REMOVE RADIATOR RESERVOIR ASSEMBLY
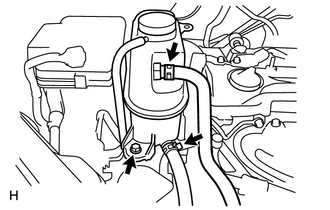
Disconnect the No. 1 and No. 2 water by-pass hoses.
Remove the bolt and radiator reservoir assembly.
16611
39.REMOVE RADIATOR RESERVOIR BRACKET
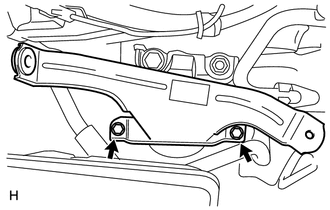
Remove the 2 bolts and radiator reservoir bracket.
16361A
40.REMOVE FAN AND GENERATOR V BELT
27415
41.REMOVE GENERATOR ASSEMBLY
89661
42.REMOVE ECM
82121
43.DISCONNECT ENGINE WIRE
Remove the engine room relay block cover.
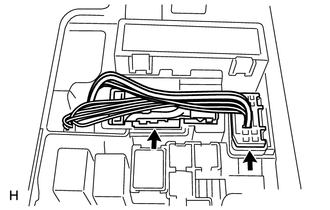
Disconnect the 2 connectors.
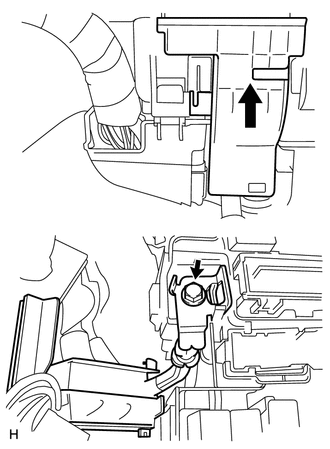
Pull up the relay block side cover.
Remove the nut and battery positive (+) cable.
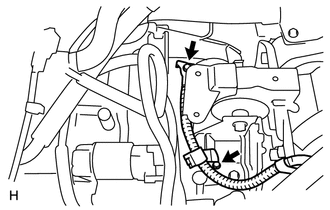
Remove the 2 bolts and battery ground cable.
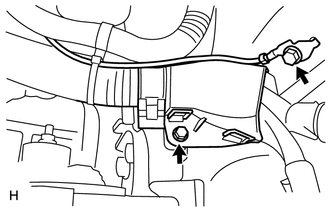
Remove the 2 bolts, engine wire harness cover and ground cable.
Disconnect the crankshaft position sensor connector.
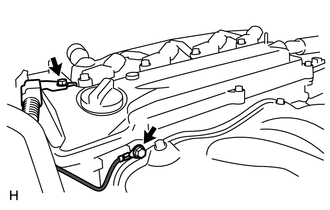
Remove the bolt and ground cable.
Remove the bolt and engine wire harness clamp.
88320
44.REMOVE COOLER COMPRESSOR ASSEMBLY
Remove the cooler compressor assembly (See page Vehicle Interior>AIR CONDITIONING>COMPRESSOR(for 2AZ-FE)>REMOVAL).
- HINT:
-
Disconnect the compressor together with the low-pressure and high-pressure hoses, then secure it to the vehicle side using rope.
45.DISCONNECT TRANSAXLE CONTROL CABLE ASSEMBLY (for Automatic Transaxle)
46.DISCONNECT TRANSAXLE CONTROL CABLE ASSEMBLY (for CVT)
45259A
47.REMOVE COLUMN HOLE COVER SILENCER SHEET
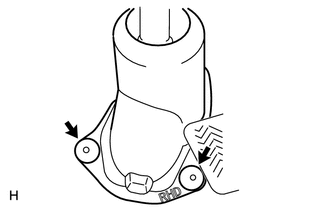
Fold back the floor carpet, remove the 2 clips and remove the column hole cover silencer sheet.
45221
48.SEPARATE STEERING INTERMEDIATE SHAFT
Place matchmarks on the steering intermediate shaft and steering gear.
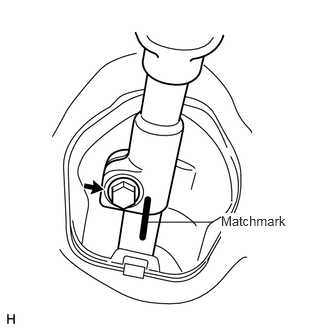
Remove the bolt and separate the steering intermediate shaft.
45025D
49.DISCONNECT NO. 1 STEERING COLUMN HOLE COVER SUB-ASSEMBLY
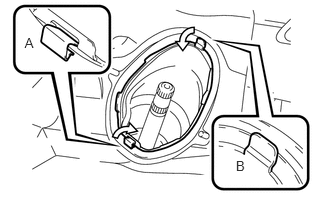
Push clip A in the direction of the cover's center, and push down clip B to separate the No. 1 steering column hole cover sub-assembly from the floor panel.
43410
50.REMOVE FRONT DRIVE SHAFT
12361A
51.REMOVE FRONT ENGINE MOUNTING INSULATOR
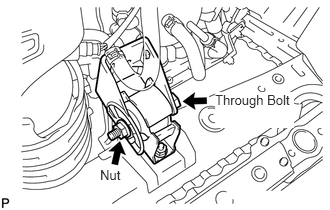
Remove the through bolt and nut.
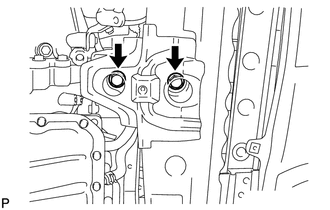
Remove the 2 bolts and front engine mounting insulator.
12371A
52.REMOVE REAR ENGINE MOUNTING INSULATOR
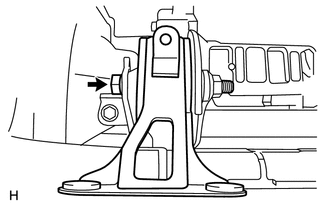
Remove the through bolt.
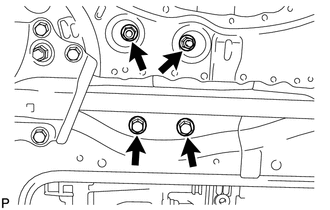
Remove the 2 nuts, 2 bolts and rear engine mounting insulator.
57104E
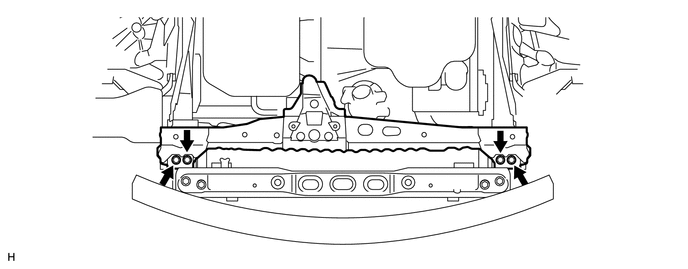
53.REMOVE FRONT CROSSMEMBER SUB-ASSEMBLY
Remove the 4 bolts and front crossmember sub-assembly.
51403B
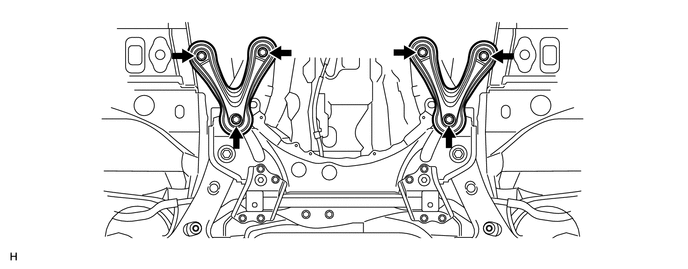
54.REMOVE FRONT SUSPENSION MEMBER BRACE SUB-ASSEMBLY
Remove the 6 bolts and front suspension member brace sub-assembly LH and front suspension member brace sub-assembly RH.
51201
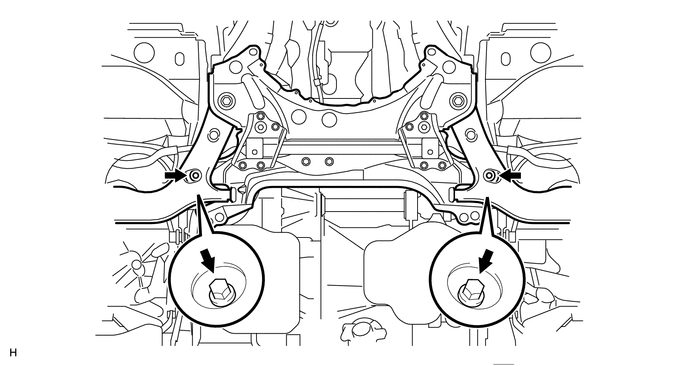
55.REMOVE FRONT SUSPENSION CROSSMEMBER SUB-ASSEMBLY
Remove the 2 bolts and front suspension crossmember sub-assembly.
56.SUSPEND ENGINE ASSEMBLY
12305
57.REMOVE ENGINE MOUNTING INSULATOR RH
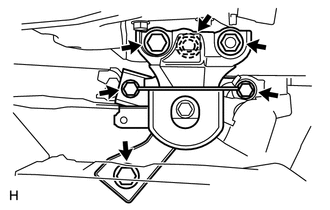
Remove the 2 nuts, 2 bolts and engine mounting insulator RH.
12372A
58.REMOVE ENGINE MOUNTING INSULATOR LH
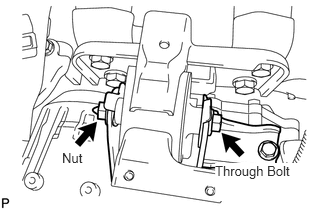
Remove the through bolt and nut.
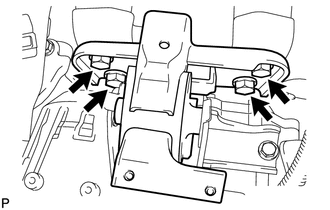
Remove the 4 bolts and engine mounting insulator LH.
11000
59.REMOVE ENGINE ASSEMBLY
Set an engine lifter underneath the engine assembly.
- HINT:
-
Set wooden blocks or equivalent under the engine assembly, so that the engine is level.
Remove the sling device and chain block from the engine hangers.
Carefully remove the engine assembly from the vehicle.
- NOTICE:
- ·
Make sure that the engine is clear of all wiring and hoses.
·While lowering the engine assembly from the vehicle, do not allow it to contact the vehicle.
Remove the 2 engine hangers.
12262
60.DISCONNECT NO. 2 VENTILATION HOSE
23807
61.REMOVE FUEL DELIVERY PIPE SUB-ASSEMBLY
23250
62.REMOVE FUEL INJECTOR ASSEMBLY
17111
63.REMOVE INTAKE MANIFOLD
17135A
64.REMOVE NO. 1 INTAKE MANIFOLD INSULATOR
82121
65.DISCONNECT ENGINE WIRE
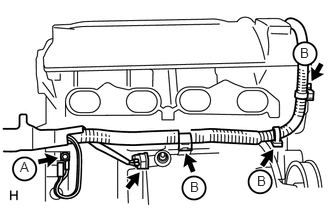
Remove the 4 bolts (A) and (B) shown in the illustration.
Disconnect the knock sensor connector.
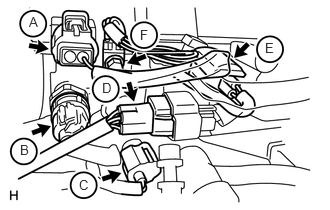
Disconnect the radio setting condenser connector (A), oil pressure sensor connector (B), engine coolant temperature sensor connector (C), heated oxygen sensor connector (D) and camshaft position sensor connector (E) shown in the illustration.
Remove the bolt and ground cable (F) shown in the illustration.
Disconnect the 4 ignition coil connectors.
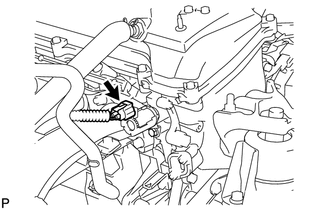
Disconnect the camshaft timing oil control valve connector.
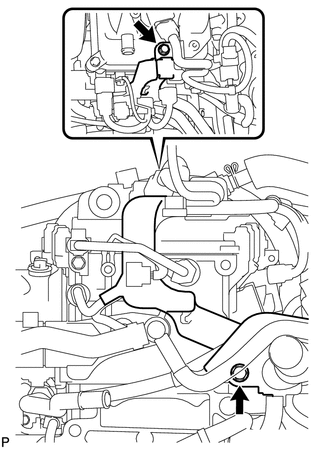
Remove the 2 bolts and engine wire harness cover.
43457
66.REMOVE DRIVE SHAFT BEARING BRACKET
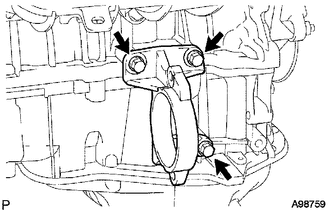
Remove the 3 bolts and drive shaft bearing bracket.
16282D
67.DISCONNECT NO. 5 WATER BY-PASS HOSE (for CVT)
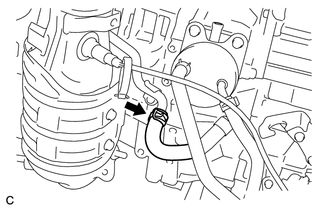
Disconnect the No. 5 water by-pass hose.
30500
68.REMOVE AUTOMATIC TRANSAXLE ASSEMBLY (for Automatic Transaxle)
30400
69.REMOVE CONTINUOUSLY VARIABLE TRANSAXLE ASSEMBLY (for CVT)
32101
70.REMOVE DRIVE PLATE AND RING GEAR SUB-ASSEMBLY
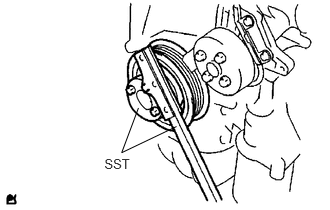
Using SST, hold the crankshaft pulley.
- SST
- 09213-54015 (91651-60855)
09330-00021
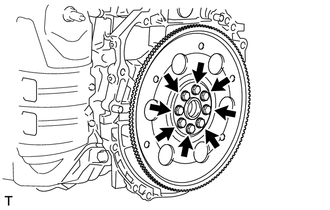
Remove the 8 bolts, rear spacer, drive plate and ring gear sub-assembly and front spacer.