1GD-FTV ENGINE MECHANICAL ENGINE ASSEMBLY INSTALLATION
PROCEDURE

 82121
1.INSTALL ENGINE WIRE
Install the engine wire to the engine assembly.
2.INSTALL ENGINE HANGER
12362A
3.INSTALL FRONT ENGINE MOUNTING INSULATOR
Install the 2 front engine mounting insulators to the 2 front engine mounting brackets with the 2 nuts.
- Torque:
- 86 N*m (877 kgf*cm, 63 ft.*lbf)
12391
4.INSTALL FRONT ENGINE MOUNTING INSULATOR RH
Install the front engine mounting insulator RH to the front engine mounting insulator sub-assembly with the nut.
- Torque:
- 8.0 N*m (82 kgf*cm, 71 in.*lbf)
5.REMOVE ENGINE ASSEMBLY TO ENGINE STAND
- NOTICE:
- ·
Pay attention to the angle of the sling device as the engine assembly or engine hangers may be damaged or deformed if the angle is incorrect.
·With the exception of installing the engine assembly to an engine stand or removing the engine assembly from an engine stand, do not perform any work on the engine assembly while it is suspended, as doing so is dangerous.
Attach the engine sling device and hang the engine assembly with the chain block.
Remove the engine assembly from the engine stand.
51100H
6.INSTALL FRONT FRAME ASSEMBLY
Install the front frame assembly to the engine assembly with the 4 bolts.
- Torque:
- 50 N*m (510 kgf*cm, 37 ft.*lbf)
7.INSTALL ENGINE ASSEMBLY
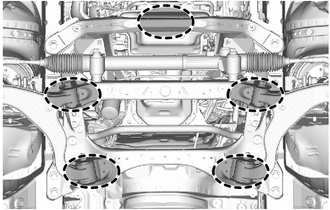

|
Place Wooden Block or Plate Attachments |
Set the engine assembly on an engine lifter.
- NOTICE:
- ·
Place wooden blocks or plate lift attachments so that the engine assembly is level.
·With the exception of installing the engine assembly to an engine stand or removing the engine assembly from an engine stand, do not perform any work on the engine assembly while it is suspended, as doing so is dangerous.
·Never install attachments to the oil pan of the engine assembly as doing so may deform the oil pan.
Remove the engine sling device and chain block.
Remove the 2 bolts, upper No. 1 engine hanger and No. 2 engine hanger.
Operate the engine lifter and install the engine assembly with front frame assembly to the vehicle.
Connect the hose, and slide the clamp to secure the hose.
Install the engine assembly with front frame assembly with the 6 bolts and 2 nuts.
- Torque:
- 188 N*m (1917 kgf*cm, 139 ft.*lbf)
Remove the engine lifter.
51107D
8.INSTALL REAR SIDE RAIL REINFORCEMENT SUB-ASSEMBLY RH
Install the rear side rail reinforcement sub-assembly RH with the 4 bolts.
- Torque:
- 35 N*m (357 kgf*cm, 26 ft.*lbf)
51108C
9.INSTALL REAR SIDE RAIL REINFORCEMENT SUB-ASSEMBLY LH
Install the rear side rail reinforcement sub-assembly LH with the 4 bolts.
- Torque:
- 35 N*m (357 kgf*cm, 26 ft.*lbf)
11355
10.INSTALL REAR END PLATE
Install the rear end plate to the cylinder block sub-assembly with the bolt.
- Torque:
- 10 N*m (102 kgf*cm, 7 ft.*lbf)
13405
11.INSTALL FLYWHEEL SUB-ASSEMBLY (for Automatic Transmission)
Clean the bolt holes.
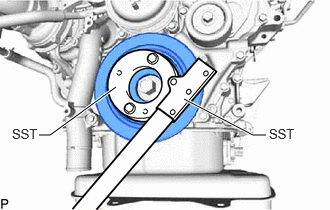
Using SST, hold the crankshaft pulley.
- SST
- 09213-58014 (91551-80840)
09330-00021
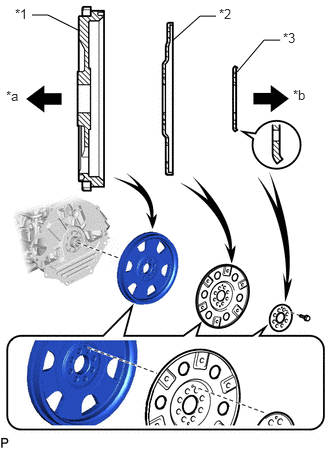
| *1 | Flywheel Sub-assembly |
| *2 | Pump Impeller Drive Plate |
| *3 | Rear Drive Plate Spacer |
| *a | Engine Side |
| *b | Transmission Side |
Install the flywheel sub-assembly, pump impeller drive plate and rear drive plate spacer to the crankshaft with the 8 bolts.
- NOTICE:
-
Align either hole in the pump impeller drive plate and either hole in the rear drive plate spacer with the knock pin of the flywheel sub-assembly, and then install the flywheel sub-assembly, pump impeller drive plate and rear drive plate spacer to the crankshaft.
- HINT:
-
As the rear drive plate spacer and pump impeller drive plate are not reversible, be sure to install them in the direction shown in the illustration.
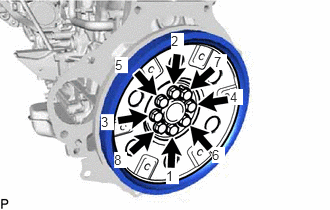
Install and uniformly tighten the 8 bolts in several steps in the sequence shown in the illustration.
- Torque:
- 178 N*m (1815 kgf*cm, 131 ft.*lbf)
Install the crankshaft pulley cover.
Click hereEngine / Hybrid System>1GD-FTV (ENGINE MECHANICAL)>FRONT CRANKSHAFT OIL SEAL>INSTALLATION
w/ Viscous Heater:
Install the viscous heater crankshaft pulley.
Click hereEngine / Hybrid System>1GD-FTV (ENGINE MECHANICAL)>FRONT CRANKSHAFT OIL SEAL>INSTALLATION
13450
12.INSTALL FLYWHEEL WITH DAMPER ASSEMBLY (for Manual Transmission)
Clean the bolt holes.
Using SST, hold the crankshaft pulley.
- SST
- 09213-58014 (91551-80840)
09330-00021
Install the flywheel with damper assembly to the crankshaft with the 8 bolts.
- Torque:
- 178 N*m (1815 kgf*cm, 131 ft.*lbf)
w/ Viscous Heater:
Install the viscous heater crankshaft pulley.
Click hereEngine / Hybrid System>1GD-FTV (ENGINE MECHANICAL)>FRONT CRANKSHAFT OIL SEAL>INSTALLATION
31250
13.INSTALL CLUTCH DISC ASSEMBLY (for Manual Transmission)
31210
14.INSTALL CLUTCH COVER ASSEMBLY (for Manual Transmission)
31210
15.INSPECT AND ADJUST CLUTCH COVER ASSEMBLY (for Manual Transmission)
35000
16.INSTALL AUTOMATIC TRANSMISSION ASSEMBLY (for Automatic Transmission)
32101A
17.INSTALL DRIVE PLATE AND TORQUE CONVERTER SETTING BOLT (for Automatic Transmission)
33030
18.INSTALL MANUAL TRANSMISSION UNIT ASSEMBLY (for Manual Transmission)
53689
19.INSTALL CENTER LOWER FRONT SUSPENSION BRACE (for Wagon)
Install the center lower front suspension brace with the 5 bolts.
- Torque:
- 45 N*m (459 kgf*cm, 33 ft.*lbf)
77840A
20.CONNECT UREA TUBE WITH HEATER ASSEMBLY (w/ Urea SCR System)
for Wagon:
Attach the 2 clamps and connect the urea tube with heater assembly to the lower center front suspension brace and front frame assembly.
except Wagon:
Attach the 2 clamps and connect the urea tube with heater assembly to the No. 2 engine under cover bracket and front frame assembly.
37100
21.INSTALL PROPELLER SHAFT WITH CENTER BEARING ASSEMBLY
for High Roof:
Click hereDrivetrain>DRIVE SHAFT / PROPELLER SHAFT>PROPELLER SHAFT ASSEMBLY (for High Roof)>INSTALLATION
for Standard Roof:
Click hereDrivetrain>DRIVE SHAFT / PROPELLER SHAFT>PROPELLER SHAFT ASSEMBLY (for Standard Roof)>INSTALLATION
17410
22.INSTALL FRONT EXHAUST PIPE ASSEMBLY
87120G
23.INSTALL VISCOUS HEATER WITH MAGNET CLUTCH ASSEMBLY (w/ Viscous Heater)
Install the viscous heater with magnet clutch assembly to the No. 1 viscous heater bracket with the 2 bolts.
- Torque:
- 39 N*m (398 kgf*cm, 29 ft.*lbf)
Connect the connector to the viscous heater with magnet clutch assembly.
24.INSTALL WATER HOSE SUB-ASSEMBLY (w/ Viscous Heater)
Install the water hose sub-assembly to the viscous heater with magnet clutch assembly, No. 2 water pipe and water outlet sub-assembly, and slide the 4 clamps to secure the 2 hoses.
Connect the water hose sub-assembly to the water inlet with the bolt.
- Torque:
- 9.8 N*m (100 kgf*cm, 87 in.*lbf)
51445
25.INSTALL ENGINE UNDER COVER BRACKET
Install the engine under cover bracket to the front frame assembly with the 2 bolts.
- Torque:
- 45 N*m (459 kgf*cm, 33 ft.*lbf)
26.INSTALL FRONT AXLE ASSEMBLY LH
27.INSTALL FRONT AXLE ASSEMBLY RH
- HINT:
-
Use the same procedure described for the LH side.
48810
28.INSTALL FRONT STABILIZER LINK ASSEMBLY LH
48820B
29.INSTALL FRONT STABILIZER LINK ASSEMBLY RH
- HINT:
-
Use the same procedure described for the LH side.
48069
30.CONNECT FRONT LOWER NO. 1 SUSPENSION ARM SUB-ASSEMBLY LH
48068
31.CONNECT FRONT LOWER NO. 1 SUSPENSION ARM SUB-ASSEMBLY RH
- HINT:
-
Use the same procedure described for the LH side.
43512
32.INSTALL FRONT DISC
33.CONNECT FRONT DISC BRAKE CALIPER ASSEMBLY LH
34.CONNECT FRONT DISC BRAKE CALIPER ASSEMBLY RH
- HINT:
-
Use the same procedure described for the LH side.
45047
35.CONNECT TIE ROD END SUB-ASSEMBLY LH
for LHD:
Click hereSteering>STEERING GEAR / LINKAGE>STEERING GEAR (for LHD)>INSTALLATION
for RHD:
Click hereSteering>STEERING GEAR / LINKAGE>STEERING GEAR (for RHD)>INSTALLATION
45046
36.CONNECT TIE ROD END SUB-ASSEMBLY RH
- HINT:
-
Use the same procedure described for the LH side.
89543
37.CONNECT FRONT SPEED SENSOR LH
89542
38.CONNECT FRONT SPEED SENSOR RH
- HINT:
-
Use the same procedure described for the LH side.
39.CONNECT INTERMEDIATE SHAFT ASSEMBLY
for LHD:
Click hereSteering>STEERING GEAR / LINKAGE>STEERING GEAR (for LHD)>INSTALLATION
for RHD:
Click hereSteering>STEERING GEAR / LINKAGE>STEERING GEAR (for RHD)>INSTALLATION
44773F
40.CONNECT UNION TO CHECK VALVE HOSE
Connect the union to check valve hose to the vacuum pump assembly, and slide the clamp to secure the hose.
88704
41.CONNECT SUCTION HOSE SUB-ASSEMBLY (w/ Air Conditioning System)
Apply the compressor oil to 2 new O-rings and install the suction hose sub-assembly.
w/ Viscous Heater:
Install the suction hose sub-assembly to the No. 1 viscous heater bracket sub-assembly and timing chain cover with the 2 bolts.
- Torque:
- 9.8 N*m (100 kgf*cm, 87 in.*lbf)
w/o Viscous Heater:
Install the suction hose sub-assembly to the water inlet and timing chain cover with the 2 bolts.
- Torque:
- 9.8 N*m (100 kgf*cm, 87 in.*lbf)
Connect the suction hose sub-assembly with the nut.
- Torque:
- 9.8 N*m (100 kgf*cm, 87 in.*lbf)
Connect the suction hose sub-assembly to the cooler compressor assembly with the bolt.
- Torque:
- 9.8 N*m (100 kgf*cm, 87 in.*lbf)
88703
42.CONNECT DISCHARGE HOSE SUB-ASSEMBLY (w/ Air Conditioning System)
Apply the compressor oil to a new O-ring and install the discharge hose sub-assembly.
Connect the discharge hose sub-assembly to the cooler compressor assembly with the bolt.
- Torque:
- 9.8 N*m (100 kgf*cm, 87 in.*lbf)
44402
43.CONNECT NO. 1 POWER STEERING OIL COOLER SUB-ASSEMBLY
Connect the No. 1 power steering oil cooler sub-assembly with the 2 bolts.
- Torque:
- 28 N*m (286 kgf*cm, 21 ft.*lbf)
Connect the return tube sub-assembly with the bolt.
- Torque:
- 28 N*m (286 kgf*cm, 21 ft.*lbf)
for RHD:
Connect the return tube sub-assembly with the bolt.
- Torque:
- 28 N*m (286 kgf*cm, 21 ft.*lbf)
53288B
44.INSTALL RADIATOR SUPPORT EXTENSION LH
Attach the 2 claws and install the radiator support extension LH to the body.
53287B
45.INSTALL RADIATOR SUPPORT EXTENSION RH (for RHD)
Attach the 2 claws and install the radiator support extension RH to the body.
27020
46.INSTALL GENERATOR ASSEMBLY
44310
47.CONNECT VANE PUMP ASSEMBLY
Connect the vane pump assembly to the generator bracket with the 2 bolts.
- Torque:
- 21 N*m (214 kgf*cm, 15 ft.*lbf)
Connect the connector to the power steering oil pressure switch.
48.INSTALL WATER HOSE SUB-ASSEMBLY (w/ Heater)
49.CONNECT WIRE HARNESS
Attach the claw and 3 connectors to the No. 1 engine room relay block.
Attach the claw and clamp and connect the wire harness.
Connect the 2 wire harnesses to the No. 1 engine room relay block with the 2 bolts.
- Torque:
- 8.3 N*m (85 kgf*cm, 73 in.*lbf)
Attach the claw and install the relay block cover to the No. 1 engine room relay block.
Attach the clamp and connect the wire harness to the No. 1 engine room relay block.
Connect the wire harness to the body with the 2 bolts.
- Torque:
- 14 N*m (143 kgf*cm, 10 ft.*lbf)
Attach the 2 claws and install the upper No. 1 relay block cover to the No. 1 engine room relay block.
89463C
50.CONNECT NO. 1 NITROGEN OXIDES SENSOR (w/ Exhaust Gas Temperature Sensor for EGR)
Connect the No. 1 nitrogen oxides sensor to the body with the 2 bolts.
- Torque:
- 13 N*m (133 kgf*cm, 10 ft.*lbf)
Connect the connector to the No. 1 nitrogen oxides sensor.
23273H
51.CONNECT NO. 2 FUEL HOSE
Connect the No. 2 fuel hose to the No. 3 nozzle leakage pipe assembly, and slide the clamp to secure the hose.
23271H
52.CONNECT NO. 1 FUEL HOSE
Connect the No. 1 fuel hose to the No. 2 fuel pipe, and slide the clamp to secure the hose.
Connect the No. 1 fuel hose to the diesel throttle body assembly with the bolt.
- Torque:
- 8.0 N*m (82 kgf*cm, 71 in.*lbf)
23941
53.INSTALL NO. 1 FUEL FILTER PROTECTOR
17303T
54.INSTALL AIR PIPE SUB-ASSEMBLY (for Air Cooled Type Intercooler)
25760F
55.INSTALL VACUUM TRANSMITTING HOSE ASSEMBLY
17801
56.INSTALL AIR CLEANER FILTER ELEMENT SUB-ASSEMBLY
57.INSTALL AIR CLEANER CAP SUB-ASSEMBLY AND AIR CLEANER HOSE
82121
58.CONNECT ENGINE WIRE
Pass the engine wire into the cabin.
Attach the grommet to the body.
for RHD:
Attach the clamp to connect the engine wire to the bracket.
for LHD:
Attach the 2 clamps to connect the engine wire to the bracket.
Connect the 2 connectors to the instrument panel wire.
Connect the 4 connectors to the ECM.
Click hereEngine / Hybrid System>1GD-FTV (ENGINE CONTROL)>ECM>INSTALLATION
16400
59.INSTALL RADIATOR ASSEMBLY
17940D
60.INSTALL INTERCOOLER ASSEMBLY (for Water Cooled Type Intercooler)
16278
61.INSTALL NO. 2 WATER BY-PASS PIPE (for Water Cooled Type Intercooler)
17030
62.INSTALL AIR HOSE ASSEMBLY (for Water Cooled Type Intercooler)
17360E
63.INSTALL NO. 1 AIR TUBE ASSEMBLY (for Water Cooled Type Intercooler)
64.INSTALL NO. 2 INTERCOOLER COOLING WATER PIPE ASSEMBLY (for Water Cooled Type Intercooler)
16551C
65.CONNECT NO. 1 INTERCOOLER COOLING WATER HOSE (for Water Cooled Type Intercooler)
12601B
66.INSTALL NO. 1 ENGINE COVER SUB-ASSEMBLY (for Water Cooled Type Intercooler)
55701J
67.INSTALL OUTER COWL TOP PANEL SUB-ASSEMBLY
Install the outer cowl top panel sub-assembly to the body with the 10 bolts.
- Torque:
- 12 N*m (122 kgf*cm, 9 ft.*lbf)
Connect the brake master cylinder reservoir assembly. to the outer cowl top panel sub-assembly.
- Torque:
- 8.5 N*m (87 kgf*cm, 75 in.*lbf)
for RHD:
Attach the 4 clamps and connect the engine room main wire to the outer cowl top panel sub-assembly.
Connect the connector to the brake master cylinder reservoir assembly.
for LHD:
Attach the 2 clamps and connect the engine room main wire to the outer cowl top panel sub-assembly.
Connect the connector to the brake master cylinder reservoir assembly.
Attach the 4 clamps and connect the engine room main wire to the outer cowl top panel sub-assembly.
Connect the connector to the front wiper deicer wire harness.
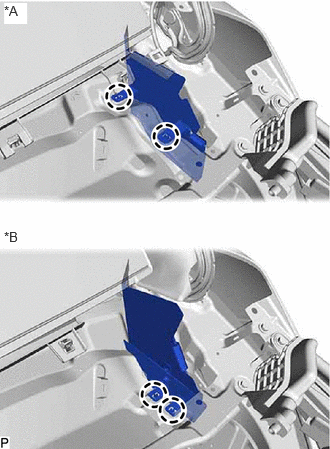
| *A | for LHD |
| *B | for RHD |
for LH Side:
Attach the 2 claws and install the No. 2 heater air duct splash shield seal to the outer cowl top panel sub-assembly.
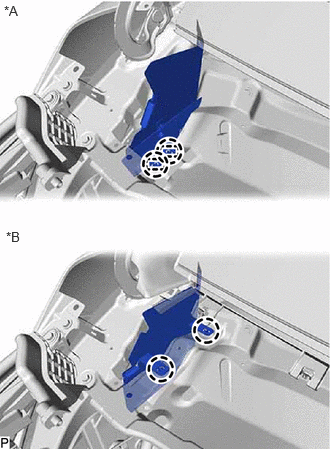
| *A | for LHD |
| *B | for RHD |
for RH Side:
Attach the 2 claws and install the No. 2 heater air duct splash shield seal to the outer cowl top panel sub-assembly.
85110
68.INSTALL WINDSHIELD WIPER MOTOR ASSEMBLY
69.CONNECT CABLE TO NEGATIVE BATTERY TERMINAL
70. INITIALIZATION AFTER RECONNECTING BATTERY TERMINAL
Click hereGeneral>SETUP>WHEN DISCONNECTING OR RECONNECTING BATTERY TERMINAL>WORK PROCEDURE
- HINT:
-
When disconnecting and reconnecting the battery, there is an automatic learning function that completes learning when the respective system is used.
-
Click hereGeneral>SETUP>WHEN DISCONNECTING OR RECONNECTING BATTERY TERMINAL>AUTOMATIC LEARNING CHART
71.BLEED CLUTCH PIPE LINE (for Manual Transmission)
Click hereDrivetrain>CLUTCH>CLUTCH SYSTEM>BLEEDING
72.INSPECT FOR BRAKE FLUID LEAK (for Manual Transmission)
73.CHECK FLUID LEVEL IN RESERVOIR (for Manual Transmission)
31301
74.INSPECT AND ADJUST CLUTCH PEDAL SUB-ASSEMBLY (for Manual Transmission)
75.CHARGE AIR CONDITIONING SYSTEM WITH REFRIGERANT (w/ Air Conditioning System)
76.ADD ENGINE OIL
77.ADD MANUAL TRANSMISSION OIL (for Manual Transmission)
78.ADD AUTOMATIC TRANSMISSION FLUID (for Automatic Transmission)
79.BLEED AIR FROM FUEL SYSTEM
80.ADD ENGINE COOLANT
81.ADD ENGINE COOLANT (for Intercooler)
82.ADJUST AUTOMATIC TRANSMISSION FLUID (for Automatic Transmission)
83. WARM UP ENGINE (w/ Air Conditioning System)
84.INSPECT FOR REFRIGERANT GAS LEAK (w/ Air Conditioning System)
85.INSPECT FOR COOLANT LEAK
86.INSPECT FOR COOLANT LEAK (for Intercooler)
87.INSPECT ENGINE OIL LEVEL
88.INSTALL FRONT WHEELS
89. ALIGN FRONT WHEELS FACING STRAIGHT AHEAD
90.INSPECT AND ADJUST FRONT WHEEL ALIGNMENT
91.INSPECT ENGINE IDLE SPEED AND MAXIMUM SPEED
12601B
92.INSTALL NO. 1 ENGINE COVER SUB-ASSEMBLY (w/ Cover)
51773E
93.INSTALL STEP PLATE COVER RH (w/ Cover)
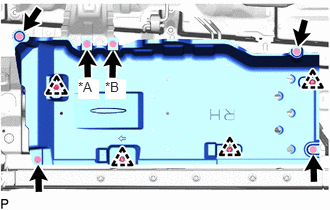
| *A | for Automatic Transmission |
| *B | for Manual Transmission |
Install the step plate cover RH with the 4 clips and 5 bolts.
- Torque:
- 5.5 N*m (56 kgf*cm, 49 in.*lbf)
51408B
94.INSTALL ENGINE UNDER COVER SUB-ASSEMBLY RH (w/ Cover)
Install the engine under cover sub-assembly RH with the 5 bolts.
- Torque:
- 13 N*m (133 kgf*cm, 10 ft.*lbf)
51495
95.INSTALL TRANSMISSION UNDER COVER (w/ Cover)
51405A
96.INSTALL NO. 1 ENGINE UNDER COVER SUB-ASSEMBLY
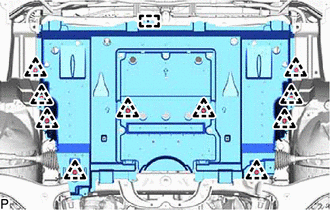
w/ No. 2 Engine Under Cover Sub-assembly:
Attach the guide and install the No. 1 engine under cover sub-assembly.
Install the 10 clips.
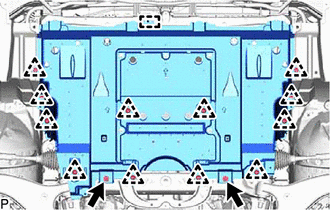
w/o No. 2 Engine Under Cover Sub-assembly:
Attach the guide and install the No. 1 engine under cover sub-assembly.
Install the 12 clips and 2 bolts.
- Torque:
- 5.5 N*m (56 kgf*cm, 49 in.*lbf)
52618
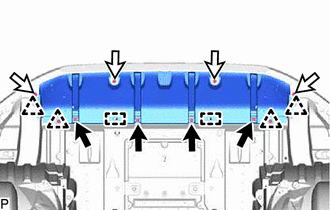
97.INSTALL LOWER FRONT BUMPER ABSORBER

|
Bolt |

|
Screw |
Attach the 2 guides and install the lower front bumper absorber.
Install the 4 bolts, 4 screws and 4 clips.
- Torque:
- Bolt : 7.5 N*m (76 kgf*cm, 66 in.*lbf)
51406A
98.INSTALL NO. 2 ENGINE UNDER COVER SUB-ASSEMBLY (w/ No. 2 Engine Under Cover Sub-assembly)
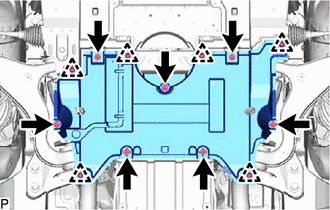
Install the No. 2 engine under cover sub-assembly with the 6 clips and 7 bolts.
- Torque:
- 5.5 N*m (56 kgf*cm, 49 in.*lbf)
53106B
99.INSTALL RADIATOR COVER SUB-ASSEMBLY
for Wagon:
Click hereVehicle Exterior>EXTERIOR PANELS / TRIM>RADIATOR GRILLE (for Wagon)>INSTALLATION
except Wagon:
Click hereVehicle Exterior>EXTERIOR PANELS / TRIM>RADIATOR GRILLE (except Wagon)>INSTALLATION