3UR-FE ENGINE MECHANICAL ENGINE ASSEMBLY INSTALLATION
CAUTION / NOTICE / HINT
- HINT:
-
Perform "Inspection After Repairs" after replacing the engine assembly, cylinder head sub-assembly RH, cylinder head sub-assembly LH, No. 1 camshaft sub-assembly, No. 2 camshaft sub-assembly, No. 3 camshaft sub-assembly, No. 4 camshaft sub-assembly, camshaft timing gear RH, camshaft timing gear LH, camshaft timing exhaust gear RH, camshaft timing exhaust gear LH, piston or piston ring (See page Engine / Hybrid System>3UR-FE ENGINE CONTROL>SFI SYSTEM>INITIALIZATION).
PROCEDURE

 1.REMOVE ENGINE STAND
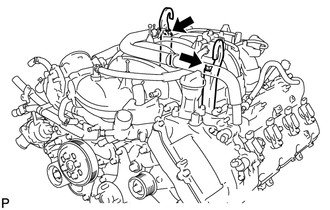
Install the 2 engine hangers with the 2 bolts as shown in the illustration.
- Torque:
- 43 N*m (438 kgf*cm, 32 ft.*lbf)
- HINT:
Item Part No. Engine hanger 12281-38150 Bolt 90119-A0166
Attach an engine sling device and hang the engine with a chain block.
Remove the bolts and engine assembly from the engine stand.
17105
2.INSTALL EXHAUST MANIFOLD SUB-ASSEMBLY LH
17168
3.INSTALL NO. 2 EXHAUST MANIFOLD HEAT INSULATOR
4.INSTALL ENGINE ASSEMBLY
Slowly lower the engine assembly into the engine compartment.
- NOTICE:
-
Make sure that the engine is clear of all wiring and hoses.
Attach the engine mounting insulators to the vehicle.
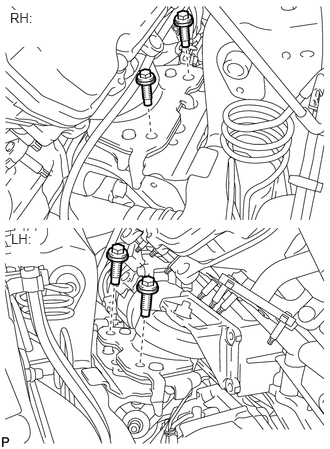
Install the 4 engine mounting insulator bolts.
- Torque:
- 79 N*m (806 kgf*cm, 58 ft.*lbf)
Remove the 2 bolts and 2 engine hangers.
16268
5.INSTALL NO. 1 WATER BY-PASS PIPE
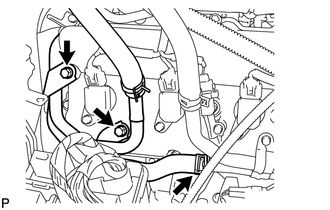
Connect the hose and install the water by-pass pipe with the 2 bolts.
- Torque:
- 18 N*m (184 kgf*cm, 13 ft.*lbf)
32101
6.INSTALL DRIVE PLATE AND RING GEAR SUB-ASSEMBLY
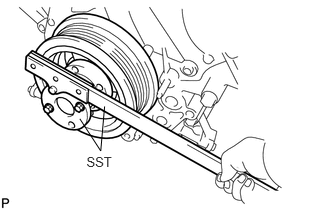
Using SST, hold the crankshaft.
- SST
- 09213-70011
09330-00021

|
Engine Side |
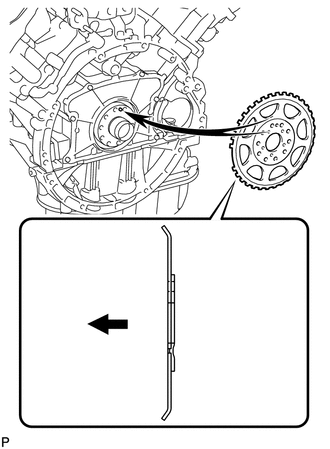
Install the crankshaft angle sensor rotor.
- HINT:
- ·
Align the pin hole of the crankshaft angle sensor rotor with the pin of the crankshaft.
·As the crankshaft angle sensor rotor is not reversible, be sure to install it so that it is facing in the direction shown in the illustration.
| *1 | Drive Plate |
| *2 | Rear Drive Plate Spacer |
|
|
Automatic Transmission Side |
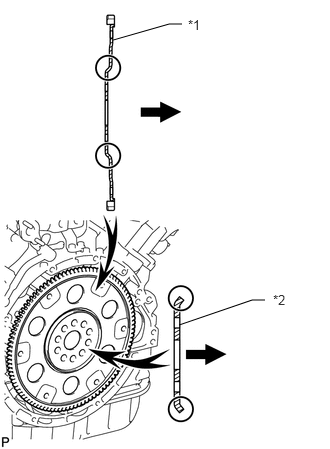
Install the drive plate and rear drive plate spacer onto the crankshaft.
- HINT:
-
As the rear drive plate spacer and the drive plate are not reversible, be sure to install them so that they are facing in the direction shown in the illustration.
Install the drive plate and ring gear and bolts.
- HINT:
-
The bolts are tightened in 2 progressive steps.
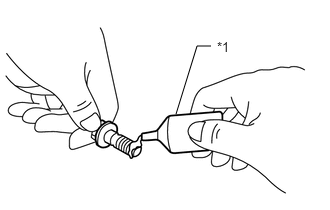
Clean the bolts and bolt holes.
| *1 | Adhesive |
Apply adhesive to 2 or 3 threads of the 8 bolts.
- Adhesive:
Toyota Genuine Adhesive 1324, Three Bond 1324 or equivalent
Step 1:
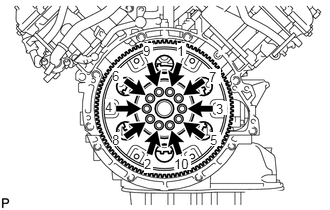
Install and uniformly tighten 10 new bolts in the sequence shown in the illustration.
- Torque:
- 30 N*m (306 kgf*cm, 22 ft.*lbf)
- NOTICE:
- ·
Do not reuse the drive plate installation bolts.
·Do not strike or damage the drive plate installation bolts. Be sure to handle them carefully.
Mark the top of each drive plate installation bolt with paint.
Step 2:
Tighten the drive plate installation bolts 90° as shown in the illustration.
Check that the painted marks are now at a 90° angle to the top.
- NOTICE:
-
Do not start the engine for at least an hour after installing the drive plate.
35000
7.INSTALL AUTOMATIC TRANSMISSION ASSEMBLY
for 2WD:
Refer to the following procedures (see page Drivetrain>AB60E AUTOMATIC TRANSMISSION / TRANSAXLE>AUTOMATIC TRANSMISSION ASSEMBLY>INSTALLATION).
for 4WD:
Refer to the following procedures (see page Drivetrain>AB60F AUTOMATIC TRANSMISSION / TRANSAXLE>AUTOMATIC TRANSMISSION ASSEMBLY>INSTALLATION).
28100
8.INSTALL STARTER ASSEMBLY
28192
9.INSTALL STARTER COVER
17104
10.INSTALL EXHAUST MANIFOLD SUB-ASSEMBLY RH
17167
11.INSTALL NO. 1 EXHAUST MANIFOLD HEAT INSULATOR
11452
12.INSTALL ENGINE OIL LEVEL DIPSTICK GUIDE
53739A
13.INSTALL FRONT FENDER APRON SEAL REAR RH
53736
14.INSTALL FRONT FENDER APRON SEAL RH
37140
15.INSTALL FRONT PROPELLER SHAFT ASSEMBLY (for 4WD)
Install the front propeller shaft (see page Drivetrain>PROPELLER SHAFT>FRONT PROPELLER SHAFT ASSEMBLY>INSTALLATION).
37110
16.INSTALL PROPELLER SHAFT ASSEMBLY
for 2WD:
Refer to the following procedures (see page Drivetrain>PROPELLER SHAFT>PROPELLER SHAFT ASSEMBLY(for 2WD)>INSTALLATION).
for 4WD:
Refer to the following procedures (see page Drivetrain>PROPELLER SHAFT>PROPELLER SHAFT ASSEMBLY(for 4WD)>INSTALLATION).
17410
17.INSTALL EXHAUST PIPE ASSEMBLY
Install the exhaust pipe assembly (see page Engine / Hybrid System>3UR-FE EXHAUST>EXHAUST PIPE>INSTALLATION).
27020
18.INSTALL GENERATOR ASSEMBLY
44320
19.CONNECT VANE PUMP ASSEMBLY
88320
20.CONNECT COOLER COMPRESSOR ASSEMBLY
21.CONNECT WIRE HARNESS AND HOSE
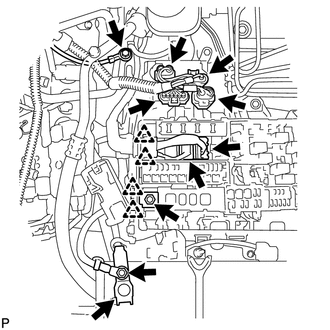
Connect the 2 connectors and 2 clips to the engine room junction block.
Install the engine wire with the nut. Then connect the 2 clips.
- Torque:
- 10 N*m (102 kgf*cm, 7 ft.*lbf)
Connect the 4 air injection control driver connectors.
Install the ground wire with the bolt.
- Torque:
- 8.0 N*m (82 kgf*cm, 71 in.*lbf)
Connect the cable to the positive (+) battery terminal.
Install the wire to the positive (+) battery cable with the nut.
- Torque:
- 13 N*m (133 kgf*cm, 10 ft.*lbf)
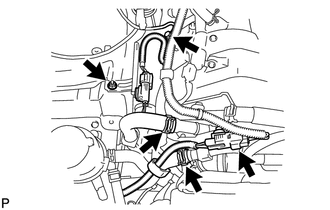
Connect the 2 air injection system hoses.
Install the ground wire with the bolt.
- Torque:
- 8.0 N*m (82 kgf*cm, 71 in.*lbf)
Connect the 2 air pump connectors and install the connector bracket with the nut.
- Torque:
- 6.0 N*m (61 kgf*cm, 53 in.*lbf)
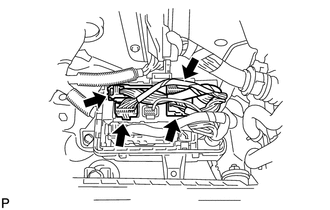
Connect the 4 connectors to the connector holder block.
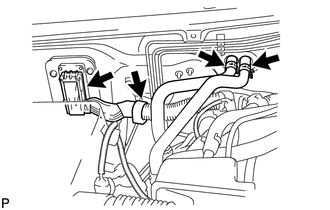
Connect the heater hoses.
Connect the ECM connector and clamp.
- HINT:
-
Refer to the following procedures to connect the ECM connector (see page Engine / Hybrid System>3UR-FE ENGINE CONTROL>ECM>INSTALLATION).
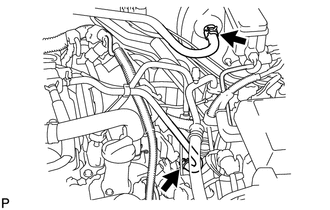
Connect the union to check valve hose.
Connect the purge line hose.
23801P
22.CONNECT FUEL MAIN AND RETURN HOSE
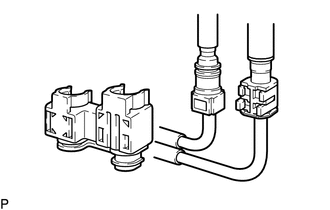
Connect the fuel main and return hoses (see page Engine / Hybrid System>3UR-FE FUEL>FUEL SYSTEM>PRECAUTION).
Install the fuel pipe clamp.
16400
23.INSTALL RADIATOR ASSEMBLY
16711
24.INSTALL FAN SHROUD
16361A
25.INSTALL FAN & GENERATOR V BELT
53294C
26.INSTALL RADIATOR SIDE DEFLECTOR LH
53293C
27.INSTALL RADIATOR SIDE DEFLECTOR RH
53101
28.INSTALL RADIATOR GRILLE SUB-ASSEMBLY
16572
29.INSTALL OUTLET RADIATOR HOSE
16571
30.INSTALL INLET RADIATOR HOSE
17700
31.INSTALL AIR CLEANER ASSEMBLY
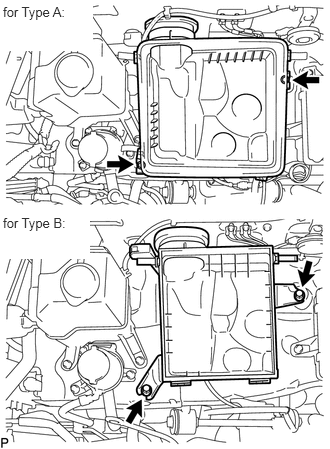
Install the air cleaner case with the 2 bolts.
- Torque:
- 5.0 N*m (51 kgf*cm, 44 in.*lbf)
Install the air cleaner element onto the air cleaner case.
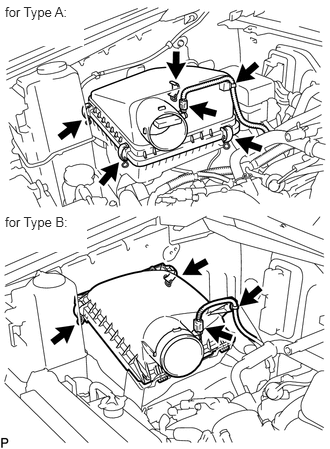
Install the air cleaner cap.
for Type A:
Install the air cleaner cap and fasten the 4 hook clamps.
for Type B:
Install the air cleaner cap and fasten the 2 hook clamps.
Connect the MAF meter connector.
Attach the wire harness clamp.
17880
32.INSTALL AIR CLEANER HOSE ASSEMBLY
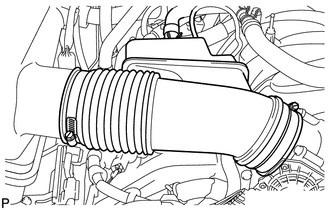
Install the air cleaner hose with the 2 clamps.
- Torque:
- 4.0 N*m (41 kgf*cm, 35 in.*lbf)
Connect the vacuum hose.
Connect the ventilation hose.
33.ADD ENGINE OIL
34.ADD ENGINE COOLANT
35.CONNECT CABLE TO NEGATIVE BATTERY TERMINAL
36.INSPECT FOR OIL LEAK
Inspect for engine oil leak (see page Engine / Hybrid System>3UR-FE LUBRICATION>OIL AND OIL FILTER>REPLACEMENT).
37.INSPECT FOR COOLANT LEAK
38.INSPECT FOR EXHAUST GAS LEAK
39.INSPECT FOR FUEL LEAK
40.INSPECT SHIFT LEVER POSITION
for Column shift:
Refer to the following procedures (see page Drivetrain>AB60E AUTOMATIC TRANSMISSION / TRANSAXLE>SHIFT LEVER ASSEMBLY(for Column Shift Type)>ON-VEHICLE INSPECTION).
for Floor shift:
Refer to the following procedures (see page Drivetrain>AB60E AUTOMATIC TRANSMISSION / TRANSAXLE>SHIFT LEVER ASSEMBLY(for Floor Shift Type)>ON-VEHICLE INSPECTION).
11209
41.INSTALL V-BANK COVER SUB-ASSEMBLY
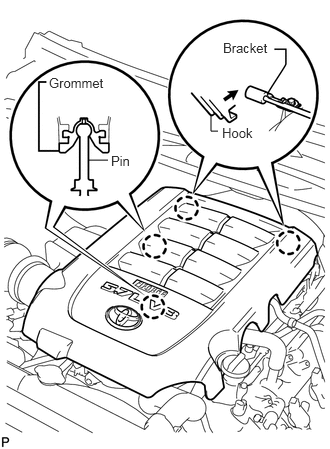
Attach the 2 V-bank cover hooks to the bracket. Then align the 2 V-bank cover grommets with the 2 pins, and press down on the V-bank cover to attach the pins.
55701J
42.INSTALL COWL TOP OUTER PANEL SUB-ASSEMBLY
85110
43.INSTALL WINDSHIELD WIPER MOTOR ASSEMBLY
Install the windshield wiper motor (see page Vehicle Interior>WIPER / WASHER>FRONT WIPER MOTOR>INSTALLATION).
53301
44.INSTALL HOOD SUB-ASSEMBLY
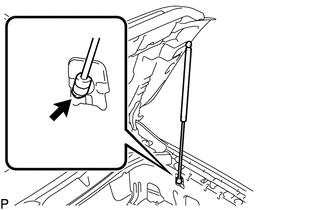
Install the hood with the 4 bolts.
- Torque:
- 13 N*m (133 kgf*cm, 10 ft.*lbf)
Attach the lower part of the 2 hood supports to the hood support bolt ball joints.
- NOTICE:
-
Install the hood support while supporting the hood by hand.
Attach the hood support clips.
- NOTICE:
-
Check that the hood support is engaged in the ball joint and that it cannot be pulled out.
53301
45.ADJUST HOOD SUB-ASSEMBLY
51441
46.INSTALL NO. 1 ENGINE UNDER COVER
47.INSPECT IGNITION TIMING
48.INSPECT ENGINE IDLE SPEED
50.CHECK ENGINE OIL LEVEL
51.CHECK ENGINE COOLANT LEVEL