1VD-FTV ENGINE MECHANICAL CYLINDER HEAD GASKET(w/o DPF) INSTALLATION
PROCEDURE

 11115 1.SELECT NO. 1 CYLINDER HEAD GASKET
Set the 2 crankshaft pulley set bolts to the crankshaft.
Clean the cylinder block sub-assembly with solvent.
Inspect the protrusions for each cylinder.
Set the piston of the cylinder to be measured to slightly before TDC.
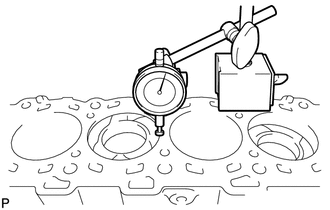
Place a dial indicator on the cylinder block sub-assembly, and set the measuring tip as shown in the illustration.
- NOTICE:
-
Make sure that the dial indicator is at a right angle to the cylinder block sub-assembly top surface.
Set the dial indicator at 0 mm (0 in.).
- HINT:
-
Make sure that the measuring tip is flat against the cylinder block sub-assembly surface and piston head when taking the measurements.
Find where the piston head protrudes most by slowly turning the crankshaft clockwise and counterclockwise.
Measure the piston protrusion value of each cylinder at 2 places as shown in the illustration below, making a total of 8 measurements.
- Standard piston protrusion:
-
0.520 to 0.780 mm (0.0205 to 0.0307 in.)
If the protrusion is not as specified, remove and reinstall the piston and connecting rod.
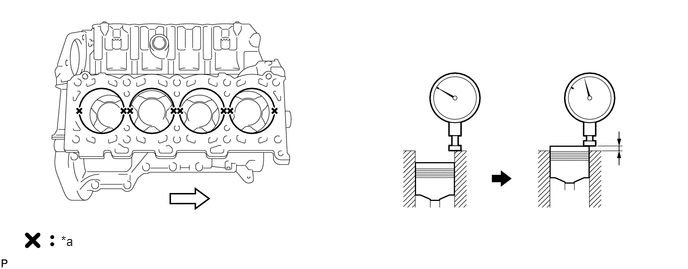
| *a | Measuring Point |

|
Front |
|
|
Front |
Select a new No. 1 cylinder head gasket.
- HINT:
-
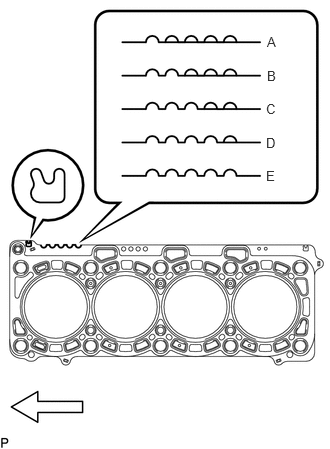
No. 1 cylinder head gaskets are marked A, B, C, D or E accordingly.
- New Installed No. 1 Cylinder Head Gasket Thickness:
-
Item Cutout Specified Condition (*) A 1 1.20 to 1.30 mm (0.0472 to 0.0512 in.) B 2 1.25 to 1.35 mm (0.0492 to 0.0532 in.) C 3 1.30 to 1.40 mm (0.0512 to 0.0551 in.) D 4 1.35 to 1.45 mm (0.0532 to 0.0571 in.) E 5 1.40 to 1.50 mm (0.0551 to 0.0591 in.)
- HINT:
-
*: The specified condition indicates the thickness of the No. 1 cylinder head gasket after tightening the cylinder head sub-assembly RH.
Select the largest piston protrusion value from the measurements and then select a new appropriate No. 1 cylinder head gasket according to the table below.
- Standard Piston Protrusion:
-
Item Specified Condition A 0.520 to 0.575 mm (0.0205 to 0.0226 in.) B 0.575 to 0.625 mm (0.0226 to 0.0246 in.) C 0.625 to 0.675 mm (0.0246 to 0.0266 in.) D 0.675 to 0.725 mm (0.0266 to 0.0285 in.) E 0.725 to 0.780 mm (0.0285 to 0.0307 in.)
Remove the 2 crankshaft pulley set bolts.
11116 2.SELECT NO. 2 CYLINDER HEAD GASKET
Set the 2 crankshaft pulley set bolts to the crankshaft.
Clean the cylinder block sub-assembly with solvent.
Inspect the protrusions for each cylinder.
Set the piston of the cylinder to be measured to slightly before TDC.
Place a dial indicator on the cylinder block sub-assembly, and set the measuring tip as shown in the illustration.
- NOTICE:
-
Make sure that the dial indicator is at a right angle to the cylinder block sub-assembly top surface.
Set the dial indicator at 0 mm (0 in.).
- HINT:
-
Make sure that the measuring tip is flat against the cylinder block sub-assembly surface and piston head when taking the measurements.
Find where the piston head protrudes most by slowly turning the crankshaft clockwise and counterclockwise.
Measure the piston protrusion value of each cylinder at 2 places as shown in the illustration below, making a total of 8 measurements.
- Standard piston protrusion:
-
0.520 to 0.780 mm (0.0205 to 0.0307 in.)
If the protrusion is not as specified, remove and reinstall the piston and connecting rod.
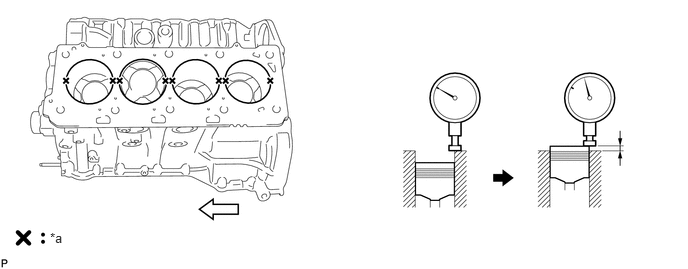
| *a | Measuring Point |
|
Front |
|
|
Front |
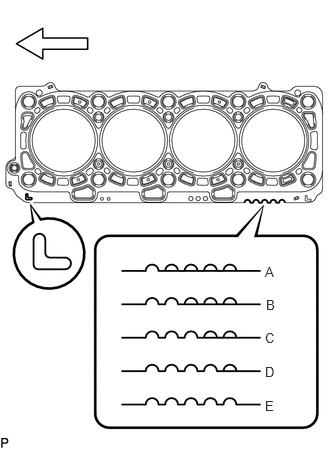
Select a new No. 2 cylinder head gasket.
- HINT:
-
No. 2 cylinder head gaskets are marked A, B, C, D or E accordingly.
- New Installed No. 2 Cylinder Head Gasket Thickness:
-
Item Cutout Specified Condition (*) A 1 1.20 to 1.30 mm (0.0472 to 0.0512 in.) B 2 1.25 to 1.35 mm (0.0492 to 0.0532 in.) C 3 1.30 to 1.40 mm (0.0512 to 0.0551 in.) D 4 1.35 to 1.45 mm (0.0532 to 0.0571 in.) E 5 1.40 to 1.50 mm (0.0551 to 0.0591 in.)
- HINT:
-
*: The specified condition indicates the thickness of the No. 2 cylinder head gasket after tightening the cylinder head sub-assembly LH.
Select the largest piston protrusion value from the measurements and then select a new appropriate No. 2 cylinder head gasket according to the table below.
- Standard Piston Protrusion:
-
Item Specified Condition A 0.520 to 0.575 mm (0.0205 to 0.0226 in.) B 0.575 to 0.625 mm (0.0226 to 0.0246 in.) C 0.625 to 0.675 mm (0.0246 to 0.0266 in.) D 0.675 to 0.725 mm (0.0266 to 0.0285 in.) E 0.725 to 0.780 mm (0.0285 to 0.0307 in.)
Remove the 2 crankshaft pulley set bolts.
11115 3.INSTALL NO. 1 CYLINDER HEAD GASKET
Remove any oil from the contact surface.
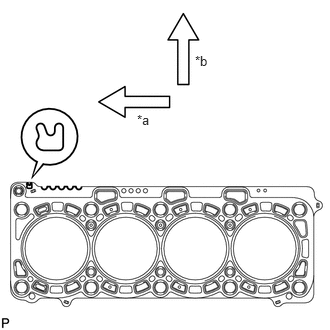
| *a | Front |
| *b | Exhaust Side |
Place the No. 1 cylinder head gasket on the cylinder block sub-assembly surface with the front face of the indicated mark "R" upward and facing the exhaust side.
11116 4.INSTALL NO. 2 CYLINDER HEAD GASKET
Remove any oil from the contact surface.
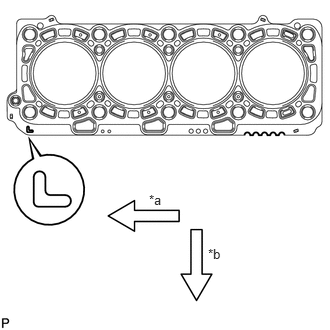
| *a | Front |
| *b | Exhaust Side |
Place the No. 2 cylinder head gasket on the cylinder block sub-assembly surface with the front face of the indicated mark "L" upward and facing the exhaust side.
11101 5.INSTALL CYLINDER HEAD SUB-ASSEMBLY RH
Place the cylinder head sub-assembly RH on the No. 1 cylinder head gasket.
- NOTICE:
-
Ensure that no oil is on the mounting surface of the cylinder head sub-assembly RH.
Apply a light coat of engine oil to the threads and under the heads of the cylinder head set bolts.
Step 1:
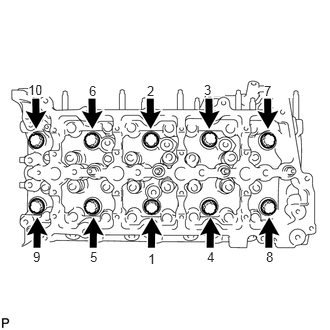
Install and uniformly tighten the 10 cylinder head set bolts with the spacers in several steps, in the sequence shown in the illustration.
- Torque:
- 80 N*m (816 kgf*cm, 59 ft.*lbf)
- HINT:
-
·
The cylinder head set bolts are tightened in 4 progressive steps.
·If a cylinder head set bolt is broken or deformed, replace it.
Step 2:
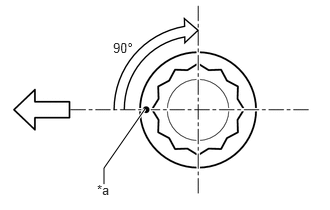
| *a | Painted Mark |
|
|
Front |
Mark the cylinder head set bolt heads with paint as shown in the illustration.
Tighten the cylinder head set bolts another 90° in the sequence shown in step 1.
Step 3:
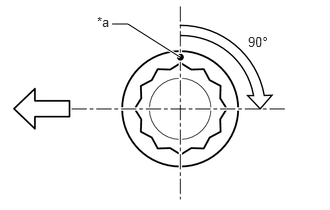
| *a | Painted Mark |
|
|
Front |
Tighten the cylinder head set bolts by an additional 90° in the sequence shown in step 1.
Step 4:
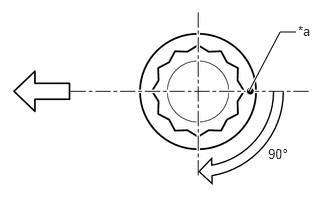
| *a | Painted Mark |
|
|
Front |
Tighten the cylinder head set bolts by an additional 90° in the sequence shown in step 1.
Check that the painted marks are now facing the LH side.
11102 6.INSTALL CYLINDER HEAD SUB-ASSEMBLY LH
Place the cylinder head sub-assembly LH on the No. 2 cylinder head gasket.
- NOTICE:
-
Ensure that no oil is on the mounting surface of the cylinder head sub-assembly LH.
Apply a light coat of engine oil to the threads and under the heads of the cylinder head set bolts.
Step 1:
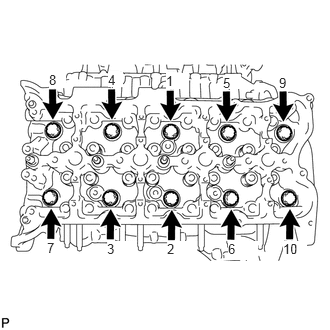
Install and uniformly tighten the 10 cylinder head set bolts with the spacers in several steps, in the sequence shown in the illustration.
- Torque:
- 80 N*m (816 kgf*cm, 59 ft.*lbf)
- HINT:
-
·
The cylinder head set bolts are tightened in 4 progressive steps.
·If a cylinder head set bolt is broken or deformed, replace it.
Step 2:
| *a | Painted Mark |
|
|
Front |
Mark the cylinder head set bolt heads with paint as shown in the illustration.
Tighten the cylinder head set bolts 90° in the sequence shown in step 1.
Step 3:
| *a | Painted Mark |
|
|
Front |
Tighten the cylinder head set bolts another 90° in the sequence shown in step 1.
Step 4:
| *a | Painted Mark |
|
|
Front |
Tighten the cylinder head set bolts by an additional 90° in the sequence shown in step 1.
Check that the painted marks are now facing the LH side.
13750 7.INSTALL NO. 1 VALVE LASH ADJUSTER ASSEMBLY
8.INSTALL NO. 2 VALVE LASH ADJUSTER ASSEMBLY
13801 9.INSTALL NO. 1 VALVE ROCKER ARM SUB-ASSEMBLY
10.INSTALL NO. 2 VALVE ROCKER ARM SUB-ASSEMBLY
11.INSTALL NO. 2 CAMSHAFT BEARING CAP
12.INSTALL NO. 5 CAMSHAFT BEARING CAP
13.SET NO. 1 CYLINDER TO 45° BEFORE TDC
13511 14.INSTALL NO. 1 AND NO. 2 CAMSHAFTS
13053 15.INSTALL NO. 3 AND NO. 4 CAMSHAFTS
16.INSTALL REAR CYLINDER HEAD PLATE LH (w/o EGR System)
17.INSTALL REAR CYLINDER HEAD PLATE RH (w/o EGR System)
11301 18.INSTALL TIMING GEAR CASE SUB-ASSEMBLY
11248 19.INSTALL V-BANK SILENCER
22100 20.INSTALL FUEL SUPPLY PUMP ASSEMBLY
21.INSPECT RADIAL BALL BEARING
13613 22.TEMPORARILY INSTALL INJECTION PUMP DRIVE GEAR
23.SET NO. 1 AND NO. 2 CAMSHAFTS TO TDC/COMPRESSION
13581 24.INSTALL NO. 1 IDLE GEAR SHAFT
13525 25.INSTALL NO. 1 IDLE GEAR
26.TIGHTEN INJECTION PUMP DRIVE GEAR NUT
27.CHECK NO. 1 CYLINDER AT TDC/COMPRESSION
13529G 28.INSTALL NO. 2 CAMSHAFT TIMING SPROCKET AND NO. 2 CHAIN SUB-ASSEMBLY
13523 29.INSTALL NO. 1 CAMSHAFT TIMING SPROCKET AND NO. 1 CHAIN SUB-ASSEMBLY
13522 30.INSTALL PUMP DRIVE SHAFT GEAR
31.INSTALL NO. 2 CHAIN VIBRATION DAMPER
32.INSTALL NO. 2 CHAIN TENSIONER SLIPPER
33.INSTALL NO. 2 CHAIN TENSIONER ASSEMBLY
13561 34.INSTALL NO. 1 CHAIN VIBRATION DAMPER
13559 35.INSTALL NO. 1 CHAIN TENSIONER SLIPPER
13540 36.INSTALL NO. 1 CHAIN TENSIONER ASSEMBLY
19315 37.INSTALL NO. 1 CRANKSHAFT POSITION SENSOR PLATE
38.CHECK NO. 1 CYLINDER AT TDC/COMPRESSION
11302A 39.INSTALL FRONT CRANKSHAFT OIL SEAL
11302 40.INSTALL TIMING CHAIN COVER SUB-ASSEMBLY
17111 41.TEMPORARILY INSTALL INTAKE MANIFOLD
17112 42.TEMPORARILY INSTALL NO. 2 INTAKE MANIFOLD
17114D 43.TEMPORARILY INSTALL NO. 3 INTAKE MANIFOLD
23670 44.INSTALL INJECTOR ASSEMBLY (for Bank 1)
23670 45.INSTALL INJECTOR ASSEMBLY (for Bank 2)
17114D 46.REMOVE NO. 3 INTAKE MANIFOLD
17112 47.REMOVE NO. 2 INTAKE MANIFOLD
17111 48.REMOVE INTAKE MANIFOLD
11213 49.INSTALL CYLINDER HEAD COVER GASKET
11202 50.INSTALL CYLINDER HEAD COVER SUB-ASSEMBLY LH
11201 51.INSTALL CYLINDER HEAD COVER SUB-ASSEMBLY
23681D 52.INSTALL NOZZLE HOLDER SEAL RH
23681E 53.INSTALL NOZZLE HOLDER SEAL LH
12270 54.INSTALL OIL SEPARATOR ASSEMBLY
12101 55.CHECK OIL PAN SUB-ASSEMBLY
12101 56.INSTALL OIL PAN SUB-ASSEMBLY
15620 57.INSTALL OIL FILTER CAP ASSEMBLY WITH ELEMENT
15614 58.INSTALL LOWER OIL FILTER ELEMENT COVER
12102A 59.CHECK NO. 2 OIL PAN SUB-ASSEMBLY
12102A 60.INSTALL NO. 2 OIL PAN SUB-ASSEMBLY
12140 61.INSTALL OIL PAN COVER
11452 62.INSTALL ENGINE OIL LEVEL DIPSTICK GUIDE
12142 63.INSTALL NO. 2 ENGINE OIL LEVEL DIPSTICK GUIDE
15301 64.INSTALL ENGINE OIL LEVEL DIPSTICK
65.CONNECT VACUUM HOSE
17293 66.INSTALL TURBOCHARGER STAY
12201 67.INSTALL VENTILATION TUBE SUB-ASSEMBLY
12263 68.CONNECT NO. 3 VENTILATION HOSE
25708 69.CONNECT NO. 3 VACUUM TRANSMITTING PIPE SUB-ASSEMBLY
15474A 70.INSTALL TURBO OIL OUTLET HOSE
71.INSTALL ENGINE WIRE BRACKET
83520 72.INSTALL OIL PRESSURE SENDER GAUGE ASSEMBLY (w/ Oil Pressure Gauge)
83530 73.INSTALL ENGINE OIL PRESSURE SWITCH ASSEMBLY (w/o Oil Pressure Gauge)
15407 74.CONNECT TURBO OIL INLET PIPE SUB-ASSEMBLY
15769 75.CONNECT OIL COOLER PIPE
17878 76.INSTALL NO. 3 INTAKE AIR CONNECTOR PIPE
17141 77.INSTALL EXHAUST MANIFOLD RH
17142 78.INSTALL EXHAUST MANIFOLD LH WITH TURBOCHARGER SUB-ASSEMBLY
16027 79.INSTALL NO. 1 TURBO WATER PIPE SUB-ASSEMBLY
17361J 80.INSTALL NO. 1 AIR TUBE
17106 81.INSTALL EXHAUST CROSSOVER PIPE SUB-ASSEMBLY
17168 82.INSTALL NO. 2 EXHAUST MANIFOLD HEAT INSULATOR
17167 83.INSTALL NO. 1 EXHAUST MANIFOLD HEAT INSULATOR
13471 84.INSTALL CRANKSHAFT PULLEY
16630H 85.INSTALL IDLER PULLEY ASSEMBLY (w/o Air Conditioning System)
88320 86.INSTALL COOLER COMPRESSOR ASSEMBLY (w/ Air Conditioning System)
44310 87.CONNECT VANE PUMP ASSEMBLY
29300 88.INSTALL VACUUM PUMP ASSEMBLY
44774 89.CONNECT UNION TO CONNECTOR TUBE HOSE
16100 90.INSTALL ENGINE WATER PUMP ASSEMBLY
15778 91.CONNECT NO. 2 OIL COOLER HOSE
15777 92.CONNECT OIL COOLER HOSE
11301K 93.INSTALL CRANKSHAFT POSITION SENSOR
11301M 94.INSTALL CAMSHAFT POSITION SENSOR
12502 95.INSTALL CHAIN COVER AND COMPRESSOR BRACKET SUB-ASSEMBLY
16262 96.CONNECT WATER INLET HOSE
16331A 97.INSTALL THERMOSTAT
16321 98.INSTALL WATER INLET
16620D 99.INSTALL V-RIBBED BELT TENSIONER ASSEMBLY
16603B 100.INSTALL IDLER PULLEY SUB-ASSEMBLY
16307A 101.INSTALL FAN BRACKET SUB-ASSEMBLY
102.INSTALL WATER OUTLET PIPE
16331 103.INSTALL WATER OUTLET
104.INSTALL NO. 3 ENGINE HANGER
17945 105.INSTALL INTERCOOLER SUPPORT BRACKET
17946 106.INSTALL NO. 2 INTERCOOLER SUPPORT BRACKET
28100 107.INSTALL STARTER ASSEMBLY
17111 108.INSTALL INTAKE MANIFOLD
17112 109.INSTALL NO. 2 INTAKE MANIFOLD
16268 110.INSTALL NO. 1 WATER BY-PASS PIPE
23920A 111.INSTALL FUEL COOLER ASSEMBLY
23763 112.INSTALL NO. 3 NOZZLE LEAKAGE PIPE
23764A 113.INSTALL NO. 4 NOZZLE LEAKAGE PIPE
16283 114.INSTALL NO. 6 WATER BY-PASS HOSE
25620 115.INSTALL EGR VALVE ASSEMBLY WITH EGR COOLER ASSEMBLY (w/ EGR System)
25602 116.INSTALL NO. 2 EGR PIPE SUB-ASSEMBLY (w/ EGR System)
25601 117.INSTALL NO. 1 EGR PIPE SUB-ASSEMBLY (w/ EGR System)
16289 118.CONNECT NO. 5 WATER BY-PASS PIPE
17114D 119.INSTALL NO. 3 INTAKE MANIFOLD
17113 120.INSTALL INTAKE PIPE
25614 121.INSTALL NO. 4 EGR PIPE (w/ EGR System)
23801L 122.INSTALL FUEL FILTER TO INJECTION PUMP FUEL PIPE SUB-ASSEMBLY
23810A 123.INSTALL COMMON RAIL ASSEMBLY RH
23820A 124.INSTALL COMMON RAIL ASSEMBLY LH
23705 125.INSTALL NO. 5 INJECTION PIPE SUB-ASSEMBLY
23805B 126.INSTALL NO. 5 FUEL PIPE SUB-ASSEMBLY
23239D 127.INSTALL NO. 1 FUEL HOSE
23706 128.INSTALL NO. 6 INJECTION PIPE SUB-ASSEMBLY
23702 129.INSTALL INJECTION PIPE SUB-ASSEMBLY LH
23701 130.INSTALL INJECTION PIPE SUB-ASSEMBLY RH
17947B 131.INSTALL NO. 3 INTERCOOLER SUPPORT BRACKET
23265 132.INSTALL NO. 1 GAS FILTER
27020 133.INSTALL GENERATOR ASSEMBLY
27280 134.INSTALL GENERATOR SPLASH GUARD COVER ASSEMBLY
82111 135.CONNECT ENGINE ROOM MAIN WIRE
23243C 136.CONNECT FUEL PUMP MOTOR WIRE
16278 137.INSTALL NO. 2 WATER BY-PASS PIPE
16288 138.INSTALL NO. 4 WATER BY-PASS PIPE
25850 139.INSTALL ELECTRIC VACUUM REGULATING VALVE ASSEMBLY
44761 140.INSTALL VACUUM PUMP TO CONNECTOR TUBE
82112 141.CONNECT NO. 2 ENGINE ROOM WIRE
44769 142.INSTALL VACUUM RESERVOIR CONNECT TUBE
23804D 143.INSTALL NO. 4 FUEL PIPE SUB-ASSEMBLY
23284A 144.INSTALL NO. 5 FUEL HOSE
16264 145.CONNECT NO. 2 AND NO. 3 WATER BY-PASS HOSES
26100G 146.INSTALL DIESEL THROTTLE BODY ASSEMBLY (for Bank 2)
26100G 147.INSTALL DIESEL THROTTLE BODY ASSEMBLY (for Bank 1)
19850 148.INSTALL GLOW PLUG ASSEMBLY
17972 149.INSTALL NO. 2 COOL AIR INLET
17971 150.INSTALL NO. 1 COOL AIR INLET
17343D 151.INSTALL NO. 3 AIR HOSE
17362B 152.INSTALL NO. 2 AIR TUBE
17940D 153.INSTALL INTERCOOLER ASSEMBLY
17341F 154.INSTALL NO. 1 AIR HOSE
87249B 155.CONNECT HEATER WATER OUTLET PIPE B
82111 156.CONNECT ENGINE ROOM MAIN WIRE
23271H 157.CONNECT NO. 1 AND NO. 2 FUEL HOSES
158.CONNECT TUBE SUB-ASSEMBLY (w/ Air Conditioning System)
44778 159.CONNECT CONNECTOR TO CHECK VALVE HOSE
87246A 160.CONNECT HEATER WATER HOSE
87250 161.INSTALL HEATER WATER VALVE ASSEMBLY
16400 162.INSTALL RADIATOR ASSEMBLY
74403A 163.INSTALL BATTERY CARRIER SUB-ASSEMBLY
28800 164.INSTALL BATTERY
165.ADD ENGINE OIL
166.CONNECT CABLE TO NEGATIVE BATTERY TERMINAL
167.ADD ENGINE COOLANT
168.BLEED AIR FROM FUEL SYSTEM
169.INSPECT FOR FUEL LEAK
170.INSPECT FOR OIL LEAK
171.INSPECT FOR COOLANT LEAK
172.WARM UP ENGINE
173.INSPECT ENGINE OIL LEVEL
174.INSPECT FOR EXHAUST GAS LEAK
175.INSPECT ENGINE COOLANT LEVEL
176.INSPECT ENGINE IDLE SPEED
177.INSPECT MAXIMUM ENGINE SPEED
178.CHARGE REFRIGERANT (w/ Air Conditioning System)
179.WARM UP ENGINE (w/ Air Conditioning System)
180.CHECK FOR REFRIGERANT GAS LEAK (w/ Air Conditioning System)
53736 181.INSTALL FRONT FENDER APRON SEAL RH
53737B 182.INSTALL FRONT FENDER APRON SEAL LH