2AZ-FE ENGINE MECHANICAL ENGINE ASSEMBLY INSTALLATION
PROCEDURE

 32101
1.INSTALL DRIVE PLATE AND RING GEAR SUB-ASSEMBLY
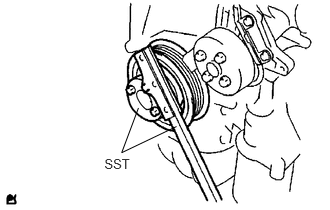
Using SST, hold the crankshaft pulley.
- SST
- 09213-54015 (91651-60855)
09330-00021
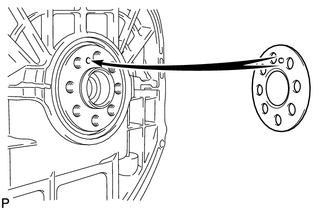
Install the front spacer.
- HINT:
-
Align the pin of the front spacer with the pin hole of the crankshaft.
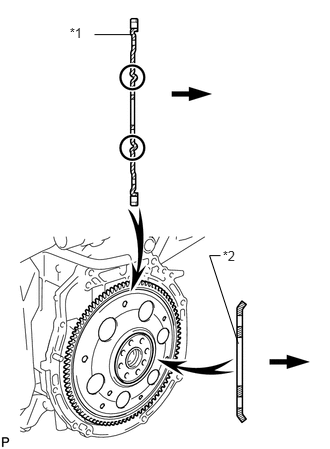
Install the drive plate and ring gear sub-assembly and rear spacer onto the crankshaft.
| *1 | Drive Plate and Ring Gear Sub-Assembly |
| *2 | Rear Spacer |

|
Transaxle |
Clean the 8 bolts and 8 bolt holes.
Apply adhesive to 2 or 3 threads of the 8 bolts.
- Adhesive:
Toyota Genuine Adhesive 1342, Three Bond 1342 or equivalent
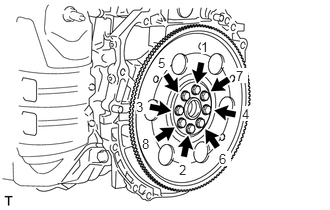
In several steps, uniformly install and tighten the 8 bolts in the sequence shown in the illustration.
- Torque:
- 98 N*m (999 kgf*cm, 72 ft.*lbf)
- NOTICE:
-
Do not start the engine for at least an hour after installing the drive plate and ring gear sub-assembly.
30500
2.INSTALL AUTOMATIC TRANSAXLE ASSEMBLY (for Automatic Transaxle)
30400
3.INSTALL CONTINUOUSLY VARIABLE TRANSAXLE ASSEMBLY (for CVT)
16282D
4.CONNECT NO. 5 WATER BY-PASS HOSE (for CVT)
Connect the No. 5 water by-pass hose.
43457
5.INSTALL DRIVE SHAFT BEARING BRACKET
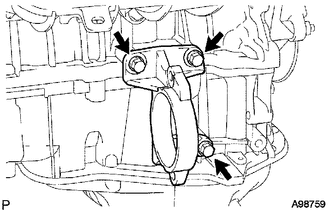
Install the drive shaft bearing bracket with the 3 bolts.
- Torque:
- 64 N*m (653 kgf*cm, 47 ft.*lbf)
82121
6.CONNECT ENGINE WIRE
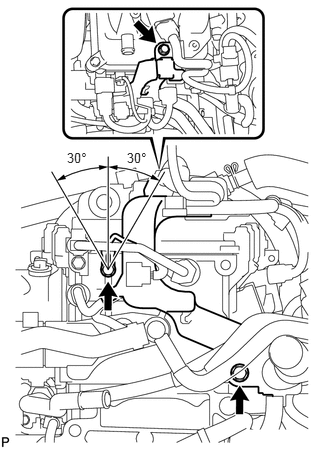
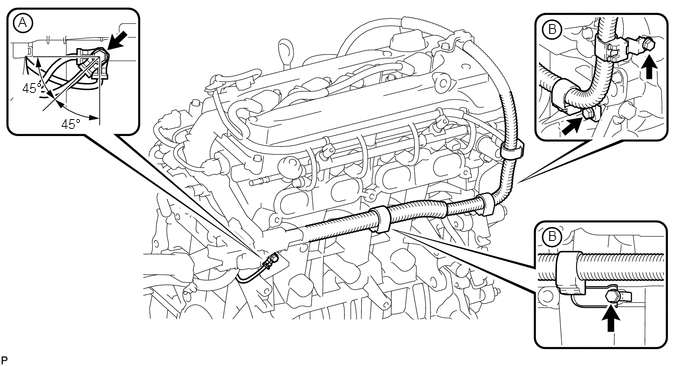
Install the engine wire harness cover with the 2 bolts as shown in the illustration.
- Torque:
- 7.7 N*m (79 kgf*cm, 68 in.*lbf)
Install the ground cable with the bolt as shown in the illustration.
- Torque:
- 8.4 N*m (86 kgf*cm, 74 in.*lbf)
- HINT:
-
The ground cable can be set to within 30° on either side of the prescribed position.
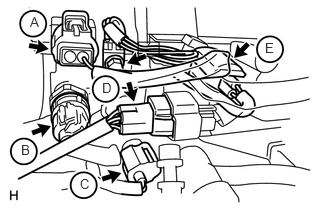
Connect the radio setting condenser connector (A), oil pressure sensor connector (B), engine coolant temperature sensor connector (C), heated oxygen sensor connector (D) and camshaft position sensor connector (E).
Connect the 4 ignition coil connectors.
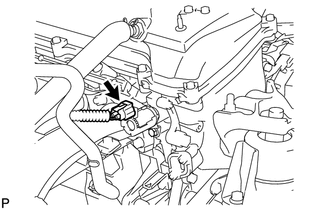
Connect the camshaft timing oil control valve connector.
Install the ground cable (A) and 3 engine wire harness clamps (B) with the 4 bolts as shown in the illustration.
- Torque:
- 8.4 N*m (86 kgf*cm, 74 in.*lbf)
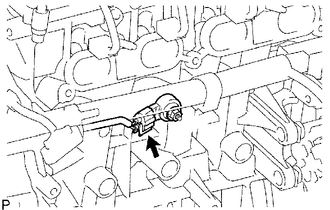
Connect the knock sensor connector.
17135A
7.INSTALL NO. 1 INTAKE MANIFOLD INSULATOR
17111
8.INSTALL INTAKE MANIFOLD
23250
9.INSTALL FUEL INJECTOR ASSEMBLY
23807
10.INSTALL FUEL DELIVERY PIPE SUB-ASSEMBLY
12262
11.INSTALL NO. 2 VENTILATION HOSE
12.INSTALL ENGINE ASSEMBLY
Set an engine lifter underneath the engine assembly.
- HINT:
-
Set wooden blocks or equivalent under the engine assembly, so that the engine assembly is level.
Carefully install the engine assembly to the vehicle.
- NOTICE:
-
While installing the engine assembly to the vehicle, do not allow it to contact the vehicle.
13.SUSPEND ENGINE ASSEMBLY
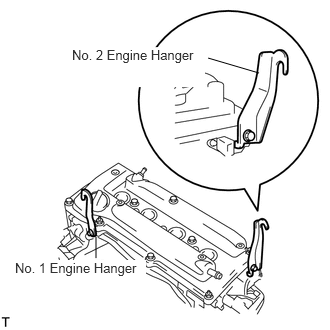
Install the No. 1 and No. 2 engine hangers with the bolts.
- Torque:
- 38 N*m (387 kgf*cm, 28 ft.*lbf)
- Part No.:
Item Part No. No. 1 engine hanger 12281-28010 or
12281-0H010No. 2 engine hanger 12282-28010 or
12282-0H010Bolt 91552-81020 or
90105-C0076
Attach a sling device to the engine hangers and chain block.
Remove the engine lifter.
12372A
14.INSTALL ENGINE MOUNTING INSULATOR LH
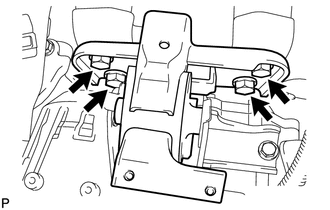
Install the engine mounting insulator LH with the 4 bolts.
- Torque:
- 95 N*m (969 kgf*cm, 70 ft.*lbf)
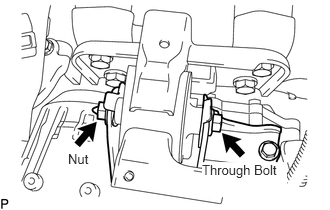
Install the through bolt and nut.
- Torque:
- 56 N*m (571 kgf*cm, 41 ft.*lbf)
- HINT:
-
Install the through bolt by tightening the nut.
12305
15.INSTALL ENGINE MOUNTING INSULATOR RH
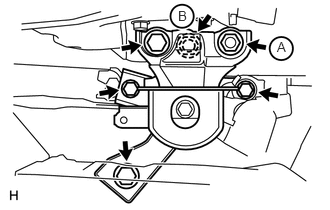
Install the engine mounting insulator RH with the 2 nuts and 2 bolts.
- Torque:
- Bolt : 95 N*m (969 kgf*cm, 70 ft.*lbf)
- Nut A : 95 N*m (969 kgf*cm, 70 ft.*lbf)
- Nut B : 52 N*m (530 kgf*cm, 38 ft.*lbf)
12281A
16.REMOVE ENGINE HANGER
Remove the chain block, sling device and No. 1 and No. 2 engine hangers.
51201
17.TEMPORARILY TIGHTEN FRONT SUSPENSION CROSSMEMBER SUB-ASSEMBLY
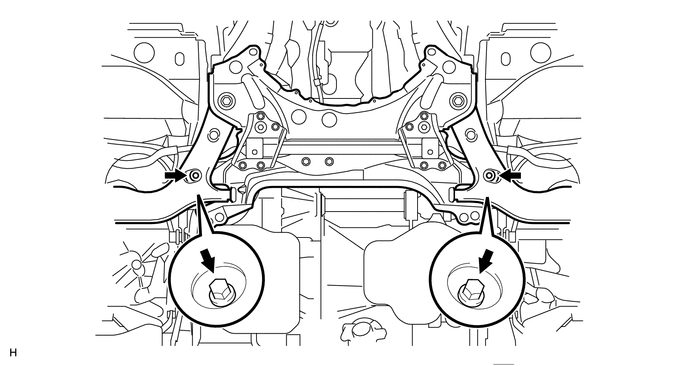
Temporarily install the front suspension crossmember sub-assembly with the 2 bolts.
51403B
18.TEMPORARILY TIGHTEN FRONT SUSPENSION MEMBER BRACE SUB-ASSEMBLY
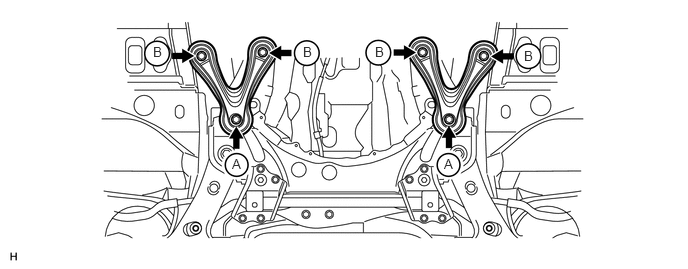
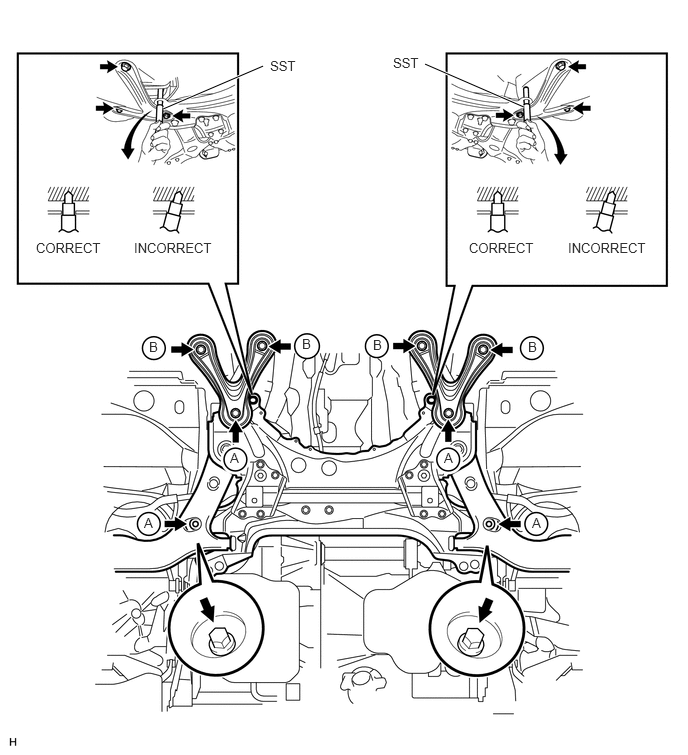
Temporarily install the front suspension member brace sub-assembly LH and front suspension member brace sub-assembly RH with the 4 bolts (B) and 2 bolts (A).
51201
19.TIGHTEN FRONT SUSPENSION CROSSMEMBER AND FRONT SUSPENSION CROSSMEMBER BRACE
Alternately insert SST into the standard holes on the front suspension crossmember sub-assembly RH and front suspension crossmember sub-assembly LH and properly align the front suspension crossmember sub-assembly. Then install the bolts (A) and (B), and tighten them to the specification in several passes.
- SST
- 09670-00010
- Torque:
- Bolt A : 137 N*m (1397 kgf*cm, 101 ft.*lbf)
- Bolt B : 93 N*m (948 kgf*cm, 69 ft.*lbf)
- NOTICE:
- ·
SST must be inserted perpendicularly into the standard holes.
·If SST cannot be perpendicularly inserted, loosen the 8 bolts and try again.
57104E
20.INSTALL FRONT CROSSMEMBER SUB-ASSEMBLY
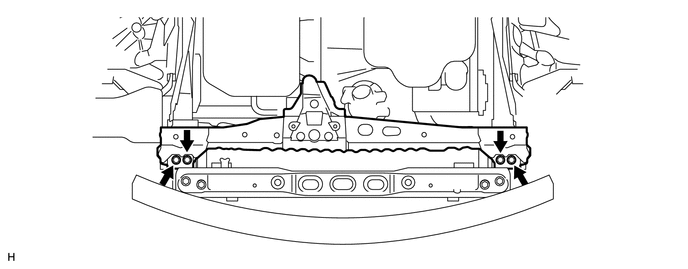
Install the front crossmember sub-assembly with the 4 bolts.
- Torque:
- 96 N*m (979 kgf*cm, 71 ft.*lbf)
12371A
21.INSTALL REAR ENGINE MOUNTING INSULATOR
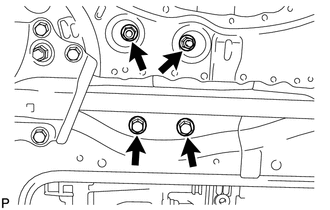
Install the rear engine mounting insulator with the 2 nuts and 2 bolts.
- Torque:
- 95 N*m (969 kgf*cm, 70 ft.*lbf)
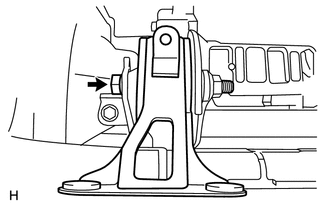
Install the through bolt which is used to secure the rear engine mounting insulator into the rear engine mounting bracket.
- Torque:
- 95 N*m (969 kgf*cm, 70 ft.*lbf)
12361A
22.INSTALL FRONT ENGINE MOUNTING INSULATOR
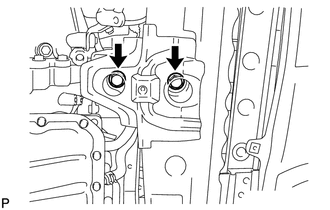
Install the front engine mounting insulator with the 2 bolts.
- Torque:
- 95 N*m (969 kgf*cm, 70 ft.*lbf)
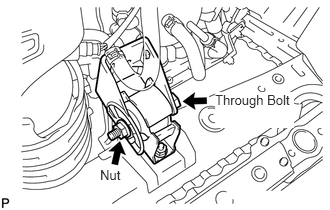
Install the through bolt and nut which is used to secure the front engine mounting bracket.
T = 145 N*m{ 1,479 kgf*cm 107 ft.*lbf }
43410
23.INSTALL FRONT DRIVE SHAFT
Install the front drive shaft (See page Drivetrain>DRIVE SHAFT>FRONT DRIVE SHAFT ASSEMBLY>INSTALLATION).
45025D
24.CONNECT NO. 1 STEERING COLUMN HOLE COVER SUB-ASSEMBLY
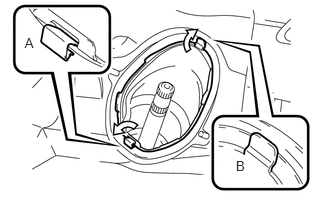
Insert clip B, set clip A on the upper surface of the panel and connect the No. 1 steering column hole cover sub-assembly to the floor panel.
45221
25.INSTALL STEERING INTERMEDIATE SHAFT
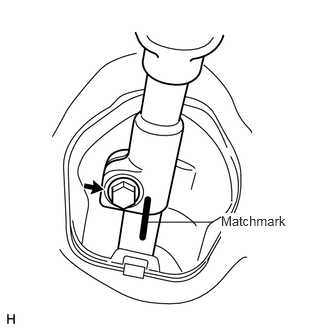
Align the matchmark on the steering intermediate shaft and steering gear.
Install the steering intermediate shaft with the bolt.
- Torque:
- 35 N*m (357 kgf*cm, 26 ft.*lbf)
45259A
26.INSTALL COLUMN HOLE COVER SILENCER SHEET
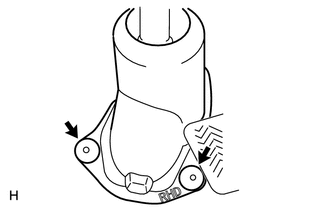
Install the column hole cover silencer sheet with the 2 clips.
27.CONNECT TRANSAXLE CONTROL CABLE ASSEMBLY (for Automatic Transaxle)
28.CONNECT TRANSAXLE CONTROL CABLE ASSEMBLY (for CVT)
88320
29.INSTALL COOLER COMPRESSOR ASSEMBLY
82121
30.CONNECT ENGINE WIRE
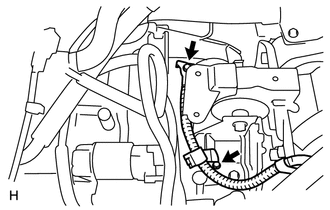
Install the battery ground cable with the 2 bolts.
- Torque:
- 8.4 N*m (86 kgf*cm, 74 in.*lbf)
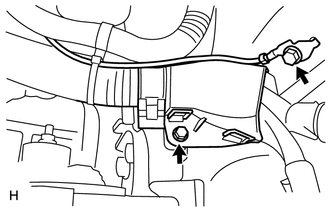
Install the engine wire harness cover with the bolt.
Install the ground cable with the bolt.
- Torque:
- 8.4 N*m (86 kgf*cm, 74 in.*lbf)
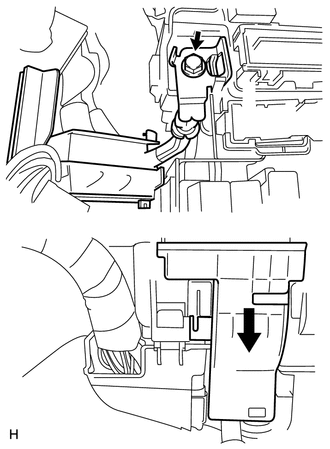
Install the battery positive (+) cable to the engine room relay block.
Insert the relay block side cover.
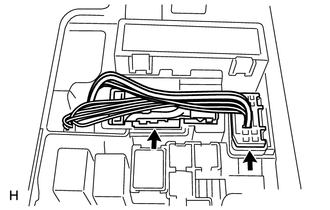
Connect the 2 connectors.
Install the engine room relay block cover.
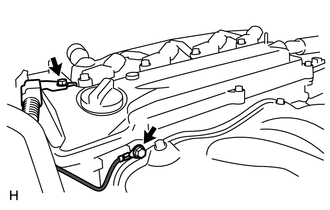
Install the engine wire harness clamp with the bolt.
- Torque:
- 8.4 N*m (86 kgf*cm, 74 in.*lbf)
Install the ground cable with the bolt.
- Torque:
- 8.4 N*m (86 kgf*cm, 74 in.*lbf)
Connect the crankshaft position sensor connector.
89661
31.INSTALL ECM
27415
32.INSTALL GENERATOR ASSEMBLY
16361A
33.INSTALL FAN AND GENERATOR V BELT
16611
34.INSTALL RADIATOR RESERVOIR BRACKET
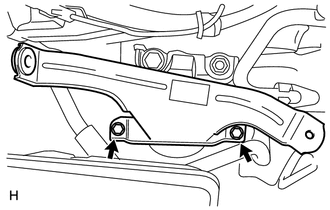
Install the radiator reservoir bracket with the 2 bolts.
- Torque:
- 5.5 N*m (56 kgf*cm, 49 in.*lbf)
16470
35.INSTALL RADIATOR RESERVOIR ASSEMBLY
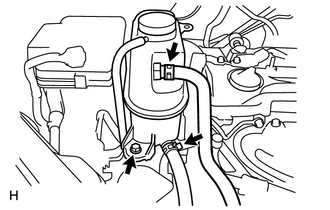
Install the radiator reservoir assembly with the bolt.
- Torque:
- 5.5 N*m (56 kgf*cm, 49 in.*lbf)
Connect the No. 1 and No. 2 water by-pass hoses.
28100
36.INSTALL STARTER ASSEMBLY
44774
37.CONNECT UNION TO CONNECTOR TUBE HOSE
Connect the 2 union to connector tube hoses.
87246B
38.CONNECT HEATER WATER OUTLET HOSE
Connect the heater water outlet hose (for Automatic Transaxle or CVT (w/ Air Cooled Transmission Oil Cooler)).
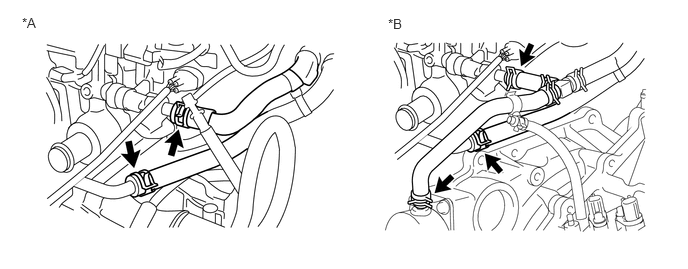
Connect the heater water outlet hose (for CVT (w/o Air Cooled Transmission Oil Cooler)).
| *A | for Automatic Transaxle
for CVT (w/ Air Cooled Transmission Oil Cooler) |
| *B | for CVT (w/o Air Cooled Transmission Oil Cooler) |
35104V
39.CONNECT BREATHER PLUG HOSE
Attach the breather plug hose to the clamp.
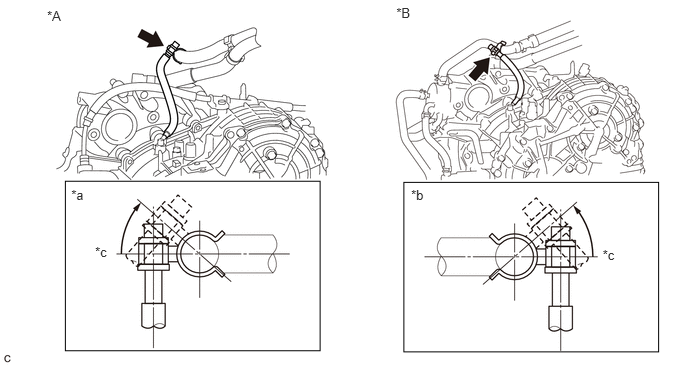
- NOTICE:
- ·
Make sure that the marking on the water by-pass hose is aligned with the center of the clamp.
·Make sure that the breather plug hose is positioned on the left side of the vehicle.
·Make sure that the breather plug is inclined as shown in the illustration.
·Make sure that the hose is not kinked.
| *A | for Automatic Transaxle
for CVT (w/ Air Cooled Transmission Oil Cooler) |
*B | for CVT (w/o Air Cooled Transmission Oil Cooler) |
| *a | View from Side of the Vehicle | *b | View from Front of the Vehicle |
| *c | Horizontal Axis | - | - |
87245A
40.CONNECT HEATER WATER INLET HOSE
Connect the heater water inlet hose.
25860
41.CONNECT PURGE LINE HOSE
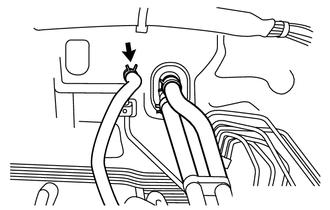
Connect the purge line hose.
77251B
42.CONNECT FUEL MAIN TUBE
74414D
43.INSTALL BATTERY CARRIER SUPPORT
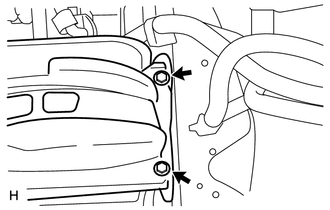
Install the battery carrier support with the 2 bolts.
- Torque:
- 20 N*m (204 kgf*cm, 15 ft.*lbf)
74411
44.INSTALL BATTERY CARRIER
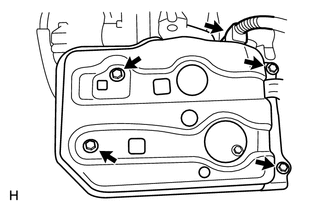
Install the battery carrier with the 4 bolts.
- Torque:
- 20 N*m (204 kgf*cm, 15 ft.*lbf)
Connect the wire harness clamp.
17700
45.INSTALL AIR CLEANER CASE SUB-ASSEMBLY
17752
46.INSTALL NO. 2 AIR CLEANER INLET
17705
47.INSTALL AIR CLEANER CAP SUB-ASSEMBLY
74431
48.INSTALL BATTERY TRAY
28800
49.INSTALL BATTERY
Install the battery clamp with the bolt and nut.
- Torque:
- Bolt : 46 N*m (469 kgf*cm, 34 ft.*lbf)
- Nut : 5.0 N*m (51 kgf*cm, 44 in.*lbf)
Connect the positive (+) cable to the battery positive (+) terminal.
- Torque:
- 5.4 N*m (55 kgf*cm, 48 in.*lbf)
50.INSTALL COWL TOP OUTER PANEL WITH WINDSHIELD WIPER MOTOR AND LINK
51.CONNECT OIL COOLER HOSE (for Automatic Transaxle)
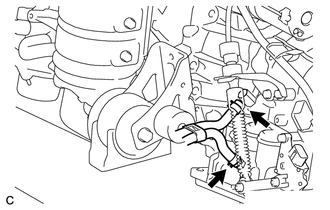
Connect the 2 oil cooler hoses to the automatic transaxle assembly.
32941D
52.CONNECT INLET OIL COOLER HOSE (for CVT)
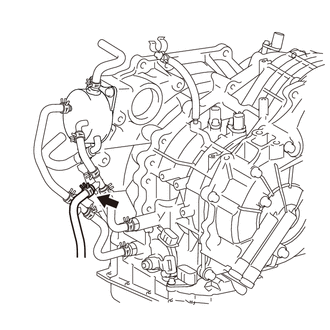
w/ Air Cooled Transmission Oil Cooler:
Connect the inlet oil cooler hose to the oil cooler outlet tube.
32942C
53.CONNECT OUTLET NO.1 OIL COOLER HOSE (for CVT)
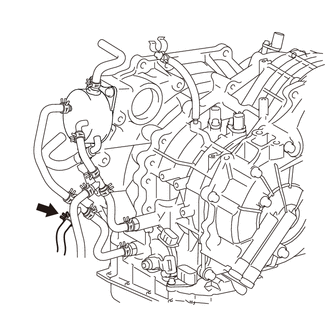
w/ Air Cooled Transmission Oil Cooler:
Connect the outlet No. 1 oil cooler hose to the oil cooler outlet tube.
16283H
54.CONNECT NO. 6 WATER BY-PASS HOSE (for CVT)
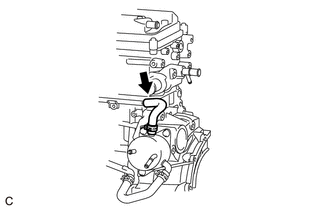
w/ Air Cooled Transmission Oil Cooler:
Connect the No. 6 water by-pass hose to the No. 4 water by-pass pipe.
16572D
55.CONNECT NO. 2 RADIATOR HOSE
Connect the No. 2 radiator hose.
16571C
56.CONNECT NO. 1 RADIATOR HOSE
Connect the No. 1 radiator hose.
17410
57.INSTALL FRONT EXHAUST PIPE ASSEMBLY
51217A
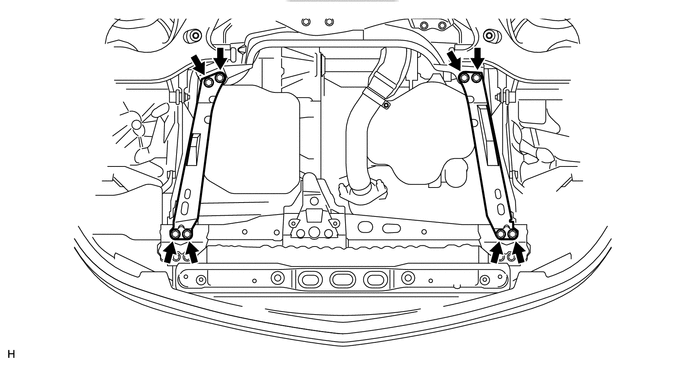
58.INSTALL FRONT SUSPENSION MEMBER REINFORCEMENT RH
Install the front suspension member reinforcement RH with the 4 bolts.
- Torque:
- 96 N*m (979 kgf*cm, 71 ft.*lbf)
51218A
59.INSTALL FRONT SUSPENSION MEMBER REINFORCEMENT LH
Install the front suspension member reinforcement LH with the 4 bolts.
- Torque:
- 96 N*m (979 kgf*cm, 71 ft.*lbf)
60.ADD AUTOMATIC TRANSAXLE FLUID (for Automatic Transaxle)
61.ADD CONTINUOUSLY VARIABLE TRANSAXLE FLUID (for CVT)
62.ADD ENGINE COOLANT
63.ADD ENGINE OIL
64.CONNECT CABLE TO NEGATIVE BATTERY TERMINAL
Connect the negative (-) cable to the battery negative (-) terminal.
- Torque:
- 5.4 N*m (55 kgf*cm, 48 in.*lbf)
65.INSPECT FOR COOLANT LEAK
66.INSPECT FOR AUTOMATIC TRANSAXLE FLUID LEVEL (for Automatic Transaxle)
67.ADJUST CONTINUOUSLY VARIABLE TRANSAXLE FLUID LEVEL (for CVT)
53292A
68.INSTALL UPPER RADIATOR SUPPORT SEAL
53701
69.INSTALL FRONT FENDER APRON RH
53702
70.INSTALL FRONT FENDER APRON LH
51442
71.INSTALL NO. 2 ENGINE UNDER COVER
51441
72.INSTALL NO. 1 ENGINE UNDER COVER
73.INSTALL FRONT WHEEL
53301
74.INSTALL HOOD SUB-ASSEMBLY
Install the hood sub-assembly with the 4 bolts.
- Torque:
- 11.5 N*m (117 kgf*cm, 8 ft.*lbf)
53301
75.ADJUST HOOD SUB-ASSEMBLY
76.ADJUST SHIFT LEVER POSITION (for Automatic Transaxle)
77.INSPECT SHIFT LEVER POSITION (for CVT)
78.INSPECT AND ADJUST FRONT WHEEL ALIGNMENT
79.PERFORM INITIALIZATION
Perform initialization (See page General>INTRODUCTION>REPAIR INSTRUCTION>INITIALIZATION).
- NOTICE:
-
Certain systems need to be initialized after disconnecting and reconnecting the cable from the negative (-) battery terminal.
80.PERFORM REGISTRATION
When replacing the engine assembly, perform vehicle stability control system recognition in the ECM (See page Engine / Hybrid System>CRUISE CONTROL>CRUISE CONTROL SYSTEM>REGISTRATION).
81.RESET MEMORY
When replacing the engine assembly, perform the RESET MEMORY procedure.
- Automatic Transaxle initialization:
See page Drivetrain>U241E (AUTOMATIC TRANSMISSION / TRANSAXLE)>AUTOMATIC TRANSAXLE SYSTEM>INITIALIZATION
- CVT initialization:
See page Drivetrain>K112 (CVT)>CONTINUOUSLY VARIABLE TRANSAXLE SYSTEM>INITIALIZATION