1NR-VE ENGINE MECHANICAL ENGINE ASSEMBLY INSTALLATION
PROCEDURE

 1.REMOVE ENGINE STAND
Using a sling device and chain block, remove the engine assembly from the engine stand.
- NOTICE:
- ·
Make sure that the sling angle is correct to prevent the engine assembly and engine hangers from being damaged or deformed.
·Securely support the engine assembly to prevent it from turning upside down until it is secured to an engine stand.
Set the engine assembly to the engine lifter.
- NOTICE:
- ·
Set the engine assembly so that it is horizontal.
·Do not tighten the rope or belt with a tightening mechanism more than necessary.
32101
2.INSTALL DRIVE PLATE AND RING GEAR SUB-ASSEMBLY (for Automatic Transmission)
13405
3.INSTALL FLYWHEEL SUB-ASSEMBLY (for Manual Transmission)
31250
4.INSTALL CLUTCH DISC ASSEMBLY (for Manual Transmission)
31210
5.INSTALL CLUTCH COVER ASSEMBLY (for Manual Transmission)
31210
6.INSPECT AND ADJUST CLUTCH COVER ASSEMBLY (for Manual Transmission)
12315
7.INSTALL FRONT NO. 1 ENGINE MOUNTING BRACKET LH
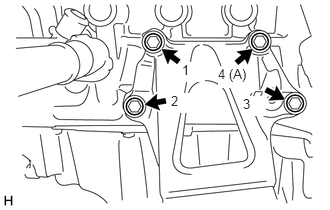
Temporarily tighten the front No. 1 engine mounting bracket LH with the bolt (A).
Temporarily tighten the 3 bolts.
Fully tighten the 4 bolts in the order shown in the illustration.
- Torque:
- 44 N*m (449 kgf*cm, 32 ft.*lbf)
12311
8.INSTALL FRONT NO. 1 ENGINE MOUNTING BRACKET RH
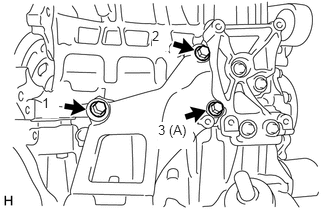
Temporarily tighten the front No. 1 engine mounting bracket RH with the bolt (A).
Temporarily tighten the 2 bolts.
Fully tighten the 3 bolts in the order shown in the illustration.
- Torque:
- 44 N*m (449 kgf*cm, 32 ft.*lbf)
12361
9.INSTALL FRONT ENGINE MOUNTING INSULATOR
Install the 2 front engine mounting insulators with the 2 new nuts.
- Torque:
- 34 N*m (347 kgf*cm, 25 ft.*lbf)
51201
10.INSTALL FRONT SUSPENSION CROSSMEMBER SUB-ASSEMBLY
Operate the engine sling device and chain block, then temporarily install the front suspension crossmember sub-assembly with the 4 new bolts.
- NOTICE:
-
Make sure that the sling angle is correct to prevent the engine assembly and engine hangers from being damaged or deformed.
Fully tighten the 4 bolts.
- Torque:
- 34 N*m (347 kgf*cm, 25 ft.*lbf)
11.INSTALL AUTOMATIC TRANSMISSION ASSEMBLY (for Automatic Transmission)
12.INSTALL MANUAL TRANSMISSION ASSEMBLY (for Manual Transmission)
13.REMOVE ENGINE HANGER
for Manual Transmission:
Using a sling device and chain block, set the engine assembly with transmission on the engine lifter.
- NOTICE:
- ·
Place the height adjustments or plate lift attachments so that the engine assembly with transmission is level.
·Securely support the engine assembly with transmission to prevent it from turning upside down until it is secured to the engine lifter.
·To prevent deformation of the oil pan sub-assembly, never set any attachments against the oil pan sub-assembly of the engine assembly.
for Automatic Transmission:
Using a sling device and chain block, set the engine assembly with transmission on the engine lifter.
- NOTICE:
- ·
Place the height adjustments or plate lift attachments so that the engine assembly with transmission is level.
·Securely support the engine assembly with transmission to prevent it from turning upside down until it is secured to the engine lifter.
·To prevent deformation of the oil pan sub-assembly, never set any attachments against the oil pan sub-assembly of the engine assembly.
·To prevent deformation of the transmission oil pan sub-assembly, never set any attachments against the transmission oil pan sub-assembly.
Remove the 2 bolts and 2 engine hangers.
28100
14.INSTALL STARTER ASSEMBLY (for Automatic Transmission)
28100
15.INSTALL STARTER ASSEMBLY (for Manual Transmission)
25051
16.INSTALL EXHAUST MANIFOLD CONVERTER SUB-ASSEMBLY
16507
17.INSTALL RADIATOR PIPE SUB-ASSEMBLY
87246X
18.CONNECT NO. 2 HEATER WATER HOSE (w/ Heater)
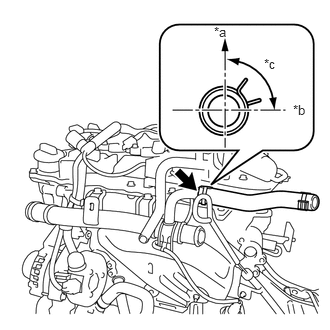
| *a | Upper Side |
| *b | LH Side |
| *c | 90° |
Connect the No. 2 heater water hose with the clip as shown in the illustration.
- HINT:
-
Install the clip so that it is positioned as shown in the illustration.
87245X
19.CONNECT HEATER WATER HOSE (w/ Heater)
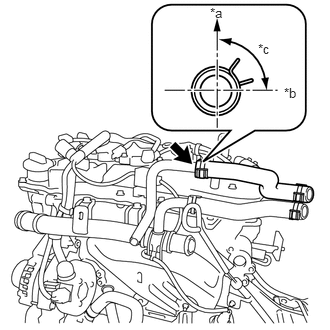
| *a | Upper Side |
| *b | LH Side |
| *c | 90° |
Connect the heater water hose with the clip as shown in the illustration.
- HINT:
-
Install the clip so that it is positioned as shown in the illustration.
16283
20.INSTALL NO. 6 WATER BY-PASS HOSE (w/o Heater)
Install the No. 6 water by-pass hose with the 2 clips
16591A
21.CONNECT RADIATOR PIPE RADIATOR HOSE
17111
22.INSTALL INTAKE MANIFOLD
23.CONNECT ENGINE WIRE
Connect all of the clamps and connectors of the engine wire to the engine assembly.
Connect the engine wire with the 2 bolts.
- Torque:
- 8.0 N*m (82 kgf*cm, 71 in.*lbf)
24.CONNECT EARTH CABLE
25.INSTALL ENGINE AND TRANSMISSION ASSEMBLY
Operate the engine lifter and lift the engine assembly with transmission.
- NOTICE:
-
While raising the engine assembly with transmission, do not allow it to contact the vehicle body.
Install the engine assembly with transmission with the 4 bolts to the vehicle.
- Torque:
- 100 N*m (1020 kgf*cm, 74 ft.*lbf)
Install the rear engine support member sub-assembly with the 6 bolts.
- Torque:
- 39 N*m (398 kgf*cm, 29 ft.*lbf)
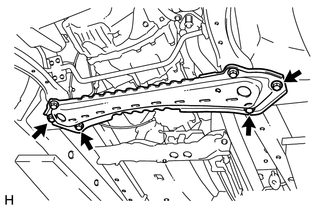
Install the front lower suspension crossmember sub-assembly with 4 new bolts.
- Torque:
- 100 N*m (1020 kgf*cm, 74 ft.*lbf)
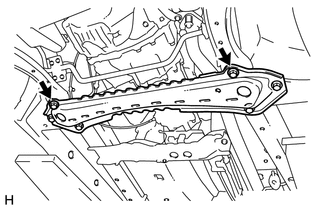
Install the front lower suspension crossmember sub-assembly with 2 new bolts.
- Torque:
- 100 N*m (1020 kgf*cm, 74 ft.*lbf)
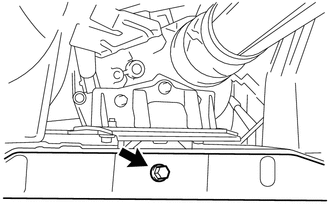
Tighten the rear engine mounting insulator bolt.
- Torque:
- 34 N*m (347 kgf*cm, 25 ft.*lbf)
45047
26.CONNECT TIE ROD END SUB-ASSEMBLY LH
45046
27.CONNECT TIE ROD END SUB-ASSEMBLY RH
- HINT:
-
Perform the same procedure as for the LH side.
28.CONNECT FRONT LOWER SUSPENSION ARM
Install the front lower suspension arm onto the steering knuckle with a new castle nut.
- Torque:
- 68 N*m (693 kgf*cm, 50 ft.*lbf)
- NOTICE:
-
Make sure that grease does not adhere to the threads or the tapered part.
Install a new clip.
29.INSTALL FRONT STABILIZER BRACKET
48810
30.INSTALL FRONT STABILIZER LINK ASSEMBLY LH
Install the front stabilizer link assembly with a new nut.
- Torque:
- 74 N*m (755 kgf*cm, 55 ft.*lbf)
- HINT:
-
If the ball joint turns together with the nut, use a socket hexagon wrench 6 mm to hold the stud.
48820B
31.INSTALL FRONT STABILIZER LINK ASSEMBLY RH
- HINT:
-
Perform the same procedure as for the LH side.
32922A
32.INSTALL OIL COOLER OUTLET HOSE (for Automatic Transmission)
32921D
33.INSTALL OIL COOLER INLET HOSE (for Automatic Transmission)
16572D
34.INSTALL NO. 2 RADIATOR HOSE
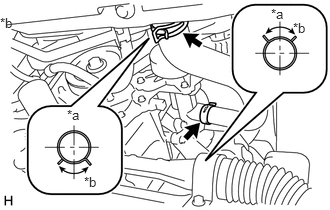
| *a | Upper Side |
| *b | 90° |
Install the No. 2 radiator hose with the 2 hose clamps as shown in the illustration.
- HINT:
-
Install the hose clamps so that they are positioned as shown in the illustration.
23901
35.DISCONNECT FUEL TUBE SUB-ASSEMBLY
Connect the fuel tube sub-assembly to the fuel tank to canister tube sub-assembly until a "click" sound is heard.
- NOTICE:
- ·
Make sure to read the disconnecting the fuel tube connector notice before proceeding with work.
Click hereEngine / Hybrid System>1NR-VE FUEL>FUEL SYSTEM>ON-VEHICLE INSPECTION
·After connecting the fuel lines, check that the fuel tube connector and fuel tank to canister tube sub-assembly are securely connected by pulling on them.
23841B
36.INSTALL EFI FUEL PIPE CLAMP
Install the EFI fuel pipe clamp.
17451
37.INSTALL EXHAUST PIPE GASKET
17410
38.SET FRONT EXHAUST PIPE ASSEMBLY
58151A
39.INSTALL NO. 1 FLOOR HEAT INSULATOR
17410
40.INSTALL FRONT EXHAUST PIPE ASSEMBLY
31340
41.INSTALL CLUTCH RELEASE CABLE ASSEMBLY (for Manual Transmission)
Install the clutch release cable assembly with the 2 bolts.
- Torque:
- 11.3 N*m (115 kgf*cm, 8 ft.*lbf)
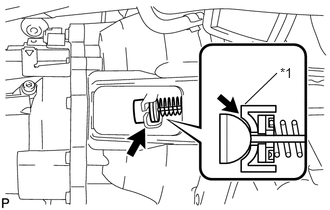
| *1 | Clutch Release Fork Sub-Assembly |
Install the clutch release cable assembly onto the clutch release fork sub-assembly.
- HINT:
-
Apply 0.5 g (0.018 oz) of MP grease to the clutch release cable assembly end and the sliding parts of the clutch release lever.
Install the clutch housing cover onto the clutch housing.
33820B
42.CONNECT TRANSMISSION CONTROL CABLE ASSEMBLY (for Automatic Transmission)
33820B
43.CONNECT TRANSMISSION CONTROL CABLE ASSEMBLY (for Manual Transmission)
37110
44.INSTALL PROPELLER SHAFT ASSEMBLY
45220
45.CONNECT STEERING INTERMEDIATE SHAFT ASSEMBLY
Install a new bolt on the steering intermediate shaft assembly.
- Torque:
- 41 N*m (418 kgf*cm, 30 ft.*lbf)
87246X
46.INSTALL NO. 2 HEATER WATER HOSE (w/ Heater)
87245X
47.INSTALL HEATER WATER HOSE (w/ Heater)
48.DISCONNECT ENGINE WIRE
Engage the 2 harness clamps.
Connect the 4 connectors of the engine wire to the engine room relay block and engage the 2 claws.
Connect the ECM connector and lock the lever.
Connect the engine wire with the bolt.
- Torque:
- 8.0 N*m (82 kgf*cm, 71 in.*lbf)
82661
49.INSTALL NO. 1 RELAY BLOCK COVER
88320
50.INSTALL COOLER COMPRESSOR ASSEMBLY (w/ Air Conditioning System)
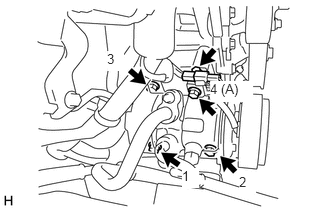
Temporarily tighten the cooler compressor assembly with the bolt A.
Temporarily tighten the 3 bolts.
Fully tighten the 4 bolts in the order shown in the illustration.
- Torque:
- 22.5 N*m (229 kgf*cm, 17 ft.*lbf)
Connect the connector.
44730A
51.CONNECT NO. 1 VACUUM HOSE (for RHD)
44730A
52.INSTALL NO. 1 VACUUM HOSE (for LHD)
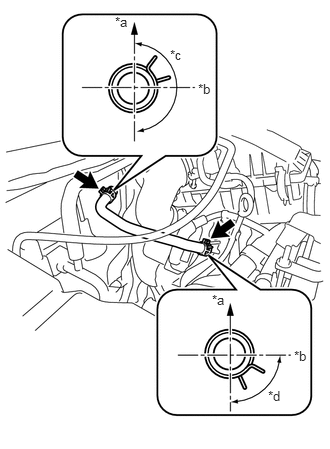
| *a | Upper Side |
| *b | Front Side |
| *c | 180° |
| *d | 90° |
Install the No. 1 vacuum hose with the 2 clips as shown in the illustration.
- HINT:
-
Install the clips so that they are positioned as shown in the illustration.
17881
53.INSTALL NO. 1 AIR CLEANER HOSE
54.INSTALL AIR CLEANER CASE SUB-ASSEMBLY
Install the air cleaner case sub-assembly with the 2 bolts.
- Torque:
- 7.8 N*m (80 kgf*cm, 69 in.*lbf)
17801
55.INSTALL AIR CLEANER FILTER ELEMENT SUB-ASSEMBLY
Install the air cleaner filter element sub-assembly.
17705
56.INSTALL AIR CLEANER CAP SUB-ASSEMBLY
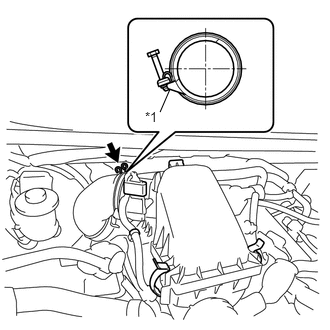
| *1 | Stopper |
Lock the 2 clamps and install the air cleaner cap sub-assembly.
Connect the No. 1 air cleaner hose with the clamp.
- Torque:
- 3.0 N*m (31 kgf*cm, 27 in.*lbf)
- NOTICE:
-
Install the hose clamp so that the clamp makes contact with the stopper.
Engage the guide and connect the No. 2 ventilation hose.
Connect the harness clamp and connector to the intake air flow meter assembly.
Connect the harness clamp to the air cleaner cap sub-assembly.
77754
57.CONNECT NO. 1 CHARCOAL CANISTER OUTLET HOSE
for LHD:
Engage the 2 guides and connect the No. 1 charcoal canister outlet hose to the air cleaner cap sub-assembly.
for RHD:
Connect the No. 1 charcoal canister outlet hose to the charcoal canister outlet guide.
Engage the clamp.
25860
58.INSTALL NO. 1 VACUUM SWITCHING VALVE ASSEMBLY
16571C
59.INSTALL NO. 1 RADIATOR HOSE
16361A
60.INSTALL FAN AND GENERATOR V BELT
17775A
61.INSTALL NO. 3 AIR CLEANER PIPE BRACKET
Install the No. 3 air cleaner pipe bracket with the bolt.
- Torque:
- 21 N*m (214 kgf*cm, 15 ft.*lbf)
17750A
62.INSTALL AIR CLEANER INLET ASSEMBLY
Install the air cleaner inlet assembly with the 2 bolts
- Torque:
- 21 N*m (214 kgf*cm, 15 ft.*lbf)
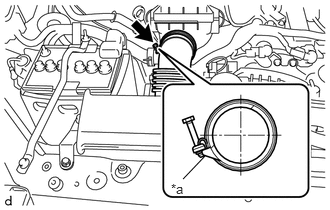
| *1 | Stopper |
Connect the air cleaner inlet assembly to the air cleaner cap sub-assembly with the clamp.
- Torque:
- 3.0 N*m (31 kgf*cm, 27 in.*lbf)
- NOTICE:
-
Install the clamp so that the clamp makes contact with the stopper.
Connect the earth cable with the bolt.
- Torque:
- 8.0 N*m (82 kgf*cm, 71 in.*lbf)
74411
63.INSTALL BATTERY CARRIER
Install the battery carrier with the 4 bolts.
- Torque:
- 5.5 N*m (56 kgf*cm, 49 in.*lbf)
64.INSTALL BATTERY
Install the battery.
Install the battery cover.
Install the battery hold down clamp sub-assembly with the bolt and nut.
- Torque:
- Bolt : 5.5 N*m (56 kgf*cm, 49 in.*lbf)
- Nut : 5.0 N*m (51 kgf*cm, 44 in.*lbf)
Tighten the nut and connect the positive (+) battery terminal.
- Torque:
- 6.4 N*m (65 kgf*cm, 57 in.*lbf)
65.ADD AUTOMATIC TRANSMISSION FLUID (for Automatic Transmission)
66.ADD MANUAL TRANSMISSION OIL (for Manual Transmission)
67.INSPECT MANUAL TRANSMISSION OIL (for Manual Transmission)
68.ADD ENGINE COOLANT
69.CHECK ENGINE OIL LEVEL
70.INSPECT FOR FUEL LEAK
71.INSPECT FOR ENGINE COOLANT LEAK
72.INSPECT FOR ENGINE OIL LEAK
73.INSPECT FOR EXHAUST GAS LEAK
74.INSPECT MANUAL TRANSMISSION OIL LEAK (for Manual Transmission)
75.INSPECT FOR FLUID LEAK (for Automatic Transmission)
76.INSPECT AUTOMATIC TRANSMISSION FLUID LEVEL (for Automatic Transmission)
77.INSPECT SHIFT LEVER POSITION (for Automatic Transmission)
78.INSPECT AND ADJUST CLUTCH PEDAL SUB-ASSEMBLY (for Manual Transmission)
79.INSTALL FRONT WHEEL
- Torque:
- 103 N*m (1050 kgf*cm, 76 ft.*lbf)
80.STABILIZE SUSPENSION
81.FULLY TIGHTEN FRONT LOWER SUSPENSION ARM
82.INSPECT IGNITION TIMING
83.INSPECT ENGINE IDLE SPEED
84.INSPECT CO/HC
51441
85.INSTALL NO. 1 ENGINE UNDER COVER
Install the No. 1 engine under cover with the 8 bolts and the clip.
86.INSPECT AND ADJUST FRONT WHEEL ALIGNMENT